LibrariaNPC
-
Posts
198 -
Joined
-
Last visited
Content Type
Profiles
Forums
Articles
Gallery
Downloads
Events
Everything posted by LibrariaNPC
-

Moving to Charleston, WV
LibrariaNPC replied to LibrariaNPC's topic in Events, Hammer ins, Where to meet
I'm a librarian, blacksmith, and gamer. Basically, all of the quirky, geeky, cultural things, as well as good food and company of good people that can hold interesting conversations. -
Moving to Charleston, WV
LibrariaNPC replied to LibrariaNPC's topic in Events, Hammer ins, Where to meet
Awesome. Thanks for that confirmation, 781! Anyone else have input on the area, places to see, people to meet, etc? -
Moving to Charleston, WV
LibrariaNPC replied to LibrariaNPC's topic in Events, Hammer ins, Where to meet
Is Quad State done by SOFA, and was just held this past September? If so, I'll know what to look for (and have a reason to start rubbing pennies together and hope they breed!) -
Moving to Charleston, WV
LibrariaNPC replied to LibrariaNPC's topic in Events, Hammer ins, Where to meet
Quad-State? Thanks for that insight! Once I have more details of where I'll be in the area, I'll reach out to him (if he doesn't see this first). -
Just as the title says: I'll be moving to Charleston, WV within the next two months for a job at one of the local libraries, and I'm curious to see who is set up out there, what groups are nearby, and see if there's a chance to meet up with other smiths and get to know the community. Thanks in advance for any input!
-
Until Frozenthunderbolt posted, I had no idea what that was. I think that would add quite the bit of detail there! I'll try that was well on another practice piece for comparison. Thank you! Just a quick thought: would you mark each part of the octagon, or just a set number of sides? My mind is trying to wrap around what three, four, six, or even all eight would look like with markings and a twist.
-
So far, my octagonal twists almost look like a round twist; not sure if I'm doing something wrong there. Next time, I'm thinking of slightly hitting the sharp edges instead of making it a "true" octagon to leave the shape that will lead to a nice twist, but without the sharper edges that will be uncomfortable.
-
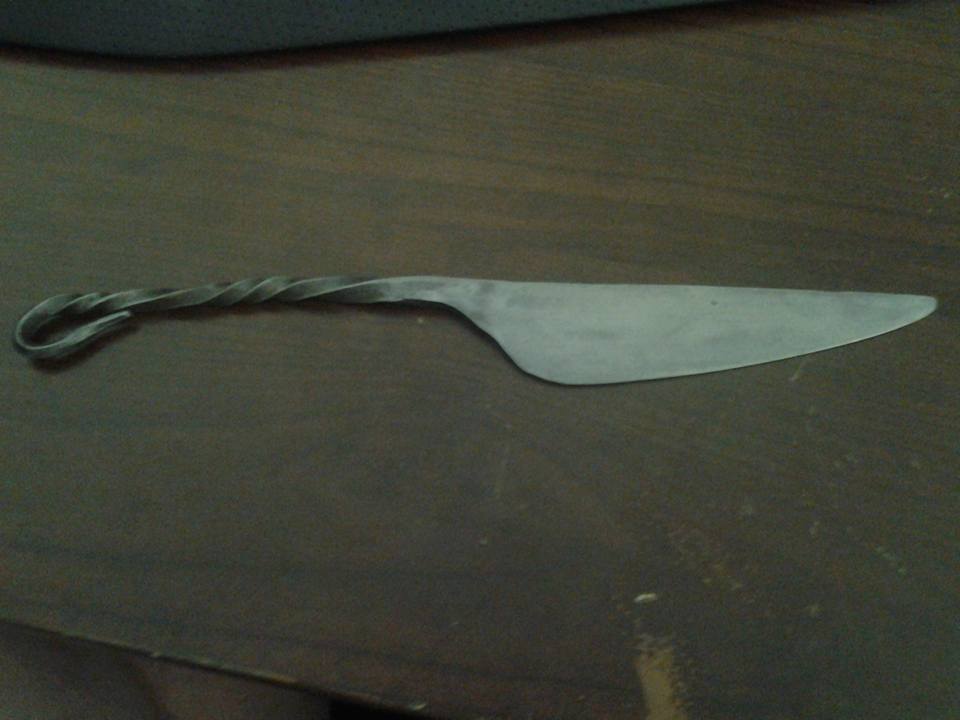
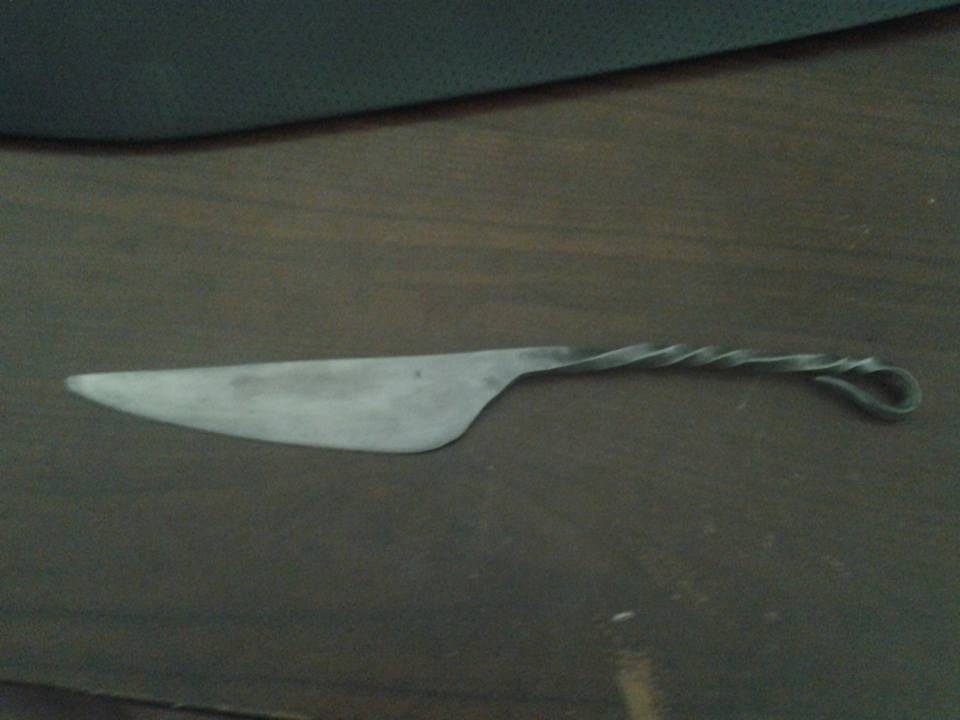
Thanks for the compliment! The twist on the straight handle was just to not have a plain square once I realized it wouldn't be long enough for what I had in mind. For the other, I was trying to have it rounded for better grip comfort, but felt it could use the twists for a better gripping texture and decoration. Not as good as I had hoped, but I will try to set the twist on just the pommel area (and make it wider/more prominent than this) next time.
-
KnifeDescriptions.docx

-
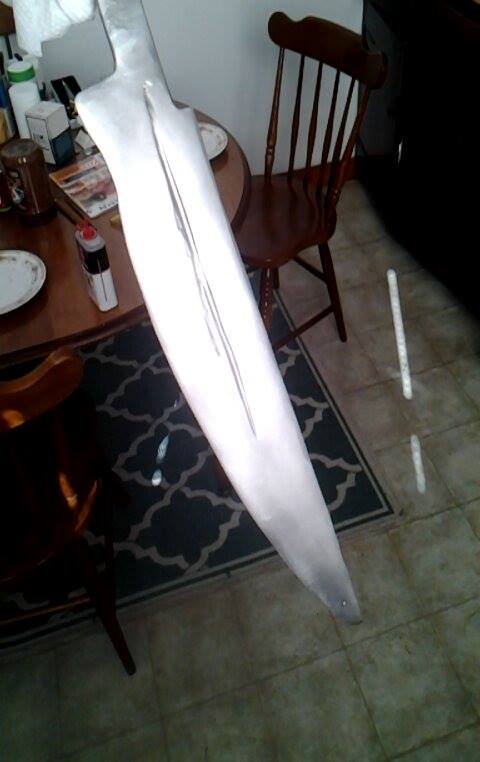
My "bad practice knifes" fall into one of two categories: salvageable of near-scrap. One of the earlier knives I made (knife #3 outside of class) has a really bad cold shunt in the tang (first attempt at a stick tang), but I've realized I can just make a smaller stick tang and still leave with a knife. If you've run into situations like that, it's not a failed attempt but a product redesign (as I was told in class). xxxx, my first attempt at a sword was botched due to a melt, but I'm working on tweaking the area that melted into a dagger now. Not originally planned, but still something I can salvage. If it's a royally xxxxxx attempt, you might be able to find another way to repurpose it (either as a smaller blade or just as an entirely different project) or weld it into something. I read that at least one smith here takes failed Damascus an welds it into a new billet, I can also see turning parts of a ruined blade into a new billet, so it's not a total waste. Just my two cents!
-
No worries! Thank you for looking into that for me, though. As I said, I'm still new to this and am trying to get a better grasp of what others are making with different sizes of steel. It's interesting to see what everyone is forging here on IFI!
-
Great work from your students there, Rashelle! Now I'm curious: how big is the blade on the House Mouse? I'm guessing about 2.5" to 3" judging by the starting stock, but that's entirely guesswork from a newbie (trying to get better at that).
-
My experience with making knives is nowhere near the levels of those here, so again, I'm turning to everyone for some input. Just as the topic says, I'm looking for ideas on handles, guards, and bolsters. So far, I've only finished two knives with slab tangs and handles attached (drilled holes in the tang, epoxy and pin in shape), two cable damascus knives (no need for handles), two "blacksmith" knives, a knife with a thin handle (SCA eating knife?), and one sword with a stick tang (two pieces of wood, cut the tang shape into the wood, epoxy together, fit snugly between guard and pommel). My tool setup is pretty simple for the moment (Harbor Freight drill and rotary tool, Rigid angle grinder, hammers, and files), but I'm trying to expand my knowledge of making handles without breaking the bank (and filling what little space is left in the apartment) on tools. Any input would be greatly appreciated! Here's what I've put together so far research-wise (I'm a librarian: I research things and then need to either test them without wasting money or ask for input from those who are more experienced): 1) Paracord. Still not 100% sure on this (still reading up on some knots), but it seems easy enough with time/practice. I am getting split reviews between drilling a pair of holes into the tang for them or leaving the tang solid and just tying tightly. I also am trying to grip how to make a guard/bolster from paracord as well (I've seen turks head knots here on the forum, and a Spanish ring knot elsewhere as a guard). 2) Wood: Outside of the approach of using thin boards and pins (lacking a saw so avoiding this one for now), I've heard about people just taking a block of wood, drilling a small hole through it, and burning a hole in the wood for a secure fit, and then peening the edge. Does this sound accurate, or am I missing something? 3) Antler: A friend of mine may have some antlers to send my way, so I thought I should figure out the best ways to use them with my tool setup. I've been reading so much that I'm not sure WHAT to believe. One approach I've read is to take a stick tang, drill a hole through the antler to the depth needed for the tang, and then epoxy the whole thing in place, which just sounds rather flimsy to me. Another was to soak an antler tine in water for a month or so (or, for faster results, boil it) until the pithy substance in the middle gets soft, then just slide a stick tang into it and leave it to dry. While interesting, I can't tell if it's just hokum or if it's going to be flimsy. The last one was to drill a hole in for the stick tang, drill a hole through the tang and antlers, and pin it all in place (with or without epoxy). This one sounds solid (and I think I read the approach in one of the bladesmithing books I have on hand), but wanted to make sure I wasn't missing something. 4) Resin. One of the things I was told in a class was to line a small container with aluminium foil and fill it with clear epoxy resin, let it dry, and then remove it from the foil (as it won't stick). Afterward, cut it into blocks with a jeweler's saw and use that as a handle material. I was also told I can put anything in there, like popcorn, glitter, paper cuttings, etc, to give it a pattern. Haven't tried it yet (no luck finding clear epoxy in large quantities at local shops and don't have the scratch to invest into a respirator just to test it), but I was curious if anyone else gave it a whirl. If the idea is valid, how good of an idea is it to just encase the tang in the resin as it solidifies and then cut that to shape? 5) Pre-made scales: This seems like an easy approach, but it seems as though the sizes and shapes are already pre-determined at production. Granted, my only experience with looking them up is via Jantz Supply, so I don't know how valid the concern is (or how easy it is to tweak some of these materials without specialized tools). Any input? 6) Bolsters/Guards/Pommels: My only experience with making a guard or a pommel for a blade was when I made a sword. After forging the guard, we used a milling machine to get the general shape needed, then did a hot fit to secure it and used a pin punch (I think) to peen it over. The pommel was drilled with a larger bit on one side and a smaller bit on the other, and then hot fit to the tang (and peened the tang to secure it all). I'm thinking I can easily do the needed drilling with my hand drill and the milling portion with a good rotary tool (or just lots of time with a cheap one). Not sure if there are other alternatives for this, whether in approach or materials, so I am all ears for input and corrections! Sorry for the long post. Just wanted to share what I'm looking at to avoid any arguments or discussing where I stand. Thanks in advance for any input!
-
Working in the shop in the winter.
LibrariaNPC replied to Glenn's topic in Blacksmithing, General Discussion
My entire setup is in my apartment until I want to take it outside (too close to Camden and a bunch of scrap yards; NOTHING of value stays outside). So, when it snows, I'm out shoveling the walkway, a path to where I set up (a now defunct driveway), and then shoveling my workspace before I haul everything outside. If it's not snowing, then I just haul everything out. My setup consists of moving a stump and an old grill, then carrying out and setting up the anvil (134# budden) and forge (Diamondback 2 burner blacksmith) onto each of these, respectively. Then it's hauling out my toolbox, stock, my work table, and any power tools I may need or smaller tools I can't fit into my toolbox at this time. By that point, I'm already pretty warm. I tend to be geared up with a short sleeve shirt with a flannel shirt over it, a wool driver's cap, normal pants, wool socks, and my boots (not steel toe). If it's bitterly cold, I might wear a glove on my hammer hand, but I try to avoid that by relying on the forge for warmth or keeping a hand in my pocket when not hammering. I've considered using spare stock for warming the forge, but until recently I didn't have stock that would handle that. I did, however, have two projects in the forge at the same time, so there was always something warm on the forge. It didn't work out too well for me (haven't even gotten a year under my belt yet), so I might not try that again this year. Honestly, no real tricks, just lots of moving, layers, and being willing to fight the cold to work. I am hoping to move out of the area before this winter really settles in (fingers crossed on my job hunt). Depending on the location, I might have an indoor option I can take over (like a garage or large shed), but otherwise I'll be doing what I do now. -
It's a possibility, but it's also the added time of moving the extra items around. I already lose almost an hour organizing what's inside the apartment to get things outside, getting things outside, and then setting up properly. Finaggling sandbags somewhere (and hoping they don't get torn into if left outside) will just add to that.
-
Getting a Better Grasp on Finishing/Shining
LibrariaNPC replied to LibrariaNPC's topic in Finish and Polish for Knives
So, with this piece, I should lock it into the board, sand diagonally (say top left to bottom right), then once it's been scratched up, approach it from a different angle (say top right to bottom left), and once it looks like it's blended, move up a grit? Just making sure I'm grasping this correctly. I was trying the diagonal approach with the 500 grit this morning for about 30 minutes but didn't look like I was making much progress, so just trying to make sure I'm not missing a step somewhere before I try again (or pick up a tool I don't really need). -
Getting a Better Grasp on Finishing/Shining
LibrariaNPC replied to LibrariaNPC's topic in Finish and Polish for Knives
I lack a proper buffing wheel; I have a sort-of buffing wheel for my battery powered drill, but it doesn't seem to get to the necessary speeds to do much. Any suggestions on a specific grit? The highest grit sandpaper I have at the moment is 1200, and I know nothing about jeweler's rouge outside of it is normally used with a buffing wheel (and again, not sure if my drill can do what is needed). Thank you for that input! -
I'm with the others: if you have some way to cut that off, do so. I'd even pitch the idea of cutting off the topmost part of the beam (the "table" with the anvil) and find some way to bolt that to a new base that you can easily dampen. Barring that, Frosty and Charles are on a good wavelength.
-
No luck on securing the table, sadly. I cannot put any holes in the wall (landlord's rule), and my work is done outside. I've tried clamping it to my Ikea desk and throw on some background music, but I'm probably sanding the table almost as much as the project at this point (that, and the desk isn't secured to anything either). One of those reasons why I'm job hunting and hoping for a place I can set up indoors. So why do you use WD-40? Just curious, as I thought liquid would just cause the dust to clump together.
-
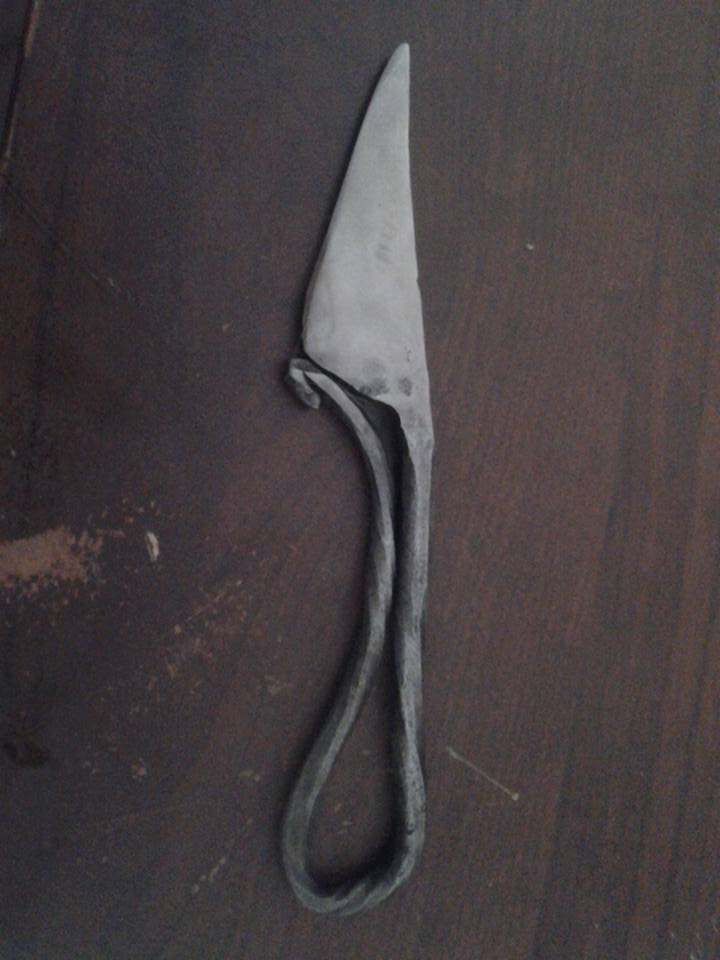
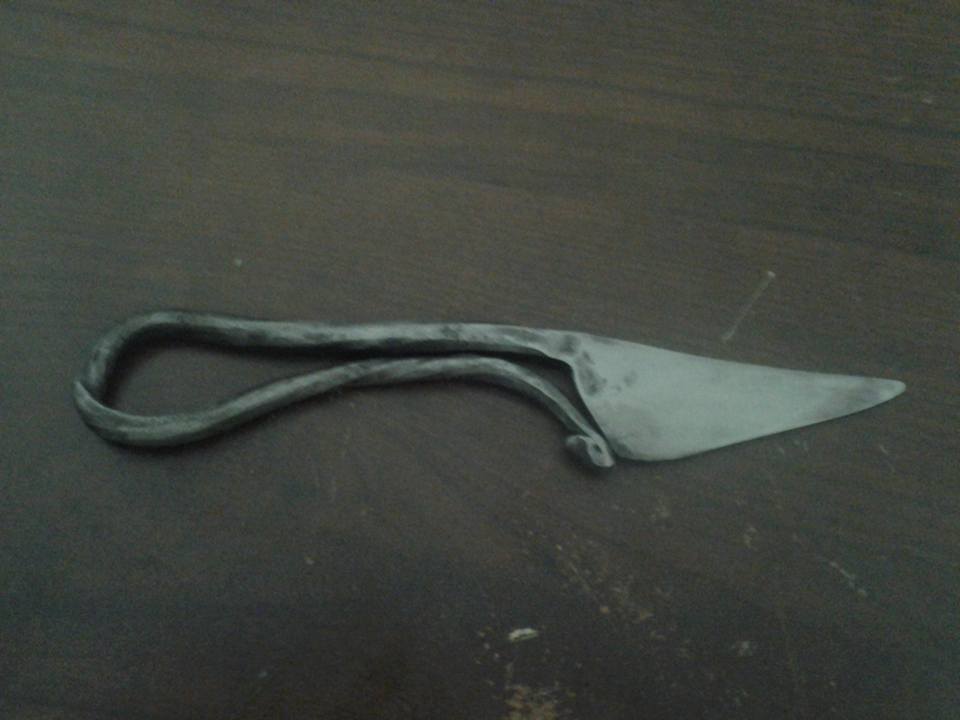
My experience with this isn't really that great, so I'm looking for some input that will hopefully get me on track here. After I finish the heat treat process on a blade, I normally do a quick pass with sandpaper (usually 60-80 grit) to get rid of any excess gunk/missed oil/char, soak it in vinegar, lock it into a vice or onto a board (which is locked into the vice) and work with an angle grinder with progressively higher grits. Afterward, I do some sanding by hand (next highest grit I have) and move up to a point I like the shine. My first time making a blade, I didn't have to do much sanding by hand, and got away with few (if any) visible scratches, and my smaller knives have been moving along pretty well without issue. My first time making something bigger (a sword) only had a few minor scratches that I couldn't remove without risking making the material too thin (already a thin blade). I've had good luck so far, I think, but I'm at a bit of a snag. Now I'm working on a project (pictured) that seems plagued with scratches that I can't get rid of, and each time I work on it (either with an angle grinder or sandpaper), I'm finding scratches elsewhere that weren't there before (in this case, closer to the spine). This particular project, a costume piece, is forged from mild steel (was specifically requested to not use high carbon steel), so I'm not sure if that makes a difference in this case (too soft and easily scratched?). I'm not sure if I'm doing something wrong (because if I have a bad habit, I wouldn't be seeing it) or if I'm not using the correct tools for the job (or not using said tools correctly). Any input involving experience with cleaning up a blade or other projects to a nice polish (mirror or otherwise) would be greatly appreciated!

-
Thanks for the input, TJ! My first knifesmithing class involved using an angle grinder, and with some practice/experience, I know the concerns you bring up. I've been pretty lucky so far, thankfully, and I think I'm getting the hang of not hollow grinding. I was actually trying to do some basic sanding on another project (trying to get the scratches out), but I haven't had much luck (the project tends to "rock" due to the unstable workplaces). The red heat and a wire brush sound like nice ideas, but I'm not sure if I can easy get that with my gas forge and not risk ruining the heat treat of the blade, and I lack an oxyacetylene torch to centralize that heat. I will keep the finer vs braided wheel idea in mind if I can get a wire wheel set up to use. For this project (and past projects), I forge, use an angle grinder (I lack a belt grinder at the moment) for fixing the profile and most hammer marks, do some cursory draw filing and sanding for fine tuning the work/bevels, heat treat, and then clean up, normally with an angle grinder, a vinegar/acid bath, and if needed, sandpaper with a board (should probably go with a smaller bit of metal). Haven't had much luck with sanding by hand (can't seem to get rid of all the scratches on my other project), but that could be my setup (table is high and not attached to anything). Any input on that would be appreciated! I didn't think about this blade being a thrower, honestly. Almost makes me want to change the blade shape a bit to be more of a drop point for that purpose. . .
-
Thanks again for all of the input! Scrap metal isn't something I have much of as I tend to just buy what I need when I need it; anything not used from a large bar sits in the living room, which sometimes puts me at odds with my wife (dangerous territory, there). When I do my filing/sanding/grinding, I usually lock a board in my vice and then clamp the blade down to the board. The grinder is used freehand (getting slowly better there), filing is done as needed (I don't do much of it with knives), and I usually use another board with sandpaper when I'm finishing (looking at getting sanding blocks soon as the dimensions get tricky). I did pick up a wire wheel attachment for my angle grinder, but the last two times I used it resulted in a broken handle (cable damascus) and nearly launching a blade when things get caught. Locking it into a vice worries me due to the pressure on the plastic, so that's out as I paid extra for battery powered due to my setup, it's not a consumable item. The dremel came up a few times this week, and I'll probably be investing in one once I see what happens with these interviews. I don't know how useful it will be with my larger projects (like the costume Ashandarei I'm working on), but I can see a number of uses elsewhere. Thank you for the input on the PH Down.I normally use vinegar and have recently stared to use a home made ferric chloride for cleaning/etching (didn't get that far with this one since I still haven't done any polishing yet), so knowing another alternative is brilliant. Thank you!
-
Thanks for those links! I'll check them out and see what else I can learn. I've been tampering/sketching simple designs lately thanks to conversations with friends (mostly SCA and Renn Faire fans), so any insight on how to make blades without extra handle material would be brilliant. Right now my highest flap wheel is 120 grit (from a bulk pack from Harbor Freight). They get pretty pricey after a while on bigger/multiple projects, as local stores outside of Harbor Freight and Fazzio's only sell up to 80 grit and charge about $8 each. I have been considering getting a backer and sanding discs (the ones that are basically sandpaper), but I'm not sure if that would work out well. Any input would be appreciated! Another side thought: how would you suggest cleaning a handle like this, especially one with a twist? I'm thinking a wire wheel should be able to handle it (a tool I currently lack due to space/setup), or maybe a dremel (probably with the small wire wheel; currently on the "to purchase" docket). And thank you for the well-wishes on the interview. I think they both went well (one on Friday, one yesterday), but now it's just waiting to see who is desperate, crazy, or awesome enough to hire me on. Hoping I hear soon, as it means I could start setting up an indoor, slightly more permanent shop by Thanksgiving if I'm lucky.
-
Yeah, wheels on an angle grinder. Sorry for not being clearer (and for the delay; had an out-of-state interview that took away my free time).
-
Thanks for that information! I have a general idea of how you did that by the description, and I still stand by my comment about gorgeous! I'm currently looking at moving (two interviews lined up), so if things pan out well, I'm hoping to start working with smiths more often than I have (second shift with weekend hours). Thanks for the advice, though!