

bigfootnampa
-
Posts
2,372 -
Joined
-
Last visited
Content Type
Profiles
Forums
Articles
Gallery
Downloads
Events
Everything posted by bigfootnampa
-
From the album: carving knives
long handled small bladed carver -
From the album: carving knives
long handled small bladed carver -
Toothed Stone Chisel For Kurt
bigfootnampa replied to bigfootnampa's topic in Chisels, Gouges, Scissors, etc
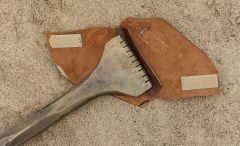
Thanks Phil. It's just an edge protector. They carry these tools in canvas satchels and I made the velcro edge saver to help keep the chisel sharp when jumbled in the bag with trowels and other chisels. -
Various pictures of my work
bigfootnampa replied to Mark Emig's topic in Blacksmithing, General Discussion
Mark I think that scroll picture is about the nicest smithing photo I have ever seen! Neat work and great photography! -
Questions about tempering/quenching
bigfootnampa replied to Akad's topic in Heat Treating Knives, Blades etc
Hill I do not LIKE to mix into petty disputes on this forum (or any other) but I have been reading on this forum long enough to know that Ted T is a pretty supportive guy. I can assure you that he has done more than most here to encourage other smiths. I am sorry that you feel that "this forum sucks" but I am PRETTY sure that you haven't hung here long enough to really understand it... just based on that statement alone. I hope that you were just caught at a bad moment here and don't really mean what you wrote. there are quite a few world class smiths here and quite a few more pretty knowledgeable backyard smiths. They are mostly just amazingly generous with their knowledge and I am pretty sure that most of them had to learn it without the benefit of anything like this wondrous forum. In my own experience I have found that this seems typical of the smithing community as a whole. You are unlikely to find other hobbies/trades where the people involved are more welcoming... I have been involved in many craft/hobby organizations and I would say that the level of helpfulness I have encountered from the smithing community is a stunning surprise! Hang around until you get to know people here a bit better and you will surely see what I mean. -
More Nails
bigfootnampa replied to brianbrazealblacksmith's topic in Blacksmithing, General Discussion
WOW! That's a 4x4 Wallopalooza! -
Toothed Stone Chisel For Kurt
bigfootnampa replied to bigfootnampa's topic in Chisels, Gouges, Scissors, etc
Frosty; Kurt got the chisel and reports that it is "the most beautiful chisel I've ever seen". He hints that it may be too beautiful to use, though I think I discouraged such thoughts... I informed him that guys here were waiting on performance reports! His wife told me that he worries that it may quickly disappear if left unattended at job sites. He assures me that he will "treasure it for years and years"! So I guess we all have to wait till he needs a chisel and breaks down and actually uses it. He said that sandstone jobs is where they usually come in handiest... so lets all hope for a sandstone job for Kurt soon! -
Wooden anvil on ebay UK...
bigfootnampa replied to GNJC's topic in Anvils, Swage Blocks, and Mandrels
That looks like the one Frosty! My son and I thought about buying it till we tried the ring! -
Wooden anvil on ebay UK...
bigfootnampa replied to GNJC's topic in Anvils, Swage Blocks, and Mandrels
There was a similar one made of sheet metal at the BAM conference... one guy had a lotta fun riding his bicycle around with it balanced on his handlebars. It was a pretty convincing fake... you'd be quite unlikely to spot it by looking at it (unless of course it was perched where an anvil should never be). Even at close range you needed to touch it to know. -
Triangular machinist scraper AKA Burr knive.
bigfootnampa replied to Charlotte's topic in Tools, general discussion
mcraigl You are right about a little rust... I pictured deeply pitted stuff when you said rusted out. Phil those hacksaw blades ought to work well if they are not too thick to flex in your hands. I have some small versions that are air hardening. They are too small for scrapers but make excellent carving knives. I have to be very careful forging the tangs though, they will crumble if I overwork them. They are especially useful as spiky little detail knives. No worries about drawing too much temper on these... as soft as I can get them is about right (just this side of too brittle). -
MarkC; I used to be a firefighter too so I understand your situation. You'll be very glad that you decided to accept my advice! Try to also come up with a fall back plan in case of falling TOO far behind schedule.... you DON'T want to put your brother in a bad spot. You might know another smith who could help with some components or maybe a good welder you could hire to help with the fabrication phase. Think about your options and maybe do a little spade work before the panic hits. As a firefighter you KNOW that the key to emergency responsiveness is preplanning, training and practice. Apply that stratagem to this project too. If you had a huge fire your dispatcher would have a whole cascading list of who to call for help... you need at least a shortened version of that for yourself and this project. You'll find it useful at some point for sure, whether on this project or a future one.
-
Marc; I've built a few sets of balustrades and a few sets of stairs too. Personally I would not assemble anything until I had finished stairs to verify measurements from. I'd check each stairway individually too. I think you should be okay with the detailed info you have to go ahead and make up the component parts and maybe pre-assemble some things. I'd sure wait to do my final assembly though... even master craftsmen like myself will adjust here or there and stringer stock is NEVER as straight as it should be. Even heavy steel railings will flex a little... but ONLY a LITTLE! Fact is, I would probably take my main components (newels, rails, etcetera) to the site and have a helper to test fit and mark out before doing the permanent assembly. Mistakes are COSTLY!!! and they make you look unprofessional too.
-
Triangular machinist scraper AKA Burr knive.
bigfootnampa replied to Charlotte's topic in Tools, general discussion
mcraigl; Rusted out is not so good as you want nice smooth flat sides on your scrapers. Saws with busted handles and messed up teeth are fine though. There is a movement away from handsaws alltogether so they are fairly easy to find on the used market now. Burnishers should be file hard and polished quite smoothly. I have made them from old file steel. They work very nicely but it takes a lot of time to get a smooth and polished surface on steel that hard. They are not cheap at the woodworker's stores either so they would make a nice gift. Straight round is my favorite shape but I love ovals too (they are much harder to make). Original heat treat on old handsaws should be about right as is. Better saws have better steel of course... Atkins was famed for their quality steels, but it's a shame to cut one up if it seems salvageable. -
Triangular machinist scraper AKA Burr knive.
bigfootnampa replied to Charlotte's topic in Tools, general discussion
Phil; The thing that you miss when scraping with glass is the geometry of the properly turned scraper edge. A card scraper with a proper and sharp burr cuts very quickly and with miniscule dig-in problems. The curve of the burr creates a limiter that prevents the scraper from digging into the wood too deeply. This is the real beauty of such a tool... I've scraped large tabletops removing impressive amounts of material in rather short order. It helps to wear gloves and to have several good scrapers sharp and ready... heat builds extremely quickly when scraping oak tabletops! I rotate my scrapers to allow cooling time and the gloves save my fingers as even a single pass with a newly sharpened burr can burn your fingertips. Mcraigl; The old timers used to make their scrapers from handsaw blades which had become too bent or been sharpened too many times to be good saws anymore. This steel was fairly springy and still works well though the younger guys seem to like pricy factory stuff of which some is much more hardened. You might try some variations and see what your guy likes best. Personally I kind of like the old way but when I have heavy scraping to do I will use thicker scraper stock so that it resists chattering... it must still bend a little in my hands though, that keeps the corners off the work and allows a super shallow gouging effect as I scrape. When the steel is left in a harder state it is less malleable making the burr harder to form. At the extreme here we approach the same sort of performance as glass (the edges are sharp and durable but the proper burr geometry is compromised or eliminated). Steel scrapers that are heat treated to finish very hard will also require harder burnishers to turn their burrs at all (some guys are using solid carbide rod for this). IMO they work best with a temper more like a saber blade than like a razor blade. I'd say spring temper or just a wee bit harder. -
I do a LOT of things to make my hammers work well. I start with discarding the old handles. Then I reforge, redrift/taper and reharden the hammer heads. Next I temper the heads to blue. Now I start from scratch and make a new handle from ash or hickory. I fit the handle to the head very carefully and install two to three hardwood wedges (glued and driven tight). Now I let the glue dry and then hammer in two metal wedges (I usually just cold forge them of mild steel... takes maybe 3 minutes). After all of this I use a ball peen to drive the metal wedges in to the level of the hammer head surface and mushroom the end of the handle over the wedges and the edges of the hammer eye. Done this way I have been able to use my hammers for as heavy a pounding as my arms can deliver month after month with no loosening whatever, in most cases (where there has been loosening I did one or more of these steps incorrectly). It does sound like lots of work... but my hammers are superior as a result (as well as having securely attached handles).
-
You're welcome. I don't mean any discouragement at all... beautiful knife! I just am always aware and searching for ways to improve... even on a VERY good thing. I do that with my own work too and usually am able to make consistent improvements. Over many years working many mediums in artistic ways I have developed a very critical eye... I hope that you'll understand that in sharing it with you I am endorsing your potential... if I didn't like this at all or considered it a bare beginners work I wouldn't say anything about it. I think you are very close to some REALLY FINE work! It excites me!
-
Stainless forging - grades / weatherproofing
bigfootnampa replied to Astro_Al's topic in Blacksmithing, General Discussion
AL; My experience with stainless is very limited, but the pieces that I have worked (bolt stock) seemed softer than mild steel to me. I felt that I could forge better at low red heat than with mild steel. My stuff took on a very light thin scale slightly brownish in tone that I found attractive. I have read threads here that do indicate that you could run into problems with separation of the alloys at the surfaces. I'd suggest that you get some sample stock of your proposed alloy(s) and do some test forging and weather testing before taking on an expensive project. Check this thread and especially Goatman's post #13. http://www.iforgeiron.com/forum/f7/forging-stainless-steel-experts-please-12082/index2.html -
looking for a tomahawk drift
bigfootnampa replied to t.sisco's topic in Axes, Hatchets, Hawks, Choppers, etc
Terry; You might check out flea markets and antique stores for old miner or railroad picks. I usually cut the spikes off with an angle grinder and cut-off disc. If you get one close in size and shape just a few heats can refine the profile and you'll be drifting in no time! Sometimes I can get them pretty cheap when they have no handle. Sometimes they are only ten or twelve bucks even if they do have a handle. -
I like it!! I like the scabbard too!! I even like the basket it's setting on!!! The only thing that I don't really like is the file work, nothing wrong with it I just think it looks pretentious on this knife, sort of like a cowboy on horseback with a necktie. The only other criticism I can see is that the bolster seems just a tad wide and blunt where it joins the blade. I'd prefer to see it a bit more oval there or at least with softened corners. On the whole though, I find this a very attractive piece of work! I am especially fond of the fine-grained peen texture on the butt cap... NICE JOB!
-
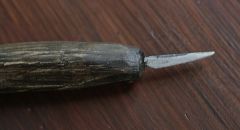
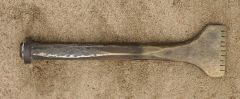
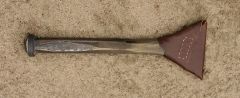
I have a great Friend who is a well known and very successful mason that I live pretty far away from now. I want him to have one of my smith made items as he is not around to experience this Blacksmithing phase of my life. I talked with him on the phone and asked him about the tools of his trade and he thought that a good toothed stone chisel would be something that he would enjoy and use. I acquired a couple of these old jackhammer bits at auctions and thought they would be ideal raw material. I was able to cut them just above the collar so that they already had this nice finger guard feature. Then I lengthened the taper toward the edge a fair amount and widened the cutting edge. I managed to whack out an oval gripping area on the shaft below the collar (this metal is VERY HARD). I cut the teeth with a cutting disc in my 4 1/2" grinder. This chisel is 3 1/2" wide X 14 1/4" long with a 1 1/4" shaft. It weighs about 4 1/2 pounds. It's not a boy's chisel! Kurt has a grip like a steel vise though, it will be just right for him.
-
From the album: forged tools
Made from an old worn jackhammer bit showing edge guard design -
From the album: forged tools
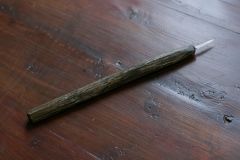
Made from an old worn jackhammer bit -
From the album: forged tools
Made from an old worn jackhammer bit, with edge guard -
At this years BAM conference Mark Aspery demonstrated the making of a chisel with one end of the cutting edge blunt and rounded so as to make a slit that begins with a rounded crotch. This method has a similar effect to punching or drilling before slitting but simplifies the process into a single step. Mark probably didn't realize that I was paying attention (:-) but I was watching very carefully. I have since made myself such a chisel and it does work just as he described. Most any slitting chisel could be very quickly and easily altered with a file or grinder to work this way.
-
Your new Vulcan will likely be quieter. Unfortunately it is also likely to have poorer rebound characteristics... the ringing seems to be louder for the harder anvils (with better rebound). I have one of each here (I have learned not to let beginners pound on the hard one... they miss with their hammer blows).