

bigfootnampa
-
Posts
2,372 -
Joined
-
Last visited
Content Type
Profiles
Forums
Articles
Gallery
Downloads
Events
Everything posted by bigfootnampa
-
Road Trip to Pickup New Ayang!
bigfootnampa replied to bigfootnampa's topic in Power Hammers, Treadle Hammers, Olivers
Here's some photos at last... sorry to keep you all waiting. -
Road Trip to Pickup New Ayang!
bigfootnampa replied to bigfootnampa's topic in Power Hammers, Treadle Hammers, Olivers
Expensive trip Dale... I bet your hammer is making it up though! -
Road Trip to Pickup New Anyang!
Images added to a gallery album owned by bigfootnampa in Members Gallery
-
-

From the album: Road Trip to Pickup New Anyang!
Pictures From The Road Trip! -

From the album: Road Trip to Pickup New Anyang!
Pictures From The Road Trip! -

From the album: Road Trip to Pickup New Anyang!
Pictures From The Road Trip! -

From the album: Road Trip to Pickup New Anyang!
Pictures From The Road Trip! -
From the album: Road Trip to Pickup New Anyang!
Pictures From The Road Trip! -
From the album: Road Trip to Pickup New Anyang!
Pictures From The Road Trip! -
Road Trip to Pickup New Ayang!
bigfootnampa replied to bigfootnampa's topic in Power Hammers, Treadle Hammers, Olivers
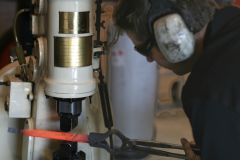
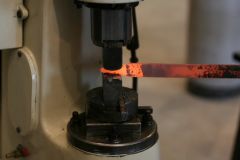
I am home with the Hammer!!!! It is still in the truck though. I do have some nice photos but am still trying to get them processed. I will upload some tonight or tomorrow. The Anyang already sold one item for me as it served as a traveling advertisement in the back of the truck. Seems like I may have a new customer as a result (possibly a couple of new friends also). This hammer is magical! I got some nice pictures of Longhorn cattle as I was leaving James shop and didn't realize (until talking with him on the phone this afternoon) that they belonged to James dad. They were so tame that they seemed like puppies! Such incredibly beautiful animals! I stopped at a little flea market in Springdale Arkansas and bought a small box of old chisels and lug wrenches that are good punch and chisel stock. Average price was about 50 cents and some pieces were nice large ones too. I got a couple more and a couple of old wooden handled screwdrivers at antique malls in Ozark Missouri. I like to reforge the tips on the old screwdrivers and regrind them for better than new usability. They are far more attractive than the plastic handled ones... cheaper too! I have become pretty skilled at reshaping the tips and have whittled the grinding down to a bare minimum now. I just short heat the tips and leave the handles intact. I thought that I would eventually have surplus ones to resell but it turns out my wife is a talented tool user and she is pretty well able to handle my output. BTW Frosty my angle on the haircut was to look extra spiffy for the pictures. Well it was a good idea anyway. 1500 miles in three days plus forging and posting and antiquing was a pretty full schedule... my tank was right on empty when I got here! I had hoped to have some company and another driver but it didn't work out that way. I got caught where there were few inns on Sunday night and those were full. I was too tired to keep going so had to nap in a parking lot in the truck... not very restful! Clay -
Road Trip to Pickup New Ayang!
bigfootnampa replied to bigfootnampa's topic in Power Hammers, Treadle Hammers, Olivers
Mike; it's a twenty pounder... don't be fooled though... I figure that it's the rough equivalent of ten young and tireless strikers available 24/7 at the flip of a switch with no overtime or holiday bonuses!! I might be conservative there too as it would be hard for even ten such as they to strike 4 times per second! It IS exciting Frosty! I stopped off in Vinita today and got my hair cut. The barber said I was just like a kid in a candy store about that power hammer!! Thanks Beth; I'll share a few tips with James permission but you'll have to get your own hammer and drive out here to haul it home to get the full lesson. Bentiron; There are quite a few Chinese speaking people here! At my hotel tonight I had a long wait because a party of such was complaining rather tediously that they did not get all of the discounts that some other customer had. It worked to my benefit because the manager gave ME a discount just for being so nice (and patient)! WOO HOO nice guys CAN win!! Clay -
Hey your neighbors just put you up to this to raise property values right? Lodi oh Lord isn't that where CCR got stuck? Tell your neighbors this won't work on boomers... we've already heard the song! (JK) (;-)
-
Ron's advice is good... but go ahead and do the microwave thing... it works very well and it would be silly to wait three years to get a hammer into action. I have some experience with this and make limb (and trunk) handles all the time. I assure you that I have world class skills with this and my handles are as nice as any made in this world. You are best off to use a chunk of wood that can be split into at least quarters and still have robust blanks to shape (bigger is fine just split down smaller). The drawknife and shaving horse is your friend!! With these two tools you can really go to town! Leave your blanks long so that you can clamp with the extra when you are shaping. Rough out to size at first (no precise fitting to the tool head yet). In the microwave use the lowest power setting and set the timer for 5 minutes or so at first. You have to kind of feel your way along until the wood is dry. If you overcook it you can burn it pretty easily! Be careful because it will get HOT. You have to use your hands though as when it is too hot to touch that is a sign that you need to let it rest and cool a little. You keep checking and cooking and cooling and cooking until you get it to where no moisture is left that will cook out. Some guys weigh it and know to stop when the weight no longer changes... personally I just watch and feel and check for moisture condensate and with my experience I can just tell pretty close when it is dry. As you approach the fully dry state you enter the critical zone where the tiny amounts of moisture left can be vaporized quickly and disastrous overheating can happen very quickly... so this is the time for special caution. It sounds scarier than it is though... with a little practice it is a pretty reliable and effective technique that is not too difficult. A little practice is a good thing. Do your precision fitting after drying (because shrinkage will alter the dimensions slightly). As for wood selection, use what you have but avoid twisty grain and any big knots (some small to tiny knots are actually nice...though they can be a nuisance during the shaping process). Lots of species work well... ash, hickory, pecan, oak, hackberry (or other elms), locust, walnut, persimmon, are all excellent. Maples, cherry, and many others (even many soft woods) are fine for many tool handles but I try to stick with the best species for hammer handles as shock absorption and extreme strength are needed for most of them (some light duty hammers can have almost any kind of handles though). Clay
-
You know you're a blacksmith when......
bigfootnampa replied to Brasilikilt's topic in Blacksmithing, General Discussion
I have a big ol hot cut that I chop those springs with (HOT of course). I bought it (minus handle) at a flea market for about $4 I think. I have also used a cut-off wheell in a 4 1/2" grinder... it gets dicey with the big springs though, and is slower than the big handled hot-cut. My torch would cost a lotta money to cut those up. -
I am halfway to Texas to pickup my new Anyang hammer! James has generously offered to spend some time in his shop with me Saturday showing me some of the basics and maybe a few tricks for working with it. I am pleased to have the opportunity as I have lots of questions for him. I hope you guys don't mind if I share my enthusiasm with the group here as you sort of feel like family to me. I saw this hammer demoed at the BAM conference this spring and I was WOWED! The hammer has been ready for a while now but I got too busy to go get it. I have a pretty good pile of iron waiting to be drawn out with it so I think I am ready! I'll let you know how it goes as I get it put to work! Clay
-
hole size in nail header
bigfootnampa replied to chichi's topic in Blacksmithing, General Discussion
I see that Glenn uses a slightly different technique than I do... which leads to slightly different header design. Glenn is using the header to trap a taper on the nail stock, whereas I shoulder the stock on two sides so that my header works better with the narrowest spot very near the top. I use the shoulders to stop and hold the nail stock where I will form the head. I am just posting this to clarify so that people don't get confused by the slight differences in our preferred header architecture. I will have to try Glenn's system now and see how I like it. -
hole size in nail header
bigfootnampa replied to chichi's topic in Blacksmithing, General Discussion
IME you need about a 3/16" square hole for 1/4" stock and the hole should be smallest at the surface of the header. I'd say that you punched the hole properly but should then have drifted it with a tapered drift from the back to get the final size and the pyramidal shape desired. -
I find that interesting. I have not shouldered any of my tools... just made a larger tenon for heavier uses. One advantage that I can see would be if ever rehandling was needed you could use the shoulder to apply the force needed to seat the tenon into the new handle... avoiding possible damage to the chisel surfaces. I can see it being especially convenient in the case of rather delicate small chisels and gouges.
-
Scrap Yard Won't Sell Scrap Metal!!!!
bigfootnampa replied to CurlyGeorge's topic in Blacksmithing, General Discussion
You have to find the little guys. All the big yards here sell truckloads or more only. Lots of little yards around though. Be friendly and considerate. Toss a little extra dough around now and then (what the cajuns call "lagniappe"). One local smallyard only buys non-ferrous but they let their customers drop off iron for pickup by one of the BIGYARDS and they let me pull what I want for a donation to a jar they keep for a former worker with health problems. Sometimes I throw in a little extra that may, or may not, make it into the jar. I needed a piece of 2 1/2" pipe for a jig yesterday and Lowes has nothing that large but this little yard had it and also picked up about 15 old mower blades for a $10 donation. OHhh yeah a couple of springs too. -
All these ways will work but the shaving horse and drawknife combination is far the best way if you are making many. It is pretty amazing how quickly you can work with these two tools and a little practice. You can literally make a pickup truckload of shavings in a day. Split out double lengths and shave away! Having a double length lets you clamp on one side while you work the whole length of the other handle. Use the ends for the handhold part and shape the heads at the centers of your blanks... that way you are always shaving downhill with the grain.
-
Personally I'd recommend that you spend the extra and buy the Hofi hammer... I am pretty sure that you will be glad you did.
-
Cut it with a scoring knife... mine has a carbide tip but I have used utility knives and they do work, not as well however. They are pretty cheap so it's worth it to get one unless you are far from a store. Cut oversize as perfect alignment is not very likely. Usually allow about 1/4" overhang on each side but an 1/8" is okay for side strips. Ideally you hang the sides first and trim them flat with the surface Then attach the surface and trim to a shallow but even width bevel... that way the top overlays the edges and helps shed water. Be sure to use a roller to press the glue joints as tight as you can. A cheap j-roller will work but one with a second handle that allows you to press with both hands and use your weight on it is better. These are rubber rollers and formica dealers should have them available. It takes some practice to use the edges of the file to cut the excess material off but with a bit of practice you will get it done and you sort of leave everything just a tad long at first cut and then file it down again to get a near perfect fit. IMO it is less dangerous even for pros than using a router... they only have to slip just a dab to make a mess of everything. I have done it both ways and I know pros who use each method. So if you are a router wizard with a nice small trim router then you do it your way. Do practice a bit though use up some time and some scrap. You WILL be glad you did.
-
You can put new formica over old if the old stuff is still tight. You just rough it up with coarse sandpaper (about 24 to 36 grit... power sand if there is much area to cover). Then you can apply contact cement to both surfaces and adhere. If you've never done much practice a bit with some scrap first. IMO it is best to avoid router trimming as it is too easy to spoil a lot of work and material. Final trim with a large coarse file instead. I like to use about a 14" plasTcut file but whatever you have can work. You can use a finer file or sandpaper and block to smooth the bevels.
-
Well we just answered that... the Sheepsfoot knife is sharpened on the straight side of the blade. They are not normally hollow ground but certainly could be. I have heard that the Sheepsfoot style blades were called such because they mimic the shape of one side of a sheep's hoof. Which (having tracked thousands of sheep) I know that they do leave a track shaped just that way.
-
Well yes those are common knife shapes. Your top design would be called a "Sheepsfoot" blade and the bottom design is called a "Wharncliffe"... errr... that is if you reversed the sharp edge and the spine on the bottom blade. They are somewhat more usual in pocket knives and carving knives than in larger blades but nonetheless standard blade designs.