

bigfootnampa
-
Posts
2,372 -
Joined
-
Last visited
Content Type
Profiles
Forums
Articles
Gallery
Downloads
Events
Everything posted by bigfootnampa
-
For outdoor projects I have heated the heads of stainless screws and brushed them with brass to get a bronzed look that matches my metal. I like the oval heads best.
-
On the surface it seems to me as though this case hardening might offer neat potential for very thin/narrow blades such as used by detail carvers. For some that I know the blades resemble tiny needles more than they do toothpicks. I wonder whether the process could be tuned to allow these blades to survive the process though. I admit that I have been making blades that tend in that direction lately and they are AMAZINGLY EFFECTIVE! Of course I have been using pretty good junkyard steel to begin with. My blades still look like large roughing blades compared to the most delicate ones I have seen but they are much finer than any being sold through regular suppliers. It is kind of shocking to use such small knives to remove so much wood so fast and with so little effort. The tiny cross-section of the blades seems to reduce the force required to make the cuts to near insignificance... even in very hard woods. It just seems that for thin small items the depth of case hardening would be relatively insignificant as they could be hardened clear through and they are not suitable for any heavy grinding anyway. Take any significant material off of one of these blades and you'd have nothing left.
-
Jayco; I do lots of handling and I have found that I usually need the cross wedges to get them thoroughly tight. Cross wedging with steel is much easier than using wood and also gets them tighter, I think. Of course I do the first set of wedges in wood. I make my steel wedges from HR rod (usually 1/4"). I forge them flat and tapering and then cut the top off with a stub of round rod left for hammering. When they are set tightly I chop the little round drive buttons off with a cut-off wheel in my 4 1/2" grinder. I like to fuller the taper with the edge of my hammer so that I get some lttle ridges that help to keep the wedge from backing out. Whenever I encounter looseness (rarely nowadays) I will either add a wedge or tap the handle further into the head and then deepen the set of the wedges with a ball peen end . I have some awesome glues... I think far better than sikaflex... but I have seen them fail anyway. Proper wedging is hard to beat!
-
I used a small piece of an Oldham hollow ground planer blade to make a carving knife years ago. To this day I have not experienced any other blade that will hold an edge through so many months of carving. I carve more now and sharpen or hone it four or five times a year... I used to use it less and only sharpened about twice a year. It is very fine steel. I hardened it (cherry red and oil quenched) and then cleaned and tempered to straw at the edge (purple at the spine) by using a very tiny flame from a propane torch and taking an hour (or so it seemed) to gently heat at the blade's spine until the colors ran to the edge.
-
Grinder attachment opinions....
bigfootnampa replied to KYBOY's topic in Blacksmithing, General Discussion
Well I bought a 2" belt sander/ 6" disc sander combo from sears for about $100 and that seems to beat this deal. I understand that they have discontinued selling them now though. I use mine a lot and really like it. The disc sander part is expendable though, I never use mine. The belt is great for all types of shaping/beveling/sharpening projects. -
They look nice but personally I would be loath to use cocobolo for handles. Cocobolo is one of the most toxic wood species and commonly causes allergic reactions. That's a shame as it is so very pretty. I read about a flute maker who brought a whole logs worth of billets back to NYC when he came home from a Cuban vacation. The first flute he made ruined the career of a promising young flutist... he had such a bad reaction that he had to give up flute playing altogether! After that the flute turner made police nightsticks of the rest of his expensive cocobolo log! All of the rosewood species are prone to cause allergies but cocobolo is particularly likely to do so.
-
I like to handle my marlinspikes. Here are some that I have made. I don't usually need an eye for the ropes that I work with here on the farm. Real sailors might need to work much larger lines. About 3/4" manila is as heavy as I use.
-
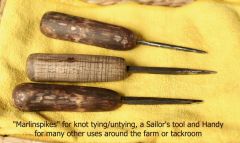
From the album: forged tools
the center spike is made from an old center puncch, the other two were forged from stainless steel bolts, 1/4" and 5/16" -
I think you got it too hot mainly. I've had that too.
-
Hauser & Miller here in Saint Louis is a leading national dealer. I've been very happy with their service and pricing too. Hauser & Miller - Home
-
Coal supplier in STL, MO
bigfootnampa replied to jeremy71504's topic in Blacksmithing, General Discussion
Wagon Master antiques on the north side of hwy 40 in Saint Charles is where I get mine. The proprietor is old and seems to be clearing things out there so better lay in some stock soon. He sells it for $15.00 per bag and it seems good to me. There is very little clinker and minimal ash. The bottoms of the bags have too much dust though... you need to sieve it before putting it in the fire. BTW last time I was there he was hauling loads of scrap iron to the scrap yard and sold some to me pretty reasonably. He's a neat old guy who used to own a smithy. He gets confused when figuring the prices sometimes... don't let him undercharge you. He also has anvils, tongs, hammers, etc. A gem of a shop to visit. -
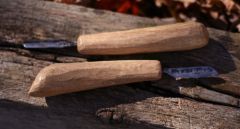
From the album: carving knives
Carved wood handles with hidden tangs -
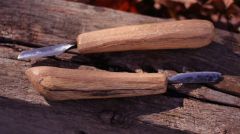
From the album: carving knives
Carved wood handles with hidden tangs -
Can rusty RR spikes be forged as is ?
bigfootnampa replied to WannabeSmith's topic in Blacksmithing, General Discussion
I happen to LOVE the fire scale pits! I hate it when I have to grind a knife down so much, to get a proper edge, that it's all lost . I do NOT waste a minute dealing with rust on my iron, The fire renews all. Same when I get some burned metal... as long as there is enough thickness left to forge ahead (past the burn thinned sections) I do so. On the (rare) occasions when I want a clean surface I just continue to forge through the red heat cycle into the black heats and the surface refines as the metal cools (or I can always grind and/or polish a bit). -
I just used one to make a nail header... works good too.
-
For short handles (like hammer handles) I just rive out a blank, rough it with the drawknife and then I microwave it till it's nearly dry. I finish the drying by baking in the oven at about 175 degrees (keep warm setting) for several hours or a day or so. This works for me because I live where I have several forested acres and I can always get a chunk of limb or trunk. As the timbers age they become spalted and very beautiful! Then they are too soft for hammer or axe handles but they do make beautiful handles for carving knives, hoof picks, spoon scrapers etc. When they get too punky to use at all they feed the mushrooms. AHHHhh... Nature!
-
I make them all the time. Hickory is my favorite but lots of oak is fine, hackberry (elm family) is VERY good. Harder, stronger, springier is mostly better. You can make many less than optimal woods work though. I like kind of fatter handles because they give me more control with less effort and they are also stronger so that the wood choice is not as critical. A drawknife and shaving horse are REAL helpful. I can do most handles in an hour or less, even allowing for very careful fitting. The ones that I have made are SOOO much nicer than the ones that come from the factories! Stronger, better fitting, nicer texture, longer lasting, WAAAY more reliably connected to the hammers(or whatever tool). Maple is not one that I favor as it tends to be stiff and brittle (why they are having lots of shattered bat injuries in MLB parks lately), but it could certainly serve if better wood is not at hand.
-
48 hours later, cast still soft?
bigfootnampa replied to Ross_E's topic in Blacksmithing, General Discussion
The temperature could well be the important factor. As long as you do not allow it to freeze the only trouble should be a delay. Warming wouldn't hurt, though, if you get impatient... don't get it boiling hot though. -
WOW! JPH; I checked statistics on your profile expecting to find something like "twenty-nine inch biceps" but there was no such entry... seems incomplete to me.
-
Dennis; I am a woodworker/carpenter too. I think you are on the wrong track with your chisel upgrade plans. IME old files are too high in carbon to be ideal for chisels. I am not saying that they could not be made to serve nicely (maybe even excellently) but they tend to be overhard and brittle. Because the main shaft of the chisel is fairly massive it rarely breaks (even when the steel is overhard) instead the edge flakes off in small chips which make for a REALLY DULL edge! You'd have to compensate for the extra high carbon content by hardening less or tempering to a softer color. I have done it but you are fighting the steel's natural properties and doing non-standard things to overcome a poor choice of steel. I'd really reccommend that you take a closer look at the chisels that you have. Are you sure that they are sharpened optimally:confused:. However well the edge is honed if the bevel is too long the edge will be too weak and the edge will bend or break under the stress of hardwood chiseling. If the bevel is too blunt the force required to pare with the chisel will be excessive. Do you polish the edges:confused:, because that helps with durability... otherwise the tiny teeth created during the sharpening process can fracture off creating a dull ragged edge. Also be aware of your technique in using the chisels. Hard scraping or prying with the chisel edge can be quite destructive of their finely honed cutting edges. Assuming that you have thought through and tried various of these stratagems and are still convinced that your chisels are just too soft, then consider rehardening the tips of your existing chisels. I have done some good in this way just by torching the chisel edges until the thin metal there begins to glow and then quenching immediately. I take advantage of the ease with which the thin sections of the chisels heat up to zone harden the edges. If you do this carefully and try to keep to a dull red heat only at the thinned edge and then quench in oil... you should be able to get by with the one step (that is you can skip the process of drawing the temper). I have made some good tools out of some completely unusable ones this way. It may be worth a try on one of yours... then if you like it do the rest of them too. It saves a lot of time over forging them from salvage steel. The steel is rarely at fault. Most often the problem is operator abuse/misuse or poor hardening and tempering of the steel.
-
How do you get thosehorses to pee in the bucket.:confused: I have the horses.
-
Chisel and Punches keep breaking in half.
bigfootnampa replied to John Martin's topic in Slitters, Punches, Drifts, etc
Water quench is almost always too fast for HC steels anyway... use oil. the faster the quench the harder the steel... BUT overhardening excessively is poor practice as the stresses of fast quenching will warp, weaken, deform, sometimes even crack the steel. If the quench is perfect you are ready to go when the tool comes out of it! Though to acheive zone hardened steel it is often useful to overharden and temper back... just don't get carried away with the OVERhardening phase. Sounds like you really need some better steel too. BTW Thomas is right about immersing the whole tool and you should be moving it in a figure eight pattern too as it is cooling. The tool is PLUNGED (very quickly) into the quench because any hesitation at all can leave a seam of weakness in the steel. Don't take it out right away either, especially for the oil or brine quenches, cooling heavy tools takes some time... keep moving it around in the quench until it is thoroughlly cooled. For critical operations like sword hardening you need a long trough of quenchant into which the sword may be plunged edge first (rather than from tip to hilt), so you can see that this is a much more important factor than you have been allowing for. -
Chisel and Punches keep breaking in half.
bigfootnampa replied to John Martin's topic in Slitters, Punches, Drifts, etc
Water quench is almost always too fast for HC steels anyway... use oil. the faster the quench the harder the steel... BUT overhardening excessively is poor practice as the stresses of fast quenching will warp, weaken, deform, sometimes even crack the steel. If the quench is perfect you are ready to go when the tool comes out of it! Though to acheive zone hardened steel it is often useful to overharden and temper back... just don't get carried away with the OVERhardening phase. Sounds like you really need some better steel too. -
It's a fire management problem mostly. Try to keep the fire adjusted so that you have just the right amount of heat for your work. A really bright fire is only needed for large irons and/or welding. Even for large irons reheating takes only a little time because there is still lots of stored heat in the piece from the previous heat. So watch your iron VERY carefully when you have a high fire and an already hot iron. It's best to cut your blower off for a while and use the coals without blast till they get too cool to do the work. Of course thin or small irons can burn in an instant if your fire gets just a little overheated... be extra careful with them. Fire management seems about half the skill to me... don't underestimate your need for it.