

bigfootnampa
-
Posts
2,372 -
Joined
-
Last visited
Content Type
Profiles
Forums
Articles
Gallery
Downloads
Events
Everything posted by bigfootnampa
-
 Did you heat treat it yourself? How?
 -
What can I make from this?
bigfootnampa replied to infinityblacksmithing's topic in Blacksmithing, General Discussion
The struck end of your tools should be domed before using. This not only helps to delay the day when it must be reground to remove mushrooming but also helps you to get a clean centered strike when you hit it. They will eventually mushroom though. I might guess that you may be doing more cold work or working at lower heats than optimal though, if you are seeing early onset of mushrooming. You should heat treat those tools but I wouldn't do any quenching AFTER tempering (you quench THEN temper). I like to keep the striking ends pretty soft so I usually get only the working ends past critical when quenching. DEFINITELY oil quench (at least IME that is nearly always good for these type steels)! They do make good hammers but are seriously tough steels and take some effort to forge into shape. I do use many pry bars but personally I have many more than I have pry work for (because I buy them often specifically as forgeable materials... many in bent or badly beaten condition, which tends to lower the asking price for them). If large enough they will make good hardies or other hardy tools. Chisels, hot cuts, punches, bending forks, nail headers, gouges, awls, tongs, garden trowels, hoes, hatchets, carving axes, adzes, stone axes, prospector picks, sickles, scythe anvils, drawknives, block knives, brush hooks, machetes, froes, towing or cargo hooks, shackle bolts... these are some things that I have made, or plan to make, from pry bar steels. -
Making a leaf spring out of a sword
bigfootnampa replied to Awalker's topic in Blacksmithing, General Discussion
I have a nice little non-contact thermometer that works well when I need pretty accurate temps on something that cannot be directly measured (like drying paint or hot iron). You could buy one of these but Phil's greasy stick method ought to get you by without the investment... I mostly use it myself. -
For stuff like that I power hammer down from 1/2" stock... that way you can get more interesting/realistic tapers and leave bumps wherever you like. I forge with drawing dies and constantly turning with medium hard hits which gives me a LOT of texture. It's easy to knock the texture back a bit with the hand hammer wherever it is overdone. The knobby vine look maybe not quite as literal as having lines but MORE interesting and easy to sell to the viewer as an authentic look. A bit of roughness on the dies or scale on the rods just adds to the effect. Of course this is not helpful if you haven't got a power hammer... though I've done it before I owned a hammer by hand, it can be pretty tiring and slow.
-
It looks very interesting. I also do some small work and sometimes it seems too wasteful to start the coal forge. I have a suggestion for improving it... if you made the legs longer or set it on some sort of platform and turn it 90 degrees you could then use the side tables on your nice little cart to rest longer rods on. Even for nails that wold seem useful as it is handy to start with fairly long rods and use them down to nubbins. You might also get a bit hotter with less fuel if you block part of the opening, which is wider than needed for most things... possibly just a couple of firebricks used as sliding doors? You could move them to get access with tongs and just slide them back while heating.
-
Yes, I have looked into it. Not much potential there for me as the supplier that I queried says that it is only available in 3.5" diameters and up. It is not really "new" except as maybe compared with some much older steel alloys, as it has been available for "over 50 years".
-
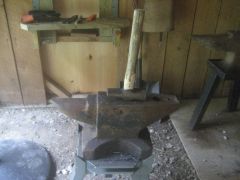
Brian; I found this tong jaw trying to crawl out of it's pry bar shell out at the forge! It looks like a heftier version! The V jaw is 3" long... I am hoping that these will serve for forging up to 1 1/2" round or square stock. As you can clearly see my finish is a bit rougher than yours... but I don't feel too bad as I think that could be said of a pretty high percentage of smiths. There is some work remaining here as these need to be drifted out more for the rivet and then there is another jaw and rivet to forge yet. I acquired this pry bar at an antique shop over the weekend (it was too rainy to fish) at the very reasonable price of $2. I keep a good stock of this type material all bought at quite favorable rates whenever I find it.
-
Matt; As it is already seasoned it seems doubtful that he might get a good bow blank from it... they should be split out while green... knife and other tool handles too of course, but less critical as bows need long staves with very little splitting whereas knife handles often need only be a few inches in length.
-
Help with making a hot punch
bigfootnampa replied to walkerironworks84's topic in Slitters, Punches, Drifts, etc
Your material is a bit small for what you are trying to make/do. It could also be a bit better grade steel for that use. I like to use old cold chisels or pry bar steel. Old spud wrenches are real nice too! You CAN make a punch from 1/2" rebar but as you now know... It will have a short useful life and require frequent reshaping even if you use it carefully. More taper means more mass to help soak up the heat and more resistance to deformation which keeps the damage more confined to the tip of the punch, where you can rework it quickly. It also means just one or two more strikes before you have to pull the tool out and reheat or change punches (if doing many holes or in thick materials multiple punches are needed). To get the proper mass you want good heavy rod to begin with so that you'll have a thick punch at the striking/handle end. Most of my good punches are 3/4" to 1" diameter material. -
I have a nice small carving knife in my hand as I type this which has a locust handle. It serves very well. This one has a bit of spalt and I have treated it with Kwik-Poly or you could have used thin super glue to seal it and reharden the spalted areas. Strong wood and carves well though it tends to be a little "stringy" with long slivers pulling out as you carve or drawknife. Sharp tools, take a little time, seal and sand and you'll be happy, I believe.
-
I wanna make a hammer and a couple other things
bigfootnampa replied to FieryFurnace's topic in Tools, general discussion
Dave; Brian Brazeal prefers 1045 but often uses 4140. 1090 is likely to be over hard for optimum hammer material though I have heard of it being used especially for small hammers. Generally axle steels are about right in alloy and sizes. Lots of farm equipment axles are 4140. Square or round are both fine and easily altered by forging. Another good source is to buy old hammers from flea markets and reforge them. Hammer heads are often available for as little as a dollar and though I usually redrift them, having a starter hole saves some time and heat. I sometimes like to use old pry bar material. In the larger sizes it is good stock for hammers though it does take a bit more effort to forge out. These are often available at flea markets or antique stores (often overpriced but if you watch you'll get some at good bargain prices). A big bar can yield enough metal for up to a dozen hammers. I have one just acquired which should make 12 small detail forging hammers (1" square stock)... I paid $5 for it. I bought some nice 9" drops recently of 1 1/4" round 1045 for about $3 apiece (say $4.50 with shipping) which would be fine hammer metal. Check the fire sale section here:Speedy Metals -
Maybe you mean for the nail HEAD? That would be about right... I've never heard of or seen a whole nail being forged in that few strikes. Personally I never count the strikes for my nail heads either, when they look right I stop.
-
Figure-eight agitation in liquid quenchant?
bigfootnampa replied to Frank Turley's topic in Heat Treating, general discussion
I agree, I learned to do it that way also and I do practice it when I quench. Sometimes when quenching a heavier piece I get a bit too aggressive and splash some out so I stand back and keep my eyes high and back as I swish it about. -
Tempering a spear?
bigfootnampa replied to Mark Wargo New2bs's topic in Heat Treating Knives, Blades etc
I'd say you are likely done. Try it out, test file it and if you can get a decent bite with a file you are good to go. A couple of hours at 400 degrees is about what I would do... and you've got that already. Why do you think you need more? With 5160, basically a spring steel, you should have a pretty tough blade there. You could go to 450 degrees for another hour or two... but I doubt it's needed. -
Phil; IME my hand-made nails are permanent fasteners. I believe that they hold more strongly than modern screws and there is no way to compare them with regular wire nails from the hardware store... they easily hold at least 15X more strongly! I don't have much parallel area on my shafts either so while there may be a difference it would never appear in practical use. In fact I theorize that the long tapered shape is a contributor to this amazing holding power. I think the textures are also important and that the scaled surfaces are helpful. I have some that hold hooks (two nails each 1 1/4" into the wood) on the back of my bathroom door and despite the large size of the hooks and the fact that they overhang the recess of the flat panel door, they have never loosened even a tiny bit. I had thought about clenching these since the door thickness (1 3/8") severely limited my nail length. In the end I decided to try it this way and made short nails with way oversized heads (for decoration) and they have never even wiggled. This door is only fir BTW... oak would be no challenge at all.
-
Pike Head
bigfootnampa replied to bigfootnampa's topic in Spears, Arrows, Pole arms, Mace/hammer etc.
The tang is 1/2" square on the thick end... I regularly make them 3/8" so just a wee bit heavier than normal. I'd say about 1 1/4" diameter maybe just a bit thicker at the tang end. When you hot seat them as I do in green lumber (if I can get it) the tang socket gets hot molded to shape and the resins act as hot glues (similar to old time ferrule cement) so the connection is astoundingly solid... You could put a collar or ring for reinforcement but it would be pretty extreme overbuild even for me. Sometimes I do drizzle Kwik-Poly down into the cracks and that penetrates the wood and hardens the whole area with very tough plastic. I might do that with this one but the larger tang should give it PLENTY of strength in any case. I think a shaft of that size will be consistent with the heavy-duty nature of the pike head itself (I might make it pretty long too, 12' seems right). BTW using green timber allows the moisture in the wood to cool the tang as I drive it in and then the wood shrinks as it cures which tightens the tang socket joint even more. Additionally the green wood is more flexible allowing for a little more effective hot-molding as the tang is seated. Note that I do this at a black heat... not red, that would char the socket and the tang would fall right out or work loose quickly. -
Old punches and chisels can be good material for new ones. I am unsure what you mean by splitting punch... perhaps you mean a slitting punch? Or maybe a slitting chisel? Either way my favorite ones have been made from pry bar material which I get whenever I can find it cheap at flea markets or antique stores. Old punches and chisels are fine though if you can get them in useful lengths and diameters (lots of them are a bit too short to work well, and some are also too thin). If it is big enough to fit your hardy hole a railroad spike would work for a starter hardy. Use the lip of the spike head for the cutting edge and just make a 90 degree bend an inch or more below it so that the spike head lays on its back on the anvil when the spike tip is inserted into the hardy hole. I would thicken and straighten the spike head lip a little to make it a better hardy shape. Smash the whole thing down on the anvil a bit to get a good stable base too.
-
I used to be a Firefighter and we had pikes available on our trucks. When I saw the one that Jake made for log rafting it gnawed at the back of my mind that I need one of those for the farm here and maybe for our boats too. My first one was just a hook as I had not worked out the details of forming the spike and hook on the same piece. I was not quite satisfied with that though and it kept nagging at me so today I made another with both spike and hook. Now I have to come up with a worthy pole to mount it! It was made of an old tent stake of 3/4" diameter metal that seemed to work like some real hard high carbon stuff. I had some trouble getting it split on the end and ended up using my cut-off wheel in my angle grinder for quite a bit of the cut. I had to finish it with the huge railroad hot-cut though. I did a poorer job than I would have liked at cleaning up the inner end of the split... but I am pretty sure that this hunk of hard steel isn't going to crack apart on me. I believe that I could pull any of our trucks with this hook. It is heavy duty for sure! Eleven and one half inch long by three and one eighth inch wide. Perhaps just a tad overbuilt!? I really like the look though!
-
What a nice barn!! Your hinges are a real elegant touch Jake! I'd love to see the latch when you get it done.
-
You're welcome Michael. I really like his work too! He is an ARTIST and SCULPTOR as well as blacksmith. I find his work joyful to behold!
-
Those are really neat looking! I wonder if that oak really feels slightly smothered though... I mean you know after over 200 years it probably feels like it is past the training wheels stage!
-
Dave; In addition to my other post; hawks beaks and heads are both rather easily stylized and look nice for handles. You could also stamp silhouettes on the flats of blades or tool handles. A simple gull silhouette could as easily be a marsh hawk and could be stamped in even by beginners. I think that such a look would go nicely with your lurcher stamp (The White Dog). A hawk head silhouette might be nice too. Or maybe even a piercing rather than a stamped silhouette. Falcon wing profiles (as seen from below) are well known and easily recognized and they would make nice stampings too.
-
some forged bird ideas forged bird head ripper stylized bird heads on flintlock pistol birds head knife handle (this in wood but the same stylized form could be done in iron) hawk and bird Tsubas Some of my googles for you Dave... just cause I like you!
-
An S hook hooked on a branch would be better... avoiding injury to the tree and extremely easy to hang or remove. One with a chain or lanyard would fit nearly any branch size with only slight adjustments. It could also be applied as a choker to a tree trunk and then hang from that... much simpler and less invasive than a spike or screw!
-
Crooked knives are not that hard Jake. I have read of craftsmen making them from small butcher or kitchen knives by simply cold forging the bend. When I tried it though I broke the knife... I was successful in hot forging one from such an old knife and just reheat treated it. I have also made them from scratch and they are a breeze compared to my needle knives. I get them ground and sharpened as straight knives and then heat and bend them. I harden them with a torch in such a way that only the thin sharp edges get fully hardened... easy to do as the thin edges will heat faster than the bodies of the blades. You have to resharpen after the heat treatment but it is minimized. Full sharpening is more important with the hook knives than the crooked knives because of the difficulties of working the inside of the curve after the bending process is completed. One piece of important advice: use files for the precision grinding and sanding belts or small grinders with flap wheels are okay... but avoid the buffer. Just today I needed an extra filet knife to teach my son with and could only find junkers locally. I didn't want to take the time to make my own so I settled for a Chinese Ruko which was not even ground or tapered properly, let alone sharpened. I reground it and got the tapers nicely tuned. During the sharpening process I foolishly tried to buff the thing and it gave my safety glasses a nice testing and made quite a serious attempt to stab me in the heart! The finely tapered tips of such blades are just WAY too dangerous to let them get near a buffing wheel (unless you fancy being buffeted by sharp objects)!!!