
brianbrazealblacksmith
-
Posts
1,683 -
Joined
-
Last visited
Content Type
Profiles
Forums
Articles
Gallery
Downloads
Events
Everything posted by brianbrazealblacksmith
-

Big Handled Swages
brianbrazealblacksmith replied to Michael's topic in Tools, ID, and pictorial reference
I use a 3 inch and 1 1/2 inch top and bottom swagges quite regularly for making hammers, top tools, hump tools, and hardies. Now that latch may be about 200 years old. It looks like some that I saw when I worked at the Mission in San Juan Capistrano, California. I made a few replicas like the originals that are still on some of the doors at the mission. The Mission in San Juan Capistrano had Catalon furnaces that smelted iron ore and produced iron in that part of the world. It was founded in 1776. Modern people didn't understand that until 1987 when a metalurgist was touring the mission and noticed the Catalon furnaces right away, before that everyone thought they were pottery kilns. -
My tools - Brazeal style
brianbrazealblacksmith replied to Tubbe's topic in Tools, general discussion
Great job, Tubbe! Punching the hole is alot eisier with a striker, but a punch press is even better if you're doing this alone. You are doing some really nice work. -
Nice job, Tubbe! I also liked the hearts you posted a while back.
-
tips on forge welding
brianbrazealblacksmith replied to MattBower's topic in Blacksmithing, General Discussion
Every time I have shown this someone always asks that question. I don't think most people that develop patterns with layers of metal would want to throw some blotches of iron in the mix. Give it a try and show us what you come up with. -
A new blacksmith is born!! (literally)
brianbrazealblacksmith replied to adamj's topic in Everything Else
That is a great picture! Congratulations! -
tips on forge welding
brianbrazealblacksmith replied to MattBower's topic in Blacksmithing, General Discussion
Glad to hear some are trying this. It does work like nothing I have ever seen before on mild steel or A36. My brother, Ed, just got off the phone with me after trying it, and he too can confirm that it wokrs like nothing he has ever seen. The ability to tack pieces together below a forge welding heat is an advantage that I would never had imagined. I know some people without much experience may not quite comprehend what has been discussed here, but for the experienced smith this is big news. I just got back from another conference in Texarkana with the 4 States Iron Munchers and they saw it in person and one person tried it during my demo and succeeded with his tack and weld. Keep your eyes open, we're going to see some new approaches open up with this new found ability. -
Thank you to Brian Brazeal
brianbrazealblacksmith replied to Grundsau's topic in Blacksmithing, General Discussion
Cool, awsome! Keep up the good work, both of you! Blacksmithing is getting bigger and better every day, and it's good to see younger people involved in promoting it. -
Anvil Weight Opinions
brianbrazealblacksmith replied to 01tundra's topic in Anvils, Swage Blocks, and Mandrels
The most important thing about anvils is how they are mounted to the Earth. I have a 25 pound piece of steel mounted to a tripod stand that is anchored into a cement slab that I use to make hammers, top tools, and hardy tools. I'd much rather use that than a 1000 pound anvil setting on a stump! Even for little work the mount matters, and until anyone tries a properly mounted anvil and sees the difference for themselves they will never know why I keep stressing this point. -
ABANA Conference 2012 Group Photo
brianbrazealblacksmith replied to clinton's topic in Events, Hammer ins, Where to meet
Alright, Clinton! You're on the ball. I believe it was Lyle that suggested you would be a good man for the job. I just got off the phone with Glen, also, and he was talking to me about having everyone meet at sometime where Lyle, Alec, Daniel, Kainon, and I will be forging to get a group photo. You know me, I'll be woking, but I'll stop for a photo. -
tips on forge welding
brianbrazealblacksmith replied to MattBower's topic in Blacksmithing, General Discussion
Here is a little Celtic cross I made the other day with this flux out of 1/8" x 1/4" and a washer. I tacked the pieces together with the Iron Mountain flux at a orange heat, brushed them clean, and then finished the weld at a forge welding heat. I doubt that i could have done that without this flux on mild steel. I know I could have with done it with wrought iron or tool steel, but have you all ever tried to weld small A36, plus what an advantage being able to position and tack below forgwelding heats. -
tips on forge welding
brianbrazealblacksmith replied to MattBower's topic in Blacksmithing, General Discussion
Thanks John. It has mostly been used by farriers in gas forges for quite some time now. -
tips on forge welding
brianbrazealblacksmith replied to MattBower's topic in Blacksmithing, General Discussion
Here are some pictures of some things that I have been playing with useing a flux that has been on the market for some time now called Iron Mountain Forge Welding Flux. It contains Disodiumtetraborate and pure iron powder, anhydrous borax and iron. Russel Colvin gave me and Lyle a bottle of it over one year ago, and I didn't try it out until about 2 months ago. I have never had any problems welding so I did not give it much thought until I took a day to play and try it out. I started by doing some branch welding with a technique that I came up with a long time ago; I call it a "blob weld". Instead of forging a scarf, I forge whatever I choose and leave a mass of parent material so that I have the opportunity to forge the weld more and make a true weld. The technique is shown in another thread titled, "Forge welded candleholder", I believe. If someone could dig that up, I'd appreciate it. My computer skills are somewhat lacking. Anyway, when I went to close up the area to be welded, I noticed that the pieces tacked together at a red heat. I had never done that before with mild steel or A 36, only with wrought iron had I done this before. I was amazed and so I stuck the next separate piece on with one hit at a orange heat. I kept doing more and was able to take my time to place my piece exactly where i wanted before I tacked it then return to the fire and finish the weld at normal forge welding temperature. Next I did some lap welds without scarfing and was able to fill in the seams with it so you could not see where the weld was. I've used all kinds of fluxes before and forge welded without flux, but I normally use plain borax. This flux allowed me possibilities that I have not seen with the other fluxes when welding A36. Wrought iron and higher carbon steels are a piece of cake compared with A36. Daniel Riffe has done alot of things with this now, and I believe you'll see alot more possibilities in the near future from other people. I did a video on youtube yesterday using this flux, but the camera that we have will not show the true heat. It looks like I'm always at welding heat. I only went to welding heat once. The one hit tack at a bright red heat is impressive though when I pry it apart. -
Disodium Borate, a new flux?
brianbrazealblacksmith replied to Wind Chapman's topic in Fluxes used in blacksmithing
I just got off the phone with the producer, and the only ingredients are listed on the label: Disodiumtetraborate Na2B4O2 and Pure Iron Powder Fe Ciladog, I have used alot of different fluxes including Easy Weld, and I have never seen anyone do the things I have been doing with this. But just because I haven't seen it does not mean what your saying isn't so. I'd like to see it. If I had some Easy weld I go out and try it right now. Surely someone has some Easy Weld out there. Show us or send me some and I'll show it. As for fumes, I think we are all aware of proper precautions and ventilation when dealing with this hot stuff. If you are not, stop. -
Disodium Borate, a new flux?
brianbrazealblacksmith replied to Wind Chapman's topic in Fluxes used in blacksmithing
Finally somebody gets it! Thanks MOblacksmith0530! I've been trying to communicate that you can tack things together wherever you want without having to reach normal forge welding temperatures, then you can secure your weld at normal forge welding temps. The video on youtube does not give this justice because the metal and fire are much brighter than they actually are. I never edit any of my videos, and I don't lie. That one hit tack that I pry apart in the end was tacked at a red heat well below orange. This product has been around a while, but I don't believe anyone ever noticed that this was possible. -
Disodium Borate, a new flux?
brianbrazealblacksmith replied to Wind Chapman's topic in Fluxes used in blacksmithing
Yes it is. -
Disodium Borate, a new flux?
brianbrazealblacksmith replied to Wind Chapman's topic in Fluxes used in blacksmithing
I did not start this thread nor did I give much technical information on this product. The ingredients are on the bottle. The proportions are not listed. All I am saying is that this mix does things I have never seen done with A36. I'm pretty sure no one else has seen this either. No one has been talking about this, but I am going to be talking about this and helping others out. -
Disodium Borate, a new flux?
brianbrazealblacksmith replied to Wind Chapman's topic in Fluxes used in blacksmithing
Interesting Thomas, but you may want to try this like others have done and will do and see what will come of it. I do want to do some better videos that show the exact heat at witch I am tacking these pieces together at. -
Disodium Borate, a new flux?
brianbrazealblacksmith replied to Wind Chapman's topic in Fluxes used in blacksmithing
That is a very short sighted response Mr. Powers. I was given a bottle of Iron Mountain Forge Welding Fux over a year ago by Russel Colvin. He asked if I ever had problems forge welding and what did I use as a flux. I told him that I just use borax and that I've tried many other products, but I have never had problems welding. About 2 months ago I had a day to play and thought I'd try it out. I was able to do what I had never done nor seen done before; tack pieces of mild steel together without going up to forge welding temperature. I have since used it and demonstrated it to several people, and some have tried it and can attest to what I've shown. There is no "magic" to it, just documented fact now. I have tacked pieces together even at a dull red heat with this flux and so has Daniel Riffe. The way it is done is to bring your pieces up to a fluxing temperature, orange, apply the flux, bring the flux up to the temp of your piece, then tack them together in whatever position you choose with ONE SQUARE blow. Then return to the fire and forge weld at a forge welding heat. You can also use it as a filler to fill seams if you want. There is a video on Youtube now that we just made. The lighting is not good and everything looks hotter than it is, but anyone is welcome to come by and see it in person. The next time I'll be demontrating it in public is at the ABANA conference. It is going to open up alot more possibilities for todays mild steel or A36. Wait till next year and see what others will come up with, or get some today and show us what you come up with. -
Protection from anvil surface
brianbrazealblacksmith replied to David Gaddis's topic in Anvils, Swage Blocks, and Mandrels
If you are needing a cutting plate, I'd recommend a mild steel plate like Bigred 1o1 suggested. Copper and aluminum will work but they also suck the heat away more. If you are punching, use other methods than the books say like I have shown you, and there will be no issues of hitting your anvil. Don't believe everything you read, and test the teachings! -
ill have a apprentice for a day
brianbrazealblacksmith replied to Joseph Tinsley's topic in Blacksmithing, General Discussion
Show him how to clean the forge and start the fire, and have him start striking. -
If you can't forge that in one or two heats, you don't have the appropriate setup. I would suggest just buying a cone mandrel. They don't cost that much, especially compared to hiring someone to turn it on a lathe for you.
-
The most efficient way to move metal around has always been by forging. You just have to have the appropriate heat, hold and hit.
-
I use a striker quite often, and I have learned how to rate my hammer just like you would with a hand hammer or power hammer. Know how much material you can put under your hammer so you can accomplish whatever you should in each given heat. I can do 1 inch square and under with my hand hammer. It does not matter if it is a one heat taper, flat horse, or whatever. Or it could be a 3D horse, for example, I take 5 heats to complete the horse head and with my hand hammer I do anything from 1/4 inch to 1 inch. If I use a striker, I can do the same up to 2 inch square. If I go larger I would have to get a bigger hammer or take more heats than it should take. For example, it took 1 1/2 hours to forge a horsehead out of 2 7/8 inch round tool steel where it only takes 20 minutes to do the others in the heats it should take. I do not reccomend using an inadequate hammer for anything, but I have occassionally and probably will do it again. So if you must, I would suggest forging a hexagonal taper over the far side of the anvil held at the appropriate angle with half hammer faced blows with the rounded face of a sledge hammer to rough the taper out then flat side of the sledge with half hammer faced blows held the same rotating and feeding the material onto the anvil rounding and planishing as the "unicorn horn" forms on the bottom side and you take it away on the top side. If you have never done this before, you may want to practice with something like 1 or 2 inch stock, and start with 1 inch over the edge if you are using 1 inch, 2 inches over the edge for 2 inch, or 3 1/2 inch if you really want to start with 3 1/2 inch. I'm pretty sure it will take you more than one heat.
-
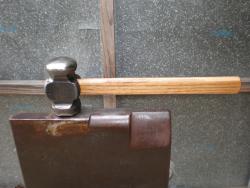
Thanks everyone! I just got finished with dinner, and yes, Lyle and I worked all day. He may post some pictures. I have a new hammer for my birthday, Lyle has a new 4 1/2 plus hammer, and we put a new handle in my 12 pound sledge I got two years ago for my birthday from Brent Bailey. It was a good day!
-
Thanks Lyle.