
brianbrazealblacksmith
-
Posts
1,683 -
Joined
-
Last visited
Content Type
Profiles
Forums
Articles
Gallery
Downloads
Events
Everything posted by brianbrazealblacksmith
-

The Trouble With Vulcans
brianbrazealblacksmith replied to Bentiron1946's topic in Anvils, Swage Blocks, and Mandrels
Lyle's anvil was also easy to mount securely to the stand. The horn was also too flat, but that was an easy thing to fix with an angle grinder. We'll be taking it with us to New Hampshire this month then down to South Carolina to use as an anvil and striking anvil. I hope no one makes fun of us. -
Thomas Dean at Brian Brazeals
brianbrazealblacksmith replied to LDW's topic in Blacksmithing, General Discussion
Yes it is, tell them I sent you. -
Thomas Dean at Brian Brazeals
brianbrazealblacksmith replied to LDW's topic in Blacksmithing, General Discussion
Russel Colvin gave Lyle and I each some of this "Iron Mountain Flux" about a year ago. He asked if I ever had any problem forge welding. I told him, no, and that I usually use borax, but I've tried all different kinds of flux. Well, it sat there by all the other fluxes that I have for a year until I had a day to just play. I started by welding some branches up like I've done alot of with a technique I came up with along time ago, the blob weld is what I call it. Anyway, I noticed that the join welded when I tapped it shut, so when I went to weld the next branch on after doing the first weld, I did something I've never done nor seen done before. I fluxed the two pieces and lined them up and tacked them together with one hit then heated them up and finished the weld as normal. I was surprised that I could tack them together at such a low heat, so I started to do other things that I had never done nor seen done before. I could go on and on, but I have work to do. I will make a video of this and I will be including this in my demonstations this year. I've shown it only to a few students so far, and most of them have some of it now. Just like Alan Lee got some from Daniel Riffe, you are going to be seeing a lot more of this in the very near future. It works like nothing else out there that I've seen! -
Drift geometry
brianbrazealblacksmith replied to MOblacksmith0530's topic in Slitters, Punches, Drifts, etc
I hammer the sides while the drift is in the hole. I am going to try and do some videos on making and using punches and drifts. Drifts are not for stretching holes like most people think. They are for opening up appropriate sized slots with appropriate sized drifts. -
I do not make hammers by myself. If I were going to make them by myself, I would get a punch press to punch the hole and 2 power hammers to do the rest. If you are interested in producing hammers for the market, just give me a call and I can advise you on the details. If you are interested in making them just for your personal use, you should come by some time and watch us forge one to see what you are up against. There are also alot of pictures on this site that LDW, Lyle Wynn, has taken of other people making their first hammers. You should be able to get alot more information from those pictures than you'll ever get in any books. Then, if you have any questions, just ask.
-
I was there last year and had a great time. There was a great bunch of people and a lot of different things going on for everyone in a very nice setting. The silent auction also had some very nice pieces in it. I am booked up at this time, so I can't attend. This conference should get bigger and better every year, so if you can make it, don't miss it.
-
Drift geometry
brianbrazealblacksmith replied to MOblacksmith0530's topic in Slitters, Punches, Drifts, etc
If you go back to to 12th post in "Slitter Geometery", ignore the other holes except the three square holes on that bar. The hole in the middle is on the square, and the other two towards the ends are on the diamond. The tools I used are also pictured. The slot punch is shown along with 2 different square drifts. I do not use a round drift to do square holes. The only difference in the two drifts is the orientation of the taper that fits into the slot that you punch. The drift for the diagonal hole has been tapered where 2 of the diagonals are flattened leading into the corners on the sides. When you drift on the diagonal like I show in the picture, you can see the result with just after drifting in the upper hole, and the result in the bottom hole after hammering on the sides after drifting. I have just recently, thanks to Dan Manders question during a class, discovered an even easier approach to these square holes like I have been using for round holes for awhile. I just haven't documented that yet, but the above method will work, also. -
Thomas Dean at Brian Brazeals
brianbrazealblacksmith replied to LDW's topic in Blacksmithing, General Discussion
Thank you Karen, Ted, Lyle, Thomas, and all the others that I have shared my time with! I am not as comfortable with social interactions as I am with what I do at the forge, but I am greatful for the moments I spend with the social interactions. Brian -
Thomas Dean at Brian Brazeals
brianbrazealblacksmith replied to LDW's topic in Blacksmithing, General Discussion
Ted, Thank you for your eloquent post. I know I speak for all of us when we say how good it is if even one person can gain from these posts and are inspired to try a technique they have not tried....Karen -
BAM Conference 2012
brianbrazealblacksmith replied to Elemental Metal Creations's topic in Blacksmithing, General Discussion
I won't be able to go, but I have demonstrated at the BAM Conference back in 2002 or 2003. And I would encourage anyone that can go and wants to learn more about this craft to attend. They are one of the largest and most involved groups out there, and they have some very talented members and get some great demonstrators from all over the world. -
-
Oklahoma State Horseshoeing School
brianbrazealblacksmith replied to Dixie's topic in Blacksmithing, General Discussion
I would highly reccomend Heartland Horseshoeing School in Lamar, Missouri. Chris Gregory is the owner and instructor, and both Chris and his son Cody are very accomplished farriers. You should check them out! Their Email address or web site is www.heartlandhorseshoeing.com -
Square Peg - Round Hole
brianbrazealblacksmith replied to Robar's topic in Blacksmithing, General Discussion
The easiest way is to drill a 3/4" hole and then heat it in the forge and drift it with a 1" square drift. It should only take one heat. -
Caleb, I had that same thought yesterday after reading this thread. I will as soon as I can. I have classes at the moment.
-
Yep, Dan, and you will never know it until you try it and succeed!
-
I guess Tom listened to Kenny after all. Tom was sure pushing the S7 back then. Kenny would suspend his anvils upside down in a circulating trough of water to harden them. I just got an Email this morning for contributions for the BAM box at the ABANA Conference this year. I'll make something. BAM sure has alot of good members that do alot for blacksmithing!
-
Go with what does the job and keeps the cost down. I believe that choice would be 8630. Kenny Mankel and Tom Clark were having a conversation about that very thing a while back in 2002 or 2003. Tom used S7; Kenny used 8630. They both got hard enough, but the material costs were quite different, and the cost of heat treating was also quite different. Tom had to send his to get heat treated, where Kenny could do it in his shop.
-
Not at all, and not even close, Dan; my rounding hammer has a square flat face with nicely rounded edges. Learning how to tilt your hammer and use its edges will show and tell you what I've been talking about.
-
Thanks, Mark! Let me know how much you want for it. They look great. I have a 17 year old here today taking a class for a few days, and he really likes my 4 pound 9 ounce hammer. He has just started smithing, but he could use a big one like in the picture. How much would you charge for a finished hammer? You could send me a personal message if you don't want to quote that on IFI. I know some people get a little funny on here about selling what we make as blacksmiths.
-
Really nice job, Mark! It's alot nicer with the power hammer; isn't it? We've worked with a few guys now and made dies for their power hammers to make hammers. One of these days I hope to settle in and set up shop and work more civilized. I'd like to get a larger hammer, like 6 or 8 pounds, made like that. Do you think you could do it with your hammers? I'd also like to buy one like that largest one,4 1/2#, if you'll put your mark on it. I can grind, heat treat and handle it myself.
-
Dave, You may want to mention where you got that information on your videos. Not because I want or need the credit, but because the method is not conventional. It is not in any books yet, and I have never seen a better way in the books or from other smiths. I did document it in the thread, "slitter Geometry", back in 2009, and I have been demontrating these types of punches since I first got around other blacksmiths in 1998. I also did a breif paper on these types of punches at Rob Edwards, editor of the Anvil's Ring, request back then. I have been punching all shapes of holes with these type of punches long before I was deomonstrating for the blacksmith organizations, and as far as I know this is original technique. But just because it has not been documented at large or just because i have never seen it before, does not mean that it wasn't done in the past. I would imagine it was done in the past before they started sharing information like we do today because it is what the forging gives you when you cut to the center with a hot cut hardy. I learned long ago to pay attention to what forging gives you and forge to finish. I would caution you on the use of "correct way" in your discriptive paragragh under the video on Youtube. It may be better to use something like "the best way that you have ever seen or tried" instead. Gerold Boggs brought up in Slitter Geometry that there is documentation of a chisel with a similar grind in the old German books, and Hofi has been using a chisel and sharing that method for a while now. These punches are not the same as a chisel, and they are used differently than the books say, and I hope to document why and how they work better with high speed photography in the future so that they may become conventional knowledge.
-
Thanks Chris! And thank you Lyle for the kind and gentle response. I wouldn't have been so nice in response of someone trying to tell someone else how to strike. I've heard it too many times and usually from someone who will never step up to the plate. I never tell someone how to strike. They will find their way themselves if given enough opportunity to strike and complete a task. Striking takes understanding the task at hand and that takes experience, just like splitting wood, but we are not just busting logs. Kelly you do make several good points, and this is not a personal affront. Daniel was doing exactly what was required at the moment, and we made several tools that day and since. He is gaining more experience with every additional experience, and it shows with each passing day.
-
I looked up this thread tonight to show it to Daniel tomarrow for his class. I guess I missed some of this because I have been busy. John B, I stand by what I said, but maybe what I said was misinterpreted. Forging has never been lost, and it is still the most efficient way to move metal around and create strong stuctures. Forging has continued into the 21st century with technology such as robotics, computers, induction heating, presses, and bigger and better hammers than yesteryears blacksmiths may have never imagined. Forging has mostly only continued into the 21st where it is neccessary, like with the aerospace industry and railroad industry for example. The really big stuff where it is essential. They are not going to grind to shape. they will only grind to finish after they have forged as close to finish. And, as far as welding with migs, tigs, or sticks, that is an entirely different technique that has no place in creating stuctures with forging technology. What would be the reason? Suspention parts for cars, trucks, trains, and planes are still forged because that is the only thing that will take the constant stresses. Could you imagine trying to weld those components with other techniques like mig, tigs, or sticks? They would only break like the spring tools like most "modern blacksmiths" make with "modern welders".
-
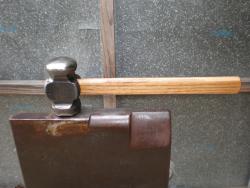
Yes I have seen them, and hammered with them, but I wouldn't say it has more dies or surfaces than my rounding hammer with a square face on the flat side. The square flat face has a straight and cross pein when I tilt it along with a nicely crowned flat die when I don't. The rounding side of my hammer is not a half sphere but more like a squashed ball, so it has a whole range of fullers when I tilt it in different directions, with radiuses bigger than a basketball to smaller than that point pein on the cat's head hammer.
-
I use a rounding hammer with a square face on the other side. My avatar shows a picture of it. I also use a cross pein that Tom Clark made occassionally. If I only had one hammer to use, I would definately choose the rounding hammer because it has more surfaces to forge with. There is not another type of hammer out there that has as many surfaces availiable. If there is, I'd like someone to let me in on it, because I'd change the second I see something better.