

Razzputin
-
Posts
161 -
Joined
-
Last visited
Content Type
Profiles
Forums
Articles
Gallery
Downloads
Events
Everything posted by Razzputin
-
Thanks for the advice. Much appreciated.
-
Well hello to all those out there interested in maile work. I have been doing maile work for over three years now and am far from being a master. But as far as many people are concerned my work is very high quality. Through these past three years I have learnt almost every trick possible to make life faster and easier to manufacture rings as well as mastering many patterns of mail. If there is anyone who would like assistance or a little guidance with this beautiful subject feel free to ask me anytime.
-

How to make Chainmail (with pictures!)
Razzputin replied to Roger D's topic in Cold Worked Iron and Steel
The best way to make rings fast and easy is to take a threaded bar of the diameter you want the inner diameter of your ring to be, slot the thread into a drill clamp shut then slip about 1" of the end of the wire down next to the bar, spin the drill on its slowest speed possible and use your thumb to guide the wire. -
You'll be surprised at the strength of these posts. And when the eventuality comes along that the post does deteriorate to a state of non ability to be used I would have by then made a steel replacement.
-
Well here is a bit of fun, I had to move all 200kg of anvil and anvil base aproximatly 10m. Many of you will say that this is easy I do not agree, especially as my floor is dirt and the edges of the anvil base kept digging in while I attempted to brute strength it along its path. Many thanks though go to my genius brother who sugested the Egyptian way of doing things as seen below. Still needed a little bit of strength but not really that much. And now my shop is looking a bit more organised. Tomorrow I complete my forge with my mentor and then... Mwhua ha ha ha ha ha ha ha ha the work can begin!
-
Well here is my vice, newly cemented in and curing, solid as a rock even now.
-
I unfortunately do not have the broken piece.
-
Well here is the finished product. And here is what my shop looks like so far.
-
Ha ha, this soil has no clay in it at all, just soil and a ton of rocks that are harder than hulks forehead. Had to beat them into submission with a steel pipe and a 9lb sledge to get the hole deep enough. The poles I have used are treated with special sealants so will last in excess of 50 years at leas before they start to deteriorate. Also I will be coating them in motor oil from time to time.
-
Ha ha ha the anvil came with he story as it came without the heel. Here are the photos of the anvil.
-
Here it is!! all set up and ready to be concreted in. This is to show the size of this vice. And here is the plot of land I cleared out today. (My brother in the background) Another of my brother. This is about as much work as he did the whole time he was "helping" me
-
Could I sink another gum pole directly in front of my original one like this? Like you say Im trying to use whatever I have lying around and I don't have a plate that big. ps. What do you think of my paint skills ha ha.
-
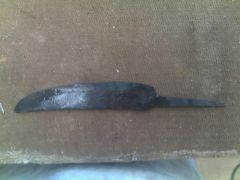
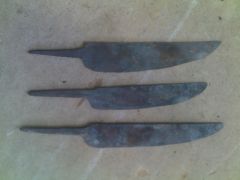
IF you look in the gallery the chainmail pictures in miscellaneous and the last three forged knives are some of mine.
-
The slots were coming, this design is actually a smaller version of my neighbors but I was vascilating as to whether i should do the slots or not. The firepot will be an interesting one, it might stay put or it might fall off, if it does ill just put it on top. I figured that since I was only really going to be using small pieces of stock that I wouldn't need the slots. The whole thing has a length of 75cm and is 45cm wide so there is also ample space. But as you have suggested in such a multitude it would be unwise to ignore.
-
Does a leg vice have to have a plate under its foot to support it or can it just be put on the ground? If it does need a plate to support it what would an ideal size be? I am mounting my vice on a gum pole cemented into the floor and need to know if I should cement the plate in as well.
-
So this is my forge that I have made. It has been made from 10mm side walls 100mm high, the base is a 5ml plate with a hole in the center, the legs are just 50x50ml square tube with end caps in them to stop the rust. I have taken a trucks brake plate as the firepot and to this I have attached a 50ml galvanised plumbing pipe leading to my waste hatch and to my valve to control the air inlet. In the background you can see my grandfathers 120amp oil cooled welder. The only concern I have with this build is that I had to weld the brake plate to the underside of the base plate as shown here. All I have left to do with this is to finish all the welds around the edges and connect up the blower that I have made out of a washing machine motor and a blower fan blade and Ill have my own smithy ready to fire up. What do you think?
-
An emu and a few chickens running around my feet. That and my frozen 5l water bottle for the thirsty moments. Also some loud electronica/dubstep or some good classical music depending on my mood.
-
© Sheldon Hooper 2013
-
© Sheldon Hooper 2013
-
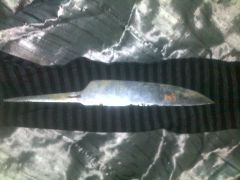 Sanded with 60 grit, Still need to heat treat it and make a handle. Then I will polish it.
© Sheldon Hooper 2013
-
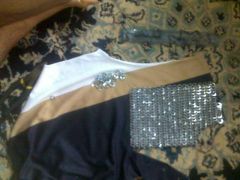
 This Chainmaile shirt is being made with 4-1 european mail. This is my first one like this and now all I have left to do to Finnish it is lengthen it.
© Sheldon Hooper 2013
-

© Sheldon Hooper 2013
-

© Sheldon Hooper 2013
-
© Sheldon Hooper 2013
-

© Sheldon Hooper 2013