Joel OF
Members
-
Joined
-
Last visited
Everything posted by Joel OF
-
I think finding a history of twists would be almost impossible because there wouldn't be any way to prove (without first hand primary evidence) that one was invented before the other. And as you've proved by chisseling the centre, or cutting into the corners, or welding multiple bars together...just add a new little feature and you've got a new twist. I think it would be impossible to have original dated documents of all the variations tried.
-
For mild steel from memory I think FH Brundles are the cheapest on delivery, they charge £10 for orders under £150. I would just set up an account with them & get what you want delivered. They sell in 6m and 3m lengths. If you've got a friendly steel yard or fabrication firm on your doorstep who are happy to order you in fresh bar with their next order or already have a decent selection of off cuts, then that route is worth a shout, but if you're pulling random junk out of their bin & have got to grind off welds/bend/etc so it's useful, you're just wasteing time and effort.
-
Sorry to do that politician thing of answering a different question to what you've been asked but I can't help thinking there's a way to give you what you want without putting a hole in that table...if you want a hardy hole at a nicer height why not just get a decent size length of box section, (or even round tube for that matter), fabricate up a hardy hole to whatever size you want using mild steel & weld it to the top of the post, and bolt the post to the ground? The it can be place where ever most convenient too.
-
I can't help thinking that to own a 2" thick cast iron bench would be an amazing thing and putting a hole in it is asking for trouble. Why does the hole have to be in the bench?
-
Joel OF replied to WestfordForge's topic in Blacksmiths and Metalworkers Association of the South West UKWhen you're first starting out it can be a bit intimidating / embarrassing approaching a fabrication or engineering firm to sheepishly say "I just want a little bit of..." but every blacksmith has been in the position of not knowing what on earth they're doing & knows that feeling of just wanting to have a bit of a bash on whatever you can get your hands on, so approaching a local smith for their off cuts, or getting them to tag a few bits for you onto their next order may be the most appealing path for you. If I had a local person wanting some bits of bar I'd probably just buy it for them and make them work it off doing some drilling or something.
-
I'm unsure from a few re-reads of your post if the presentation of your pitch is designed to hook in commission clients or lesson pupils. I think the first question commission clients will ask from seeing a board of demonstration twists is what's the comparative costs -- but a possible lesson pupil will be salivating and sold at the first glimpse of twist No.1
-
Yeah definitely interested to see any pictures you have that help explain the process and options. Always useful for future reference!! Cheers
-
I found that tee-ing up a pupil with a problem but not giving them the answer or immediately showing them how you would sort it & instead making them think through the solutions got them to "think like a blacksmith" enabled them to become more self sufficient when problems cropped up. Eg unwanted bends/twists.
-
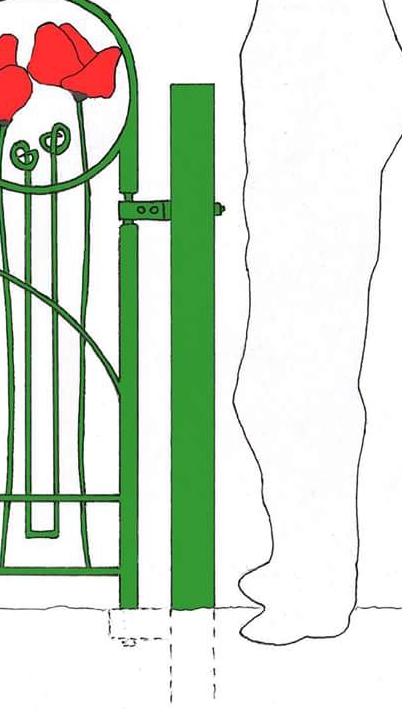
Thanks anvil, Unfortunately I have no knowledge whatsoever of bushings & bearings as I don't have any mechanical/engineering/agricultural background, so ways to include these sorts of things in designs goes well over my head. If a broze bushing is effectively a tube, how do you get it around the rounded up section (the top hinge) when you can't physically drop it on? Is it in 2 parts? Also, would a bushing required a shoulder to sit on to prevent it sliding down? Unfortunately because these gates are going in a public space all the fixings nuts are going to be shear nuts, so any worn parts can't be easily swapped out for new ones. I think this time around I'm going to have to rely on good spirited local public to ocassionally grease the hinges - top & bottom.
-
I didn't notice before you're in the Forest of Dean. That can only be an hour from from F-Y-F, no? My local steam train line (Romney Marsh in Kent) uses F-Y-F coal, you must be able to get it easier than they can.
-
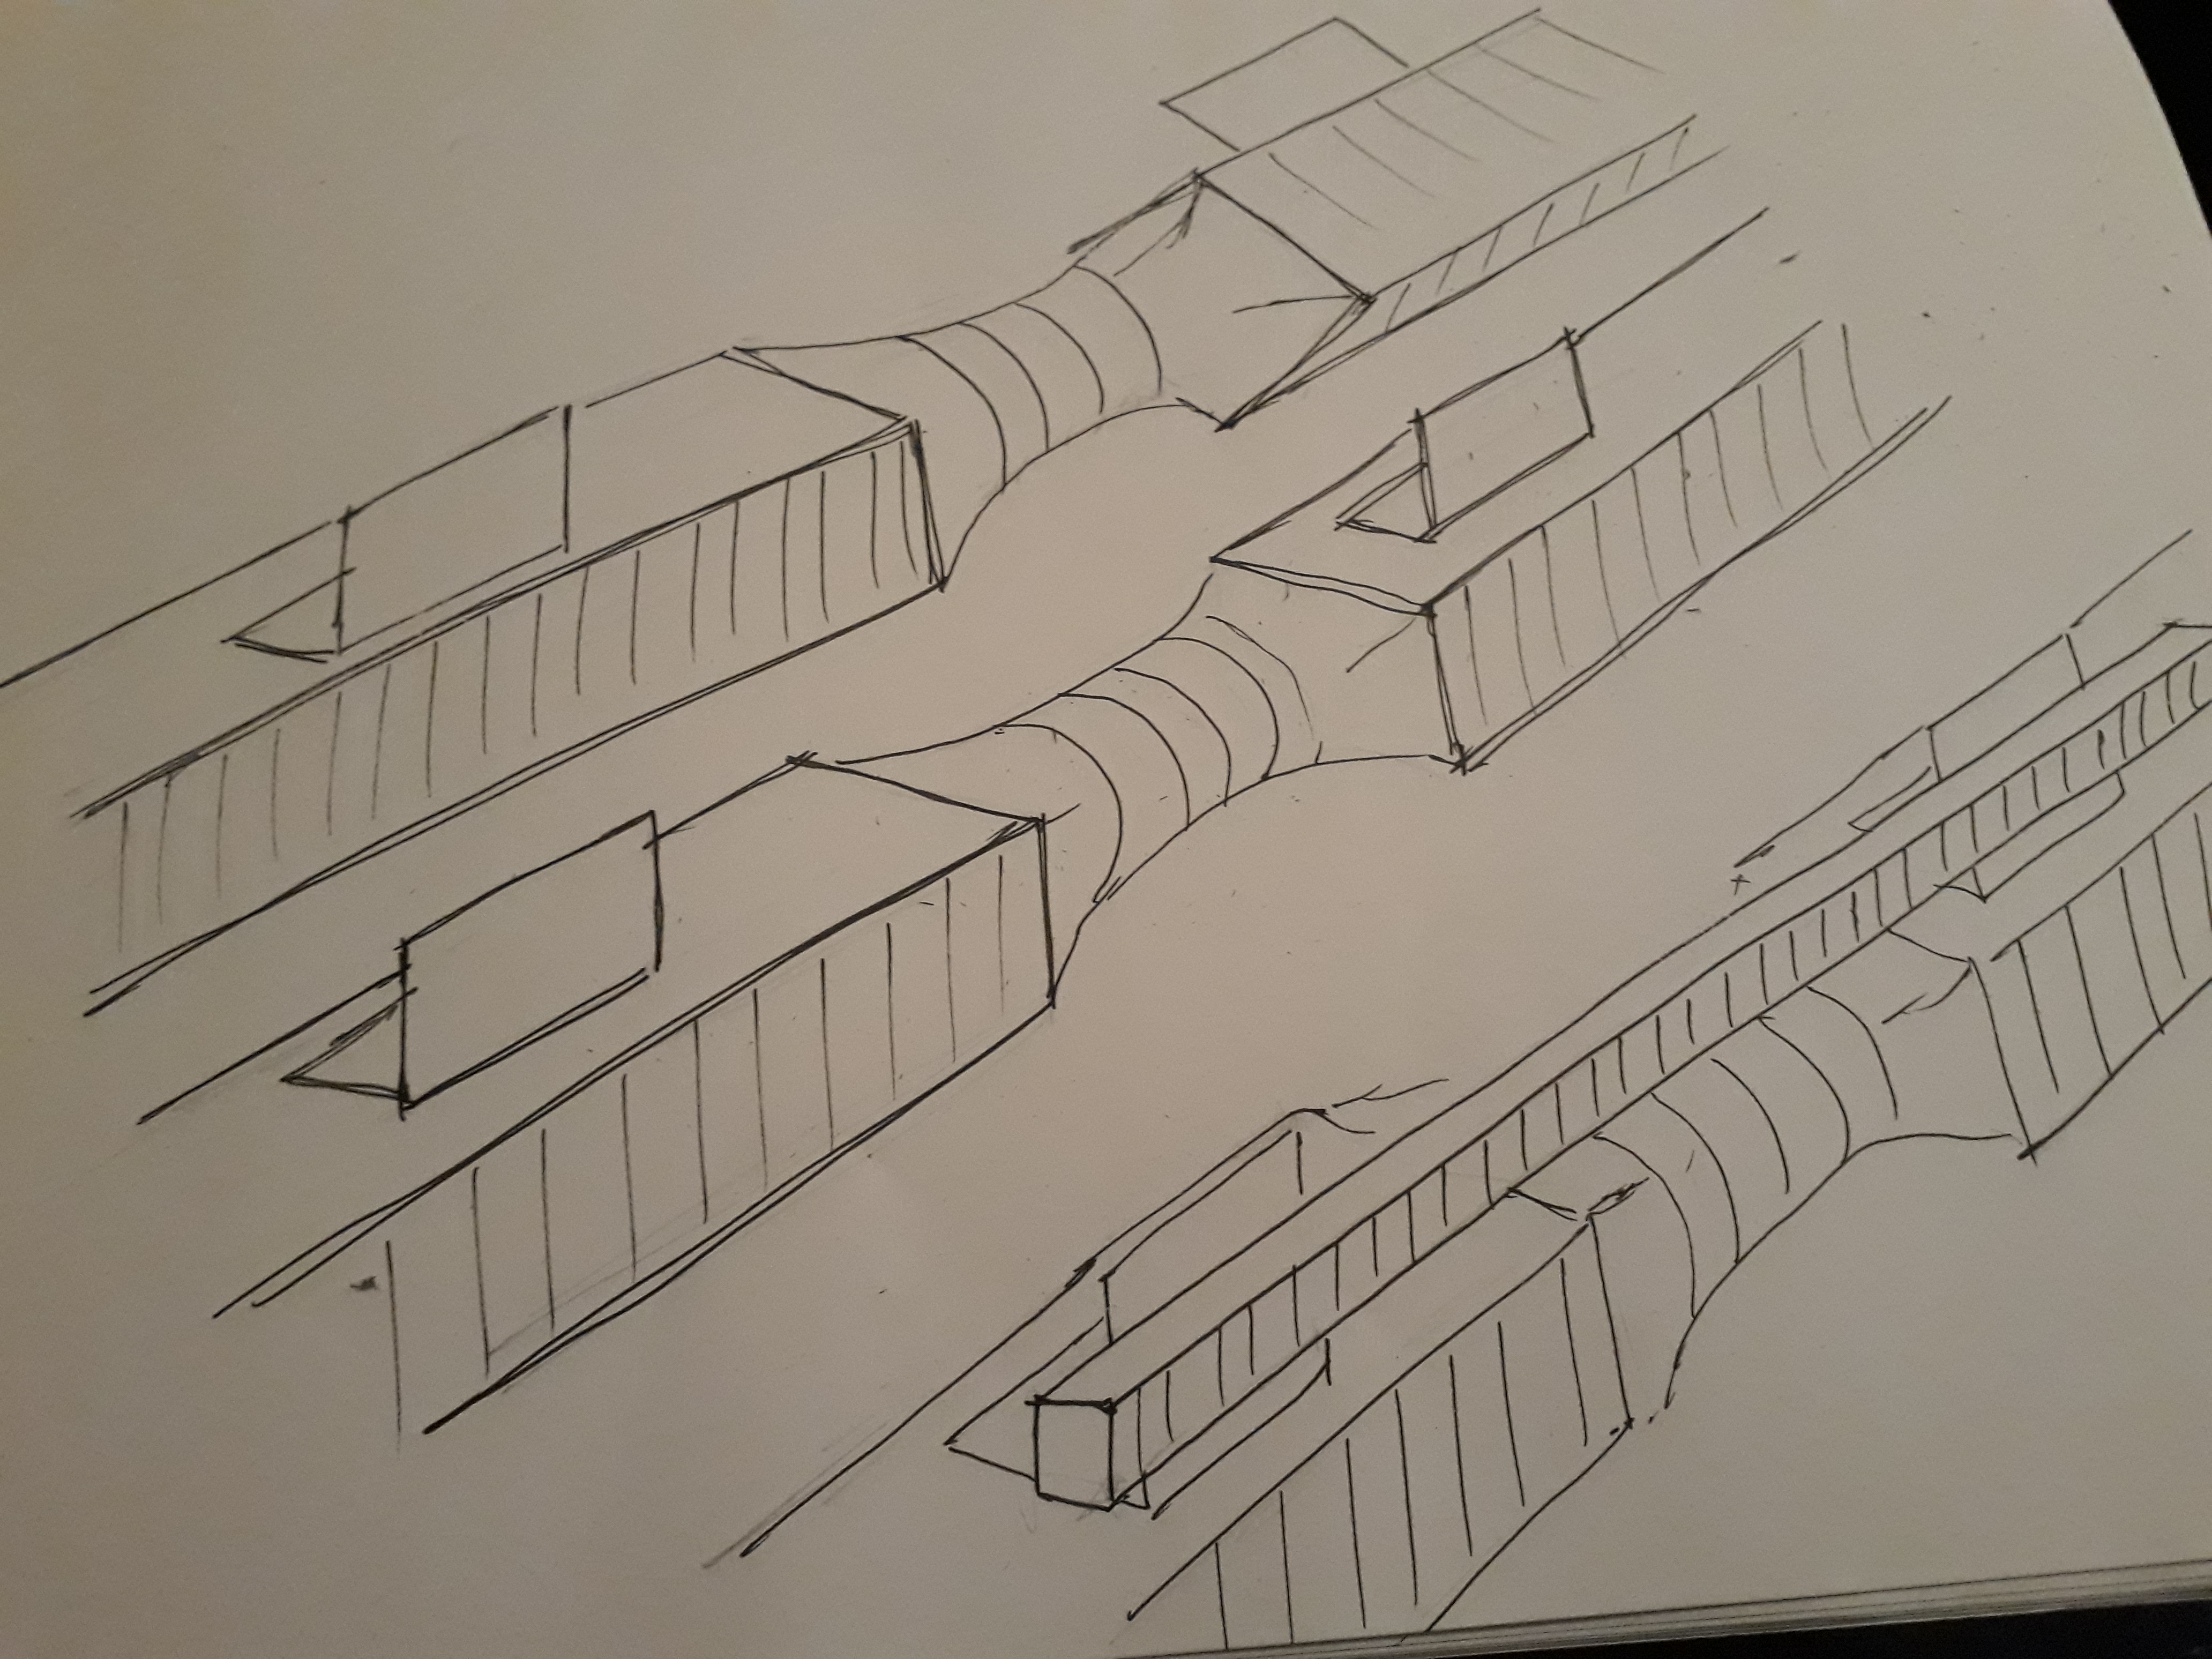
Very true. I just thought it might help reduce the nut on the backside being "worked". Although they're quite different I'm mentally scarred by the half collapsed farm gates I constantly see as a result of the nuts on their adjustable threaded hinge pins working themselves loose & so the pins rotate. Yes I'd planned on purposefully making the shoulder on the shank too short & packing with shims for adjustment. I'd planned on rolling some 2mm flat bar to match the curve of the hanging post. I'm also making some railings to go either side of the double gates - they actually funnel in towards the gates. The gates have to hook open onto the rails but the site is so uneven there's little chance of me having a successful mock up in the workshop so we're having a dummy run install before weatherproofing to check the fit. Cheers for your words of widsom.
-
Thanks for the replies folks. The horizontal drilled U sounds like a neat trick Marc1 - and the tenon length VS socket depth info was golden billybodgeit - I had assumed the sockets were really a tunnel so that water would drain through. The socket being above ground level makes complete sense. The posts will have square plates welded to the bottom & they will get bolted to concrete pads. The plates can be shimmed to level up the post. I think the socket will just be welded to the 100mm round hollow post, 5mm wall. For the top hinge I'm going to weld in reinforcing SHS to prevent the post from crushing as the nut is tightened up. The first part of the journal shank will be square (to prevent rotating) before it's rounded up & threaded to allow for adjustment on the backside of the hanging post.
-
Pretty much, unless you shimmed between the tenon & socket to bump it up in height. For the gates' site it's the best hinge arrangement.
-
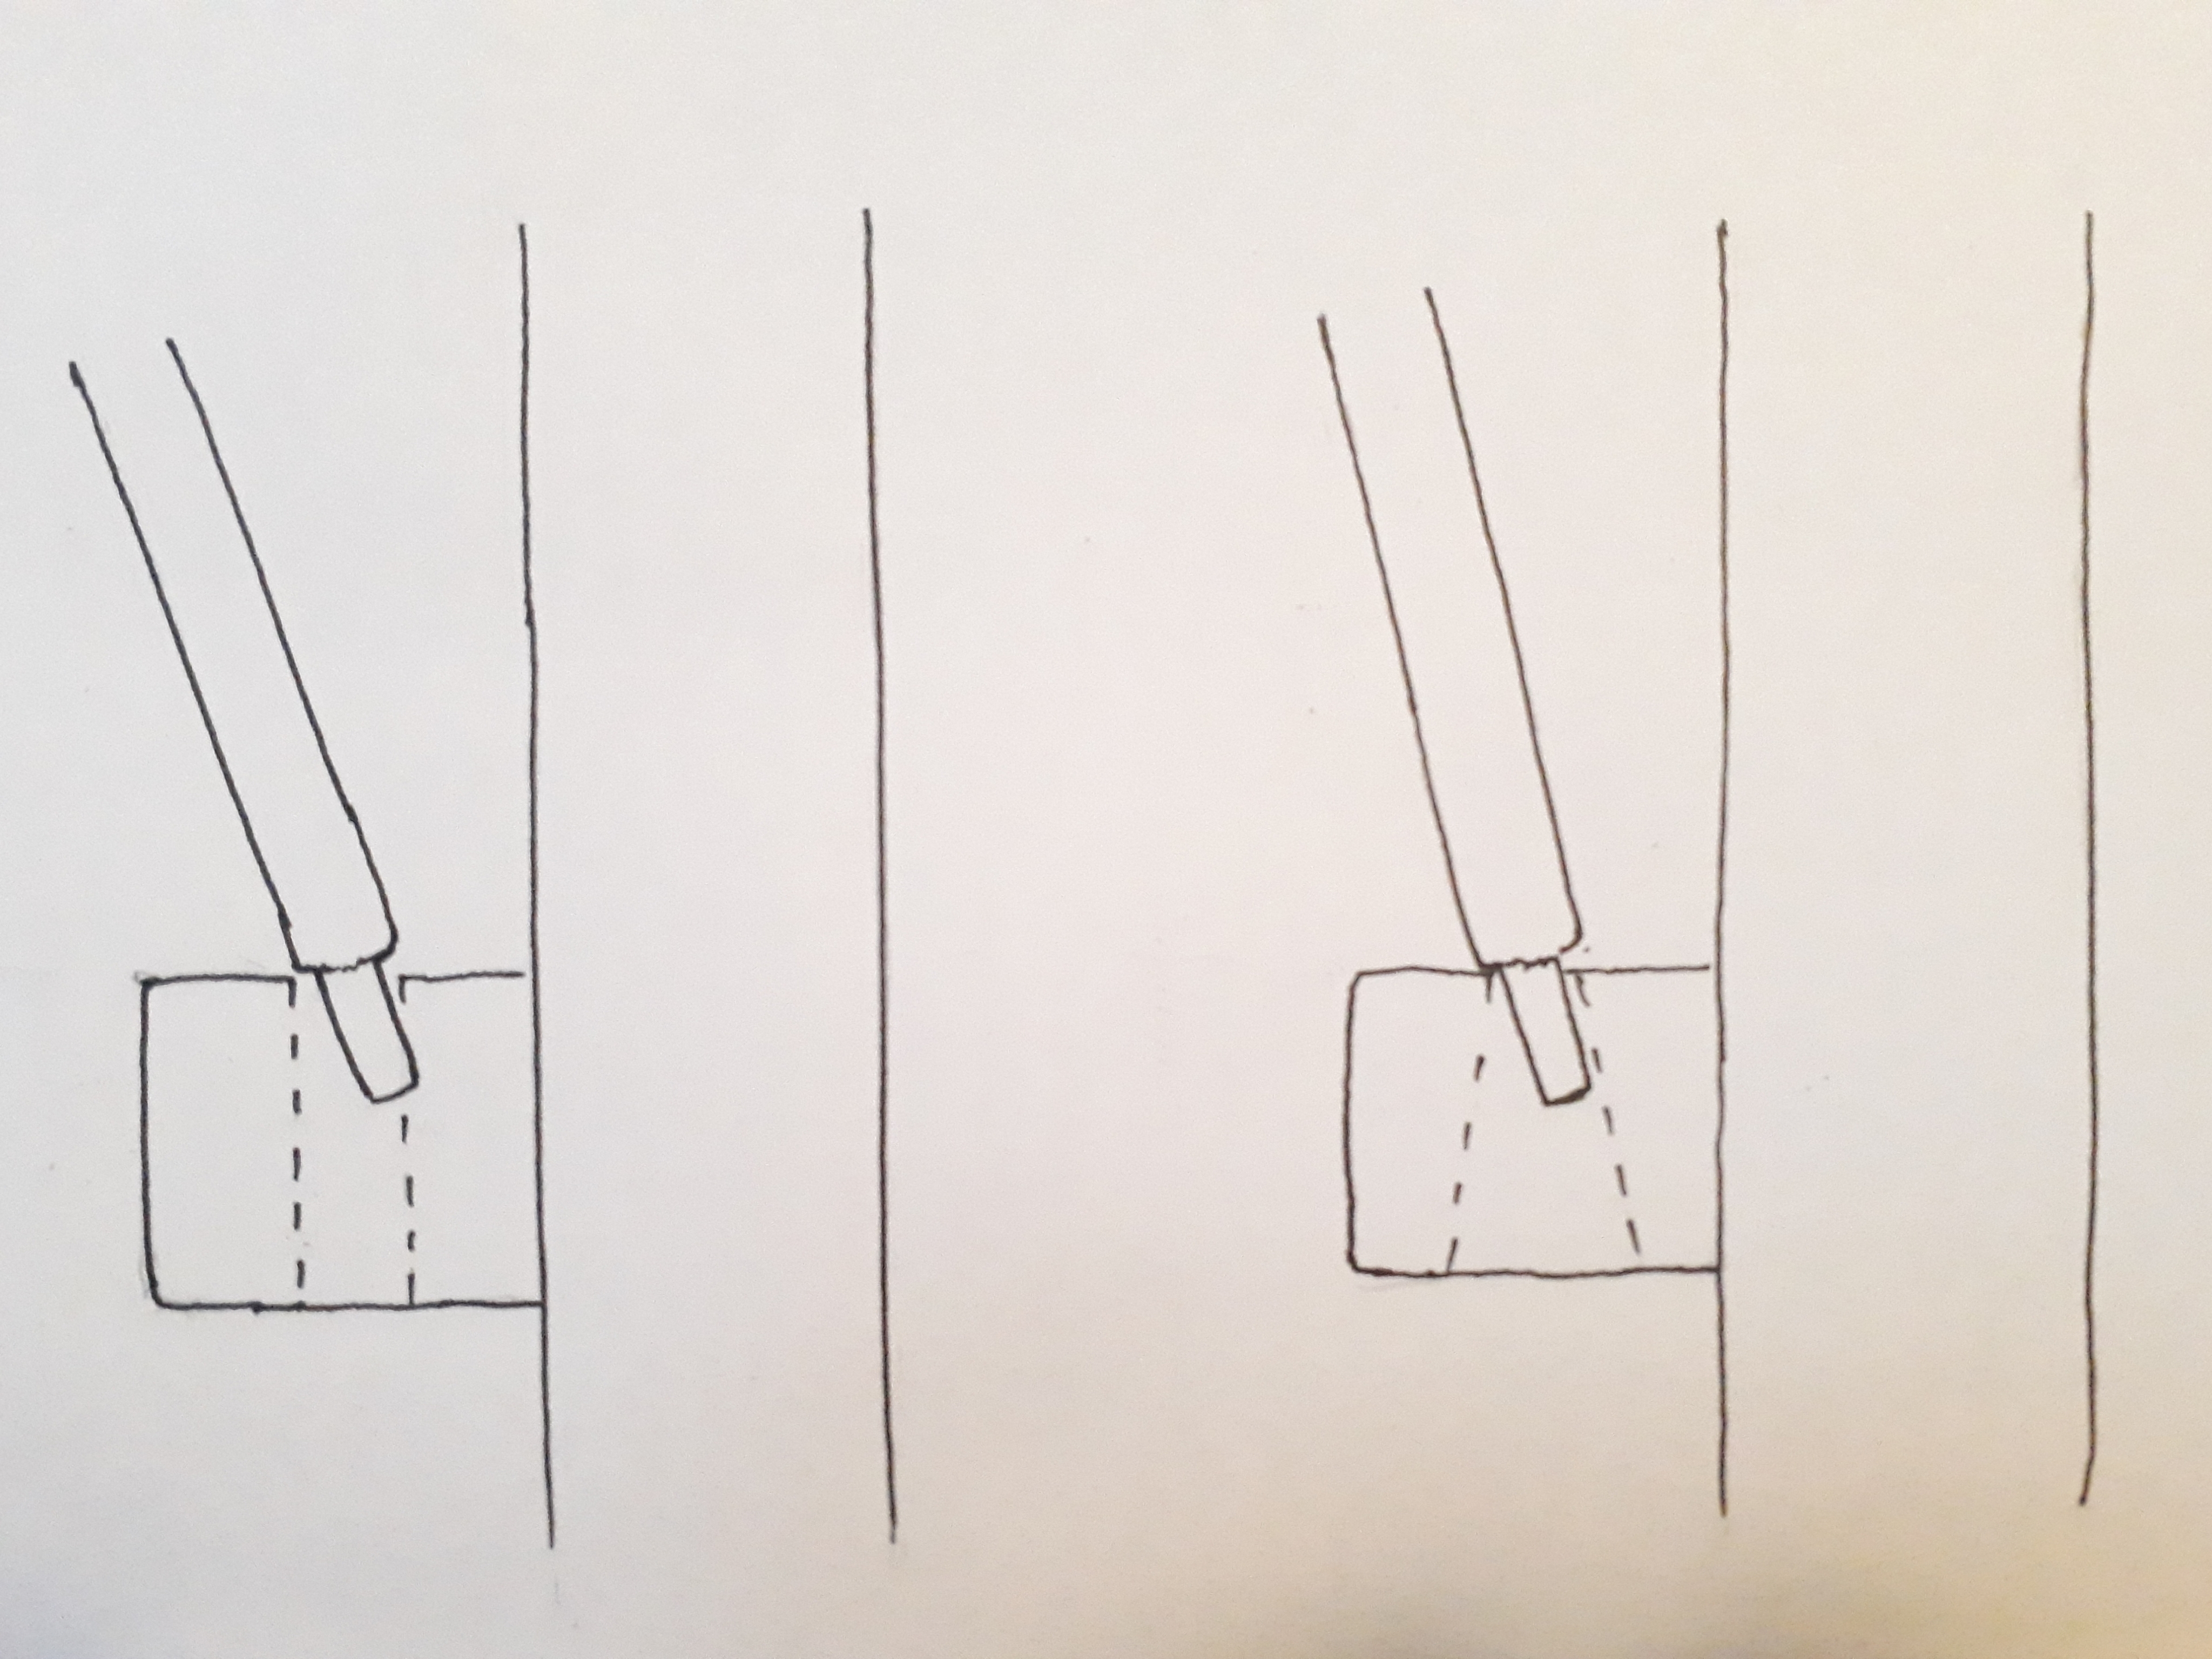
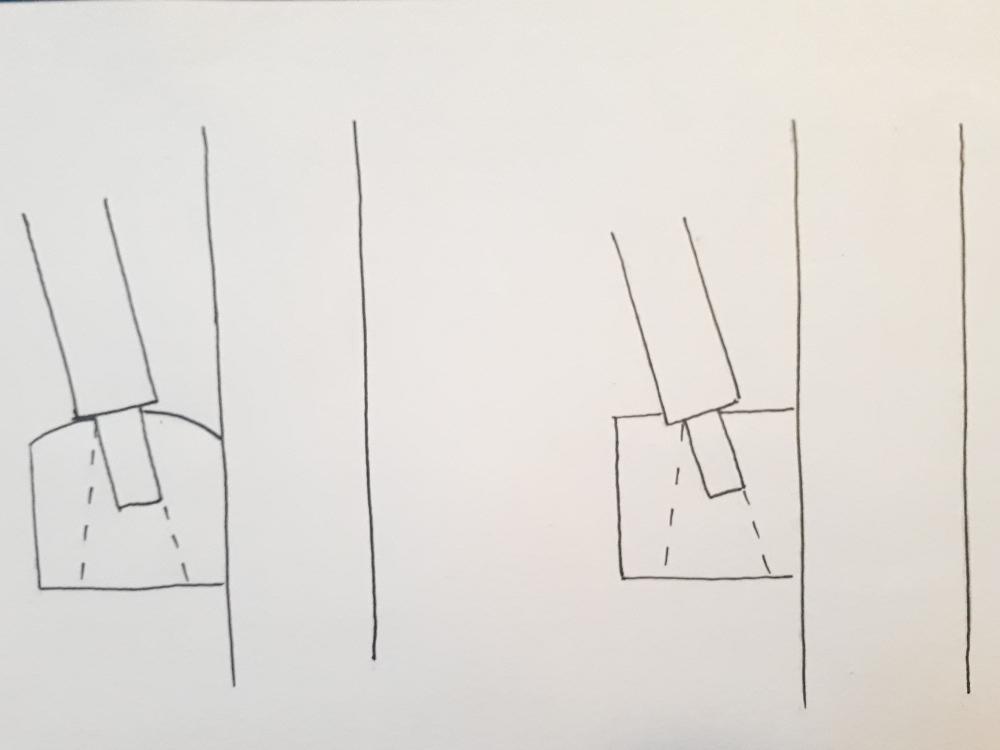
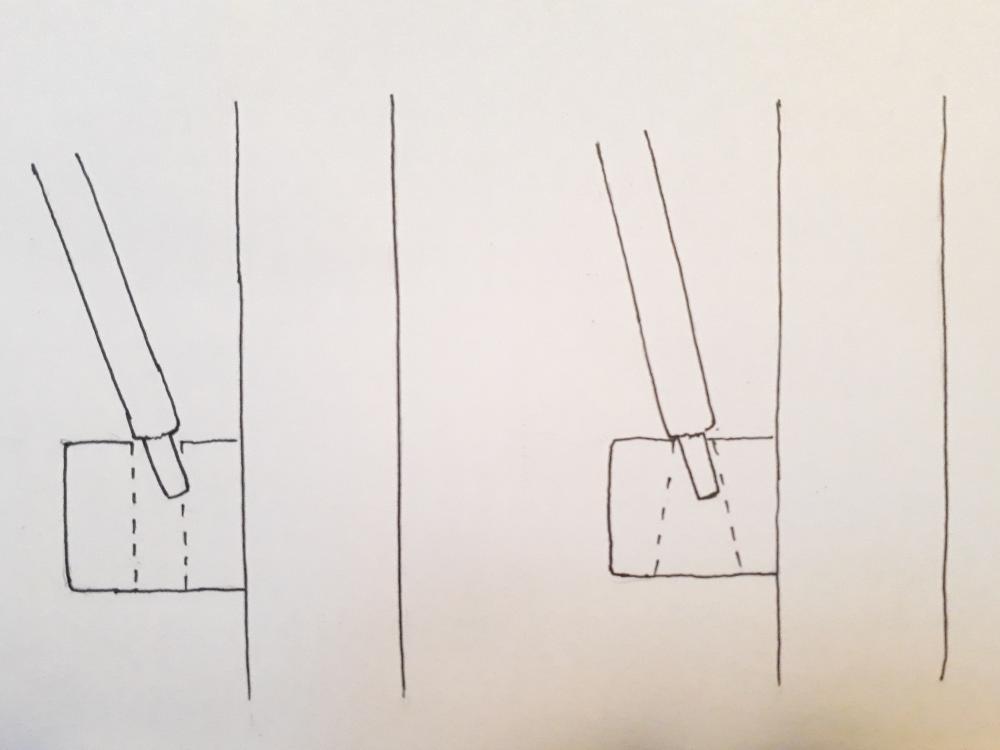
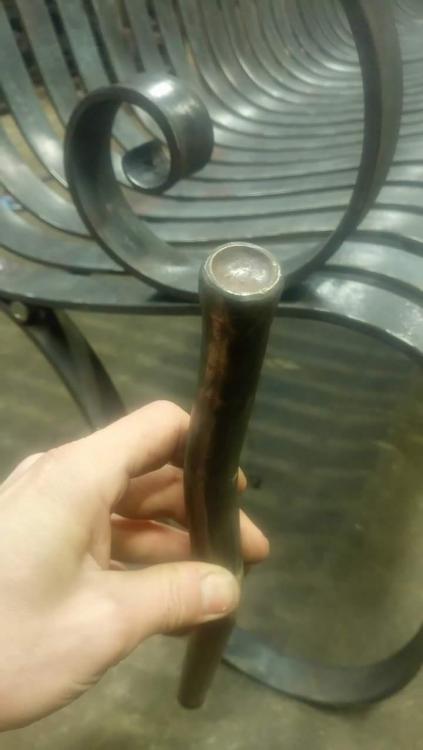
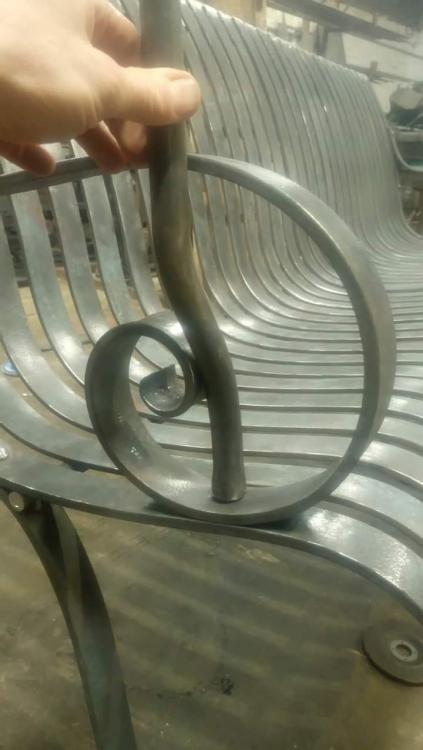
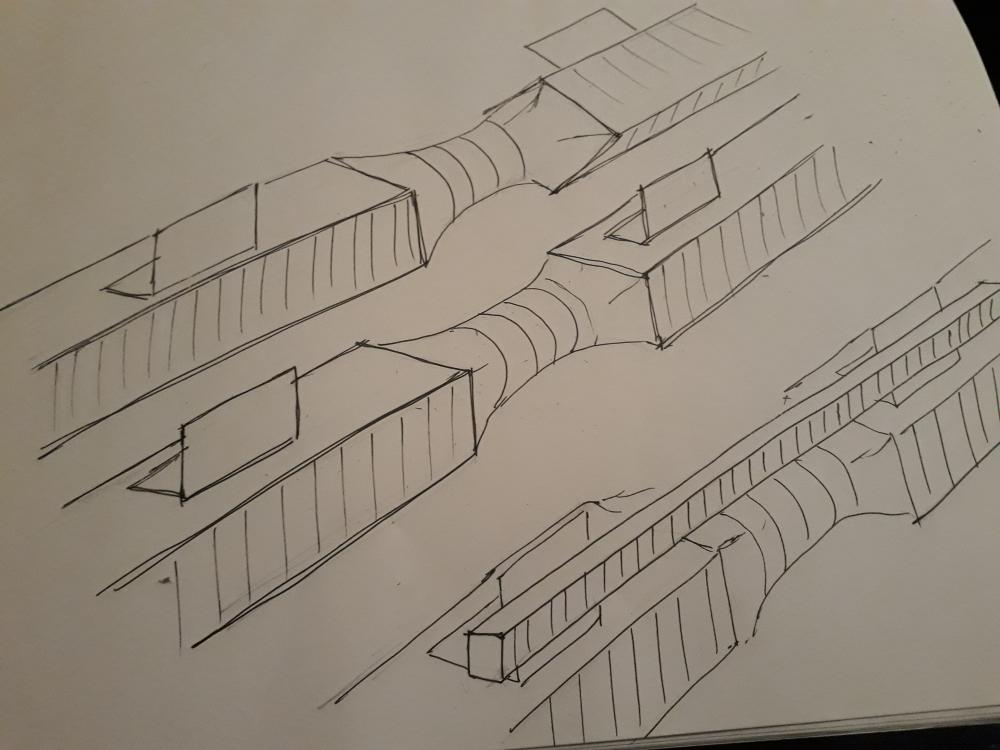
Hello folks, I have some questions relating to the ground level tenons & sockets on strap & journal gate hinges. I haven't used this type of hinge system before but am due to use it on some gates I'm making soon - close up from design attached. In the accompanying sketches I have exagerated the angle of the gate back stile for sake of explanation. Due to site circumstances the socket will not be independent & will be welded to the gate hanging post, meaning the only adjustibility will come from the top hinge. In the event of needing to adjust the gates angle it will cause the tenon in the socket to tilt. I want to avoid the tenon binding on the inside of the socket & also avoid the tenon shoulder binding on the top of the socket. Is it common practice for the holes in the sockets to be flared & the tops of the sockets to be rounded over? I could alternatively make the shoulders on the tenon rounded back & taper the tenon.
-
I'm shamefully lacking in technical knowledge about this sort of thing but I think Welsh dry steam coal from Ffos-y-fran is meant to be ok for forging. I tried some a while ago & if you look back in this UK section threads you'll find some discussions on it.
-
Not if you make sure they kick out a tad from below the bottom hole.
-
I have a local light gauge railway that I buy small size scrap track & spikes (dogs in the UK) from. At Christmas I made a few screw-to-the-wall bottle openers from some of the dogs. To my mind the dog heads have the defining character so my design keeps that intact. Bottle goes from angled to vertical in the opening process so no beer is spilled.
-
Meh, no one will notice :-P Two things that immediately come to my mind are that there's no swelling on bar No.2 and you can't see the setup from behind.
-
I was just about to say something very similar.
-
My first port of call would be a farm. In my area there's a farmers buying co-operative that sends out newsletters to its members - if you don't fancy walking up to a farmer's door then that may be a route?
-
That's an ambitious first project. Some sleepy thoughts after a night of insomnia... 1) Rivets. Buying 6mm shank rivets will save you a lot of time making them & they can be set cold. Edgeing section = 25 x 3mm flat stock. 2) 2mm sheet or max 3mm would be my guess. 3) Felt glued on? 4) Rivet head bolster(s), at least one for maintaining the rivet head shape on the outside. A cranked bolster for getting to the internal heads - no need to shape if then hidden by internal fabric lining. Cranked bolster example, WITH shaped head.
-
Ah ok, I see where you're coming from on both accounts now. I never actually explained that my rounded up section only needs to be about 75mm (3") long. I like the angle iron trick though for checking straightness. You even take that one step further & clamp a scrap piece of bar to the vertical face of the angle iron & assuming you clamp the 2nd piece of angle iron in the same spot on the other side of the rounded up section, when the piece of scrap bar hits the verical face of the angle iron on the other side you know you're back to even. Dubious doodle attached.
-
Sorry I'm not following you at all, but that may be the wine. I don't start with 1" round bar. My idea for making sure the two square sections of bar either side of the short round section are twisted back straight was going to be: Clamp flat bar to at least 1 face at a time & span it across the transition area. If the bar lays flat on both faces either side of the transition then it's twisted back straight.
-
Thanks for the input folks. Ah, now I get ya. Haha nope, just another quirk of being self taught & setting up my shop in way that feels comfortable. I think I'll stick to my current method & suffer the consequences of the twisting as it seems that to avoid it I've got to add in another stage or two, and doing so will take me just as long as it does to twist it back. One thing I like about using the spring swage from the start is that I'm guarenteed that the rounded up section is centralized with even shoulders all around. This part is the top hinge in a gate so the eveness of it is critical. My mind's been put at ease hearing that the twisting is a natural result of this tooling method, rather than me doing the method badly. I suppose that a spring swage doesn't close paralell, it closes at a slight arc & that'll affect the outcome. Same difference between leg vises & engineers' bench vises. Maybe in the future I should make a guillotine jig setup for my power hammer so that interchangeable dies will close straight. P.S nice transitions on your candleabra @anvil
-
My terminology isn't very good as I'm self taught - I'm assuming a Kiss Block is a generic term for a type of block? I can see the logic of forging to square before rounding up, but the result I have in my head from your description wouldn't give me a 1" square section that's centered, it would be bias towards one side of the bar, and I need the rounded up section to be centered. I guess I'm misunderstanding your description? The only way I can picture forging to square first (centred in the bar) is with another spring fuller that's got plain flat faces. Ideally I'd like to stick to just using the spring fuller I already have as I can forge that section round in 1 heat & the filing only took about a minute. However if adding extra steps are a better guarentee of straightness, then they're very welcome & appreciated!