EdCaffreyMS
Members
-
Joined
-
Last visited
Everything posted by EdCaffreyMS
-
I'll be there! Table O9. Right now I'm working like a mad man, trying to get everything done for the show. Within the next couple of days I'll have a preview page of the knives I have on my website. Once its up, I'll post a link. The Blade Show is always THE big event of the year. So much going on, and so many folks to visit with that by the time I get home, I need a couple of days off just to recoup.
-
Personally, for Bladesmithing, I think gas is the only way to go. I forged in coal for a number of years, and upon moving to Montana in the early 90s, I had a difficult time finding any sources of good forging coal that didn't require cross country shipping. After some trial and error I managed to build a propane forge that would weld. After the first couple of damascus billets I was thinking to myself "I wish I would have done this 10 years ago!" Much cleaner, far better control than I could ever achieve with coal, and in my situation, much more cost effective. I admit that there are times I do miss my coal forges, and even the smell of coal burning in the shop, however, since about 95% of my work consists of blades, when those times come I just place a small chunk of coal (leftovers from the coal forge days) at the front of the propane forge so I can have the smell of coal. :)
-
If your looking for them with the intended purpose of sharpening, I would recommend Norton Fine India stones. They are a man-made stone from Norton abrasives. I have never found the need for more than the Fine India stone for my sharpening needs in the shop. Some folks prefer water stones, which are available in a wide range of grit sizes and types. For field sharpening, I carry a DMT (Diamond machining technologies) sharpener that has a 400 grit diamond sharpener on one side, and a 600 grit on the other. It comes with a fold up handle that contains the stones for storage. Whats nice about the DMT is that when I'm out hunting, all it needs is a swish in any water, or even snow, and its good to go. Any of the above you can quickly find by doing a google search.
-
When I put a "name" on a knife, it is generally because the knife is a "special" one, and something that occurred during it's creation inspired me, either during the process of making the knife, or something that I've seen/done during its completion. For example, I have made Bowies that I've dubbed "Prairie Storm", because while completing it we had a huge storm taking place. Another I named "Wind Song" because while I was forging the blade, the wind was howling and whistling through the shop doors. Another one that comes to mind is "Ice Out", which had a blade of Mosaic Damascus that looked just like the ice on the river behind my shop, when it was breaking up in the spring. Even something as trivial as an emotion can induce a name.... on a whim I created a folder and carved the titanium handle to match the pattern in the damascus blade.....I called the knife "Impromptu". I'm working on a new folder design right now, and had a friend ask if I was going to name it. I told him that it was so new, that I hadn't thought about it.....until right then. The name of the newest folder model from me will be "Sonue" (So-New). If the knife is right, and the name matches it, that seems to give the knife a personality to people. If a particular knife becomes popular, its name will often become directly associated with yours......not a bad thing for a maker!
-
Hi Tom! Welcome tot he wonderful world of Bladesmithing! I won't go into what the other folks have already covered, but I will say that its always a learning experience. I've been at it for 25 years, and every day I walk through the shop door, I learn something new. I suppose thats why I've always remained excited about it. Working with carbon/alloy steels is a totally different animal if you've never done it. Each type has its own set of temp ranges for forging, and all the other steps involved. Its just a lot of fun. You should join in with us on Friday evenings at 10pm EST for the knife chat. Just go to the upper right hand corner of the forums page and click on "Chat", then type in a user name and your password. There are all levels of experience, and everyone is welcome to discuss knives and knifemaking. We generally go for about an hour, or until the conversation dies down. Its a great place to learn and interact with other makers.
-
Hi All! For some time now I have been getting the impression that during the Friday night knife chat time (10pm central time) that folks are expecting something along the lines of what Glenn does on Tuesday nights......a tutorial and/or a rigid subject type environment. I feel it is necessary to explain what my intent on the knife chat is. When I started the knife chat on my website, its intent was a place where knifemakers/bladesmiths could get together at an appointed time/place to exchange ideas, talk about subjects that folks might be having difficulties with, and maybe get some questions answered. Nothing rigidly structured, just makers talking about what they do, and exchanging information. When attendance out grew my website, Glenn offered to host the chat on IForgeIron, for which I'm very grateful. I count on those attending the chat to bring up issues/subjects that they might have on their mind(s). Like most of you, I have a lot of irons in the fire, and simply do not have the time to create tutorial type information every week. All I ask is that things are kept civil (which everyone does a wonderful job of) and that those in attendance get what they need. All in all, just informal and friendly. Sorry for being so long winded, but I just wanted to let everyone know what my expectations for the knife chat are. If your looking for good general information exchange, and seeking to solve problems concerning Bladesmithing, its the place to be.
-
I agree with Don. The use of a grinding jig is a VERY limiting thing when it comes to knifemaking. The use of a bench grinder might seem like a good idea, but as Don mentioned, it is intended for coarse work, and will force you to use the files anyway to clean up. Basically you'll just be adding one more step to the process with the bench grinder, and will actually be creating more work for yourself, rather than less. You also mentioned about not wanting to forge in the bevels....think about this: 10 mins of work at the forge can save 3-4X that amount of time when finishing.
-
My answer is GOOD lighting, and taking your time to visually inspect the blade as your grinding or hand sanding. Most of the time previous grit scratches do not become evident until you've gone to the next finer grit. When this occurs your generally forced to go back to the last grit used in order to remove the scratches, and then move forward again. This get very frustrating. When I say GOOD lighting, I also mean different types of lighting. Scratches that do not show up under florescent lights, will show up under halogen lights, likewise those that do not show up under halogen, will show up under another type of light such as sodium vapor or incandescent. I learned this hard lesson years ago when I got to a show and was taking my knives out of the case. At that time I had only florescent lights in the shop. The show hall had sodium vapor lighting. I was so embarrassed at some of the things I had missed, that I put three knives back in the case and never offered them for sale. When I returned home, the first thing I did was install several types of lights over the finish bench. It has made a huge difference. Its also a matter of training your eyes. The majority of students who come to my shop get frustrated because when they think their done hand finishing, I will take a sharpie marker and start marking the areas of the blade they need to work on. Most of the time the tell me that they cannot see anything, but by shifting the blade in the light, the "shadow scratches" become evident. Its all about patience, and knowing what to look for. When someone asks me how long hand finishing takes, I tell them "Sand until you think your done.....then sand 10 minutes more."
-
I keep the following grit sizes in the shop.... 50 grit (in either a blue zirconia or Norton "Blaze" which is ceramic) 120 grit 220 grit 400 grit 800 grit 1200 grit I also have various other belts that I consider "special purpose" such as scotchbrite belts in 2 different grades, a couple of cloth polishing belts, and a couple of 600 grit cork belts. Belts come with various backings, which equate to different levels of stiffness. The basics of belt backings are as follows: "Y" weight backing: heavy and very stiff, best used for flat or large contact wheel grinding "X" weight backing: slightly lighter than "Y" weight backings, stiff with limited flexibility "J" weight backing: thin, flexibly backing, generally available in 220 and finer grits. This backing can "roll" around contours and works well in tight radius applications and general finish work. There are also variants of these backings, especially on the newer belts like Norax belts. Belt grits and brands are like vehicles.....everybody has their favorite, and some seem to work better than others for specific applications and individuals.
-
Saturated solution..... mix it into distilled water until no more TSP will dissolve. All you need is a minute or two in this solution to neutralize the etchant. When the blade(s) come out, they will have a black "sludge" on them, this is the leftover etchant that has been neutralized. I usually go to the swarf bucket under the grinder, and scrub the blade with #0000 steel wool to clean all the sludge off, then clean it good with acetone, oil or wax it and your done.
-
I personally stamp all of the straight blades, and most of my folders have my name engraved on the inside of the backbar. Most folks who stamp their blades use one of two methods. They either hot stamp them just prior to hardening, or if stamping them in the annealed state, they use a press (usually a 12+ ton hydraulic jack setup as a small benchtop press). Either way requires a bit of finesse and trail/error. If stamping, a quality stamp is a must. Heny Evers corp out of Rhode Island is my personal choice. The cost for a quality stamp is about the same money as you will pay for an electro-etch setup, so its really a dealers choice kinda thing. While were on the subject of marking blades, do your self a favor and mark your blades in such a manner that anyone who sees the knife will know that YOU made it. Fancy logos, and weird symbols have no place on a knife in my opinion. The whole idea of marking a knife is so that its readily identifiable to anyone who sees it. Over the years I have had a number of people come into my shop with knives that had some obscure logo on it, asking if I knew who made it so they could order another knife from the maker....if they can't identify you, they can't find you, and that means they can't purchase/order another knife from you.
-
Just wanted to remind everyone that this coming Friday, Feb 1st, at 10pm eastern, 9pm central, 8pm mountain, and 7pm Pacific time we will be holding our first knife chat here at IforgeIron.com. Glenn has graciously allowed me to move the chat from my website to Iforgeiron. Bring your questions, thoughts, and ideas, and lets enjoy each other company. All of the general rules that apply to the regular Iforgeiron chat room will apply. Rather than waste the time on the chat, I thought I would give everyone a little background on myself here. I'm Ed Caffrey. I'm located in Great Falls, Montana, USA. I am an American Bladesmith Society Mastersmith (ABS), and have been a Bladesmith for 25 years, with the last four years being full-time, since my retirement from the US Air Force. I have taught Bladesmithing all over the US, Canada, and Europe. I have also been a judge for the American Bladesmith society at both the Journeyman smith, and the Mastersmith levels. Currently my passion is Mosaic Damascus, but I produce knives at all levels, both straight and folders. I thrive on sole-authorship, meaning that when you see one of my knives, everything to do with it has been accomplished by my hand. I am also a firm believer that sharing is the key to advancing our knifemaking skills. Each encounter with another maker opens new ideas and possibilities, and what better way to do that than a format such as the chat room, where folks for all over the world can participate! Look forward to visiting with all of you on Friday evenings!
-
After you've squared the stock, anneal it and then drill a 5/32" hole at each end of what will be the eye, taking great care to ensure that the holes are dead center on the bar, and straight through (if your off a few degrees the eye will come out crooked). The two 5/32" holes will be at each end of your hot cut, and will keep the tool cutting true through the steel. The two things that effect how well the hole will drift out is evenness of heat, and hammer control. If either side of the hole is even a little hotter than the other, it will bulge to that side. If you hit glancing blows, rather than straight impacts on the drift, that will push things off too. One final thought on drifting the eyes on hawks. Partially drift the eye, then finish forging out the head/blade, and complete the drift when your about 95% completed with forging. That way you don't stretch the eye and get it over sized by the time you done. For a number of years now, I have been making the bodies of my hawks from mild steel, and forge welding a high carbon bits into them. The reason I went this direction is that hawks tend to endure a LOT of abuse, and unless you differentially heat treat one made of total high carbon/ally steel, chances are you going to get it back sooner or later because of a failure.
-
Don't you just love it!! I'm convinced that there is no better grinder for the money on the market. A hint on the machine....make sure that the machine is set a such a height that when you stand in front of it, with our elbows loosely locked to your sides, the grinding area is right there....the worst thing you can do when grinding is having to reach up or down....no stability, and you'll constantly fight the machine. I love to see folks get themselves a good grinder. It will be the most used machine in your shop, and will offer more versatility than any other machine can.
-
Hi Glenn! I tried to upload the images to that gallery, but as before, I get warnings. It also tells me that there are 5 images in my qeue....not sure what thats all about. If you could help me out with this, I'd sure like to upload them to the gallery.
-
Hi All! I just finished putting up a page on my site previewing the knives I will have available at the ABS Expo in Reno, NV. on Jan 25-26. Please feel free to take a look, I hope to see you there! ABS Expo Preview
-
What is that I see written on that blade!!!!???? ::) Bill, Bill, Bill.....did somebody sneak into your shop and plant stainless seeds? :D Just kidding Bill....you know I'd have to give you grief over that. How thick were those Ti scales when you started out? I've tried texturing a few pieces that way and they always wind up warping so badly that I can never get then straight enough for scales. In fact I still have a set of scales that I did not long after Tom was over here.....what, two years ago or so, and they're still sitting in the same place. By the way, in spite of all my hassling you about the SS, that if a super looking folder....you have been working hard haven't you!?
-
After etching, it is important to neutralize the etchant. Use a solution of TSP (tri-sodium phosphate) which you can get at any local hardware store. (its sold mostly in granular form as a product to wash walls prior to painting). Mix it up with distilled water until the water will not dissolve any more. After etching, place the blade in the solution for a few minutes. Afterward, use some #0000 steel wool and water to scrub the "gunk" off the blade. Dry the blade completely. I personally use Mother's Caranuba Cleaner/wax to protect all my knives. There are also many type of oils you can use, but they required repeated application and are somewhat messy, and any oil will draw/hold dirt and grit. Stay away from products that contain silicon. Silicon will trap moisture, causing small rust spots to form, especially in humid climates. What I like about the waxes is that you can apply them to the entire knife, lightly buff them off by hand, and you have protection that is complete and last a very long time compared to oils. Over the years I have tried many products to protect blades, but I always keep coming back to the Mother's wax. It can be found at most Walmarts, and places like Checker or Autozone. It's about $10 a can, and a can will last a LONG TIME.
-
Be aware... over the last couple of years there have been some problems with 1095 steel, due to the specs being widened on it. What does this mean? It means that in order to make production easier and cheaper, the steel companies are not holding as tight tolerances on the elemental makeup of the steel as they used to. About two years ago I started getting emails and phone calls from folks telling me that they could not get their 1095 blades to harden. After some investigation, I discovered that due to some tolerance changes, SOME batches of 1095 will give you less than one second to harden them....meaning that its physically impossible to achieve. Theres no way to ensure that you get the "good" 1095, which in turn means that you may be able to harden one batch, and then the next order you get, you might not be able to harden it. Personally, I have stopped using 1095, because I don't have the time to reinvent my heat treating process with each new batch of steel. Be careful of files too. Years ago you could just about count on a file being made of 1095, but today, about the only way you can be reasonably sure is to use a Nicholson file. Their standard files are still made of 1095, and their Black Diamond variety contains the same elemental makeup as 1095, with the exception of the carbon content, which is 1.27%. Most other files these days are case hardened. Meaning they only have about .005-.015 hard surfaces. If you try to forge a blade from one of these, it will not harden, and all you end up with is some forging practice.
-
Thats a question that I asked early on with the material. Nobody has ever given me what I consider a valid answer. I had a couple of pieces analyzed, and the list of elements it contained was long, including titanium, aluminum, chromium, and a number of others. The reason I got interested in finding out what it contained was due to a project I was working on that required mild steel. I had forged a tenon on a piece, then cooled it in the slack tub so I could work on the other end. I noticed that the scale had blown off in several places, and upon examining the bar, the shapes of the hardened areas looked familiar.... a couple looked like screw shapes, and one looked like a coil spring. Thats when I decided to send it off for analysis. Talking with some of my contacts in the steel producing arena afterwards, I was told that the only spec on the steel was 36,000psi tensile strength, and that it could contain just about anything...which is what the analysis showed. Over the past few years, many of the old concepts we as Blacksmiths/Bladesmiths have had about steel, have gone out the window. I've learned that even asking for a spec sheet with your steel order doesn't always mean anything, as I have been sent spec sheets that were photocopied out of books, and upon having samples tested, the spec sheets did not match the test results. One example is 1095, a steel that I used to trust and use a lot. A few years ago I noticed the specs started to creep wider and wider, and then I started getting emails and phone calls from newer Bladesmiths who could not get blades made of 1095 to harden. What I found was, due to the specs widening, the time/temp curve was a variable from batch to batch, depending on a specific element's content. In some cases the quench time was less than 1 second! Thats physically impossible in most small shops. Some still fight the battle, trying different techniques, and re-inventing their heat treating process with each new batch of steel, but for me it was a waste of time, material, and effort. I no longer use that particular grade of steel. Another example is that one NW steel supplier advertised 52100 in flat stock. Now unless someone purchases 52100, then rolls/forges it flat, your not going to get it in that configuration. (52100 is only produced in round stock) I purchased one 36" length, and when it arrived I started forging. I've forge a good amount of 52100, and this stuff was totally different under the hammer. I forged two "test" blades, heat treated as I would 52100, and then began testing it. As a general rule, I can make a 52100 blade flex to 90 degrees without cracking/breaking. These blades literally shattered at about 30 degrees of flex. I sent samples off for testing, and they came back as O-1! When I called the dealer where I had purchased the steel and confronted them about it, I was told "Its close enough that we can call it 52100." WHAT???? Needless to say, I no longer do business with that distributor. The whole point is that many of the things we knew/trusted, and took for granted with steels, may no longer valid. Competition from foreign steel sources (who sometimes introduce substandard products) have forced the US steel industry to change in order to compete. That, in turn has a trickle down effect on the small end user. Its not that big of a deal with making ornamental items, but it has a huge impact on those who must heat treat their products. Its just something that we need to be aware of, and that we will have to deal with. My only intent posting this information is to make those who might not be aware, that these circumstances do exist, and to hopefully help avoid them.
-
Quenchcrack, I wasn't dogging you, or our steel companies, just trying to get the point across that everyone needs to be fully aware of what their buying as far as steel goes, and also to understand that if you walk into an establishment and ask for "mild steel" your gona get A-36. Most of the folks who have been around Blacksmithing/Blademsithing for a number of years can remember when "mild steel" meant 1018 without any question. When the change to A-36 took place it was something that was not made well known. Even the distributors that I deal/dealt with did not know of the change until customers started asking questions/complaining. Where it used to be safe to request "mild steel" and know you'd be getting 1018, it is now necessary to specifically request 1018 steel, and as you pointed out the cost is significantly higher. As for my comment about throwing scrap in and seeing what comes out, that was over simplified in hopes that everyone would get the idea of what I was talking about. The main thing that frustrates me is the widening of the specs on various steels. The spec sheets I have from way back versus those I have from more recent times, as well as conversations with various contacts within the steel companies, proves that. I honestly did not think much of it prior to having some specific grades of steel, that I had used for many years, give some very abnormal results during/after forging and heat treating. When I eliminated all the variables in my shop, I started looking into the steels, and found what I wrote in my previous post. I have no doubt that our production capabilities are the best in the world, but due to the import of substandard foreign steels, it has forced US steel makers to cut some corners in order to compete. Those are not my words, but those of Marketing VPs that I know from two different steel companies. Again, thats not dogging them or any steel company, its just something that we as end users have to realize and adapt to.
-
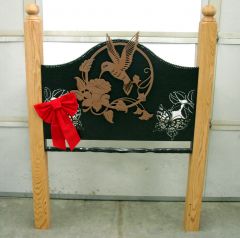 This is a headboard that I built for my Mom for Christmas. We lost my Dad in August, and Mom came to live with us in early December. Its going to be a difficult Christmas at our house, but hopefully this will brighten my Mom's spirits. It really was fairly easy to make. Just a lot of plasma cutting. The rope twist that outlines the top was about the most difficult aspect of it. The Hummingbird was cut out separately, and then using 3/8" round stock, I built 1/2" tall standoffs, and mounted it for a 3D effect.
 -
This is certainly not something I would recommend doing to a knife blade. For knives the best thing I've found is just a good coat of caranuba automotive paste wax. Put it on just like you would a vehicle. For ornamental ironwork, I use a mixture of canning wax, beeswax, japan drier, and turpentine. As has been mentioned, the key is to heat the object your coating, generally to a "black heat", then wipe the mixture on. The liquid portions of the mix will be evaporated, leave a fine, even coat of the solids to protect your work.
-
A very similar question was recently asked on my forum. Heres a link to that conversation... The Knife Network Forums : Knife Discussions If your going to purchase a "good" 2x72 grinder, I wouldn't recommend either of those two machines. Both are very limited in what they can do compared to the KMG or Bader style machines. When you pay the money for a top end grinder, what your paying for is the precision and versatility. Either of those two machine will seem wonderful at first, then they will start nagging you what may seem like "small" problems such as belt tracking, smoothness, and limited versatility. After a while you will get fed up with the issues, spend money to try to make them work better (which never works out), and then eventually you'll be looking to purchase a "better" machine. If at all possible, I would highly encourage you to save some more money, and buy a KMG right off the bat. Its going to make your grinds better, and therefore you overall knives better. With only routine maintenance, it will last you a lifetime, and provide you nearly unlimited expansion opportunities. It boils down to the old saying...."Pay me now, or pay me later". Eventually, if you continue making knives, your going to want a "good" grinder, so why not skip handicapping yourself and get the best you can to begin with? In this case, the tool really does improve the finished product.
-
yes, "hot" or "cold" rolled only refers to the methodology used to bring the bars to a specific size. Hot roll will be covered in mill scale, and generally is nominal in size, where as cold rolled is clean and will be very close to the specified size. Check closely! Even most cold rolled now a days is A-36! Its not safe to assume anything with steel, until you check it out. Even the "standards" for well know steels such as the 10XX series have been "stretched" recently. This is all due to the fact that there is very little, if any "new" steel being produced in this country. The vast majority of the steel today is recycled. Which means they try to segregate scrap as well as they can, then throw it into a crucible, melt it down, and then test it to see what it comes closest to matching. That is over simplified, but you see what I mean. I have data sheets on steel from 15-20 years ago, and when compared to recent data sheets for the same type of steel, most of the elemental specifications have widened by as much as 10-25 points. Thats significant! And it can cause a lot of problems with heat treating. We as Blacksmiths/Bladesmiths are such a small percentage of steel buyers that most of the steel companies consider us insignificant, and therefore don't pay much attention to our needs/wants. (don't laugh, thats almost a word for word quote that I got when discussing this very thing with a couple of steel company sales reps.) Sorry, I got a little off subject there, but its something that folks need to be aware of. The best thing that any beginner can do, is to educate themselves on steel. The types, the uses, and finally if your going to forge, it is very helpful if you understand the elements that steels can contain, and what those elements impart alone, and in conjunction with other elements to the given steel. I have a chart on my site that lists elements, and how they effect steel. Your more than welcome to look at it, and/or copy it for your own use.