

cal-k
-
Posts
79 -
Joined
-
Last visited
-
"I'm testing a knife, the whole knife, made the way I make knives." Ah, fair enough! Thanks for clearing up my confusion.
-
"I'm not making a test knife - I'm making a knife that will be tested" I understood that you weren't actually going to take the test, but you are going to test it yourself (as the quote says). That means it will very likely be damaged, perhaps to the point of making it 'useless'. Personally, I wouldn't spend that much time and effort on a knife that I know is going to be destructively tested, especially since I know nobody else needs to look at the blade. If it's purely for testing forging and heat treatment skills, I'd only go to 400grit, and slab handles, anything else seems to be wasted effort. I guess I'm trying to say: If you know you can make a great looking blade, why don't you save the extra time and effort spent on the test knife for another Knife that won't be tested? I'd be interested in the long version, but only if you don't mind! Thanks,
-
First of all, a big thanks for putting this up. Your work seems to be at about my level, so this knife is truly inspirational. Second,its nice to see your jigs, work progress, and attention to detail; gave me many new ideas to try. Finally, the JS test is destructive...so why would you put this much work into something that will be 'destroyed'? It would make more sense to make a blade that passes the test with just a basic handle, and not as high a finish. Just read an article off of the ABS website about the JS test, a quote: "The applicant’s test knife. No special handle or finish is required. This is a test of performance, and the test knife will ultimately be destroyed during the testing process." http://www.americanbladesmith.com/uploads/file/Testing/JS%20Test%20FINAL%204-24-2010.pdf You put so much work into getting the fit and finish right, but it can't be used as one of the 5 blades for the Show Judging Panel, because of the rough surface on the spine. "The by-word here is CLEAN! By that, I mean all of the lines should flow properly, blades should be straight, and your finishes should be as impeccable as you can make them. " http://www.americanbladesmith.com/index.php?section=pages&id=172 Also wonder why you chose a pinned blind tang. It obviously fits the style of handle, no question there; but if this blade undergoes the bend test I would be concerned about it. From a pdf Ed Caffrey wrote: "Remember that you may use either a full or hidden tang blade for the JS test, but for safety sake, I recommend forging a full tang unless you feel supremely confident that you can make a hidden tang that will pass the bend test." "The test blade is not required to be a fully finished piece, and therefore guard and bolster are not necessary. A couple of tips that will help with the bending test are...: 1. Choose some type of micarta or phenolic for the handle slabs. Both of these materials are very tough, and will lend support to the tang area during the bending phase of the test. 2. DO NOT use large handle bolts that force you to drill large holes in the tang! This will only serve to weaken the tang, and could cost you dearly during the test. I suggest holding the handle material in place with epoxy, and at the maximum, a couple of 1/8" pins. Maybe even just a couple of 1/8" brass pins that are piened to hold the handles." http://www.knifenetwork.com/workshop/tut_smithtest_caffrey.shtml (I realize its about a knife out of 5160, but given he's an MS, I'd apply this advice to every knife...) I think your blade is great, I wish I had the time and patience to pay that much attention to detail, and would love to own it, this is just 'Food for Thought...' (Oh and a quick way to re-size the rod: Just a steel plate with the correct size hole drilled in it, hammer the pin through, the sharp edges of the hole should scrape off the excess diameter)
-
Very nice combination of pitted blades and wrapped handles. Love the look, and the blade design meshes perfectly with it. Definitely gonna give this a shot myself.
-
Brilliant brainwave on the grips there, look very technical.
-
Hmm nice blade, but I'd loose the ring too; the colour and shape don't fit. (IMHO) Maybe replace it with a non-round loop in black. Deeply etched trapezoid?
-
Yet another guy showing off some knives he made
cal-k replied to Brasilikilt's topic in Knife Making
Nice work with the pewter on the third. Like how it's run down into the handle, bit like water frozen in place. Did you use nails/screw/etc to anchor the pewter? -
Get a couple really cheap folders, with different mechanisms. Take them apart and study the lock, should give you a real good idea of what is needed to make each type. Most will take a fair bit of fiddling, filing, fitting, and time to get it just right.
-
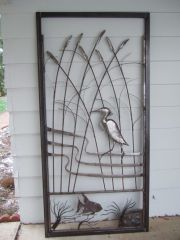 Spectacular! Love the heron and reeds. Is it good on both sides?
 -
Metal Suppy in Ontario
cal-k replied to cal-k's topic in Ontario Artisan Blacksmiths Association (OABA)
emailed Resource Metals, they said they could get 1080 no problem... this is the fella i mailed: Jason Bell <jason@resourcemetals.ca> hmm, being a student, price is usually an issue, but thanks anyways. If i recall properly, bandsaw blades from sawmill are likely L6, right? could get my hands on that... thanks -
hello folks, been a while since i've posted here. I'm looking to start working with damascus, have made a piece using 5160 and mild, but when I etched there wasn't much difference. so, i started looking round IFI for what to use, came up with a combo of 1080 and 15n20. lotta people saying its good steel for knives, fairly easily forged, and has a very obvious pattern. I'm in flamborough, part of Hamilton, called a number of steel supply places that I know of...none have come back with 15n20, 1080 isn't a problem. so... do any of you know where i can get 15n20, or a different combination that would make a good start? Maybe a list of steel supply places, i could have missed some? I'd drive max an hour(one way) for steel, or could pick it up at A+H custom machine in Burlington. thanks
-
Used it for pins before. Got a whole bunch from two boxsprings, but the spring is almost two hard for what i'll be doing, might work nice for the inside of folding knives....
-
have a picture here of the hitler youth knife... thought the same thing when i saw it, but maybe just the same style
-
ok, had another night of forging, and I decided to just try a separate piece, to see if I could get a weld in ideal circumstances. I forged out a peice of the torsion bar into flatbar, and gave it slight convex face, so that the slag/flux could leave easy. Low light (nighttime), heated anvil, added borax at red, nice bright Yellow no sparks, just tapping the piece together, ...nothing. Not even sticky. At this point I decided that it's probably not my technique so much, as the steel itself. Got lots of practice shaping though, ready for the next one. I agree with the people who have cast doubt on my plan of how to form this Ice Axe, it would be better to do differently. I figured that if I split the rod down the center(1) and used one side for the head, and then upset the other side for the adze,(2) where the actual split would occur would be a bit of a mess with both arms running on a curve into the shaft(3). However, if I try using a sort of triangular drift after punching a hole, like fciron says, I might be able to pull off(4). Do you folks think it's possible to more the metal from the shaft up to the top of the head like that? I've never tried anything like that... Thanks to all the helpful people! Ice Axe.bmp
-
Thank you MattBower, I feel like you're one of the only ones who actually read both entire posts, instead of just assuming I have a deathwish. I have worked with 5160 for a number of my blades, but it just didn't feel like the same kind of steel. Maybe it's just me. Junkyard rules, I wouldn't be surprised if there is other 'stuff' in there. ironstein: Thanks, thats probably a big part of the problem, I was working outside in the Canadian winter, that probably didn't help. chichi: In the books I've read "sparks scream weld me". Obviously books are not a substitute for experience, so I'll try a different less subjective way of telling heat than colour next time. it wasn't sparking like nuts or on the anvil, just a bit in the fire. Francis Cole: Not even going to try fore welding stainless, from what posts, tutorials etc. I have seen it is way out of my range. Something else I read, it said it had to be a reducing fire. Is there any hard and fast way of telling for sure if it is reducing? Thanks