
Gundog48
-
Posts
283 -
Joined
-
Last visited
Content Type
Profiles
Forums
Articles
Gallery
Downloads
Events
Everything posted by Gundog48
-
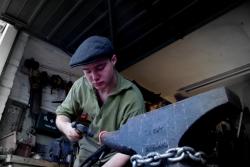
I've been away from the forge for the last couple of weeks and was happy to get some time to do some forging today. For some reason I felt inclined to have a shot at a double bit axe so I did! I forged this out of two leaf springs (assuming 5160) which I welded together to form the two blades. As I don't have any fancy slitting and drifting tooling yet, or even a mandrel, I just wrapped the middle around a piece of rod. It's just as good as it will naturally form an oval shape, but you have to be very careful not to close it up which made it almost impossible to do any cleaning up after it was welded. I'm pretty happy with it, everything is straight for a change and I was quite pleased with how the curves are consistent. I'd have liked to have left a few less hammer marks, although I quite like rough finishes. I managed to keep both blades roughly the same size and shape which was where I thought I'd run into trouble. One edge is sharpened like a knife for stripping bark or general woodwork, the other has a much steeper bevel for rough work like splitting. Quenched in veg oil, tempered brown. I think I'll do some more work on axes! I like the fact that they are forge finished with only a little grinding on the bevels. Without a belt grinder, knives take me ages and I don't have a whole lot of time, I think I've only ever finished two knives, once I put a handle on this one it'll be my 3rd finished axe. I'm pleased with the fact I'm getting a lot faster at forging. A while ago, this would have taken days, which means weeks when you can only work at the weekends. I should really forge myself a mandrel and proper slitting and drifting tools! I also forged this 'Urak-Hai' letter opener for a friend. I'm doing a fantasy exchange with a guy from Portugal which normally means giving books or other gifts. I thought I'd make this to go along with it! It was actually surprisingly difficult to get the bit at the top right, at first I thought I'd just turn a right angle, quickly realised that wouldn't work! I wanted to go for a completely blackened finish, but I hardened and tempered it properly so I didn't want to ruin the temper by heating and quenching again after sharpening. I'll be wrapping a little thread around the handle to finish it off I think! Had some fun with this!
-
Thanks for that info, so am I to assume that lost wax is almost always done in a plaster mold as opposed to setting it in petrobond or sand? I always do my research, but I was under the assumption that I'd be doing this project under the supervision of someone who knows what they are doing. From what I've read here, my teacher has gotten a lot wrong and I can only conclude that he is experimenting as well, but he is sure in his methods and doesn't want to learn himself. I'm going to have to look carefully at how I approach this. The issue here is that I can do it at school where we have full extraction, a specialised casting area under the guidance of someone who clearly isn't an expert but probably knows more than I do. However, to do this, I need to convince my teacher that the method he has in mind won't work and is dangerous. My original suggestion was to do a two-part mold in petrobond, however he was dead against that as the shape is supposedly too complex and I'm pretty sure he won't let me try. The alternative is to get my foundry at home set up and working, in which case I have a steep learning curve in order to get myself knowledgeable enough to do this safely in a short space of time. I'm always very careful, but I'm a newcomer to foundry work so there is a potential to do something wrong. Neither is ideal, and it's a frustrating situation considering my school has such excellent equipment and everything I need, but I'm not going to be allowed to do it the way that many here are recommending and I'm being encouraged to do something which everyone here has said is dangerous.
-
Thanks, I'm going to have to put my foot down on this one, it's clearly very dangerous and the worst thing is he doesn't realise it and could try it with another student. I've done a fair bit of research but I'm still learning. Basically, I need to get him to trust me enough to let me do a two part mold against his advice. If I am forced to go down the lost wax route, is there an effective way of burning wax out of petrobond?
-
Thanks again! I'm talking about pottery clay, I was thinking That once I had it to shape I could fire it. For the time being, I will only need to cast one of these for the project, but I'd like to do them in multiples some time in the future, but the real priority is getting a single good casting done. I'm not going to widen the base because I want to keep it simple for the project, I've learned that's the best way when it comes to these projects as you get little time and you won't loose marks for doing simple designs, as long as they are well executed. It's frustrating because the technicians tend to faff around and take it incredibly slow as if we have ages on the project, when in fact we only have a few weeks. The issue is that my teacher believes the method we mentioned will not work and probably won't let me do it which is incredibly frustrating! That and the fact he's convinced it's best to leave the wax in means I should really hurry up and get my own foundry set up!
-
Wow, that's beautiful work you did there! Bear in mind that this is very small, only 5" long from horn to tail! I thought that idea regarding the wax sounded like a horrible idea, now I have to convince him that it's better to burn it out beforehand which will be no easy feat. The original plan was a 2 part sand mold, but apparently I'd need to cut the model in half which would reduce the width too much. I don't see why I can't set it half way down in the drag, then pack the cope on top and do it that way. However, my teacher is convinced that it would not be a good way of doing it and that an investment casting is the only way. I think you can see why I'm eager to get my own foundry! I agree with your concern at using plaster as a wax mold, although I've seen it done before where they soaked it beforehand. Do you think modelling clay would work, perhaps left unfired? I'll have an experiment in the morning and see how it goes. Any idea on using a type of plaster as the mould for the metal? It's probably what I would choose if I was casting at home, partly because it would be easier to burn the wax out, but I don't imagine everyday plaster is what they have in mind!
-
After doing a rather large aluminium casting for my last school project, I'm afraid to say that I've caught the bug. This next project is a promotional product for which I intend to cast an anvil-shaped paperweight. I've made an MDF blank like the one pictured, but I'ts since had it's shape refined and been sealed. I intend to cast it using the lost wax process. After getting interested in foundry work, I'm working on my own furnace at home which I hope to have done in time for this product. If I don't get it done in time I'll be limited to casting it from aluminium when I'd really like to do it from brass. This is due to a number of health and safety reasons and limitations of their furnace. Anyway, this is my plan so far: Create a two part mold of the anvil from plaster by putting it half way into a piece of clay, adding a few dents so it'll line up, add the sprue, plaster over the blank, wait for it to harden, pop it out, put it into the plaster half and remove the clay, then plaster the second half With my plaster mold created, I'll 'cast' the wax by melting and pouring. I know how much wax likes to shrink, any suggestions as to what to do about this With the wax investment done, I now have two options. I can either put in into a sand mold, or plaster over it. I'd be interested in using plaster, any comments on this or advise on what plaster to go for? This is where I'd heat it up and pour the wax out, however my teacher assures me that this is not necessary as the molten metal will simply melt and 'push' the wax out. Now to me, it sounds like bad practice, but he has a lot more experience than me and has done it in the past, so I didn't say anything. Any opinions on this? I can see how it may be difficult to melt the wax out of a large sand mold, but a plaster one should be quite easy With the metal poured, it's just a case of cutting off the sprue and riser then finishing and polishing which I think I'm okay with! I'd appreciate your opinion on my current plan and any advice you give me. As much as I respect and value the input of my teacher, he is not an expert metal caster, but a technician who has to deal with just about everything from woodwork to laser cutters. I know you guys have a lot of practical knowledge of casting and you may be able to help me out! But generally, I'm quite looking forward to more casting in the future and my main priority is on keeping it safe and having some fun along the way!
-
[Video] Forging a Small Bearded Axe
Gundog48 replied to Gundog48's topic in Axes, Hatchets, Hawks, Choppers, etc
Thanks for the input guys! I've never seen those chain vice grips before, they look incredibly useful, I'll have to check them out! The real issue was trying to grip it so it was half off the anvil, making my usual hold-down methods useless. I think either a helper or a special pair of tongs to grip hammer heads tightly would be in order. Thanks for the advice Owen. I do normally wear a long sleeved shirt when forge welding, I'll be sure to make myself wear the gloves next time too, I find they make me a lot more clumsy, and I seem to be doing a good enough job of that as it is! But I guess it's much better than what could happen if I don't wear them. I'm going to do some quench tests on the spike I cut off. Hopefully it hardens in oil, if not we'll see about a water or superquench. I haven't come back to finish it off, I have a terrible habit at the moment of jumping between projects, which is why I'm doing a lot of forge-finish ornamental stuff right now. I've got to straighten the blade a bit and probably a few passes with the flatter, then I'll test the piece I cut off and see where I go from there. -
I've seen an anvil sculpture on the Internet and was interested in replicating a small version of it. I'm hoping to go for a paperweight-sized thing. This one created by Willway Forge is supposedly strong enough to be fully functional. My plan would be to make a mold to 'pour' the parts into to give the parts their shape. That shouldn't be a problem. What's got me stuck right now is how to join the parts together in a way that won't be visible. I'm not worried about making it solid enough to use, but I want to be solid and look good. The only way I can think of is to mix all the parts together with resin before fitting it into the mold, but I'd imagine that wouldn't look too nice. Any suggestions?
-
I'm making an anvil bridge tool from a piece of 5160 to sit in the hardy. How far should I temper it? Obviously I don't want it to bend with use, but hammering in the middle of the bridge would be likely to cause cracking if it was too hard. Any suggestions? I'd imagine it wants to be a bit softer than an anvil face.
-
What would it cost????
Gundog48 replied to VaughnT's topic in Smelting, Melting, Foundry, and Casting
I was thinking ring gear. Perhaps it could even be possible to cut a ring gear if it's too big and forge it around something of a suitable size and weld back up. Bit of a long shot but it could be done. -
Easy (?) question -- good bit material?
Gundog48 replied to Blackcat's topic in Axes, Hatchets, Hawks, Choppers, etc
I'd say that 5160 is pretty easy to weld. I haven't been smithing long, but I'm now pretty much 100% on welds with 5160. -
Metal work projects of a different kind
Gundog48 replied to newbieforge's topic in Blacksmithing, General Discussion
Theirs. Most of the time it isn't a case of the good side vs the bad side, there are very few times in history where this is the case. These guys are probably fighting for what's best for them, maybe their freedom, maybe their lives maybe their beliefs. Whatever side they fight on, I doubt they're much different from us, and if they fight on the 'bad side', I bet their reasons for fighting are the same as those on the 'good' side. I just think it's important to understand the significance of the photos, rather than trying to judge the craftsman in them. -
Differential-Hardening (Japanese swords)
Gundog48 replied to Chris Zaker's topic in Heat Treating Knives, Blades etc
I think there may be a formula in The Complete Bladesmith, I'll have a look when I get in from the shop. -
I lost my threading hammer, I think I left it next to the elbow grease and headlight fluid!
-
Wrought Iron Axe with Steel Bit
Gundog48 replied to Dave Hammer's topic in Axes, Hatchets, Hawks, Choppers, etc
Looks very modern, I like it! -
Forging Game of Thrones Sword (Jaime Lannister)
Gundog48 replied to DennisG's topic in Swordsmithing
Having read the books I can see where the commenters are getting their blacksmithing knowledge from! They are always making references to how Valyrian steel blades are 'folded back on themselves' like pattern welded steel. Low and behold, everyone is saying it's not a good sword because he didn't 'fold it back on itself'. It's rather amusing, not to mention that this would not be a Valyrian steel blade anyway. I mean, he didn't even spell-forge it, is he even trying? -
Casting an Aluminium Rod
Gundog48 replied to Gundog48's topic in Smelting, Melting, Foundry, and Casting
Here you go! We were really pushing it in terms of volume with a full crucible, it wasn't quite enough as a pass on the lathe revealed a low spot- not to worry, it'll only reduce the diameter by a few mm. The surface is about as good as you could expect from simple gravity casting! Very excited to work with liquid metal for the first time! -
Casting an Aluminium Rod
Gundog48 replied to Gundog48's topic in Smelting, Melting, Foundry, and Casting
Wasn't really an alternative, really needed the aluminium finish! Managed to get it done at school though, it was a very big pour but we just about managed it! -
Zinc and Metal Fume fever
Gundog48 replied to Nick Esposito's topic in Zinc, galvanized, and coatings
Thanks for the info, I think it may well have been carbon monoxide, perhaps with the heavy wind some of it may have got trapped inside the garage which I forge next to where I keep my anvil and most my equipment (my forge sits just outside. I'm going to make a hood and small chimney for it, seems the best option as it should draw most of the smoke and fumes above me rather than blowing straight into my face! -
Zinc and Metal Fume fever
Gundog48 replied to Nick Esposito's topic in Zinc, galvanized, and coatings
I had this exact same problem last weekend, I'm always careful about galvanised stuff, and I still can't work out how I got it. Same forge as ever and the steel I was working with was definitely not galvanised. Could large amounts of coal dust cause similar symptoms? I was working with the bottom of the barrel, so that's all I can really think of. -
A youtube series on tools needed to start a knife shop (must watch)
Gundog48 replied to Guiltyspark's topic in Knife Making
May I point out that ads are not usually wanted by the video creator, they are added by YouTube. You can block these YouTube ads and ads on just about every site using AdBlock Plus for Chrome or Firefox, highly recommended to get rid of these annoying ads, but also to stop viruses which mostly come from ads on pages. If the ad was actually part of the original video, then I apologise as those can't be removed, but usually they are added at the start by YouTube. Personally, I'd have liked to have seen the video, the formatting of the knife chat isn't suited to casual reading as one may watch a video, although the information is fantastic. Just a consideration next time a video is posted with the ad, it is not usually the intention of the creator/uploader to have ads on their videos, and I'd hate to see a large number of videos removed from the forum for this reason. Edit: Just found the video, I stand corrected, the video also was not very good! We only removed the commercial, which happened to be an info-mercial. -
When are you considered a blacksmith?
Gundog48 replied to mk74's topic in Blacksmithing, General Discussion
To my non-blacksmith friends, I am a blacksmith, to other blacksmiths, I'm a kid who hammers metal at the weekends! Talking to non-blacksmiths, the easiest way to explain what you do is to say that you're a blacksmith and try and represent the craft in the best possible way. I always make a point of saying I'm a beginner and that the stuff that I do is nothing compared to what is done by master blacksmiths and how I have only scratched the surface with 6 months experienced when there are blacksmiths who have been forging for 20+ years who still haven't 'mastered the craft'. I feel it is important to point this out as, while people think blacksmithing is interesting, they don't appreciate just how hard it is- you just hammer metal to shape, right? If I try to pass myself off as a 'full blacksmith' when I've only been forging for half a year, it devalues the craft and makes it appear less of an art. And in the company of other blacksmiths, I wouldn't presume to put myself on their level! I may do blacksmithing, but I'm no blacksmith- not yet! -
Casting an Aluminium Rod
Gundog48 replied to Gundog48's topic in Smelting, Melting, Foundry, and Casting
Thanks for the advice, that's what I need. I'll scrap this idea and look for an alternative. I don't know enough about aluminium, or anything other than steel really. I'll stick to my plans of having a go at some brass knife fittings or crossguards at home and only do heavy casting at school under supervision. -
Casting an Aluminium Rod
Gundog48 replied to Gundog48's topic in Smelting, Melting, Foundry, and Casting
Thanks for the tip, I've certainly been considering it. I was hoping to get a loan of the protective gear from the school, they've got a really well kitted out forge/foundry that barely gets any use. I can get small amounts of scrap aluminium for free, or get it from a scrapyard cheaply enough. The reason I am so hesitant is because it would cost me around £40 per foot. But you're right, I have no knowledge of casting apart from what I've seen/read, seeing as I can't get any help with this, I will have to look at the alternatives. I was hoping that I could create a casting over multiple pours and that it would become hot enough to fuse with the existing metal, but this is not the case. I'd like to learn more about it and give it a try though, I may try some brass casting some time with much smaller pours, and perhaps get a proper gas furnace. It's a little frustrating having to shell out so much when all I need is something long enough, wide enough and roughly round! -
I'm working on a school project and to start I need a fairly long(~12") aluminium rod that is just over 3" in diameter. Now, if I bought that from a metal merchant, I'd be broke. So we plan to cast a rod using the facilities at school. The only problem is that the only one qualified to help is ill and will be away until after the finished product needs to be in, so I need an alternative. The rod doesn't have to be perfect as it'll be turned on a lathe, as long as it is roughly round and not too small. The issue is going to be the size of the casting, it's pretty huge. I've seen 'ingots' being cast from scrap ali at school where they just pour it into a piece of angle iron, so here is what I was wondering: - If I got some 80mm steel pipe with a good wall thickness, could I use that as an open mold for casting rather than using sand? - Would the pipe need to be preheated in any way, and how should the end be capped? - What would you recommend I use as a crucible, are there any good alternatives to the proper ceramic ones for a one-off? - If I had to do the cast in multiple pours, would the second pour have enough heat to melt some of the ali in the mold from the first pour and 'weld' them together, or am I limited to the size of my crucible? Thanks!