
Gundog48
-
Posts
283 -
Joined
-
Last visited
Content Type
Profiles
Forums
Articles
Gallery
Downloads
Events
Everything posted by Gundog48
-
I went to do that earlier, I shall finish what I begun! The 5, 10, 20 and 50p coins are all 75% copper and 25% nickel which could potentially do the job, although I have no idea how the alloy is made up. I really need to do some research so I can determine for myself what is and isn't suitable. 10ps would be my best bet as they are quite big and not too expensive! I assume I'm looking for metals with similar melting points. If bronze can be used, that would be fantastic as I have loads of 2p coins which are big and not worth much!
-
Thanks, I'm in the UK, but the Royal Mint kindly provides information on the composition of our coins! http://www.royalmint.com/discover/uk-coins/coin-design-and-specifications I'll compare them to American quarters and find out if I can do it with any of our... cheaper money! Although it is actually illegal in the UK to deface or destroy legal tender, but I don't think a few pennies are going to affect inflation, although it's rather disrespectful to melt down the Queen's face!
-
I'm rather interested in this, never heard of it before! What reading would you recommend for this? I'd like to try to make a bracelet using this technique, but I wouldn't have the slightest clue which metals to use or the correct welding temps. What cheap metals would you recommend to start with, considering I'm likely to make lots of mistakes- so I'd rather not be using silver or gold! Perhaps copper would be ideal, but what other metal?
-
I found the best way to punch on your own is to get some chain (chainsaw chain is best, but normal chain works). Fix it to your anvil or anvil stand at one side, drape it over your anvil and attach a weight to the other end. Take your piece off the fire, put it under the chain and the weight will clamp it down like a vice, freeing your hands!
-
Thanks Dennis, a lot of people use coal here, it's hard to appreciate just how hot coke can get! Was that 3/16" on the bottom of the whole forge? The problem with mine is that the 1/4" grate part is bolted to 4mm thick spring steel sheet. Perhaps some reinforcing to stop it sagging? I just got some 3/4" steel plasma cut to make a rectangular firepot which will drop in above the grate and then the gap will be sealed with fresh fire cement (that's why it was cut away in the picture). Hopefully the extra mass will help a lot with preventing the bottom from heating up. Kindly remind me, is there some special procedure to welding cast iron? I remember hearing something about preheating- I'm pretty new to this. Was thinking of welding some bar to the cast iron drum, but I suppose I'd better check if there's anything special involved! You're not kidding about great deals of forges! I was looking up water-cooled forges and stumbled across an agricultural auction website. They have catalouges from their past auctions and there was a "water-cooled forge" that sold for £2! There were so many incredible deals! I guess people don't know what some things are worth! Next time there is one nearby I'll be paying a visit! I think I may switch back to coal. Although I burn through it a lot quicker I find it nicer to use. It feels wrong coming off the forge without being covered in soot, and I love the smell of coal burning! For me, it is generally nicer to use, although I'm far from used to either fuel!
-
You're probably right, but after the incident of my last forge I've been pretty paranoid, and I'd just love to think that this is idiot proof! After a couple of sessions the only sign of wear I've noticed is a tiny sign of the surface of the stainless 'melting' which you can just about see in the picture. I just figured that if I can get a WC shroud on the top of that pipe, I'd never have to worry about it, and it would require minimal effort to set up and run.
-
As you probably know due to the number of questions I've posted, I'm trying to finish off my new forge. I'm really concerned with the overheating problem, although the fire cement protects most of the bottom, the stainless steel 'nozzle' is still exposed to the full heat which will heat up the rest of the forge through conduction. I'd like to be able to run my forge on full blast and it last for a few years without having to worry about it overheating. I've read a lot about watercooled forges, and I think that may be just what is needed. The pictures below show how my forge is configured with the fire cement chipped away for a better view. As the pipe is directly attached to the grate, I think that would be the easiest location to cool it and would also prevent the heat from spreading to the rest of the forge as this part would be cooler, thereby 'cutting off' the heat before it spreads. So, what I have in mind is some kind of jacket to fit around the top of the air pipe, with an in and an out which go to an open container of water. The water will pump itself through convection. I just don't know how I would construct the jacket. Maybe some sheet steel carefully wrapped and welded? Perhaps I could buy something? Any suggestions?
-
Using the brake drum primarily to save space as I am extremely challenged for it! This brake drum is huge as it's from a bus, so I can have a 7"x8" fire pot with plenty of room for storing that coke to drag over. My concern is for the 4mm plate along the bottom, I'm worried that it will overheat due to the heat coming through the stainless grate which is bolted onto the 4mm plate and cause it to sag. The fire cement is to fill the space- it raises the bottom a few inches and allows for a firepot to be installed.
-
I'm working on getting my new forge just right. It's a large brake drum forge, as you can see from the early picture which is a little difficult to understand as the plate is not bolted to the drum and the grate has not been drilled into the stainless steel. It has a 4mm steel bottom with a 1/4" stainless plate with the grate drilled into it which attatches to the air pipe underneath which is also stainless. I lined it with a couple of inches of fire cement to give it a lining and to make a firepot shape in an otherwise flat forge. I burn coke. Unfortunately, the fire cement that forms the firepot gets impregnated with clinker and cracks under the heat, leaving me with a bigger and bigger firepot! I need something that will not need to be relined all the time and is easier to clean- this is the plan. Chip away most of the cement, weld up a rectangular firepot out of 1/4"-1/2" sheet steel, about 3" square at the bottom to leave the grate and some of the stainless surrounding it exposed, then seal the pot in place by surrounding it with fire cement. What worries me is that the heat that this produces is ridiculous. First of all, will the plate be up to the job? Second, although the bottom of the forge is protected with fire cement, the stainless plate is exposed to the full heat of the fire and bolts to the thinner plate, heating it up. Am I being far to cautious or should I be worried about this? I've even considered ways of cooling the bottom, I have the most powerful 24V fan known to man which I could point at it, I've even considered some kind of watercooling jacket around the top of the airpipe to conduct heat away rather than heating up the plate.
-
What did I do right? [Video]
Gundog48 replied to Gundog48's topic in Blacksmithing, General Discussion
Thanks so much for all the comments- it was exactly what I needed and I really appreciate you taking the time to watch the video, I was kinda embarrassed posting it here because I could see the mistakes I was making when editing, I'm really glad that I did now. I'll be sure to post more of these when I have another forging session, it really helps me out, and hopefully you get some enjoyment out of them. Here's my list: Tongs! I made a pair of adjustable ones before but they were fiddly to use in practice and didn't grip hard enough. I'll try the basic ones and make some clips for them. I do want to avoid ending up with 100 different tongs because, as you can see, my shop is pretty small! Also, I had huge problems with riveting the last pair, almost broke them in the process and they lost most of their movement- I think I'll stick to a nut and bolt until I learn how to rivet better. Hammer- round one face to reduce hammer marks. I use the existing edges for peening the metal sometimes. I may invest in a Hofi hammer if I want to do more bladesmithing Eye protection- I'll get safety glasses rather than the goggles I currently have, as for hearing protection it honestly isn't that loud (unless it's gone already!) When the steel is hot it's pretty quiet, and the ring isn't too loud either. Other smiths- I plan to offer myself as an apprentice next summer when I have something to offer rather than being a burden! I think I'll put a session with Basher on my birthday list as he's in Kent, England same as me! Fire tools- I actually have a fire rake, but it has quite a long rake part and is difficult to use in this forge, I think I'll either shorten it or put a curved rake on it. Questions: The forge lining is holding up pretty well, however it is deteriorating and is awful for clinker- it can get almost completely blocked in 4 hours if your not careful. I'm getting some 1/2" steel plate for the belt grinder and I may cut it up and weld myself a rectangular firepot that fits over the stainless grate at the bottom, then seal it in by replacing the the cement I removed. This should make it easier to clean and reduce clinker, and with it being 1/2" I don't think I'll have problems with it starting to melt like my last one! As for tongs, what design would you go for? There are many different variations, but I want something which will do most of the tasks I need, without having to have 100 different pairs. Would I still be a heathen if I used long handled mole grips? :P Gripping the work- this has always confused me about tongs. With smaller pieces such as this, I really don't see a practical place to grip the work to get a strong grip but not be in the way. What's your general advice on tong use? Thanks for the advice, I read it all thoroughly and really appreciate you taking the time to watch it and reply! I hope to do more of these in the future as I enjoy sharing what I do, especially if it means improving too! -
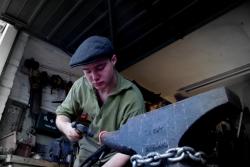
My friends have been very interested in my blacksmithing so I decided to record my sessions for them to watch. I thought this would be a perfect opportunity to get some practical advice from those that know what they are talking about as it will be a while before I can get any proper training with another smith. Now I realise that I will have done more wrong than right here and my technique and hammer control are likely horrible, but that is why I'm posting it here. What would you have done differently? Am I doing something that will likely kill me? I've been smithing for about 3 months, normally once or twice a week. I've forged a few knives and thought I'd have a go at a proper forge welding project, so I'm having a go at some tomahawks. Please excuse the mole grips... and the music, kindy excuse that too! Don't worry about being harsh, any feedback is good feedback! http://youtu.be/ijlE8tv91NY Jake
-
New Drill Press- Oldie but a Goodie
Gundog48 replied to Fe-Wood's topic in Drills, Post drills, Mag drills, etc
My shop is a mess also, problem is that my shop is a single garage that would just about fit a car if it was empty! Wonderful pillar drill, from the ones I've used the old ones always seem to be pretty bulletproof! You'll excuse me eyeing up the motor, having a nightmare finding one for my belt grinder! -
Wanted: ideas for making an unpowered air supply
Gundog48 replied to rdennett's topic in Bellows, Blowers
The original output has almost zero static pressure, but with the adapter box that brings it down to a smaller size to fit the pipe, the pressure gets pretty high. Pressure is really more important, but try telling my old forge that! I tried seeing that this could do at full blast and it melted the steel body! -
what type of clay to use for a BBQ grill? where to find it?
Gundog48 replied to Guiltyspark's topic in Solid Fuel Forges
I did a lot of searching for this too, the stuff I came up with is more like refractory cement, but is supposed to work well (mine's still setting, no cracks or anything!) About 2 parts portland, 2 parts sand, 0.5-1 part dry lime, 1 part clay and 1 part perlite. The clay can be found by getting 100% clay kitty litter or at a masonry supplier if you're lucky. The perlite is almost identical to the stuff that they make firebricks from, but holds less moisture so is better for cementing- this gives it it's insulating qualities. You can get it at garden centres. First mix everything but the clay thoroughly, moisten, then mix in the clay. Get it just wet enough so it all sticks together and spread away! This stuff is a bit OTT, but you're forge will be both bullet and idiot proof. Something which apparently I require! -
Wanted: ideas for making an unpowered air supply
Gundog48 replied to rdennett's topic in Bellows, Blowers
With access to an auto yard your best bet is to get a snail shell type blower from a vehicle, basically the biggest one you can find, I'm using a demister fan from a bus which is incredibly powerful. Bring a 12V car battery and take it back and charge overnight. Really simple solution and probably the easiest to pull off. Judging by your choice of language you're not from the UK, but if you are I can get you a duel fan bus demister fan that can push 700CFM on 24V and about the same as a crank blower on 12V and ship it to you for a reasonable price. They cost about £200 but I have a source for used ones! If you definitely want to go with a hand-operated unit- I've seen ones that utilise an old bicycle mechanism to get the gearing. You could salvage one of these fans and drive it with this mechanism. Making the actual 'fan' part would be difficult if you wanted to do that yourself, but it has been done many a time with sheet metal. I'm sure someone will be able to provide a link to a project. -
I have to make a confession, I never use tongs. They just aren't sturdy enough for me, I end up putting most of my effort into gripping the product or holding it steady than the hammer work. So when I can't weld a bit of rebar onto it to hold it solid, I use mole grips. I absolutely love them, they give a great grip and I have so much control over the piece, although the downside is pretty obvious, my hand gets hot! Because they are short, they heat up quickly and are difficult to remove and reattach while the piece is in the forge, so they just end up getting hot. Not to mention my hand's proximity to the piece itself! What I really need are mole grips with a nice long handle that I can detach and reattach without getting too close to the fire and being able to have my hand at a good distance from the forge. I've thought about modifying a pair by welding longer handles, but are there special types you could buy for this kind of application? I've heard of proper blacksmith's tongs that have a locking grip as well. Any input on this? Thanks!
-
If you want to get a really quiet anvil, you'll have to sacrifice the horn- that's what gives it the ring.
-
The death of a forge, the start of a new era!
Gundog48 replied to Gundog48's topic in Solid Fuel Forges
Thanks Phil! I did consider this, but to be honest I want something a little more professional now, the new forge is looking good, bulkier with a proper stand and holders etc. The only problem is that it is flat bottomed, so I plan to make a firepot with the clay, only 2" or so deep as I can stack the coke like I normally do on the old one. I'll post some pictures later today so you can see where I am! -
I built a 55 Forge a few months ago after I became really interested in the art. I was really excited when I first saw something that I made heat a piece of steel up to that glorious red and then watching the scale fall of as I hammered or bent it. My parents were took a bit of convincing (I'm 16), but my Dad was quite happy that I wanted to do something like this as most of my interests lie with computers and electronics. To me, it's the same thing but a different medium, I just love making things! After making myself some tongs, a punch and a chisel, I forged my first knife from a 1/2" square ring gear. It was kinda jumping in at the deep end as the ring gear took a lot of work to get the the flat state that I needed, but it was the only high carbon steel I had at the time. Anyway, everything went well and I was rather proud of my first knife. I've been making more, but I'm waiting on a belt grinder to finish them off as the bench grinder I used on the first knife was hard to use for what I needed. Anyway, I recently switched to coke and found that my blower wasn't up to the job. I was using one of these: http://www.spalautomotive.com/eng/products/view_centrifugal.aspx?id=006-B39-22, a bus demister fan that operates at 24V. I built an adapter box so it would pump the air through a nozzle to which I fixed a hose to the forge itself. I was powering it on 12V from a PC power supply I put in a box with the blower, along with a switch to turn the PSU on or off. I was looking at 24V transformers to get the most from the blower when I remembered we have a variable load car battery charger that basically supplies however much current is needed at either 12V or 24V. So I hooked it up and it was crazy! On full blast it pumps 700CFM, and the way the adapter works, the pressure is huge. I toned it down and got forging, my coke was now getting hotter and I was actually getting flames, whereas last time I had to give up because it just wasn't getting hot enough. The heat was incredible, I could see the paint burning on the bottom of the 55 Forge which I never got before, and I could see it starting to sag. At this point I knew that this forge was no longer capable of supporting the heat that I needed, so I knew it would fail soon. About 20 minutes in, the air pipe drops off, the aluminium piping had melted through and dropped out. It was a bit of a safety mechanism as it cut the air off, because if the bottom of the forge went, it would be pretty dangerous. When I raked over the coals the heat was like nothing I've felt before, more the sort of heat I would expect a proper forge to have. Anyway, after it cooled and I reclaimed the angle iron legs, this is what was left. Note that the forge has the standard bottom of the barrel reinforced with 2x2mm steel plate with a further 2mm steel plate for the nozzle. So, what now? I've started work on a more manly forge now! It will be able to cope with the blower at full blast which will be ideal for some light foundry work as well. Obviously I'll normally be running at around 400CFM, but this forge should be able to cope with just about anything. I've fabricated a proper frame complete with casters for moving it around with a tool holder and a holder for the blower housing. It's made from a bus brake drum with holes cut in the side for access. I'm bolting down some really thick steel plate, not sure what I'm going to use yet, but I have access to anything between 1/4" to 2"! I've welded up a nice stainless piping system for the air and possibly a ceramic nozzle. I'm then lining the whole thing with 1-2" of proper refractory clay to make the thing virtually bulletproof. I'll post some pictures of the new forge soon. Needless to say that I am incredibly excited to use this new forge as smithing has become my favourite hobby by far. And now I've done my GCSEs at school, I'm on holiday till September so I want to clock in some serious shop hours!
-
It's a shame the video went down, I used to enjoy watching that. I've already drawn what I need so it's not really a problem for me. Anyway, thanks for the sarcasm, but I am fully capable of cutting metal. However, neither my angle grinder, hacksaw, torch or plasma cutters could cut steel that thick, so I was after alternatives. The 30mm bar sounds like my best bet, would it have to be high carbon and be hardened and tempered, or could I get away with mild? Thanks!
-
Hi Rich! I found that article and found it very informative and I'm using it as a base for this oven which I'm modifying to work vertically and to be longer.Just trying to source parts and was wondering how long these could be stretched and if they could be controlled in the same way as the ones in the article.
-
Not sure what I'd do without a hacksaw or angle grinder! I cut a very small section out of it for the cutting edge of a tomahawk using an angle grinder and it took me a good few hours and many disks. To cut a curved shape across the block would take way too long, and would be almost impossible by hand. At least with my little arms! When I say leaf spring, it's not what you'd think, it's a cast off from a bus garage so this thing is huge. It's about a foot and a half long, two inches thick and weighs 30-odd pound. I found a picture! So you would say rather than a big die like this, to just get two lengths of high carbon rod that I could harden, temper and weld onto the arms?
-
I am planning to forge my first sword in the next few months and have been looking at ways of getting a fuller when working alone. The best example I have found is at the start of this video: http://www.youtube.com/watch?v=OvmGvAM93bg The construction of the tool won't pose too much of a problem, but the dies themselves will. The way I see it, I will need pretty huge chunks of high carbon steel to make them. The best I can do is a leaf spring from a bus that is about 1.5" thick, but I don't have the equipment to cut it, even a plasma cutter wouldn't get through that. There is also the shape of the die, are there any good templates or guides to getting the shape just right? Would I be able to get away with something a little smaller rather than the big lumps used here? Basically, what would you do bearing in mind I have limited cutting equipment? Thanks!
-
I am looking at making a heat treating oven and am on the search for heating elements. I came across some reasonably priced ones on ebay that seem to be the right size. However, it says nothing about the minimum/maximum stretch length and the seller is clueless. Is there any general rule of thumb I could use here? Also, what recommendations would you have when it comes to wiring them? In series through a heater controller? Thanks! http://cgi.ebay.co.uk/ws/eBayISAPI.dll?ViewItem&item=400305853088&ssPageName=ADME:X:RTQ:GB:1123#ht_1122wt_1163
-
Thanks for the advice, that was what I was really expecting. I don't produce enough blades to warrant any serious kit, but the point of power tools is to make the job faster, which something that was too lightweight just wouldn't do. That Grizzley is exactly the kind of design I was thinking of making myself, although I'd probably be limited to a half horsepower motor. I'm collecting materials to build a lightweight tyre hammer, so this should get me in good practice! I've got some time tomorrow so I'll take a look at doing a few drawings!