Gundog48
-
Posts
283 -
Joined
-
Last visited
Content Type
Profiles
Forums
Articles
Gallery
Downloads
Events
Everything posted by Gundog48
-
Thanks for the tips guys! I've been doing everything to clean it an assumed some wiping and using the wire wheel would remove any moisture, but I never considered about what is hiding in the tiny cracks and crevices! I think a wax applied hot would be my best bet- I take it you only get it mildly warm, not enough to create scale?
-
I'm a bit of a mess of ambidextrous and not, I'm told it's to do with dominant eyes. I'm much stronger with my right hand and that's what I use for most things, but I'm far more accurate with my left hand which I write with among other things- but it's just not strong enough to constantly swing a hammer. I get on just find with my right hand but I've sometimes had to switch to my left hand in awkward situations where it's not possible to use my right (happens to me a bit with long stock in a small shop)- it goes okay but I only move about half as much metal as I would with my right.
-
I normally only forge blades which I always finish with simple oil and a polish, but recently I've been getting into decorative work and I'm having some serious rust issues. I think part of it may come from when I quench some pieces in brine, but most are not and I keep my brine bath stored outside! Up until now I've always finished my products by wire brushing then spraying with a few coats of clear coat or sometimes painted. All my clear coated pieces always rust through. I always thought it was because I wasn't cleaning them enough, the most recent pieces I did I wire brushed to almost a polish, then cleaned the whole thing with isopropyl to make sure it was entirely clean of everything. Gave it a coat, waited, gave it another. About a week later the metal had turned from a polish to a darker metal finish and it was starting to rust in places.I did a piece cleaned in the same way, two coats of red oxide primer, then a few coats of black, left it to cure overnight, when I came back the next day the paint had flaked off in places down to bare metal having never been touched, and I knew that primer was a good solid coat! Now, I've decided that laquers and paints are not the right way to be doing this- too much hassle! I'm looking to switch to waxes instead, but I'm concerned I'll still have this problem.Having never used wax before, what do you normally do prior to applying the wax- do you wire brush it to remove the scale then apply it while the metal is warm? I plan on mixing some renaissance wax for my shiny stuff, and I've heard of a beeswax-gun blue mixture which I've seen being applied cold. The real question is though, will switching to wax solve my problem? I'm still certain that it's rusting from underneath the coats of whatever I put on it, I don't think it's rusting through the clear coat, but underneath it. I can research the use and benefits of different types of wax myself, but I'm struggling to find anything specifically concerning this problem!
-
I've been rather busy since the IFI has been down (excellent work on that by the way, I think I speak for everyone when I say that we really appreciate the hard work being put into this site) and I thought I'd show you what I've been up to! I've been doing quite a few integral handled knives, this one is rather different in it's design, it was quite fiddly to get it all to fit and to be honest I prefer the other styles! Oh well, it was good practice! This is one of my latest Viking Woman's knives which I have a lot of fun making! I made myself an eye punch and had a go at forging some horse head bottle openers. The drifting was quite rough, the one with the bent neck looks better but the straight necked one is much easier to use! Using the same idea I made a horse head knife, it's actually really comfortable, but I'm not massively keen on the looks! I made a large treble clef chime a while ago which was a bit awkward, so I made some smaller ones which I quite like, they have about 3 different tones depending on where you strike it. I had a go at doing a hook rack, I was quite pleased with how it looked until I assembled it and my welds let me down massively and ruined the piece in my opinion. This was largely because it needed about 3 pairs of hands to hold things in place and weld them. I've got an idea on how to improve the design to eliminate the welds which I'll do when I get enough time!
-
Thanks broomhead! That mahogany was a good find from an old door- I reckon there's about 100 handles in there! You're right on the polish, I did one recently with a polished finish, the thing is that I spend about twice as long with file and paper as I did with hammer and anvil. This may just be due to the abrasive paper being cheap, but I really enjoy forging and don't like to spend hours polishing as I don't have a whole lot of time to work on things! It's pretty much a matter of time for me, plus it'd allow me to do different kinds of grinds which I can't to with files and abrasives. I enjoy doing the handles by hand, I wouldn't use a grinder on them. I carve it out with a draw knife then start rounding it off until I'm ready to smooth it off with sandpaper!
-
My latest creation - a 5160 nessmuk with a mahogany handle and my first time with proper fittings! Quite enjoyed making this fellow, I think I'll look to sell it at some point, I've far too many knives lying around to make use of it! Eagerly awaiting the drive wheel for my grinder so I can start doing polished blades and put better grinds on them!
-
I've had a lot of time at the forge recently and have been trying out all sorts of new things. I was watching Lord of the Rings last night and one cannot help but admire the workmanship of some of the props, from weapons and armour to the furnishings of the buildings. Anyway, the spears carried by the Gondorian spearmen really caught my eye. I did a little research and discovered that they were made from cast resin which is always bad news when trying to reproduce something on the forge. However, the shape of it looks quite forgable, as seen below, and I think the blade and flat part will cause few problems aside from a lot of tapering! However, the difficult bit would be the socket. The way the lines neatly carry on from the rest of the spear would be near impossible (at least for me) to reproduce by flattening and wrapping a socket as would be the norm. The only alternative I can think of is to forge it from one solid piece of steel to make it neat and then to drill the socket into the bottom. I was wondering if you'd have any other ideas or general tips as to how you would approach this? I don't normally pay much interest to fantasy weapons, however I think this one is an achievable albeit challenging goal that could yield some good results and have some fun along the way! If I create something good enough to share, I will! copyrighted material reomoved 2x, Copyright means its owned by that person that took the photo or owns the item iteself. In this case the item is owned by one party, and the person that took the photo owns rights to the photos them selves, A link to that persons site with those is acceptable. HE has the rights to display the item, Please do not repost others property with out permission.
-
Rather a lot simpler I'm afraid, I won't turn 18 until October!
-
I like the sound of a meetup! You're more than welcome to come and tour my 16x9 garage! I can't say I know it, whereabouts in Kent is it? The embarrassing thing is unless it's after October I'd have to be drinking orange juice!
-
Thanks! I'm going to have to make one for myself, I really liked it! It is supposedly the type of knife that Viking women would carry with them as a sort of utility knife where men would normally carry seaxes. I haven't looked much into the historical accuracy of it, especially as it seems likely that most women didn't wear belts as an emphasis was given in one of the Norse texts about a woman when she put a belt on as though it was not normally something she would have done. I think it's far more likely that this kind of knife would have been used by all sorts of people as it is a relatively easy knife to produce!
-
Here's a knife I made the other day as a gift for someone, modeled after the 'Viking womans' knives seen around on here. I haven't had time to check the historical accuracy of this one so I'll just call it a blacksmith's knife! Probably the sharpest I've made, simple and fun to make!
-
Alec Steele made a great video on making hooks that I used to make my own with some success! The jig took 2 mins to weld up which allows you to do nice uniform hooks!

-
Thanks for the compliments! I should have given it a proper measure before I sent it off but the blade was 7" long and 1.5" wide if I remember correctly!
-
Henrick Stark? Good to see you here! Good luck!
-
Just about finished this Viking Seax project. This'll be my first commission, it's for a chap from America who's a Viking re-enactor. There's a few things I would have done differently, but he was quite specific on how he wanted it and he's satisfied, so I guess it's all good and it saved me some time making proper brass fittings!
-
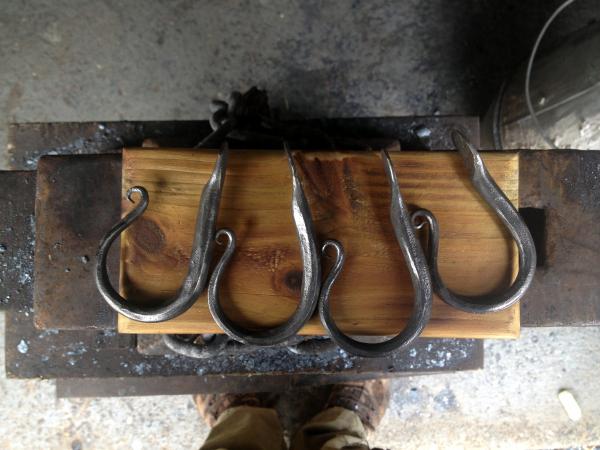
I had a go at a different style today and managed to get it down to just over 15 minutes per hook! Still need to work on how I'm going to attach it- I'm going to get some brass screws, square headed bolts as suggested and try forging some nails and see what looks best. The first one I tried went a little wrong as the scroll wasn't uniform with the others, so I used it to replace a cheap plastic hook, I countersunk the hole and just used a normal screw with a black painted head and it looked pretty smart, so that's always an option!
-
Thanks for the input everyone! The wood was in the same sort of condition as those used on pallets, but I'm fairly certain it's a softwood, I think it's supposed to be used on fencing. Either way, it was cheap and did the job- made it easier to sand down I guess! I burnt it and sealed it with teak oil. Considering the hooks are only held in by one screw, I think a good tight screw would be the best option- I can get brass ones rather cheap. Although I was thinking of cheating and using a nail but dropping some epoxy into the hole to hold it in place. I have an almost infinite supply of Plexus which is unbelievably strong, so that could be an option to make sure it stays tight!
-
This is what I've been up to today, made some wall hooks! These took me 30 minutes per hook which I hope to speed up with a little practice, I'm thinking countersunk brass screws to attach them to the board (which was a piece of cheap timber which needed a load of sanding, may get some better stuff to save time!) or I may have a go at forging some nails which would be a lot more traditional and may make the flat area look a lot nicer!
-
Okay, I'll bite, how did you join up the top ring so neatly? Is it butted togehter, welded and ground, forge welded or just butted really neatly?
-
Looking good, you'll want to try and work on reducing your hammer marks which will come in time. Giving them a go over with a wire wheel would also make them look a lot nicer! I've also seen them called 'woman's knives', although you'd be surprised how civilised Viking society was compared to how they are portrayed. They were incredibly advanced technologically and were some of the best traders in the world- they were also very clean compared to Europe at the time!
-
It's closer than I could have hoped, the tang transition is a bit off though! That depends entirely on how much they hide behind their father!
-
Saw this knife in the show and decided I should give it a go. It's my first time doing a replica, in fact, it's the first knife I've made with a wooden handle or any kind of fittings! It was a fun one to do as there wasn't a whole lot of grinding to do- it was practically forge finished. It was forged from 5160 and deferentially tempered to a light brown at the blade and blue at the back. It's very cleaver-like and is surprisingly good at slicing, I still need to work on my sharpening as I can never get my knives as sharp as I would like! I think it could have done with being a little thinner, but other than that, I'm pretty happy. Copyrighted material removed.
-
 I've been toying with the idea of getting a metal vertical bandsaw for a while as I'm tired of doing all my cutting with an angle grinder. I'd use it mainly for cutting sheet and stock up to 1/4" thick. Most bandsaws are either woodworking ones or horizontal cutoff saws, but I started thinking, what is the real difference between a woodworking bandsaw and a metal cutting bandsaw? The main difference would obviously be the speed which would need to be adjusted down, and I believe good bandsaws are belt-driven in case of jams. There's also the power of the motor which must come into play to prevent stalling. Am I missing something here or are vertical metal bandsaws the same as vertical woodworking bandsaws with a more powerful motor, a belt drive and a slower speed? As most metal bandsaws I see are very expensive industrial units, would converting a woodworking bandsaw be a viable option?
 -
Thanks! I suppose I should have a go at the collars, this whole project was way out of my comfort zone as a beginner, so how hard can a few collars be? I guess I just had a bad experience the first time I tried riveting and ruined 2 days worth of work, but this is quite a bit different. I'll do some research into how they're done! And yeah, the top bracket goes over both scrolls so it shouldn't be a problem!
-
I've had enough of people confusing my forge with a BBQ so I decided to have a go at forging a bracket today for a sign. I'm really starting to like this decorative work! I'm probably going to cheat and tack weld it as I've never done collars and I don't want to experiment on this! I'll probably wrap the weld area with copper or brass wire and use something similar to make the loops for the sign. I think I'll make a bigger sign too! The leaf clips on the left will have holes drilled and will hold the bracket to the wall. Getting those tight enough to the bracket itself was probably the hardest bit! More to come!