ede
-
Posts
254 -
Joined
-
Last visited
Content Type
Profiles
Forums
Articles
Gallery
Downloads
Events
Everything posted by ede
-
Off-grid blacksmith shop near Tyler Texas
ede replied to JoshuaMS's topic in Events, Hammer ins, Where to meet
It's nice to see you being so resourceful with your materials, it should prove helpful in the villages that are resource poor. Don't know where you plan on going to help, but If you listen to Blacksmither radio, Brian Brazeal is going to Kenya to start a Blacksmithing school there with his brother Ed. -
While carving a burner port in an insulating fire brick last night without any power tools, I got a particle embedded in my eye. No I was not wearing safety glasses and just using a hand file. I don't know how it happened exactly. The particle was on my iris and would not flush out no matter how much water I splashed or ran across my eyeball. Fortunately, several hours later it dislodged naturally. Just a word of warning for those that don't think they need safety glasses when using hand tools.
-
I've used a hydrogen torch gas generator. Yes the gas is invisible until it's bubbled through a boric acid methanol to cool the flame and give it a green color. I never heard of the UV damage associated with hydrogen. They are great for platinum work.
-
Off-grid blacksmith shop near Tyler Texas
ede replied to JoshuaMS's topic in Events, Hammer ins, Where to meet
JoshuaMS, A penny for a close up photo of your bellows. -
Looking good, littleblacksmith!
-
Interesting, Thomas. I often forget that as someone who started in non-ferrous metals, charcoal blocks were/are used in forges. Lot's less impurities when it comes to coal or even coke. In jewelry, we use charcoal blocks for all manner of soldering, annealing and it provides a great reducing atmosphere which lends itself well to most metals. I'm guessing it is the same qualities that are great for the blacksmith's craft. Hmmm, I would like to try out propylene gas, but definitely don't want to damage a nozzle in the process. It's good to know that propylene can be purchased at welding supply stores. Pardon the pun, but I may have to give that gas a whirl!
-
I like it. Looks like you will have most of your bases covered for different size stock heating. Is that a quick disconnect for your gas supply line?
-
Striking Anvil-- Last minute decisions
ede replied to ede's topic in Anvils, Swage Blocks, and Mandrels
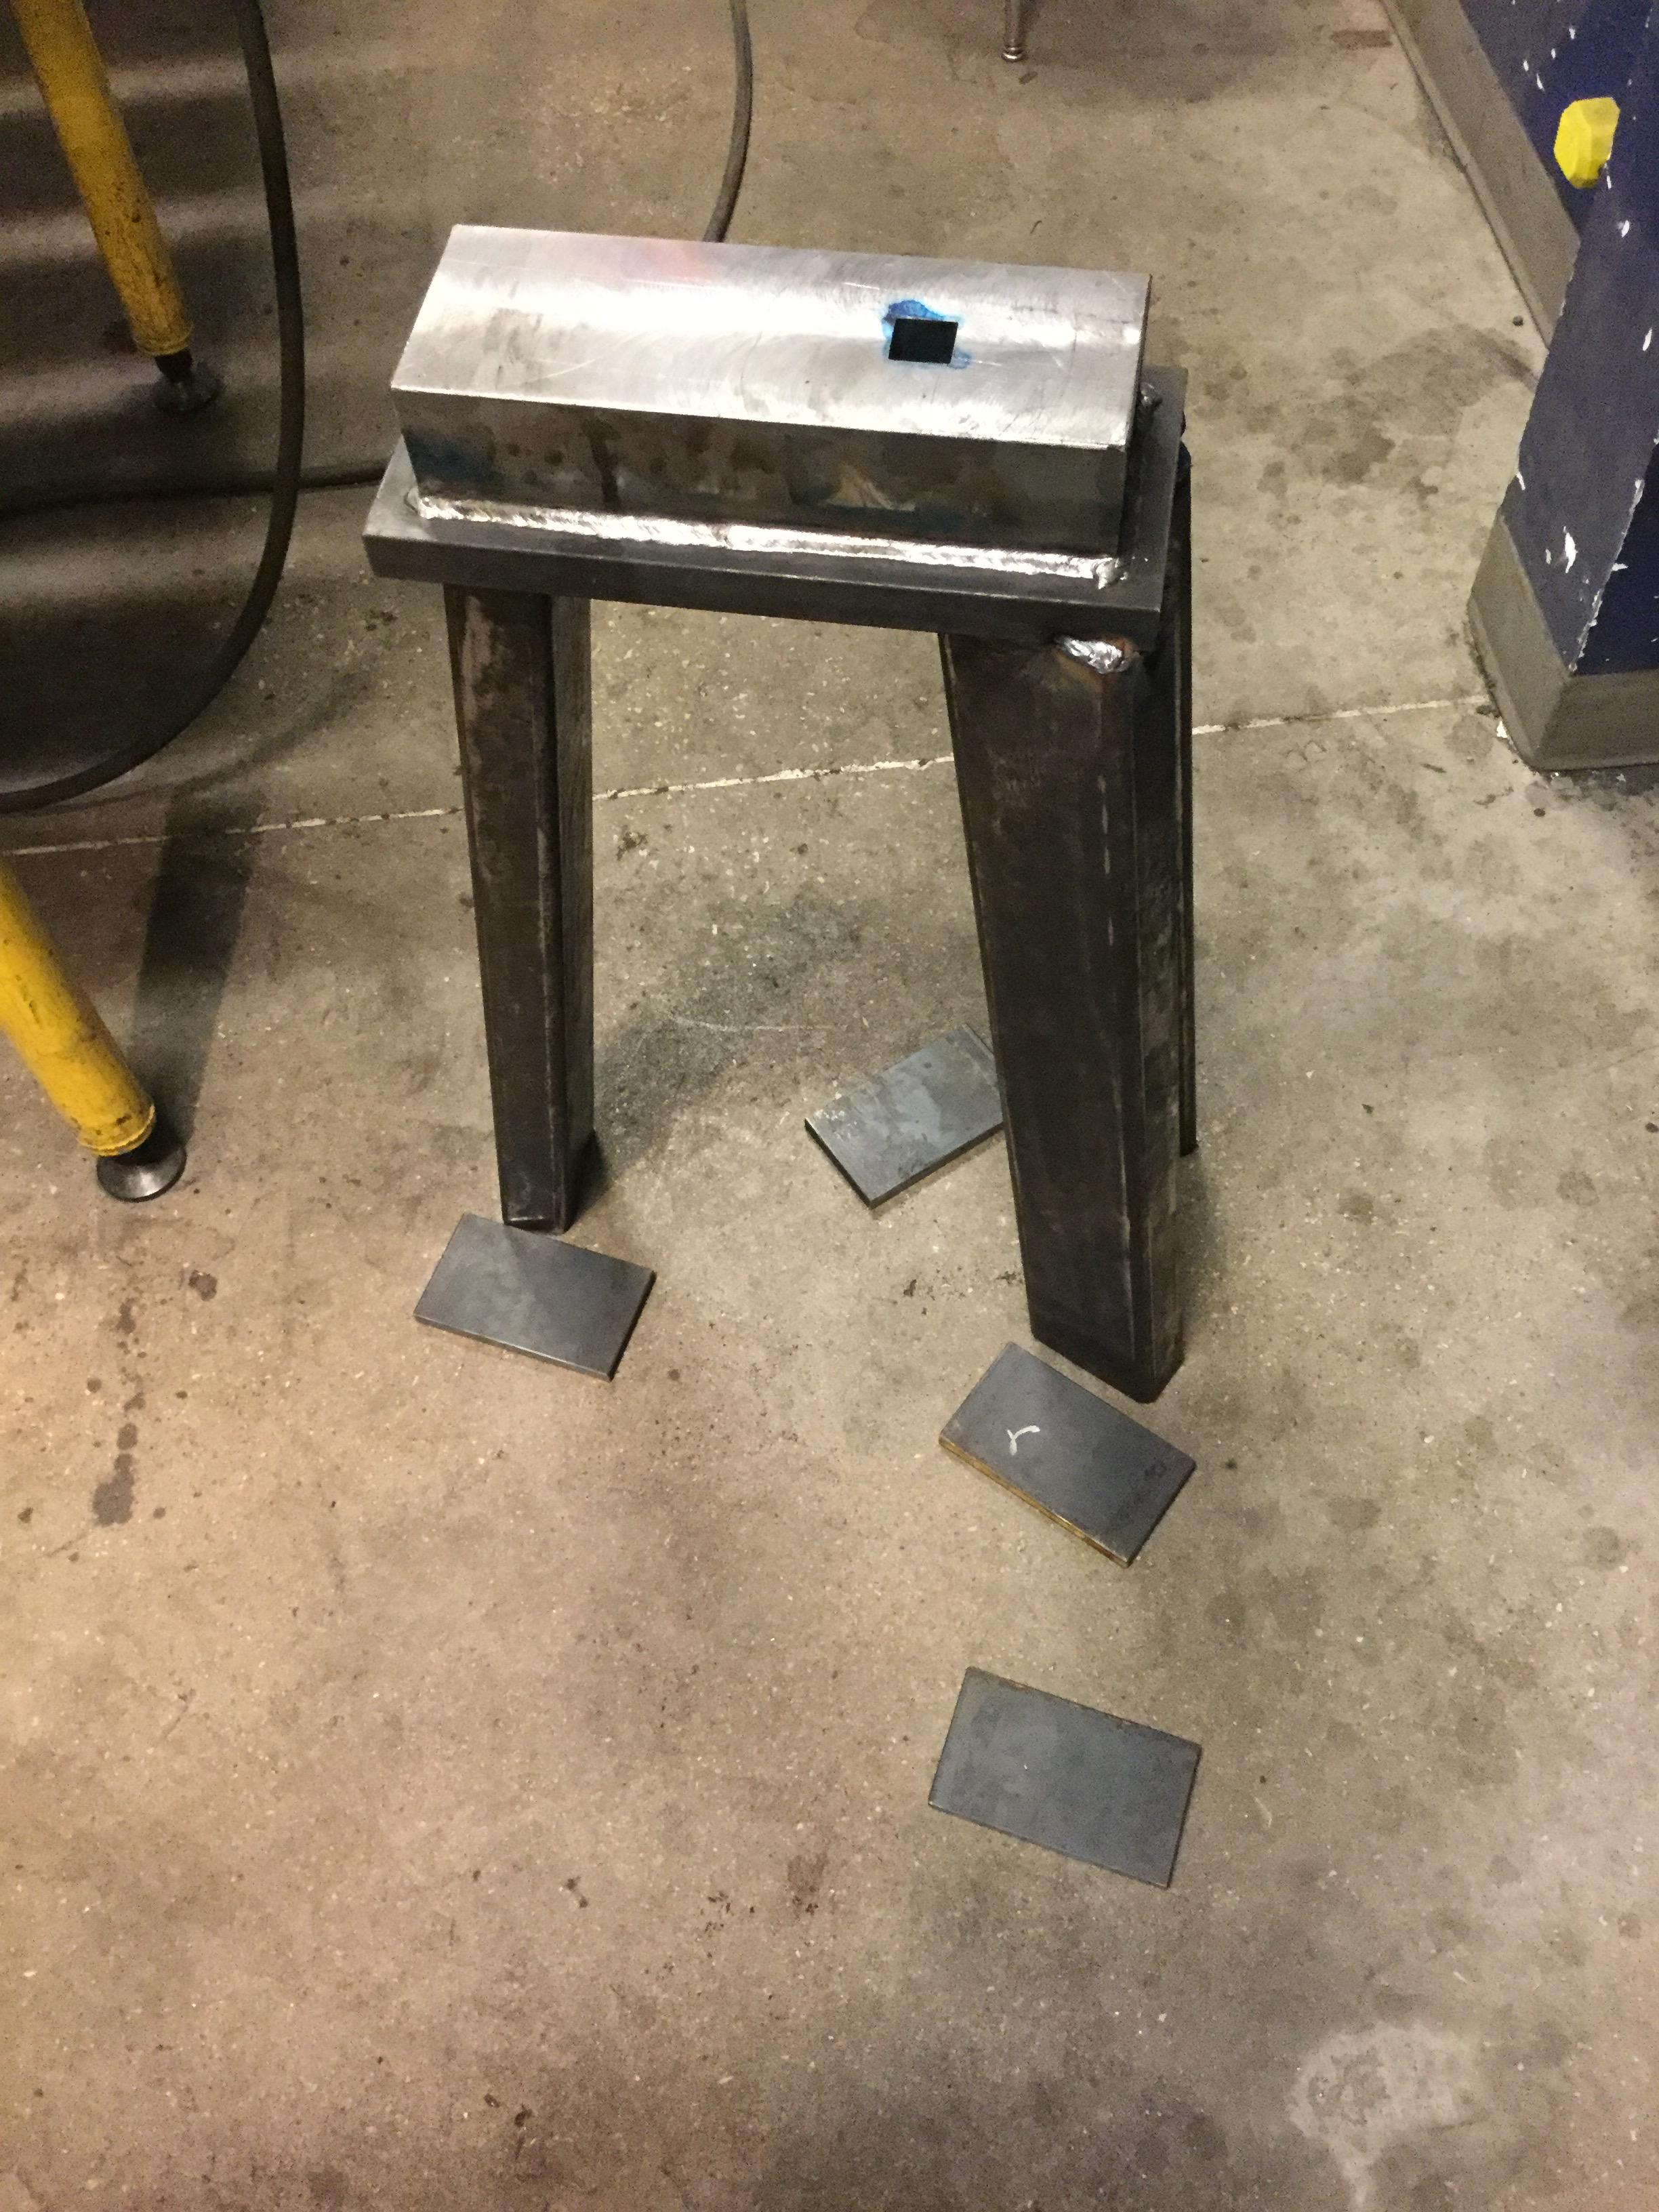
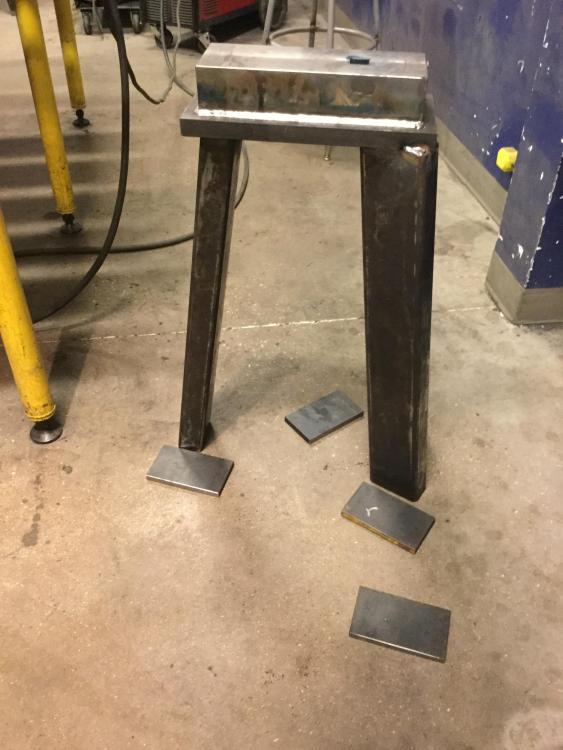
I need to drill holes for the feet and weld them on. Other than that, almost there. In hindsight, I would of made the legs closer to 15 degrees for more stability as these are at 8 degrees based upon a suggestion I had read. Also, if this striking anvil looks taller than most, it's because it is, at 30".
-
Man, there was a treadle hammer on CL awhile back, asking 4 or 500, I forget exactly. Sounded like a steal. One of the many tools that I would like to build. Will have to peruse plans on iforge sometime soon!
-
Striking Anvil-- Last minute decisions
ede replied to ede's topic in Anvils, Swage Blocks, and Mandrels
Great reference picture, notownkid. -
Striking Anvil-- Last minute decisions
ede replied to ede's topic in Anvils, Swage Blocks, and Mandrels
Thanks, Daswulf, I have a nice bolster plate and didn't think of that. -
I'm getting ready to weld my 3 legs on, going to cut them at about 10 degrees. The 1" hardy hole is completed, however I didn't include a pritchel hole in the design. It seems like most striking anvils don't include this feature, however some do. My question is, how many of you drift smaller holes on your striking anvil?
-
I recommend checking out "Health Hazard Manual for Artists" by Michael Mc Cann. What follows is paraphrased from his book: If you are buying solder, specify cadmium free, as easy silver solders can contain up to 30% cadmium. Some of the health risks associated include chemical pneumonia, kidney damage, chronic lung damage, and possibly prostate cancer. He goes on to say that one person died in'67 from brazing with silver solder containing cadmium. Cadmium is what really lowers the melting temperature for these solders so the parent metals don't melt.
-
Is there something wrong with my anvil?
ede replied to Lars92's topic in Anvils, Swage Blocks, and Mandrels
Here is Dick Nietfeld's recommendation on radiusing the edge from his web bage on anvil maintenance. 7. For some forging and bending operations a small and short rounded edge on the anvil is very useful. This rounded edge is generally found on all old anvils. Both sides of an anvil face usually have a small (2 1/2 to 4 inches) portion of the anvils edges that are rounded. The reason for “small” is to preserve as much of the square edges as possible. The smaller the anvil, the shorter this rounding should be as there are less square edges on a smaller anvil. The heavier the anvil the more could be the radius, but with a new anvil start with the largest radius being no more than approx. 3/32 inch. That would be the roundness of a 3/16” drill bit maximum. The rounded edge can always be made a little bigger, if needed, but not smaller. My anvil has the roundness of a 1/4" drill bit and 4" long on my 330 lb. anvil. The typical older anvil face would have this larger radius rounding start at the round horn and gradually decreasing/tapering to a square edge back about 1/3 of the length of the anvil face. That would leave about 2/3 of the anvil with the anvil’s sharper edges. Today the trend with blacksmiths is to not taper this round edge 1/3 of the anvil face like was typical in the past. The current reasoning is that bending wider stock on a taper is generally not as good as when bending on an edge that does not taper. Also, limiting the length of the round edge preserves more of the anvil's square edge. Therefore, an even 3/32” radius about 2 1/2 to 4 inches long seems to be the current preferred method. -
1st-Timer Forge Build Fun ( or 'Hey look, still not blowed up')
ede replied to Hoenirson's topic in Gas Forges
-
1st-Timer Forge Build Fun ( or 'Hey look, still not blowed up')
ede replied to Hoenirson's topic in Gas Forges
I'm curious how your sliding door is going to work out. If I was going to make a sliding door, I would probably try one similar to Penland's. If you FF to 8:20 in the video, you can see they've rigged up a counterweight balance where one steps on a pedal to lift the loose fitting door up. I agree with Frosty on this one that your door will succumb to warpage. -
Is there something wrong with my anvil?
ede replied to Lars92's topic in Anvils, Swage Blocks, and Mandrels
Matei is right. Ideally, your anvil should be the hardest, followed by your hammer. I've slipped and hit my Refflinghaus with a sledge while forging a hardy and it didn't dent it due to the hardening and tempering of the hammer compared to the anvil. Perhaps Dick Nietfeld will chime in as he is the N. American rep for Refflinghaus. -
Excellent photos and good idea on the solenoids! Tell us, what kinda blower are you using to power these? It's my understanding that a water column of at least 5 is needed for these to work decent. Also, how did you develop your jet style diffuser idea?
-
One more of an Asian smith doing open die ball forging. Notice how he forges it on the diamond to bring it back:
-
Thanks for the explanation. I bet you can watch the needle on your propane tank moving down with the big mama version. What will be the ID of the new forge? That's an interesting diffuser you made kinda, shaped like a jet turbine. With your burner mounted at a tangent, is your Mizzou brought up to the other side for the flame face? I noticed that not many people are making a safety solenoid shut off switch on these in case the electricity goes out. Also, on the pine ridge burners it looks like they are using tubing pressed into a secondary baffle plate between the plenum and burner block to eliminate leaks.
-
crappiew, Very nice build, and I like your color choice for the pipe. It looks like it's running great, how about giving us some specs on how you built it? For instance, it looks like you used an old water heater tank, what is the internal CI after insulating and interior length? It looks like you used about 32 crayons for orfices, what kind of WC is your blower rated for? And finally, is that a PID controller, and not just a DRO for the temperature? Thanks for sharing.
-
Check out this guy forging balls on the power hammer:
-
Brazeal Anvil Rising * 4" Plate Anvil (with pics)
ede replied to Avadon's topic in Anvils, Swage Blocks, and Mandrels
Does anyone have the original pics from this post that they can re-up? -
This source for high alumina kiln shelf was mentioned some time back, I thought I'd ad it here: http://www.psh.ca/index.php?cat_id=211 The Pottery Supply House is a Canadian company out of Ontario that looks like it has pretty good prices.
-
Branstetter, can you tell us a little about how you came to your calculations for eight, 9/16 orifices? Was is arbitrary, did you try Frosty's method with a 2x4 w/drilled holes, or an entirely different method of calculation altogether? Pretty neat.