

Trip
-
Posts
302 -
Joined
-
Last visited
Content Type
Profiles
Forums
Articles
Gallery
Downloads
Events
Everything posted by Trip
-

History of Blacksmithing & Demo video
Trip replied to Trip's topic in Blacksmithing, General Discussion
OK, it took me a while to remember where I read that, but here it is . For couples that could not secure their families' blessings, this was a consolation. You joined hands and declared that you took each other to be a lawfully wedded spouse, and lived together. Henceforth you were man and wife. This short but sweet ritual went by the name "handfasting" or "spousal." Parental permission did not enter the picture. No priest, minister, magistrate, or license was called for, although it was not unusual for blacksmiths to officiate—the anvil becoming a symbol of where long-lasting unions were forged. Here is the link to the website where I read that. http://www.history.org/foundation/journal/holiday07/court.cfm -
History of Blacksmithing & Demo video
Trip replied to Trip's topic in Blacksmithing, General Discussion
I did some research concerning the blacksmith holding weddings in the shop, and it aint "BS" as you call it, Thomaspowers. -
History of Blacksmithing & Demo video
Trip replied to Trip's topic in Blacksmithing, General Discussion
@ Sparky; Super basic.. hmmmmm.......... :) If my memory serves me right ( and I think it does) I had to keep telling you that you were getting TOOOO technical LOL I know its a habit. Just like me saying "ummmmm" all the time. LOL And for the record, I have NEVER done a public demo, but I hope to do some this summer........ guess I should write a speech on my side of the anvil, OR have sign in-front of the anvil that say's I am a mute... :D I will find out how the school like the video, and let yall know. -
History of Blacksmithing & Demo video
Trip replied to Trip's topic in Blacksmithing, General Discussion
Hey now, we didn't have our "speeches" all written down. I was having to make it up as I went!!! LOL Thanks -
History of Blacksmithing & Demo video
Trip replied to Trip's topic in Blacksmithing, General Discussion
Glad you had a good time!!!! Well maybe we can build you a masonry forge, I've taken all the guess work out of it. LOL I am glad the shop snake didn't make it's way in the video!!!!! If that had happened there would have been some "snake dancing" going on!!!! LOL -
Hey yall, Well yesterday me and my good friend Dave Custer made a video about the history of blacksmithing and we both did a demonstration. Check out the video and let me know how you liked it TTYL, Trip
-
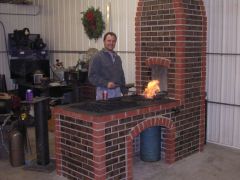
Well all I got to say is this........... It took me longer than I thought. LOL So here is how I built it. First I built the basic "frame" out of concrete blocks, then I "faced" the block with bricks ( just for looks). After that I built a steel "table" with a hole cut out for the fire pot, and then I laid brick on top of that, leaving a hole for the fire pot to set in. Then after building a 10X12 steel fire pot, it set right in the hole, and lastly I got some solid bricks to lay on the top run of bricks for an edge to keep the coal in. At the same time of doing all this, I also built a side draft forge hood that I built to sit on top of the forge. There isn't all to much that is special about it, except on the front I cut out a 14X14 hole for the smoke to go through. I know that is kinda big, but I built a door that slides up and down by using a lever, and by doing so I can control how strong the draft will be. I tested it out today by placing a piece of paper in the fire pot, and after a little adjustment on the hood door, the draft was SO strong it pull the paper right out of the pot and up the flue!!!!!!!! Now I know my description on how I built my forge was as clear as mud so I will show some photo's. I am sorry about all the links, but I couldn't get my photo's to upload on IFI. :( http://www.flickr.com/photos/kyblacksmith/6842337318/in/photostream http://www.flickr.com/photos/kyblacksmith/6858548260/in/photostream http://www.flickr.com/photos/kyblacksmith/6858534534/in/photostream http://www.flickr.com/photos/kyblacksmith/7007301973/in/photostream http://www.flickr.com/photos/kyblacksmith/7010058149/in/photostream http://www.flickr.com/photos/kyblacksmith/7022496669/in/photostream http://www.flickr.com/photos/kyblacksmith/6882036540/in/photostream http://www.flickr.com/photos/kyblacksmith/7028139821/in/photostream
-
Here is the side draft I just finished building today. http://www.flickr.com/photos/kyblacksmith/7022497573/in/photostream I built it with a door that slides up, so that I can adjust the amount of draft. Hope this helps, Good luck Trip
-
It does have a fill a "fill to this level" mark, and that is where I fill it to. Also I found an old add on a Tiger Blower just like mine and it said that it is "oil tight and dust proof case" Here is a link to the photo of the old add http://www.flickr.com/photos/kyblacksmith/7011417073/in/photostream Thanks, Trip
-
Hey yall, I noticed the other day that my forge blower was a little stiff when I tried to turn it, so I filled it to the proper level with gear oil. But today i found that most of the oil was on the floor!!!!!! There isn't any kind of name on the bower it's self, but there is a name on the stand, It reads "TIGER", and I can't find any kind of info on it. Here is a link to a video I made this morning showing where it is leaking oil, and the whole blower it's self. http://www.youtube.com/watch?v=6NL3b2MX-VM Thanks, Trip
-
Slit and drift on the diamond
Trip replied to Gayle Brooks's topic in Blacksmithing, General Discussion
Dave, For all your window replacement needs, just call my dad, your local and friendly Pella Window and Door Company Sales man. LOL -
I have one to, it say's Tiger on the stand, and the case has a bunch of numbers on it. It works Great, but it is leaking oil like CRAZY!!!!! It is leaking from the bottom, and from the "air hole". Do I need to rebuild it???
-
I had a Hofi hood for over a year, it was made out of mild steel, 4 feet long, and I had galvanized pipe on it, but I WOULD NOT make the hood it's self out of galvanized. Now the pipe I used was galvanized, And if it gets hot and makes fumes, the draft will pull it up the flue with the smoke.
-
Got my first small coal forge, need advice
Trip replied to Neil Blythin's topic in Solid Fuel Forges
Check with your local brick & block supplier and ask for fire clay, that's what I was going to use on my masonry forge before I decided to replace it with a steel fire pot. Glad to hear my idea on the handle worked for ya. Trip -
Well it sounds like I got some good material for my fire pot, and for a good price, since I paid $0.30 a pound for it!!! I was going weld up the fire pot today, but my welder ran for about 2 minutes, and then went on the fritz.... :( bummer.
-
Got my first small coal forge, need advice
Trip replied to Neil Blythin's topic in Solid Fuel Forges
It might be that the hole in the wooden handle is "wallowed" out, and may need to replace it. Looks like you got a good forge there!!!! just my 2 cents worth. -
Got a Question...... Thats nothin new is it?? LOL OK So I went to the metal yard today looking for some metal for a firepot and side draft forge hood. After looking for several hours I found a piece of 1/2 sheet big enough for 2 fire pots. After getting home I found that is it Stainless Steel!!!! So my question is this. Will 1/2" SS hold up as good or better than 1/2" mild steel??? Thanks, Trip
-
Looks like a good forge. Congratulations!!! A hair dryer will work for heating small metal, but I don't think you will be able to do any forge welding, or heating much metal over 1/2" thick, and it probably won't hold up long.
-
When I first started blacksmithing I would just put a pile of small pieces of pine in the fire pot and soak it in lighter fluid!! I don't store the KCC in the shop, but in a small shack that has a tin roof and wood lattice for walls, so it has plenty of ventilation. I think I freaked Dave out when I was all out of corn cobs and used just kerosene..... BAD IDEA!!!!!!!! LOL I don't know who's eye's were bigger, mine or Daves LOL So I know not to do that again. I have never heard of substituting corn cobs for a fuel.. hmmmm might have to try that some time, but it doesn't seam like it would get the fire hot enough to do any thing. I tried the saw dust and wax fire starters on a camp fire, but never a forge fire, I will have to give that a try when I get my new forge finished. Speaking of the forge, are there any "cut Sheets" for a fire pot??? Thanks, Trip
-
Daves first day with Brian a.k.a. Fieryfurnace
Trip replied to LDW's topic in Blacksmithing, General Discussion
Looks like you are learning a LOT!!!!! Wish I was there!!! -
Hey yall, Well I just came in from working on my new masonry forge (I will post photo's when it's done), I am getting close to having to build a fire pot. Although it is a masonry forge it will have a metal fire pot, I know I want to make it out of 3/4" thick steel, but I don't know how big I should make it, 10"X12" OR 12"X14", and how deep 4" OR 4.5"? Also, should I put in a clinker breaker? Also I would like to share with yall how I start my forge fires. I am posting this because my good friend Dave Custer of Fiery Furnace Forge LLC, has a REAL problem on how I do it. What I do is go down to the corn field and pick up corn cobs the combine discards, then when I get back to the shop I soak them in kerosene over nigh, then I set them back for when I want to start a forge fire. So what I do is, I take one KCC (kerosene corn cobs) and set it over the clinker breaker. Then all I have to do is light it with a match and put coke on it, and with just a little air I have a fire that is hot enough for forging in less then a minute. So what do yall think about it? Chase Check out my blogs at http://chewinthefatwithchase.blogspot.com/ & http://kentuckyheritagehomestead.blogspot.com/
-
TIRE HAMMER at long last
Trip replied to FieryFurnace's topic in Power Hammers, Treadle Hammers, Olivers
HMMM I think I might have to borrow that hammer from you, since you have an air hammer, I am SURE you won't miss it. :ph34r: -
 This is how my new forge is going to look!!!!
 -
I am building a new masonry forge in my new shop, and I am going to put a steel top on it, then I plan on building a masonry side draft hood on the side of it. So part of the hood will sit on a portion of the top, but I plan on supporting it underneath. So What size top would you put on it if it was your forge? Here is a link to a sketch of what I plan on doing. http://s1109.photobucket.com/albums/h422/kyblacksmith/?action=view¤t=Image274.jpg Thanks
-
Nice job!! I like how you attached the vice on the end, but I would weld some 2" angle all around the edge to keep the coal in. I didn't do that on one of my forges one time and it was a pain in the rear the whole time I had it.