

Glenn
-
Posts
17,325 -
Joined
-
Last visited
Content Type
Profiles
Forums
Articles
Gallery
Downloads
Events
Posts posted by Glenn
-
-
A search for autoignition temperatures yield the following.
A certain concentration of vapor in the air is necessary to sustain combustion, and that concentration is different for each flammable liquid. The flash point of a flammable liquid is the lowest temperature at which there will be enough flammable vapor to ignite when an ignition source is applied.
Unlike flash points, the autoignition temperature does not use an ignition source. In other words, the autoignition temperature is the lowest temperature at which a volatile material will be vaporized into a gas which ignites without the help of any external flame or ignition source. As a result, the autoignition temperature is higher than the flash point.
Beeswax flash point of beeswax is399.9 °F, (204.4 °C). There is no reported autoignition temperature.
Turpentine autoignition temperature 428 °F (220 °C; 493 K)
Linseed oil autoignition temperature of 650 F.
-
IForgeIron Blueprints
Copyright 2002 - 2011 IFORGEIRON, All rights reserved
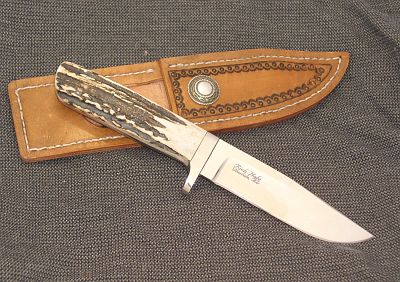
BP0592 Knife Sheathe
by Rich Hale and James Joyce
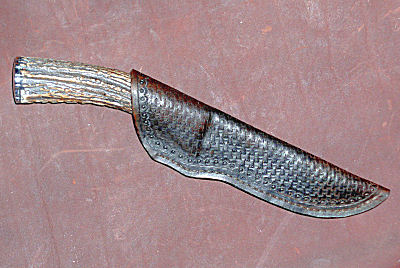
If you make knives and would like to know how I make a sheathe, these pictures and text may help. Like everything we do there are many ways and this is only one. What I would like to show is how I fit a sheathe to a knife and how I sew the seam. Almost all of the tools I use are available from Tandy. This is not about stamping patterns but I will show when I do that in the pictures. Tandy has a couple of books that will help as will any of there latest catalog for finding supplies and tools. One book I like is how to hand sew. It is not a pricey book.
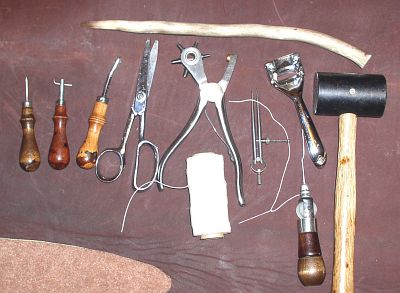
List of the tools I use in this Blueprint. Starting from the left is an awl for marking on leather, a grover to cut into the leather where the stitching holes will go, an overstitch wheel that lays out the spacing for the holes, a hole punch for the rivet holes, dividers for laying out the area for the basket stamp pattern, skiving tool for tapering the billet, sewing awl with bobbin, sewing needle, mallet, thread and an old antler for shaping the finished sheathe around the knife handle.
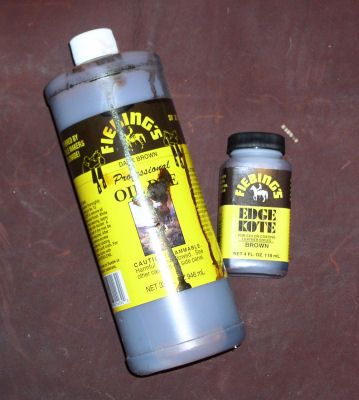
These are the products I use to dye my sheathes. The large bottle is the oil dye and the small is edge coat. I dye the leather several times until I get the look I like. I do the edges with the edge coat. I put on one coat with a cue tip and when it is dry I hands sand it. Another coat and it is smooth and nice.

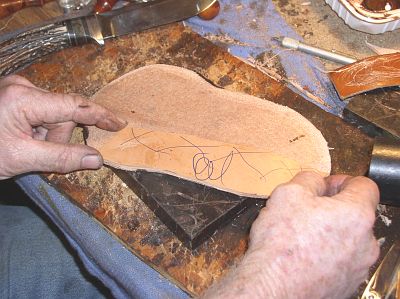
I use 8 oz leather for sheathes. I lay the knife on the leather and cut a large enough piece with the scissors that it will fold over the knife. The leather cuts better if you wet it first. Several time in this demo we will expose the blade to wet leather and if you have a carbon steel blade please take the time to wipe the moisture from your blade to prevent rust.
I have placed the knife on the leather and trimmed the outside. making sure I have enough when folded over to leave room for the seam.


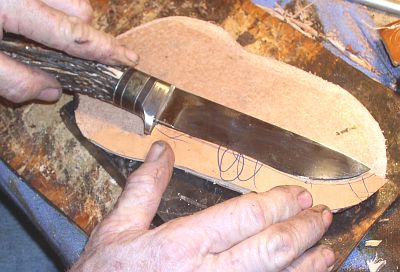
This is a right handed sheathe. I have laid out the area for the pattern with the dividers and awl and have started the stamping. I used the grooving tool to lay out the line for the stitching. It actually cuts little shallow trench for the thread seam to lay into. I then used the overstitch wheel to mark where the stitching holes will be drilled. You just run the wheel in the groove and it spaces the marks. They sell wheels for different spacing's have them show you several and choose which you like. They are made to mark so many stitches per inch.

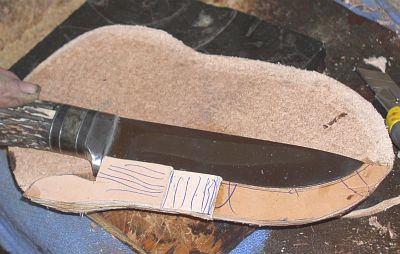
I have marked up another piece of leather and laid it on the inside of the sheathe. I will cut this to match the blade and use it as a spacer, called a billet.

I lay the knife on the billet and mark around it where i will cut it to fit. The billet is a key to making the knife fit into the sheathe nice and snug . And if you do not put a billet in and sew the folded over sheathe together the knife edge may cut the threads.

I have cut the billet and laid it in place to show how it follows the edge of the blade and leaves room for the guard . The billet will need to be thicker on this sheathe to make room for the handle and guard.

I have glued on two more piece of leather on top of the billet. You can use rubber cement for this to hold things in place for sewing but I prefer Barge cement.
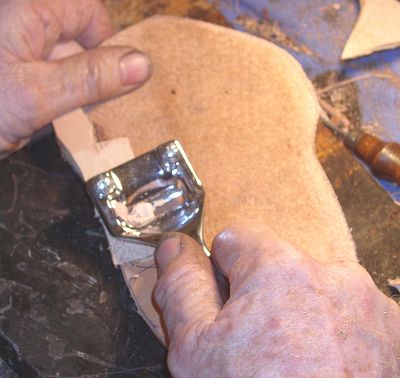

I use the skiving tool to taper the last two pieces I glued onto the billet. The tool has a blade in it and cuts when you pull it. You can also do this with a sharp knife or razor blade.

The edge of the sheathe showing the billets, and how they taper down to make a smooth line along the edge. Sheathe is ready to be folded over and cemented in place.

After sewing I wet the whole sheathe with water and push the knife in and using my fingers and an antler I mold the sheathe around the knife so it fits nice. I then remove the knife and let the sheathe dry in the sun. I then use a belt grinder to dress the edge of the sheathe and smooth it up so all pieces of the billet and outer layers appear as one. I use a 120 grit belt for this, You could shave the edge with a blade and hand sand the edge.

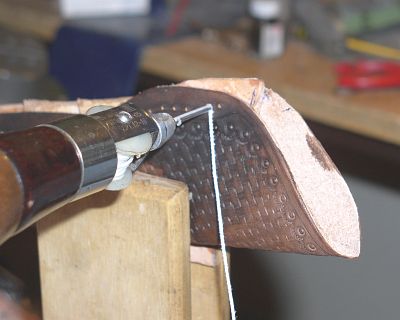
I have a small block of wood clamped to the drill press table to provide a back support for the leather when I drill with the 1/16" drill.


Drill through the sheath using the marks you made with the overstitch marking wheel as a guide. Use care to keep the sheathe flat so the holes exit the back of the sheathe in a straight line.

Sheathe is all glued up and in stitching horse I start the first stitch in the second hole and pull about 20" out the other side for this size sheathe.
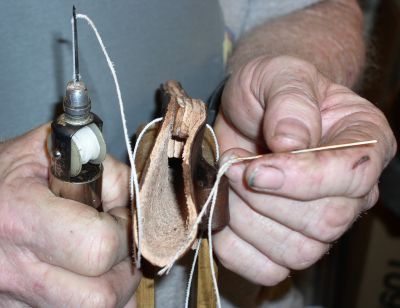

I have pulled the thread through and attached a needle to it,, the needle always stays on the side away from the stitching awl.
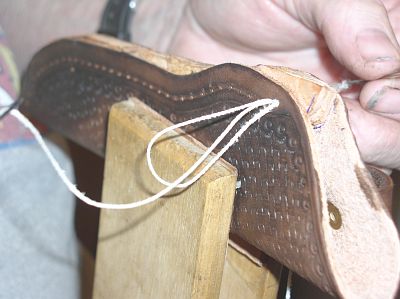

Go into the first hole now. when you push the awl through and pull it back a little bit it will leave a small loop on the other side push the needle through that loop and then pull withdraw the awl,,pull evenly on the strings from both sides so they make a nice tight stitch keep the tension the same all through the sewing for nice looks.

When you get to the end of the sheathe start back and sew about three or four hole to lock things tight. Then push the awl though and put the needle like this. pull the awl out and the needle will keep a loop of the thread on the back side ,,pull that loop out a bit and cut the awl loose. Now you have both ends of the thread on the back side. cut them short.
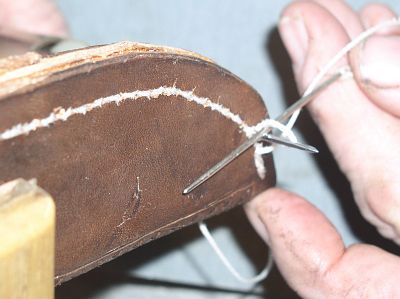
Now its the time to put some finishing touches on the seam.
Lay the sheath on its face side on something nice and hard and real smooth. Tap flat on the back of the seam all down its length with the mallet. Then take the overstitch wheel and run down the seam on both sides of the sheathe. this makes the stitches look real clean.

Different styles of knives may take different types of sheathes. We covered the fold over push type and this is a flat sheathe sewn all around. to fit this sheathe you would make a billet like in the demo and it would go all the way around the knife and be sewn in like the other but this would only need to be one layer between the front and back pieces. I hope this gives you and idea on where to begin or may just let you know that how you are doing your leather work is better than mine.

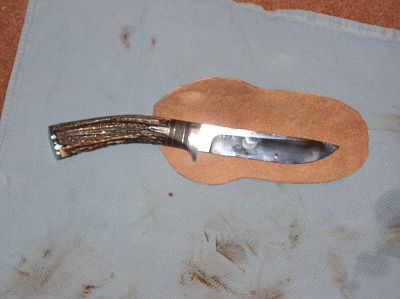
This is what all the work has been about. I feel that when I spend a lot of time on a knife it is only right to compliment it with a well fit attractive sheathe.
Special thanks to Jim Joyce for flying in to take the photographs, And to my hands for the modeling assignment.
-
Linseed oil polymerization. What is it, and how does it work? Rabbit hole alert:
-
Are you close to that someone you care about ? The rest you can deal with.
-
It is suggested to melt the beeswax, you use a double boiler. Water boils at 212° degrees Fahrenheit or about 50° degrees Fahrenheit above where the wax melts.
The beeswax, BLO, terp mix can be applied at room temperature. Warm metal just means that it applies a little easier and flows into the nooks and crannies a little better.
-
Beeswax melts at 145° degrees Fahrenheit, and has a flashpoint of around 400° degrees Fahrenheit.
Turpentine can catch fire around 95° degrees Fahrenheit (35° Celsius) as that is the flashpoint.
Linseed oil flashpoint is approximately 200° degrees Fahrenheit (93.3 °C). Flashpoint means the temperature at which a liquid ignites without warning when in contact with air.
-
Put a couple of firebrick to cover the end of the forge and act as doors. The forge will get hotter faster.
-
It would depend on the size and shape of the arch, and the metal stock being used.
-
The right tool for the job definitely has its advantages.
With tightening bolts, compare an open end wrench, a box end wrench, a 6 point box end wrench, a 12 point socket, and a 6 point socket. Look at the length of the handle for each. You decide which is the right tool for your job.
-
Hot metal moves easier than cold metal. Anything above 1/2 inch thick would benefit from being hot so it will bend easier. Only the heated area will bend easier. You can only work so fast with a hammer and once the heated area cools, it should be heated again so you can continue working.
Get a block of modeling clay. Make the clay into the size and shape of the metal you are using. Use the clay to make the bends, scrolls, tapers, etc and lay out the pieces to make the project. You can easily bend and shape the clay for an exact fit. With clay you can make changes as often as you wish.
Form the metal to the same shape and size as the clay and assemble the metal together for your project.
When you look at books, photos, etc, do not look but see how many small pieces were used and put together. You should find many of the scrolls, bends, tapers, etc are repeated, then assembled to make a much larger project.
-
The project in the video was done using a hammer, ruler, soapstone marker, grinder, vise, bending fork, and welder.
The rest is just putting small pieces of metal together to make a much larger project.
-
Like many things, you just have to eat the cost of the first stick of metal or stock. Buy an extra stick or two to begin with in order to save a trip back to the steel yard later. You can always use any left over stock later or on other projects.
Bending Cold:
Take your best guess at the size die you are going to use as a template. Clear the table and set up the bending jig. The easy way is to use a dog to grab or hold the beginning of the circle. Slide the stock between the dog and the die and start bending. The die can easily be made from say 2x? lumber. Draw the diameter circle you want to test and cut it the die out with a jig saw. Depending on your trial results, you can always cut it smaller if needed, or add a thin strip of wood if you need it larger. Make things easy, use a half circle die so you only have one or two or repositions to get a full circle.
Measure the diameter of the resulting circle, inside diameter, outside diameter, or what ever is important to your project. Adjust your die as needed to get the diameter you want.
Now that you have the jig working, feed the stock in from the bottom so the coil rises up and out of the way as things progress. If you can, coil the entire length of stock, or 5 circles on a new piece of material. Measure the length of the curved stock to be sure it is exactly the circumference you need for the circle you want. Cut the circles (stock) and put 3 good circles off to the side, ready for welding. Put an X on the flat spots, and put the two circles with flat ends in another pile.
This is where you stop and weld up the 3 good circles to be sure that the system works to your numbers and your satisfaction. A lay out table with say 5 dogs that you can put the circle inside the dogs, that are positioned to that the two ends come together for welding. Any gap can be corrected by repositioning the dogs, or by inserting a wedge between the circle and a dog. Make the weld and inspect the circle to be sure it fits your project.
Take the two flat sided circles, measure the length of the curved stock to be sure it is exactly the circumference you need for the circle you want, and weld the flat ends together. Bend the flat sides into a curve that matches you ring. Cut them apart and take the ring to the welding table for assembly. Make the weld and inspect the circles to be sure it fits your project.
Sit down with the 5 rings, a tape measure, and a cold drink. Stack the 5 rings one on top of the other and see if there is any difference. This is where the 2 rings with the X can be identified, if needed.
Review the entire process to see where or if you can make improvements or changes to the system. If you are happy with the system, make one more test run of 5 rings, sit down with another cold drink, and make another inspection, before you start final production.
-
The challenge is to solve the problem of the flat section at the beginning and end of a circle.
You should be able to bend 1-1/2" x 1/4" steel flat bar by hand, cold, against a die that you can make from metal or wood. You do not have to make a full circle die, as a half or quarter or partial circle die will work. Couple of bending wrenches and you should be good to go. First circle would have a flat spot where you started, the rest would look like a coil (think coil auto spring). Roll as much as you can handle, then cut the flat bar where it overlaps to give a smooth circle.
That leaves one 4 foot coil of stock at the beginning and one 4 foot coil of stock at the end of the bar with a flat section on the circle. Weld the two flat sections together and bend the two joined pieces of flat bar against your die to form a round circle. Once the straight sections are now round, cut them apart and weld them into two individual rings.
-
Can you use the radius under the heel? Not as a perfect fit but to use as a tool.
You can use the step of the anvil to curve the flat also.
-
16 minutes ago, Phillip-SC said:
would be great to have a swage block with a large radius
You bought the whole anvil, not just the face. Turn it on its side and use the curve between the feet, or under the horn or heel.
Find something with a 15 inch diameter, clamp one end, and walk the 20 feet around the form. Then cut the rings where they overlap.
The roller should let you do this. Roll the entire 20 feet into rings at one time.
-
You are not going to be making a different product each time, so start a catalog with photos of the products, dimensions, weights, etc. and include shipping to east coast, west coast, and middle America. Keep a running total of how many were made and how many sold. The running total will help you with how many of each to make at a time so you have shelf stock to pull from.
Shippers will provide you a cost estimate of packaging and shipping, which requires two trips to their shop, one for the estimate, and another trip and after the item is approved, funds clear the bank, and it ready for delivery.
Other shippers have a flat rate system and provide you boxes to use. If it fits in the box, it ships for a flat rate. But you have to do the packaging, addressing, etc.
-
I got out of casting when recycled materials were melted and a pot full of liquid metal developed a problem. PLAN B had to immediately implemented. Had I not used the wisdom of others, it could have easily been damage to property, and or a trip to the hospital. Fortunately everything worked out but it was enough to scare me away from casting.
If you still insist on casting, even on a small scale, study everything you can find on the subject. Seek out those that know what they are doing Learn what to do, what not to do, the proper and safe way to do it. Youtube is not your friend here, and after one short class is not the time to adventure out on your own. Proper protective gear and proper tooling can be expensive, but much less expensive than a hospital visit. Things will go wrong, it is just a matter of when.
-
Only the end or goesinta needs to be flattened to fit. The rest can be left as round pipe.
-
There are packaging and shipping services that take your product, package it, and ship it to the address you provide. They can work with one item or what ever you bring to them. Attach identification to each item, your business card, with the receivers address on the back, tied with a string to the item, so there is no question where it came from or where it is being shipped to.
Write the check and walk away.
Some services will pick up from your location.
-
Do you want it to be exactly right, like the original, or make it work?
Fabricate a goesinta for the flattened 2 inch pipe, and then weld to the goesinta on what ever you like or need for leverage.
-
2 hours ago, Daswulf said:
Being not so tech or business savvy doesn't help me one bit. And shipping and logistics make my head hurt but I might just over think that stuff.
This is where you hire out Mr. Savvy and Mr. Logistics so you can concentrate on what you do best. Then hire an accountant to keep track of the paperwork.
-
Look for a coupling so you can screw on an extra leverage extension pipe when needed.
-
Thanks for letting us know your ok and able to deal with the damage. Hope they get the utilities and services back up and running ASAP.
-
Post rules of the shop in several places. The shop rules, your rules, should be hard, and fast to implement. When broken, that person is gone, sent home, and everything stops until they leave the property.
Keep a fire extinguisher, or several fire extinguishers, and a first aid kit handy. If they even say ouch, then stop and look for injury.
Rules for the shop:
Top have of a sheet of paper.
Please list all body parts you can do without. Right eye, finger, left pinkie toe, heating, etc. Have them sign their name under the list.
Bottom of the sheet of paper:
It is my personal responsibility to protect anything not listed above, and sign their name again.
Frazer's Corner of the Internet [photo heavy]
in Member Projects
Posted
Try this link for some ideas.