

Glenn
-
Posts
17,325 -
Joined
-
Last visited
Content Type
Profiles
Forums
Articles
Gallery
Downloads
Events
Posts posted by Glenn
-
-
Mele Kalikimaka Y'all
-
According to the news, It was so cold that ...
It's raining BATS in Texas: Stunned creatures are plunging from underside of bridge as Lone Star State
Frozen Iguanas Falling From Trees in Florida
Nearly 200 sea turtles have died off Cape Cod, Massachusetts, freezing to death
In general, when the temperature dips below freezing, limit your dog’s outdoor activity to 10 to 15 minutes.
It was a 3 dog night: The story goes that people who live where it gets REALLY cold sleep with their dogs to stay warm. A cold night calls for one dog, a really cold one two dogs, and a three dog night is one to be remembered.
-
At the bird feeder, the chickadees have fluffed up their feathers to where they look like pigeons.
-
We found the true meaning of "a Three Dog Night"
The fire in the forge would not start.
It was so cold that ...
-
A thermometer measures temperature and does not change if the wind blows.
NWS: Wind Chill is a term used to describe what the air temperature feels like to the human skin due to the combination of cold temperatures and winds blowing on exposed skin. In simple terms, the colder the air temperature and the higher the wind speeds the colder it will feel on your skin if you're outside. So even if it remains the same temperature, but the wind speed increases it will actually feel colder to your skin.
So why does it feel colder if the wind speed increases but the temperature remains the same? The reason is because as wind blows across our bodies it takes the heat we naturally emit and blows it away from our bodies. The faster the wind speed the faster our body heat is taken away and the colder it feels. It is a similar process for when you blow on a hot bowl of soup to cool it down. The temperature that it feels like outside due to the air temperature and wind speed is called the "Wind Chill."
-
At what temperature do you risk damaging your anvil or hand hammer by using them in the cold?
-
Wait until it warms up a bit and the dog enjoys the snow so much it comes back with 15 or 20 baseball size snow balls stuck in the fur.
-
Thank you for o the update. Gives home for the holidays a whole new meaning.
-
Thank you for o the update.
-
Starting today, the US and Canada are in for 3 months of winter weather.
-
Johnson's paste wax is no longer made. MSDS Sheet
Johnson’s Paste Wax Flashpoint: 87.98°F (31.1°C)
-----------
Gasoline (petrol) −45 °F (−43 °C) Autoignition temperature 536 °F (280 °C)
Diesel (2-D) >52 °C (>26 °F) Autoignition temperature 210 °C (410 °F)
Jet fuel (A/A-1) 100 °F ( >38 °C ) Autoignition temperature210 °C (410 °F)
Kerosene 100–162 °F (>38–72 °C Autoignition temperature 220 °C (428 °F) -
Flashpoint means the temperature at which a liquid ignites without warning when in contact with air.
Linseed oil can catch fire at approximately 200 °F (93.3 °C), the flashpoint.
Turpentine can catch fire at approximately 95 degrees °F (35 °C) the flashpoint. It will also auto-ignite, that is catch fire without any source of flame or spark, at a relatively low 220 degrees Fahrenheit (104 Celsius).
-
It took a while for the vise to freeze up. It may take a while to break loose. Be patient.
-
This is where an apron is used, not only for protection, but to keep your clothes clean.
Get two aprons, one waist down, and the other a full apron.
-
Thank you for noticing.
-
Holes in the tube indicate they have moved out.
-
Lessons in Blacksmithing
Copyright 2002 - 2007 IFORGEIRON, All rights reserved.
LB0007 Seeing ColorsExplanation of colors:
I divide red, orange, and yellow (the colors of heated metal) into 3 groups each. Start with black then low red, medium red and high red, low orange, medium orange, and high orange, low yellow, medium yellow, and high yellow, then white heat. This is followed by sparks. The lower temperatures have more separation in heat colors than the separation in heat colors at high temperatures. The difference is suttle, and everyone sees color differently. The same colors are different temperatures in bright sun then in shade and may differ by as much as 2, 3, or 4 color levels. You need to standardize to your conditions. The 12 color divisions (black to sparks) are enough for discussion purposes, and are repeatable under YOUR conditions.
This is the time you need to find a steel yard and purchase some NEW mild steel stock. Put the metal into the fire and get it hot enough to throw sparks, just like a 4th of July (USA) sparkler. This is usually when the metal is beyond high yellow or white in color. You have now successfully burned the metal, don't do it again as that is TOO HOT. Cut the burnt end off the stock to where there is new material.
Put the stock back into the fire, heat to high orange or yellow, and hit it with a hammer. It will move a certain way under the hammer each (every) time. When the metal gets to low orange in color by loosing heat, it will stiffen a bit. Warm it back up and do it again at orange in color, hammering the metal while it falls to medium red in color. Put it in the fire and bring it only up to showing low red in color. Hit it with the hammer and feel how it moves (or doesn't want to move). Back to the fire and then repeat at yellow. Feel the hammer when it hits the metal at different temperatures. If you see the color of the mild steel as red stop and take another heat, get it back up to working temperature.
Different types of metal act differently at the same heat color. Some metals have short working temperatures, meaning that they only should be worked at medium to high yellow for instance. If it gets to low yellow quit and take another heat. This is something you will have to either learn on your own or seek the advice of others that have worked this type steel.
Your eyes see colors differently then how others see and label the same color due to age, glasses, and life experiences. You are building YOUR heat standard for YOUR forge under YOUR smithy conditions.
During the next week, look at different objects in your part of the world and and see the color. Then label that color as black, reds, oranges, yellows, white. The practice will aid you when you get to the forge and being able to tell the sometimes suttle differences in colors. If you really want to know what temperature a specific color represents, or what temperature a piece of steel has been heated to, purchase a temperature measuring device called a pyrometer. There are also wax pencils that can be applied to the steel that will melt at a specific temperature. Both work well and are more than accurate for use in blacksmithing.
A temperature chart for mild steel is as follows.
Sparkler - burning the metal
White heat
High yellow
Medium yellow
Low yellow
High Orange
Medium Orange
Low Orange
High Red
Medium Red
Low Red
Black heat (1000*F +/- down to room temperature)
-------------------------
Black heat can be 1000*F or more depending on the ambient lighting.
From black, to room temperature, to freezing, the metal looks the same. This is why everything on the hot table is considered hot until it goes into the water, then into the bare hand, and only then onto the work table.
The best way I have found to get a "black heat" temperature reading is to turn the hand palm up and DO NOT TOUCH but just pass the back of the hand across the metal. Start at about 6 inches or so and lower the gap with each pass. The back of the hand is not calloused but tender, and sensitive to heat.
That is 12 levels of heat. If you divide 100% by 12 that is 8% repeatability at each heat level, or about 150-200 *F -
IForgeIron Blueprints
Copyright 2002 - 2011 IFORGEIRON, All rights reservedBP0553 Building a Brick Forge - Part 1
by Jeremy Knippel 2006
I will try to explain the best I can on how I built this forge. Nowing that if you build a forge similar to this, you may be using mat'ls of different sizes and or re-design it to fit your needs. I'm including a lot of pictures so that any cement contractor / or yourself can see how it's done and use their / your judgement as to any changes or modifications. These are the only pics I took during construction. If I don't have a clear picture of something I will try to explain it as I go.
*******This is just my design and may not be the best way or the right way to build this.*******

In the backround is a couple pallets of bricks worth and this shows the future placement of brick forge.

These are the dimensions for the brick layout. The 2 side arches are not dimesioned but as you will see in the following pics - you will understand how they are in relationship to the rest. All they are for is access to the ash dump and extra storage under the forge, so they do not need to be any place exactly. The 24" dimension is the depth of the chimney from the firepot up,(again later pics will explain).

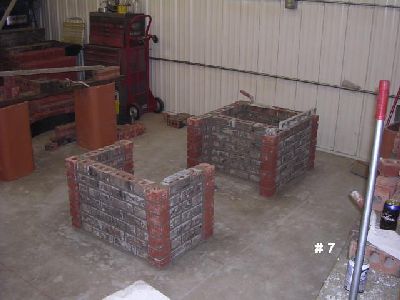
This is the start of the lay out so the contractor can get a feel for what is wanted. The row next to his hand will be moved over toward him so the 2 bricks on top can be placed in between the 2 side rows so the width is 3 brown bricks an 2 red half bricks.

This is the start of laying the bricks. The red half bricks for the borders are set out from the brown bricks by a 1/4" for a bolder look. Concrete ties were used ( shaped in a U and inserted in the holes of the bricks and core filled) to help hold the border bricks to the rest of the main ones.

Another view of the start.

Working on the base of the chimney.
The bricks are layed up to were the arches will set now.

This is the start of puting in the archways. The arch support is made from 1/4" x 6" flat steel. Each end has a 1"flat extension to set on the bricks. Being the arch supports were made from mat'ls at hand I had to put a rod support on the back side to hold the arch from tipping inward during the brick installation.

Laying the top row of red bricks for the (coal tray and firepot support - # 2 in the series of 3).

Another view.

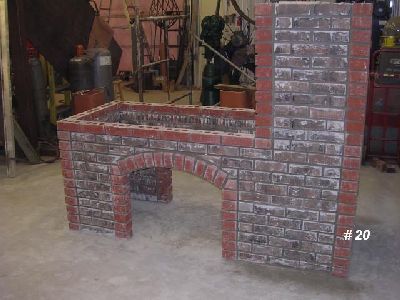
The brick work is done and ready for the chimney floor (will be the same level as the coal and firepot level).

The base below the chimney was filled with extra and broke blocks for filler and filled with cement. I used a 6" galvanized pipe for a clearance hole for the 3" air intake pipe. This is a critical measurement as far as height, so that after everything is done your air intake pipe will fit into the bottom of your fire pot. Also you can see were the back of the arch was filled with mortar and smoothed upward (as a fillet weld), this may not be necessary but I did it for extra support for the arch bricks.

Fire brick was used for the inside of the chimney area. Measurements are approximate - I did not measure these during assembly - I triied to get them afterward the best a could. These are as close as I could get - you may have to slightly change these measurements as needed.

Laying the brick up as the chimney is being done. The chimney opening is starting to take shape.

The opening is almost done(14" wide, 16-1/2 " tall, and 17-1/2" at the middle of the arch). The arch support on this one is temporary - it was removed so that there was no problem with different heat expansions between the metal and brick.

Things progressing along good.

By this time I was getting pretty exited as to how it was looking.


View looking down the chimny.
Another view.

Starting the tapering of the inside of the chimney.

Tapering the sides inward so the 12"x12' flue will have a place to set.

Another view.

You can see were the inside of the transition of the taper is plastered over with mortar to make smooth for the smoke. Also there is a smoke shelf just above the top firebrick row across the back.
The rest of the outer bricks were brought up to the clay tile area and the first clay tile flue was set.

Another view.

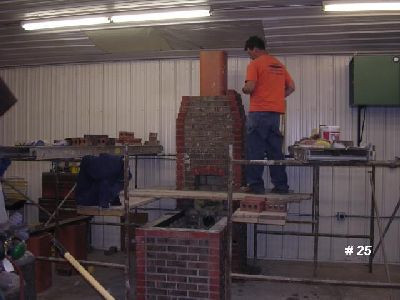
From the bottom of the 12 inch x 12 inch flue up - insulation was put inside the gap between the outer bricks and the flue. This helps to speed up the heating of the flue to start the smoke draw. This was done all the way to the top of the chimney outside above the roof.

Another view, ready to go through the roof.
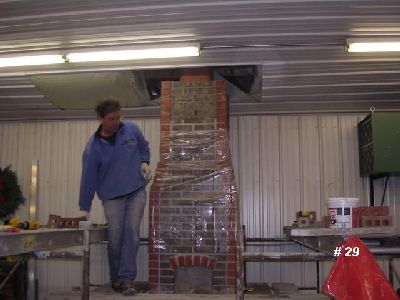
Plastic was put on the tapered area to keep motar off while proceeding through the roof.
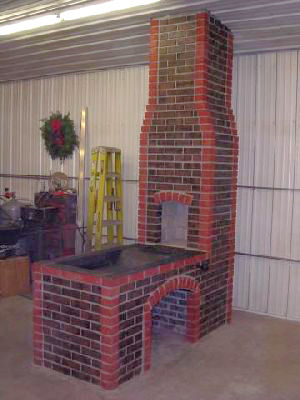
All the brick is done, acid washed, and sealed. The chimney above the inside ceiling was made with regular block around the flue and built up to the recommended height according to the distance from the peak of the roof. I made a stainless steel roof jack for were the chimney exits the roof outside.That's how I built my forge -Jeremy Knippel
-
Purchase a block of modeling clay. Anything you can do with modeling clay, you can do with metal. Think of it as 3 dimensional problem solving. You can forge ideas in clay and the practice transfers directly when you can get to the forge.
-
Tongs that properly fit the work being used, a heavy work table, post vise, machinist vise, and hand held angle grinder. One good measuring device and marker. One because sometimes rulers do not agree with each other, and you should cut with the ruler you measure with. The rest can be made or acquired as the projects call for different tools or tooling.
-
The overall height of the tool and the target area height for the hammer is a consideration.
If the tool is used much, the top die may mushroom under the repeated impact of a hammer.
Depending on the design of the tool, slag and debris may collect below the bottom die or collect in the rails. An easy to clean tool is helpful, but the tool can be simply tuned up side down, and the debris dumped out. This is fine for a time or two but under heavy use gets bothersome.
-
There are several designs, H shape, C shape, and 45 degree diagonal. Each has a purpose.
-
Link with photos is now a part of the very first post.
-
Forget bringing it home for a while and instead go to the resource center (scrap pile) and dig out the materials necessary to complete that project you have been putting off for a while. Resource center (scrap pile) gets smaller, one item gets scratched off your list, one project gets completed, and you have a new partial inventory of what is available to work with in the resource center (scrap pile).


Living Room Anvil
in Anvils, Swage Blocks, and Mandrels
Posted
Do NOT to overthink simple. You have answered your own question in a couple of different ways.
Modeling clay at room temperature is not so stiff that it takes a lot of impact to form or deform the clay. Instead of hitting, try using the hammer and tools and simply push the clay.
Look for, or make, a lap anvil that fits across the legs and the actual anvil is between the legs and in the lap. Another option would be a cobbler's cast iron shoe last anvil that fits across the legs and the actual anvil is then in the lap.