

Glenn
-
Posts
17,325 -
Joined
-
Last visited
Content Type
Profiles
Forums
Articles
Gallery
Downloads
Events
Posts posted by Glenn
-
-
Many hits on a subject search, most advise against it due to the use of electricity during the process. PPE and cautions do not remove the dangers.
Safety alert means learn all you can on a subject and understand the dangers before you try it. No reason to get hurt of killed just because the opportunity is available.
-
Safety alert:
Lichtenburg method or fractal burning of wood is extremely dangerous and can kill you.
How dangerous? The American Association of Woodturners has banned the use of this process at all of its events and has banned articles about use of a fractal burner in all of its publications.
-
A quick search of IForgeIron came up with the following.


-
Photos of all sides and the bottom would give us a place to start.
-
Steve Sells posted it on IFI and it was in the archive.
-
If you think hammer angle is a problem, put a piece of wood on the anvil and hit the wood 2-3 times and look at the impression the hammer face makes.
Turning your back to the sun puts the hammer and anvil in a shadow. Next would be to hang something up a tarp as a sun shade.
-
Condolences to his family and friends.
-
Collect a bunch of wooden pallets. When you get in wood, cut it to the size the stove can use. 16 inches is standard. Then split it to the size the stove can use and stack the splits on the pallets and up and off of the ground. The pallets are usually 48 x 42 inches so if you stack the wood 48 inches tall you have a cord of wood for every 8 feet of stack length.
Stack only the best wood, straight and of the proper size for the stove. Put the twisted wood, crouch wood, gnarly wood, and knotted wood off to the side to be burned first at the start of the burning season. If you have a piece of wood that will not split, not to worry, throw it into a separate pile. No use fighting with it, or stressing the wood splitter. When everything else is split and stacked, return to the gnarly wood pile. You purchased a chainsaw to cut wood, so cut the gnarly wood into pieces that will go into the stove and burn them first.
The wood should be stacked so a mouse can run between the splits but a cat can not follow. (I do not know how that equates to inches, metric millimeters, or metric centimeters, but you get the idea.) This allows for air flow to help dry out the wood. The bark up or bark down discussion continues, with covering the top of the stack always being a good idea.
I have looked into stacking wood using the Holz Hansen method. The concept is very interesting as a single stack can hold a lot of wood. Build it on pallets to keep it off the ground and allow for air flow.
Stack a single cord of the best wood as close to the door as is practical. Do not use wood from that stack until the temperature drops to really cold, and the snow stacks up higher than you can shovel. Now slide out the door (if you can get it open because of all the snow), grab some wood and slide back inside while you are still warm.
No reason to think ice sickles will burn well, they will not. Keep a couple of days of wood inside so it will warm up before going into the fire.
Each stove has its own personality and likes to burn a certain way. Do not fight it. Learn what makes the stove happy and enjoy being warm.
-
The wood stove I use has to exhaust 300*F, (350*F is better on cold days), measured as the chimney exits through the wall) for the chimney to draft. The stove prefers dry firewood 4x4 inches in size. It burns best when the fire is to the front of this stove where the air enters.
If you have some unseasoned or damp wood, stand it on end in a circle around the stove so the radiant heat dries it out. Then mix it little at a time with 2x4 or 2x2 size wood that burns hot.
If you have the opportunity, stack all the split wood from the same tree together, so it all burns the same. Mixing types of wood means you must constantly adjust how it burns.
A cheap laser noncontact thermometer will help you with how a fire is burning by reading the skin temperature of the stove in several different locations. After a while you can guess at the burn temperature by holding your hand out to feel the radiant heat.
-
Was it made from a mower blade or a saw blade?
Clean the metal after each use and coat it to keep out moisture and oxygen.
-
You may want to look at South African Highveld
Any plans we suggest may be of no use to you in South Africa, as it would suggest parts not available in your part of the world.
It would be more useful to tell us what you have to work with, if the want to have the press turn key, fully built and working, or just how much you can build on your own. Do you have a welder and can you make structural welds for instance.
Are you interested in a hydraulic press, screw press, fly press, or mechanical press? Have you looked at the section on hydraulic presses, fly presses, etc which has 7.3k posts?
Have you looked at the section on bladesmithing? Pay particular attention to the sub-sections Knife Making Classes,
Knife Making Class 101, Knife Making Class 200, and Knife Class Reference Material. -
Glad to hear Thomas is back home. Thank you for the report.
-
You have now made something that did not previously exist until you put your hand and mind to the hot metal. Therefore, you ARE a blacksmith. Now, you can spend the rest of your life becoming a better blacksmith. George N.M.
-
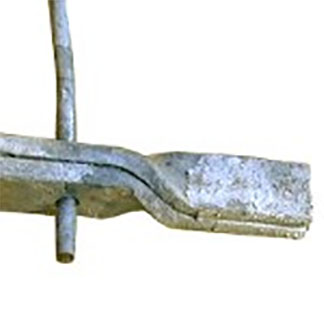
BP001 Easy to make tongs Copyright 2002
by Whitesmith
Easy to make tongs. One rivet, one twist, and your done.
Whitesmith is a 10 year old that provided IForgeIron with the following easy to make tongs.
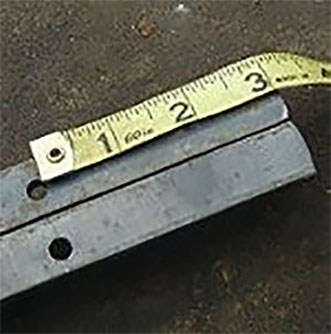
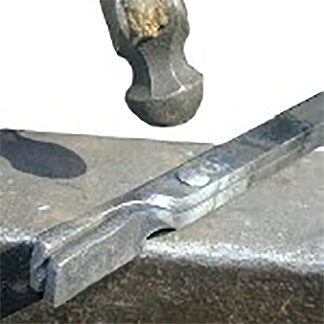
Start with 2 pieces of 1/4" x 3/4" x 20" long flat bar. Drill, or heat and drift, a 1/4" hole, 3 inches from one end, and in the center of the bar. Insert a piece of 1/4" round rod into the hole. Put a vise grip on the handle end to hold the two pieces together and heat the working end of the tongs to orange in the forge.
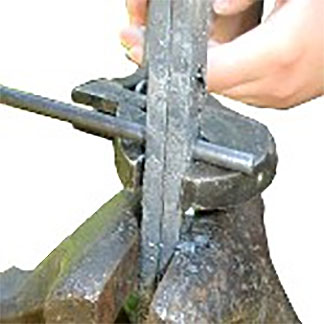
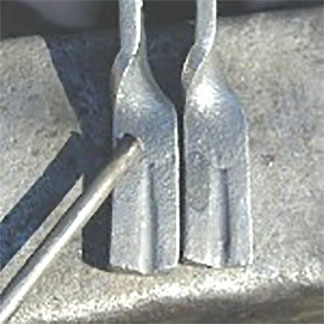
Place the tong end in a vise. Put a crescent wrench just under the piece of 1/4" round rod and adjust the vise so there is about 1 inch of space between the bottom of the wrench and the top of the vise.
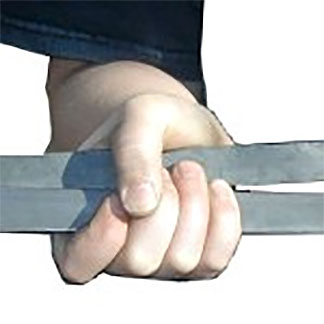
Turn the wrench 90 degrees or 1/4 turn. You are turning BOTH pieces of bar stock at the same time, and in the same direction.
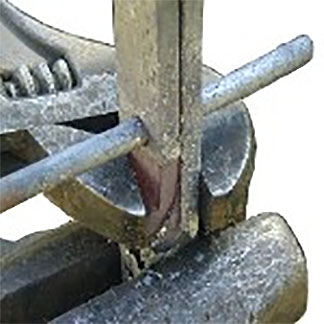
This shows how it looks from the top and the side.

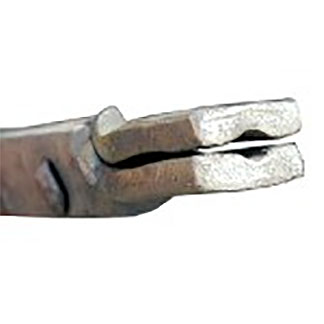
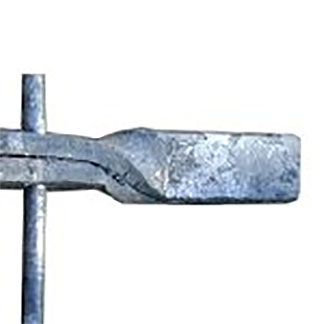
Remove the rod. Heat the tong end in the forge and then shape it for what you want it to do. This set of tongs was being built to hold 1/4" round stock. The tongs can be taken apart and worked easily in the forge. When you want to see how you did, put them back together with the rod.
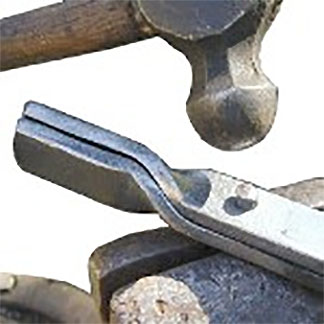
When you have the tongs shaped the way you want, heat the end of the 1/4" round rod and put it in the hole in the tongs. Clamp it in the vise and pein the end of the rod to form a rivet head
Once you have made a rivet head from the end of the rod, cut the other end of the rod off, leaving enough rod to make a rivet head on that side too. Put the whole thing in the fire and get just the end of the rivet hot. You can make the rivet head with the rod cold, but a little bit of heat makes it work a lot better. Put it on the anvil and pein the end over to form a rivet head. Be careful not to get it too tight. You can always make it tighter later, just pein it again, but you can not make it loosen up by hitting it with the hammer. Note: For the rivet, leave about 1-1/2 times the diameter of the rod to make the rivet head

These tongs have just about the right space at the end of the handle to work for me. You can heat and bend the handles to adjust the space to fit your hands.
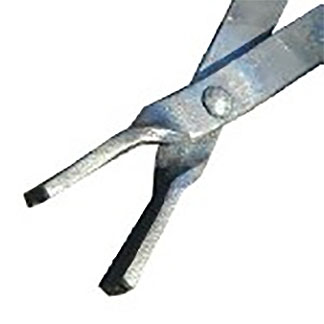
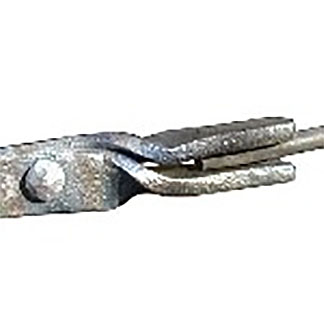
These are not heavy tongs, and will not do the work of heavy tongs, but they will do a lot of work and are quick and easy to make.
-
Thank you for the update. We wish him well.
-
Next fire make an S hook with one loop as before, but the second loop say 3 or 4 inches diameter. The large end is nice for over a tree limb etc. Makes hanging a basket of flowers from a tree limb easy.
Nice thing about working metal is you can reheat the pig tail and fix things, either by straightening the pig tail out and reforming it in the other direction, or grabbing the pig tail with a pair of pliers and giving the pig tail a twist to the other direction. It does not have to be done the hard way, it just needs done.
-
Next S hook, put the pig tails to the outside of the loop. Then compare the two and see which you like best. Pig tails to the outside leave the entire loop open and can not catch on things going in or out of the loop. Make a variety of lengths of the S hooks as some projects like a longer space between loops. Make a S hook but also make a C hook and a J hook as all come in handy for different reasons.
On the single loop hooks, arrange them back to back so you can hang things from either side, like when you want to day herbs, straw flowers, and etc.
Great start !! Add something new with each fire.
-
Look for places that use coke, restaurants etc. Grocery stores sell it by the weekend warrior bag for BBQ.
-
How many units are in the production run? Is it a different stamp for a group of units produced?
-
It is part of a cast iron anvil, vise, combination. The anvil part is hollow.

-
MJ congratulations on getting your drivers license. Learn how to make each trip have multiple stops in order to save gas.
-
Coat the stakes with BLO to keep them from rusting.
-
-
The standard procedures, spray with penetrating oil or 50/50 ATF and acetone. Let it soak in and spray again, and again, and etc. Look into electrolysis derusting or evaporust. Go slow, it did not get rusty overnight so be patient.
When it starts to break loose, do not try to disassemble things. Use that tiny bit of movement to apply more solution and let it slowly move down between the parts.
Telling coke from clinker
in Solid Fuels: Coal, Coke, Charcoal, Wood, etc
Posted
Clinker is what does not burn in the fire. Let the fire rest for a short while and clinker will solidify together in a lump that can be picked out of the fire in large pieces, and discarded.
If you have a mix of bituminous coal and clinker, place it in a 5 gallon bucket of water. The clinker, being heavier, will sink, and the coke and coal will float or rise above the clinker. Just scoop out the coke and coal and put it to the side to dry so it can be used later.