-
Posts
17,325 -
Joined
-
Last visited
Content Type
Profiles
Forums
Articles
Gallery
Downloads
Events
Posts posted by Glenn
-
-
A site search had the following discussion
-
1 hour ago, natkova said:
Bought myself drill press .
Use lubrication on all the holes you drill.
-
There is a fellow from Australia on IForgeIron (Mooney) that used to hammer on small round stock to light a fire. Even posted a video showing how it was done.
-
What shade visor are you using now?
-
He, his wife, and friends are on the list.
-
Anvil, please read your forearm is parallel to the ground and your daily driver hammer face is parallel to the ground/anvil face again.
No matter what height you come up with, put a piece of soft wood on the anvil face and hit it with your hammer. A crescent at 12 o'clock means the anvil face is too low, a crescent at 6 o'clock means the anvil face is too high. Adjust as needed so the hammer face makes a full impression.
-
Put BLO Boiled Linseed Oil on the table anvil to protect it for winter. It may be just a piece of rail road track but it is used often, both as an anvil and a swage block.
-
An anvil does not have to be a London pattern anvil. It can be another style and shape anvil, or even an improvised anvil.
Advice is provided based on the authors knowledge, experience and expertise, and may or may not be applicable to the viewers situation. For instance horn left or horn right does not apply to a piece of rail road track, or other improvised anvils.
Safety should be a common concern in all situations.
-
Reminding folks of dangers and telling them how to stay safe is a responsibility.
Just because they have always done it this way is no excuse, because "until that one day" is closer than you think.
It has been said before:
Make a list of all the body parts you can do without, a pinkie toe, a pointing finger, an eye, hearing, etc. Sign your name below the list.
Then write, it is my personal responsibility to protect anything not on the list. Sign your name again below that statement.
-
Do not give up on the full use of the tool. You can still use it in a portable hardie hole or even the vise.
One or two hardie tools are easy, but keep 3 or more in a dedicated box or crate so you can find them.
ALWAYS remember to remove the hardie tool from the top of the anvil when it is not in use. Otherwise it is a pinch point for injury or removal of fingers.
-
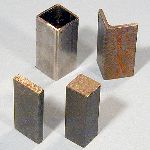
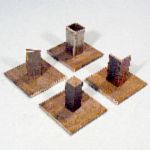
Use a piece of plate as the hardie tool base with anything that fits into the hardie hole as a post to keep the tool from turning. A piece of flat bar welded diagonally to the base plate will work, as will angle iron, square tubing, etc. Then weld the hardie tool to the top of the base plate.


Make up several of the base plates to have them on hand when needed.
-
Then all else fails, read the instructions. (grin)
-
Shaina, The first of anything, tongs included, are a practice piece, so you know how to improve the next one.
-
Adjusted the sundial to the correct time this morning.
Should be good until spring.
-
Steel 55 gallon drum with coal or water weighs 500 pounds.
-
Make the below floor level support very strong as you will be hammering on the vise and that impact will be transferred to the base.
-
A wooden handle in one hammer is 9 inches (229 mm) from end of the wood to touching the metal. Thin circumference is 3-1/2 inches (89 mm), and at the grip is 4-1/4 inches (114 mm).
A wooden handle in another hammer is 11 inches (280 mm) from end of the wood to touching the metal. Thin circumference is 2-1/2 inches (64 mm), and at the grip is 3-1/2 inches (89 mm).
A wooden handle in another hammer is 14 inches (355 mm) from end of the wood to touching the metal. Thin circumference is 3-1/2 inches (89 mm), and at the grip is 4 inches (102 mm).
A wooden handle in another hammer is 16 inches (406 mm) from end of the wood to touching the metal. Thin circumference is 2-3/8 inches (60 mm), and at the grip is 3 inches (76 mm).
Each hammer handle has been adjusted to fit my hand and the way THAT hammer swings. It is all about what is comfortable in YOUR hand.
-
With winter and the holidays fast approaching, it is time to get started again.
Everyone’s invited to participate, from beginners to hobbyists to professional smiths to even resident curmudgeons!
It is a decoration theme, on a tree, inside, outside, etc. It can be anything and any size you choose, and made from new stock, old stock, copper, brass, mild, wrought, titanium, high carbon, stone, glass, wood, bone etc.
The deadline for the challenge will be December 24,
20022022, Christmas eve.Edit to reflect correct deadline.
-
Be very careful removing that collar and bolt from the leaf spring assembly.
-
I find that removing the factory coating, or any handle coating, is a good start. The next item in the process, is contouring or adjusting the handle to comfortably fit YOUR hand. Adjust a little at a time then go to the forge and try it out.
Once the handle fits your hand you need to protect the wood from water, dirt, etc. The protective coating should not be so slick that you can not comfortable hold the handle, and it should not cause blisters during use.
Everyone has their favorite coating, and if it works for them great. But it is YOUR tool and it is in YOUR hand so you may have to try a couple of different protective finishes to find which one that works best for you.
Boiled Linseed Oil has been my go to finish for several years. Lightly sand the wood and apply BLO with a rag until it no longer soaks into the wood. Give it a couple of days to dry, or wipe it dry, and put it to use. While your at it, give the metal a wipe too.
-
"The good news is that this steel is hard as hard could be."
Does hard as hard could be have a Rockwell number?
"The Hardie Hole Extension is welded on and should not be used as part of the striking surface."
Can we hit metal on the hardie tool with a hammer?
-
A large diameter wooden round made a nice anvil stand until it was time to move or reposition the anvil for large or different work. Then there were the bugs that decided to make the wood home.
The metal anvil stand cured the bug problem, allowed the anvil to be turned or repositioned when needed, and you can now get a half to full step closer to the anvil. In fact you can put your feet under the anvil if you want. A piece of plate steel plate welded to the end of the metal legs has a hole in it so a spike can be driven through the plate to hold the anvil from turning.
I purchased the whole anvil not just the face, so many times you will find the anvil turned horn up, heel up, or laid over on the side. This gives a cone (horn) and a narrow metal surface (heel) and on the side gives access the different curves which act as a swage block.
Then there is the expanded metal shelf under the anvil for the most used hardie tools.
If you want to add a couple of goesintas, you can add a swing-away shelf, tool pan, or an anvil level extension to rest the longer pieces of metal on.
-
"Do not repair what is not broken." coworker of natkova
The blacksmith version is, "If it ain't broke we'll fix it till it is." Frosty
"And then redesign it to make it better." Glenn
-
PDF removed due to copyright, and Jock Dempsy not allowing links to his site.


What did you do in the shop today?
in Blacksmithing, General Discussion
Posted
Moving the forge closer to the door will save a couple of steps and make the move from the forge to the anvil quicker.
When you take the hot metal to the cold anvil do not lay the metal flat against the anvil face or surface, but rest the metal on the edge of the anvil and angle it slightly up. This keeps the metal from contacting the anvil face and loosing heat until you are ready to start hammering.