September 24, 20205 yr I give myself maybe a 10% chance of making anything that survives to being a sword right now since I am still so new to smithing. I was starting to make a machete but the steel, 5160 leaf spring, was moving so easily under the persuader, my 8 pound sledge, that I decided to try for an actual short sword of some type. The problem I am concerned about is the amount of steel I started with and if my rough estimations are correct. I started with 10.5 inches of 2.5 x .25 inch steel. If I reduce its width by half that should bring me to about 21 inches and working the tang down further I may be able to get 24 inches of metal over all? My goal for the thickness is 1/8 inch. Can I get it close to this, or should I just cut a longer piece? I fully expect this to fail in one way or the other but the lure is too much. I don't care if I come out with a mini Saber or end up making 2 knives out of what's left I'm going for it.
September 24, 20205 yr Author Don't have one yet. I think I may go from 1/8 inch down to 1/16 about 2 inches shy of the tip, depending on final shape, I may go with a small swell since it's going to be single effed. I had also considered fullering it in case my lack of a plan and generally being clueless isn't enough of a handicap for finishing this up successfully.
September 24, 20205 yr Seax, wakizashi, kleine grosse messer? You should have what you are trying to make identified before you light the forge and pick up a hammer!
September 24, 20205 yr You may want to consider using weight as a guideline. If you want to end up with a 2 pound sword you'll need more starting weight to compensate for scale loss and grinding. To me an eighth of an inch thickness near the hilt would be a bit thin. I like more meat than that for large knives that are about half the length you indicated. Stretching 10.5 inches out to 24 inches can be done of course, but it's a lot less work to use starting stock closer to your finished product dimensions. You may end up burning enough fuel to equal the cost of new stock. On the other hand you can get in some good practice on drawing out with your plan. I'm not sure that a sword project is a good place for that kind of practice though. One other word of caution - even if you are a beast, using an 8 lb. sledge one handed for very long may cause you some painful physical issues over time.
September 24, 20205 yr Author I was leaning towards a saber but realized I won't have the length needed. A Kleine Messer is my current plan. Thank you both for the advice. I've not always done things the easiest but I've never fretted over failing at something new. Buzzkill, I like a lot of meat on my knives as well, they just feel better in the hand with some weight to them. I'm not beyond calling this a failure early enough to still salvage some blades from the steel. With my sledge, I don't normally swing it like I do my other hammers, I use my whole body and add the force on the down swing. I don't use it on back to back heats either. I've had shoulder issues in the past and got into weightlifting because of it, targeting my shoulders with rotational and stability work. I found that kettlebells really b helped too.
September 26, 20205 yr Author Ok, I have it drawn out, and when I quite for the evening I started working on the distal taper. It's a little under 3/8 inch at the base, and a touch under a quarter inch at the tip. I'm working on a Kleine Messer, so nice narrow tip. I am planning on fullering it out still so I have a good chance of wrecking it there. But right now I have a mostly sword shaped object. The blade is at 17 1/2 inches and I got it over 20 inches total length. I'm going to have to add on some tang with the welder I think.
September 27, 20205 yr Author I think I could have drawn it out since more, the blade is fairly heavy but no visible signs of cracking or stress from drawing it out. The blade is 18 inches, I have a little more to pull from the tang but film the original 10.5 inches I've stretched it to 21. Pardon the knife...I must can't seem to focus on one project at a time.
October 2, 20205 yr Author Fuller is roughed in, as is the bevel. It's weighing in at 23 oz right now with a bit more grinding to do. I didn't like the tang so I split it and I am going to be forging an add on and stick welding it in place. Not much choice to it but I plan on peening and normalizing it to relative the stress of the welds. I still don't give myself more than a 50% chance at pulling this off but I'll keep plugging away.
October 2, 20205 yr Historically there are some great examples of pattern welded or even wootz swords with forge welded on wrought iron tangs. Of course they were betting their lives on those blades.
October 2, 20205 yr It sounds like you plan to use an electric welder to improve the tang rather than forge weld. I'm not sure if 5160 benefits from a preheat before welding. It probably wouldn't hurt even if it's not necessary. If you do that, get full penetration welds and normalize it should be fine. You obviously don't want brittle heat affected zones that will cause the blade to separate from the handle in use. It's looking good to me so far. I'll be standing by to see pics of the finished product. I know you have prepared yourself for failure and I don't want to jinx you, but to me it looks like you have a reasonable chance at success at this point.
October 2, 20205 yr Preheating it won't hurt a bit and might help. If you grind the tang's widest side to a 45 and match it with the extension the stress will be dispersed rather than concentrated on a perpendicular line. Welding relatively thin stock as pictured I don't grind bevels, I use a spacer and fill the gap. By spacer 1/8" is more than enough for up to 1/2" stock though what's handy is a stub of the same welding rod I'm making the weld with. I nip a couple short pieces and put one JUST SHY of each end of the weld to prevent it pulling out of alignment and run the arc right over the spacers making the weld. Break any of the flux off the stubs you're using for spacers of course. Frosty The Lucky.
October 2, 20205 yr With damascus, I over lap the joints an inch or two, machine weld, then at welding heat reduce thickness to match the original, it forge welds nicely that way for me, I dont wish to waste pattern welded material for a tang
October 2, 20205 yr Author Thanks for setting my mind at ease Thomas, I know this isn't going to be a combat weapon but you never know when you'll need a good blade that means business. Buzzkill, Frosty, I hasn't planned on heating the tang before the weld but you're it wouldn't hurt and I would help with the stress. The tang is about 1/4 inch thick there, so I already have ground in the angles and I will use the trick with the welding rod stubs. Steve, my little one burner forge isn't strong enough for a forge weld. Besides I missed the equinox and I don't have any magic Flux with cat hair. Hopefullly one day soon the stars will line up for it.
October 12, 20205 yr Author I'm trying to find good examples for the guard and hilt setup for a messer and an having very little success. Is there a solid reference that is online that will have solid examples?
October 12, 20205 yr Might ask that over at armourarchive.org in one of the research forums. The Messer has more of a knife handle rather than a sword hilt, slab handles, smaller inline pommel, etc. Unfortunately my main resources are all on paper, like the Wallace Collection catalog and various examples published in books on medieval and renaissance weapons. https://fi.pinterest.com/siresasa/messer-only-historically-accurate/ has some examples of the various subtypes.
October 13, 20205 yr Author Thanks Thomas! That's what I've been trying to find. The easy part is done, now for the guarding, pommel, and scales.
January 17, 20215 yr Author I got busy with the colder weather and a move into my house. Also, for the life of me, I couldn't get a decent handle extension forged... until today. I was goofing off making an herb chopper from a rail road spike when I realized that with minimal work it, the cap would make a great pommel end and drawing out the spike would bring it to the width and thickness I wanted. Since I was on a roll, and I have plenty of rail spikes, I started drawing another one out for the guards. So after a few months I can finally get back on this project.
April 11, 20215 yr Author Almost got the elk antler to fit today, though I did have to thin down my newly welded on tang and I'm going with a different pommel now that I'll have to make but there's finally progress again on this. The knuckle bow and rear guard are out of proportion but that's a simple fix. For the tang I welded it up several times then took it to critical and let it air cool. There were no signs of stress cracks or uneven heat. I'm happy.
April 11, 20215 yr It sure looks like you drew the heat treatment out of the bottom 6" of the blade. I don't recall, is this a user or wall hanger? Frosty The Lucky.
April 12, 20215 yr Author I hadn't heat treated it yet because the work needed to be done on the tang. It would have wrecked it. I also have to make a longer quench tank.
April 14, 20215 yr Author I didn't harden the tang. I did successfully harden and get the first tempering in. I had a warp about 3/4 of the way up the blade after the quench. I have a gas oven and I know it can vary greatly in temperature. I put the sword in the oven on my pizza stone with my cast iron wok, which is heavy, on top of the warp. Wouldn't you know it, the warp came out. I tempered it at 425 fire an hour and a half, second will be tomorrow after work.
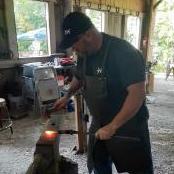
July 18, 20214 yr Author I have some cleanup work to do on it but I have finally assembled my short sword. RR Spike guard and knuckle bow, rr bolt pommel peened on, deer antler handle with epoxy for a good measure. Nothing is moving. It isn't the prettiest sword but it's my first competed.
July 18, 20214 yr Nice job. Did you forge the fuller in or did you grind it in? If I may make a couple of suggestions: I think the guards would look better with more of a curve than the sharp angle you have used. Also, I suggest that the knuckle guard be curved back on itself. You have a semi-sharp point aimed at the user and that is seldom a good idea. You never want to facilitate a self inflicted injury. I can see it getting knocked into your leg or hip, particularly when parrying an opponent's blow. "By hammer and hand all arts do stand."
Join the conversation
You can post now and register later. If you have an account, sign in now to post with your account.