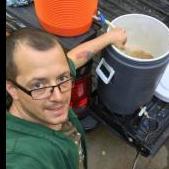
December 24, 20178 yr Hello everyone, I am just starting to get into the art of blacksmithing and wanted to build a very popular beginner forge which was an easy cheap way for me to go but after hearing about all the bad stuff on galvanized pipes am afraid to light up my forge now lol. here are some pics of the forge I built. I am in the NC area. Please any advice or tips on how to proceeded would be greatly appreciated. Merry Xmas.
December 24, 20178 yr It was definitely wise to check before lighting it. You will need to replace the Galv with black pipe or find a safe way too strip the zinc. Someone may pipe up with advice on that, I just stay clear of anything galved. Also, because the forge has no table, when (not if) coal/charcoal falls out of the forge pot they will hit the ground, so be sure you are on concrete. They will also fall on the blow drier and that rubber boot and like as not catch them both on fire. I would strongly suggest moving the blower farther from the heat zone and adding a table.
December 24, 20178 yr Disconnect the blower from the air intake by about 3 inches or to. Aim the blower more directly to the air pipe for more air, and less directly for less air. You can get a 3 inch expandable aluminum clothes dryer vent to give you some quick and easy piping between the blower and the forge. A site search will discuss how to remove the galvanized coating from the pipe and connection fittings. Vinegar will work, but you need to read the discussion. Use the ring (groove) on the drum and size a ring from 1/4 x 3/4 or 1/4 x 1 inch flat bar to fit into that groove. Weld a 24 inch square of 11 ga plate or 3/16 or 1/4 inch plate to the ring and set it on/in the groove. The idea is to have some place for additional coal for the fire.
December 24, 20178 yr Author Thank you for the feedback so far. I found some articles and I had read about that on here as well about soaking the parts in vinegar. I just did that to, found a large glass vase that's about 1/2'' thick and placed everything from the T joint up in the vase and submerged it in vinegar, its in the middle of my driveway so its plenty ventilated and its a windy evening so should dissipate the fumes rather quickly. Ill defiantly look into the dryer vent solution. as far as a plate goes I'm looking into a solution of either dropping it into a metal table or something similar to it. do you thing a food service cart would work? it is pretty durable. thanks again for the help.
December 24, 20178 yr Good Morning Steve, Do you have or can you acquire an old Bar-B-Que cart? They normally use thin wall 1" square tubing, yes it is light but it can be stiffened up with some triangulation. You are on the right track. You will need a reostatt to control the fan speed. You can use a plywood deck with clay on top (I use Clinker, but you don't have any yet). If the plywood gets hot you can cool it with a watering can (which you will need to control the hot spot of your fire, anyway). You need something to heat, someway of heating it, someway of holding it, something to hit it on, something to hit it with and a little imagination to help you design on the fly. The rest is pure Magic. An Anvil can be any shape, a Hammer can be any shape, your Forge can be any shape, your imagination can be any shape. Play through with a smile on your face!! Forget the Rules Committee!! Enjoy the Journey and be safe!! Neil
December 24, 20178 yr Author Thanks Neil, The attached pic is basically what I can get my hands on at the moment. I think it would work for now at least. At the moment I have an ASO "Track rail", a couple of cross peen hammers and a few tongs I got from a friend, flat stock tong and scrolling tongs. I just ordered a set of 1/2'' round/bar stock tongs as well.
December 24, 20178 yr Good Morning Steve, Add some triangleation to stop it from falling over with the weight. It won't stay shiney!!LOL Neil
December 24, 20178 yr Track if used in the vertical position is an anvil. ASO is a cast iron peace of extrament that is shaped lik a London pattern anvil.
December 24, 20178 yr The greater the depth of metal directly under the hammer blow, the more rebound, and the more efficient your hammering will be.
December 24, 20178 yr Other words, the web if a rail is about 7/8” even tho the head is 1-1/2”. So every time you hit metal on the head in the vertical direction you loose a significant amount of energy to flexing the web instead of deforming the metal. In the vertical position you have a 3x1-1/2” mass that is fare stiffer than the 7/8” web. Besides that it is fare easer to modify the web and flange for tooling than it is to carve out a horn from the head.
December 24, 20178 yr Now to the next gueston that usually pops to mind... ”but the striking face is so small” google “Viking era anvils” and “Iron age anvils” I like image search. Disregard the junk and modern anvils and look at the historic ones. If you need to straiten your work, lay it down the face of the head and straiten, yes your puwnding sideways but it doesn’t take full blows for that anyway. not to toot my own horn, but here is an example of what can be done
Join the conversation
You can post now and register later. If you have an account, sign in now to post with your account.