November 21, 20178 yr Finally got this project started. Disassembled and cleaning with some preliminary repairs. Fairly good condition but of course needs all new leather.
November 21, 20178 yr Definitely a lot of work. I humbly suggest several coatings of linseed oil to help prevent further damage to the wood, ..... and new valves.
November 21, 20178 yr Author It has been interesting to get into it. It is in original condition and could find no evidence of previous repairs except for the 'factory' leather patch shown in the fourth photo that covered a place where a piece of the wood tore out on assembly revealing part of the feather that fit in the grooves holding them in alignment. You can see the original hide glue in the joints that is still sound in most places. Light cleaning reveals the outside was painted with a red paint of some kind. I had intended to give it plenty of linseed oil but a friend suggests using thinned out spar varnish particularly on the inside to give it some fireproofing. There was evidence of hot embers being drawn back in and burning some spots near the throat. The valves don't need replaced, just relined with new leather. One rib brace chewn through by mice will have to be replaced. The ribs look like oak, the center board and bottom yellow poplar.The top looks like pine and maybe chestnut? Hundreds and hundreds of cut nails and tacks pulled out! I don't know how you date one of these but my guess would be it is 100-150 years old. The spout is cast but the other iron work is all hand forged.
November 21, 20178 yr 1 hour ago, David R. said: I had intended to give it plenty of linseed oil but a friend suggests using thinned out spar varnish particularly on the inside to give it some fireproofing. Varnish isn't going to give you "fireproofing" -- the resins therein are usually pretty flammable in themselves, even after the solvent evaporates. A decent homemade fire retardant for wood is a solution of two parts borax to one part of boric acid (e.g., Roach Prufe) dissolved in water, sprayed or painted on, and allowed to dry. If you're doing forge welding, you've probably already got the ingredients on hand.
November 23, 20178 yr Author Plugging nail holes and gluing up a few small cracks etc.,. in preparation for new leather
July 6, 20206 yr I have a couple thoughts: First, smoke backing up into them over the years may have left a sooty or tary coating. The other and I think likely one for something that's been inactive for a long time is a black mold or other growth. Frosty The Lucky.
July 7, 20206 yr The OP hasn't been on the forum since Jan 2019 so we may never know if he finished it or scrapped the attempt.
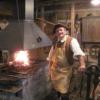
August 23, 20205 yr Author Finally got back. Bellows completed and after some tweaking on valves, working great. Link removed as it needs access to your computer
August 23, 20205 yr The link doesn't work unless you'll let us access your computer, David. Try again please, I'd like to watch it. Until then a friend sent me this link. The fellow who made the video and bellows has quite an operation. I don't think this link violates the forum commercial site rules but maybe. If it does, I'll take the medicine. https://www.youtube.com/watch?v=9wVNOEU_-Es Frosty The Lucky.
August 23, 20205 yr I didn't break the rules! I liked it quite a bit and actually subscribed to his videos. I think the next one is building the forge. There's one about the anvil coming too. He's a colonial reenactor and his site is really extensive. Not enough blacksmithing though. I'll post links as they come. Frosty The Lucky.
August 23, 20205 yr Author It may have been easier to make a new bellows. The center board and bottom paddle had succumbed to gravity over the years and bowed a bit under their own weight. I ended up making a metal ring I sealed to the center board so I could get a good level valve seal. The bottom board I planed level on valve surface. The leather on the old bellows was really heavy. I used a lot lighter weight leather on rebuild. I took a piece of the old leather and gave it several good scrubbings with saddle soap. After drying, I saturated it with neatsfoot oil and made a little belt pouch out of some of it. The bellows really works well. I can easily get welding heats. You also get some free run time as top paddle settles down after you pull. Gives you time to get tongs and hammer in hand. I also added a safety valve at outlet pipe. I made a box with a check valve so no gas could migrate back into bellows. Took a little figuring to get geometry right on my lever, as I had to mount bellows overhead to save floor space in my small shop. Cow horn makes a perfect handle on lever rope
August 27, 20205 yr Nice was it hard to stich overlap joint, i tried and quit , because it was akward for me. I stiched it just bending leather, it look ugly , but it is airtight. I see you made valves without hinges using dovel tehnique.
Join the conversation
You can post now and register later. If you have an account, sign in now to post with your account.