Cody G Posted January 21, 2015 Share Posted January 21, 2015 To start off, I am new to forges, blacksmithing and a lot that goes along with them. I would however like to setup a small forge for now to tinker with and learn from. I have acquired a champion blower/forge setup, I do not know the model number or anything like that, it is an an old hand crank blower and small forge. My lack of experience leaves me in the dark on running/rebuilding one of these old things, so I will start off with what i have discovered so far and some of the questions I have. In simply turning the old hand crank I discovered that the blower fan was hitting, so I disassembled the blower, finding a bunch of rust/buildup. I attempted to wire brush the rust out, the fan blade is still hitting, I can't tell whether the fan blade is bent, or if the blower case (I don't know if I am using the correct terminology so I hope my explanations make sense) used to have a gasket and therefor the inside dimension used to be larger. In trying to get set up to run the forge I would like to get it in a bit better condition, so I was wondering if it was worthwhile to paint the exterior of the blower and forge with a high heat paint (like auto exhaust paint). If others have had experiences with paint just burning off or what paint works it would be greatly appreciated. Sorry I have a lot of questions and such hopefully I am not just blabbering on and on. Onto my next thought/question I know I need to clay the forge before using it, but I don't know which clay would be best to use and where I might get such clay. I am in rural Wyoming, so if anyone knows of sources in Wyoming or northern Colorado that would be great, otherwise I will be shopping online for clay. Anyway thanks for reading, and I wanted to say I am enjoying the website and forum already. Quote Link to comment Share on other sites More sharing options...
george m. Posted January 21, 2015 Share Posted January 21, 2015 Dear Cody, This appears to be the exact model forge that I have used since 1978. If the fan is hitting its casing there is probably a bent blade but that is not obviously visible in your photos. If it doesn't hit the inside of the case when you have it split open look for something misaligned in the outer half of the case. It's unlikely that the case would be bent because it is cast iron. Cast iron is brittle and breaks rather than bend. You don't need high temperature paint. That part doesn't get hot. The only part that gets particularly hot is the center of the forge. Even the rim is usually cool enough to touch. My main piece of advice is to keep the blower well lubricated. That is the only place where there is any friction and where parts may wear out. Good luck. This forge and blower may give you decades of service. Quote Link to comment Share on other sites More sharing options...
DSW Posted January 21, 2015 Share Posted January 21, 2015 You might chalk the inside of the case and see if you can't see what is rubbing from the marks or chalk transfer. Try local masonry suppliers for fire clay. It's often used when mixing mortar for fireplaces and it's sold in bag's like portland at supply houses. Quote Link to comment Share on other sites More sharing options...
arftist Posted January 21, 2015 Share Posted January 21, 2015 How much slop is in the bearings? Quote Link to comment Share on other sites More sharing options...
NickOHH Posted January 21, 2015 Share Posted January 21, 2015 There are lots of recipes online for different refactory cements that will work for lining the forge. Just search diy refactory cement. You can take a tub furnace cement from lowes or homedepot and mix it with some silca sand or vermiculite. Shouldn't need a whole lot to line the forge.a bent blade is a likely cause you could throw some washer in the bolt holes to see if there is clearance and use automotive liquid gasket at any parts store to seal the case . Quote Link to comment Share on other sites More sharing options...
SJS Posted January 21, 2015 Share Posted January 21, 2015 First thing I would do is drench it in a light oil and crank the snot out of it to see if I could loosen the sludge in the gearbox. Maybe the shaft would work back in to its proper place where it wouldn't be clunking? You should keep it oiled all the time anyway. Hopefully you still have it disassembled, try cranking it with the cover off, if it doesn't clunk its rubbing on the cover, and you can put a gasket in and get a bit of clearance;-) If it is clunking on the gear housing you can try tweaking them, or try to get the fins off and shim it out with some washers. Quote Link to comment Share on other sites More sharing options...
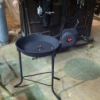
Alan Evans Posted January 21, 2015 Share Posted January 21, 2015 (edited) Difficult to see exactly but your photo no. 3 appears to show a tell tale scrape on the inlet side casing, and a corresponding highlight on the edge of the bottom left blade. The shadows seem to indicate that the impeller is a good distance from the surface of the gearbox side casing. So what are the options for moving the impeller into a more central position in the casing? suggestions that come to mind without knowing the beast, A) the one blade may need a tweak, it looks like a pressed steel impeller, obviously don't tweak if it is a cast one. B ) It may be possible to slide the whole impeller along the shaft towards the gearbox side C) Reset the end thrust of the shaft bearings to move the whole impeller shaft towards the gearbox side. D) Check the bearings and replace if wobbling as arftist suggested In my old side blast coke hearth I used a mix of garden soil and ash to line the bed and form a swan's nest. But that was an old steel 36" square hearth with an independent tue. I am not familiar with the specific requirements of your cast bowl bottom blast, but I presume that the clay is just to insulate the cast iron from the intense heat so anything much would suffice. A castable insulating furnace mix would do that job better than a dense lining fireclay. A bag of vermiculite and a bucket of garden soil to bind it perhaps? Alan Edited January 21, 2015 by Alan Evans Quote Link to comment Share on other sites More sharing options...
george m. Posted January 21, 2015 Share Posted January 21, 2015 Dear Cody and others, Back in 1978 when I got my forge I followed the instructions cast into the bowl, "Clay before using." I got some fire clay and laid it in to form a shallow cone from the edge towards the tuyere. I found it broke up and also welded itself together with the clinkers. I removed the clay and have used the forge successfully for the last 37 years. There has never been any cracking of the bowl or other problems. I would avoid using large amounts of water to quench a fire to avoid thermal shock but that's about it. I've had to replace the tuyere twice and will need to do it again within the next year or so. My experience is that claying a forge is more tradition than anything that will actually avoid a problem. One of those, "The guy who taught me clayed his forge so that is what I'm going to teach my students" things. I suspect that the manufacturer was just trying to avoid potential liability. That was an issue a century ago as it is today. You can make something foolproof but you can't make it damfool proof. Claylessly, George M. Quote Link to comment Share on other sites More sharing options...
Frosty Posted January 22, 2015 Share Posted January 22, 2015 Welcome aboard Cody, glad to have you. I have the same forge and blower though my blower turns freely and works a treat. Unfortunately the pan is cracked almost all the way across a little close looking shows scars from the fire around the air grate where it hadn't been clayed. Don't get fancy if you clay your forge, a mix of 2-3 pts sand to 1pt. clay and just enough moisture it will form a hard clump when squeezed hard in your hand. Then ram it into the pan with a mallet or board, smooth it and it's ready to go. If you burnish it with a piece of burlap it'll help keep clinker from sticking. If you clay it you have to be VERY sparing with water or it'll make a mess and collect between the clay and pan speeding rust. Bear in mind I rarely burn solid fuel, I'm a propane forge guy, metallurgical coal is hard to get here and charcoal is a hassle to make. Frosty The Lucky. Quote Link to comment Share on other sites More sharing options...
Cody G Posted January 22, 2015 Author Share Posted January 22, 2015 Thanks everybody for the helpful hints, I haven't had time since I made the initial post to dig deeper into the forge, hopefully tomorrow evening I will do so. This weekend I will hopefully get to town and get sufficient materials to get the forge looking a little better, and to clay it. Just wanted to pop in and say thanks thus far, hopefully in a day or two I will have an update on what I have figured out. Cody Quote Link to comment Share on other sites More sharing options...
Charles R. Stevens Posted January 22, 2015 Share Posted January 22, 2015 As to paint, as suggested, the blower itself is safe from forge heat, the pan, if not lined would need "stove"," barbecue"or "exhaust" paint designed higher temps than "engine paint. If you clay it, then engine paint will do just fine. Clinker will indeed stick to vitrified clay (fire brick and clay exposed to forge temps. Much worse with coal, as it has more "trash" in it than charcoal. Your little forge was not designed for charcoal, and would need to be adapted to it (lower pressure air- crank slower. Deeper fire, clay,set a ring or fire bricks to gain about 2") best bet is to mix "stove cement" with vermiculite or pearlite and apply an inch or two with a 1/4" thick coat of strait stove cement. Stove cement isn alumina based, as apposed to portolan cement that will breakdown when hot. You will have to ad a bit of water to make it runny enough to mix with the pearlite/vermiculite, and use it 2/1. This makes a light weight insulated layer. Then brush on a thinned layer to provide more durability. Like all cement it will get hard and crack, so score it like a pie to control it. To keep the clinker from sticking, keep a layer of sand or ash in the pan. Feather around the tweere Quote Link to comment Share on other sites More sharing options...
Cody G Posted February 4, 2015 Author Share Posted February 4, 2015 Thanks for all the input everyone, Sorry I haven't been on to post for a bit. Got the fan blade issue straightened out. now she spins freely, and blows like a champ. In addition I build a new ash dump, and what i would refer to as an ash screen. I have yet to get anywhere to pick up clay for the forge, but I used high temp paint to paint it all up. Quote Link to comment Share on other sites More sharing options...
Recommended Posts
Join the conversation
You can post now and register later. If you have an account, sign in now to post with your account.