Vascar Posted December 27, 2013 Share Posted December 27, 2013 I'm fairly new to blacksmithing, with very little money to invest in it. At the moment (and for the foreseeable future) my only anvil is a 3' section of railroad track. I've read from multiple sources that they make great beginner anvils, provided you cut in a hardy hole and a horn. How exactly does one go about cutting these? Quote Link to comment Share on other sites More sharing options...
DSW Posted December 27, 2013 Share Posted December 27, 2013 Actually they work best when stood on end so the majority of the mass is under the hammer rather than used in the "traditional anvil" form. Most guys I know who use a RR track anvil use a separate chunk for a horn, like a stake or bick and often hold hardie tools in a vise. If you feel you have to cut the track, whether because you have an extra piece you want to form or just because, an OA torch usually does the best job roughing things out. A good sized plasma cutter would also work, but most guys don't have access to a big plasma typically, The few I've seen done with a hardie hole, they usually cut away the web and bottom flange 1st, then often roughed out the hardie hole with the torch, then heated and drifted it to final size. It's a lot of work though to do it and on a small anvil results are less than satisfactory to me vs just working in a good post vise. Quote Link to comment Share on other sites More sharing options...
the iron dwarf Posted December 27, 2013 Share Posted December 27, 2013 depending on what you are making it may be good just stood on end, fix it to something so it dont fall, grind a radius on it so you have the choice of a rounded edge or sharp. the part you use on an anvil is normally only as big as the face of your hammer so it may seem odd but you can work in such a small area and do things in the past most anvils did not have a horn, maybe get the worn out tooth from a excavator bucket and weld that on for your horn Quote Link to comment Share on other sites More sharing options...
the iron dwarf Posted December 28, 2013 Share Posted December 28, 2013 multipost Quote Link to comment Share on other sites More sharing options...
the iron dwarf Posted December 28, 2013 Share Posted December 28, 2013 sorry multipost Quote Link to comment Share on other sites More sharing options...
njanvilman Posted December 28, 2013 Share Posted December 28, 2013 If you do end up using the track in a horizontal mode, be sure to get some good ear muffs. The track anvil will be very noisy. Protect your hearing for the long run. (I use a Fisher anvil, which is very quiet, and still use ear muffs.) Quote Link to comment Share on other sites More sharing options...
ThomasPowers Posted December 28, 2013 Share Posted December 28, 2013 you might want to ILL "The Complete Modern Blacksmith', Weygers from your local public library as it includes and entire chapter on how to gussy up a RR track anvil Quote Link to comment Share on other sites More sharing options...
Vascar Posted December 28, 2013 Author Share Posted December 28, 2013 For some reason, setting the track vertically hadn't occurred to me. My primary focus, once I develop the fundamental blacksmithing skills, will be weaponry. I plan on forging arrowheads, spearheads, war hammers, axe blades, knives, and eventually swords. Thinking in the long term, would an anvil surface that small still meet all my needs? Would setting the base of the track in concrete or mortar work for standing it up? Quote Link to comment Share on other sites More sharing options...
njanvilman Posted December 28, 2013 Share Posted December 28, 2013 If you use the track vertically, you will probably want to shorten it to a more suitable height. Practice swinging a hammer while standing up and see what height feels comfortable to you. Then either torch or saw the track to that height(or bury some of it in the ground. I would not use concrete or mortar. They will crack. Make a wood "box" to support the track. Drill some holes in the bottom flange of the track and bolt that to one of the sides, then build a box around the track. This could be filled with sand to increase weight and absorb some of the noise. If I was doing this, I would probably use 2x12 material, with a good bottom made out of 3/4" plywood, glued and screwed all around. A box perhaps about 12" x 12". A little experimentation will go a long way. Remember, there is no "correct" way to do this. Try a few ideas and always be willing to improve. Quote Link to comment Share on other sites More sharing options...
Charles R. Stevens Posted December 28, 2013 Share Posted December 28, 2013 All the weapons you describe have been forged on anvils with faces of 2-4". And forges with fires about 6". Quote Link to comment Share on other sites More sharing options...
Chuck in Ms Posted December 28, 2013 Share Posted December 28, 2013 No, it will not meet all of your needs. It will get you started. On end and in concrete will provide good results for most of the projects you have mentioned. The swords and armor will require additional tooling later on. Relive all the edges a bit with a file or grinder and actually radius a near and far edge where you can. As mentioned above a vise can hold hardy tools for now. Try to join a blacksmith group to learn basic skills and to network. You may find an anvil and other tools for less than you think at these meetings. Better yet you will meet people who are willing to help you learn this craft. Quote Link to comment Share on other sites More sharing options...
Frosty Posted December 28, 2013 Share Posted December 28, 2013 No need for a horn or hardy hole, they're pretty recent additions. I've recommended standing shaft anvils on end in concrete but it takes care or the shock will break it up. If you put a piece of decent thickness plate in the bottom of the bucket with a few washers welded on edge to it and the end of the rail/shaft/etc. it'll go a long way to preserving the concrete under the shock. The web and flange of rail can be made into all kinds of handy shapes with a little grinder time. A hot hardy and butcher are natural firsts, then a couple various radius fullers and a ball swage can be handy. Then there are the handy, long inside curves between the web, rail and flange, these work well for straightening and bends. Thee are lots of possibilities with rail, I've done a number of rail anvils. Once you have something heavier and more suitable for a shop anvil the rail anvil can be the portable, bench or corner if you need one like that anvil. Frosty Quote Link to comment Share on other sites More sharing options...
Vascar Posted December 28, 2013 Author Share Posted December 28, 2013 Thanks for the tips y'all ^.^ So, here's what I'm going to try: I'm going to fill a 5 gallon bucket 2/3 with cement, and the top third with sand. I may just end up using quickcrete mortar, as I have a rediculous amount of that on hand (product of being a floor installer). I don't suspect it will work as well as concrete, but it's what I have (not spending money is good, in my situation). Once I've got it all together, I'll likely post a pic or two. Quote Link to comment Share on other sites More sharing options...
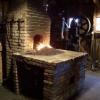
Vascar Posted December 28, 2013 Author Share Posted December 28, 2013 So, here's what I'm starting out with. I made an anvil stand out of 6x6 and 4x4 for the track, before I asked for suggestions on here. I'm going to attempt to attach the big plow counterweight to the stand instead, and do the bucket thing with the track. Thoughts? Quote Link to comment Share on other sites More sharing options...
Vascar Posted December 28, 2013 Author Share Posted December 28, 2013 Also, I've no idea why ifi rotated my pictures. Quote Link to comment Share on other sites More sharing options...
DSW Posted December 28, 2013 Share Posted December 28, 2013 Counterweight looks very promising. If it's steel vs cast iron, I might look at altering one of those round holes to act as a hardie. A nice piece of heavy square tube inserted and welded in one of those large round holes might work well if they are big enough. If not a bit of torch work would rough one out fairly easily. I'd probably grind off the 2 rectangular keys on top though I might wait before doing so and see if they might have some use before I did away with them. Quote Link to comment Share on other sites More sharing options...
Vascar Posted December 28, 2013 Author Share Posted December 28, 2013 I don't plan on ever really buying any smithing tools, because...money, and stuff. Is there a specific reason hardy holes are usually square? The opposite side of those holes are oval, instead of circular. I'm thinking since I'll be making my own hardy tools anyway, I could just make them to fit the existing holes. In my head this seems feasible. The counterweight is steel, I'm glad to say, has a very nice ring to it when struck (my understanding is that cast iron usually has more of a dull thud). Quote Link to comment Share on other sites More sharing options...
Vascar Posted December 28, 2013 Author Share Posted December 28, 2013 Also, what does "ILL" stand for? Google is not helping me with that acronym. Quote Link to comment Share on other sites More sharing options...
EricS Posted December 28, 2013 Share Posted December 28, 2013 Inter Library Loan Quote Link to comment Share on other sites More sharing options...
Elemental Metal Creations Posted December 28, 2013 Share Posted December 28, 2013 how thick and heavy is the counterweight? It might do better than the track, it has a lot of possabilitys. I have a 100# piece of 2" plate that maces a good anvil. Quote Link to comment Share on other sites More sharing options...
Vascar Posted December 28, 2013 Author Share Posted December 28, 2013 It's 2# thick, not sure on the weight but it's certainly more than 100#, I can't lift it without help and I'm not exactly weak lol. That's my room mate's planned anvil, so while I'll have access to it, I'd like to have my own as well. Quote Link to comment Share on other sites More sharing options...
DSW Posted December 28, 2013 Share Posted December 28, 2013 Hardie holes are often square so tooling doesn't shift when struck, Square is just easier I guess than having a hexagonal or triangular shaped hole. Tools tend to spin in round holes. I don't plan on ever really buying any smithing tools, because...money, and stuff. While I can certainly understand the money aspect and while it's true you don't always need "fancy" tools to do quality work, I have a feeling you are already handicapping yourself with this attitude. Above you said " My primary focus, once I develop the fundamental blacksmithing skills, will be weaponry. I plan on forging arrowheads, spearheads, war hammers, axe blades, knives, and eventually swords." If you plan on doing top quality work, you'd better expect to spend a fair amount on tooling, even if you build it all yourself. Typically I see guys with minimal tooling make it up with exceptional skills. They gained those skills either by paying for them with many many years of hard work, or by working with other tools while learning under someone else. Good tools don't have to cost you a fortune. There are plenty of places where you can locate nice used tooling inexpensively. I'm constantly browsing flea markets, garage sales, used tool dealers, antique shops and CL looking for "stuff". Most times I don't even have a specific item I'm on the lookout for. I wander and see if anything catches my eye that's cheap. Then there's also times when it can pay to shell out some money. I've made my own hammers, but if I can find a nice one at a reasonable price, I'd rather buy it and spend my time working on my project than just building tools. I "treated" myself to 3 or 4 pairs of nice tongs when I got started. Sure I could have made them, but the time I would have spent working on tongs was time I could spend working on projects that interested me more. When I tried to make tongs and they didn't turn out right, it wasn't stopping me from doing other projects that might interest me at the time. As my other skills improved, so have my tongs. Now I can add to my collection as needed. Quote Link to comment Share on other sites More sharing options...
Vascar Posted December 29, 2013 Author Share Posted December 29, 2013 I figure by the time I've gotten a good handle on the skills needed to turn out a good blade, I'll have the money to afford the mats :). Don't get me wrong, every time I go to a flea market or garage sale I keep an eye out for anything that has metalworking capabilities. I just think that, from a beginner's perspective, having to make all your own tools due to a lack of funding can only help in learning the craft ^.^ Quote Link to comment Share on other sites More sharing options...
DSW Posted December 29, 2013 Share Posted December 29, 2013 I can't argue that any practice is generally good. You'll certainly learn plenty as you make your own tools. However just keep in mind that you don't want to frustrate yourself in the process. I see plenty of guys loose their focus if they aren't really doing what interests them. While you may learn to draw out or weld material building tongs, you can also learn the same things working on blades. If you make 20 pairs of tongs and still don't have a good pair, you may have learned the same amount as if you made 20 blades using similar techniques. However I bet you'd be frustrated at the end of the tongs even if you are making progress. I'd also bet that you'd see more "progress" being made doing the blades, even if you learned the same amount, since that's the area that interests you more. I don't mean to harp on this, but I see a lot of guys who get frustrated and loose focus because they handicap themselves with a nonexistent budget. To make this work they get so wrapped up in trying to save money that they forget why they started this in the 1st place. It's really easy to do. Been there, done that, when I was younger. I've found in the long run being "cheap" is often way more expensive. There's a need for balance. As long as you keep your goal in mind and balance costs with enjoyment, things generally work out. Quote Link to comment Share on other sites More sharing options...
Recommended Posts
Join the conversation
You can post now and register later. If you have an account, sign in now to post with your account.