pkrankow Posted October 4, 2012 Share Posted October 4, 2012 Sure would like to see the results. Same here, even though I have been "Mr. Negativity" :o Phil Quote Link to comment Share on other sites More sharing options...
lil tomato metalwerks Posted October 19, 2012 Share Posted October 19, 2012 now im all anxious to see this beauty myself . Quote Link to comment Share on other sites More sharing options...
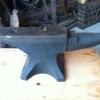
monomoit Posted October 22, 2012 Author Share Posted October 22, 2012 OK guys, I'm back!! My apologies, but work had me tied up for the past four weeks, seven days a week, dawn-til-dusk... Well, in any event, here are the results! In our last episode, the anvil was sitting in the electrolysis tank as shown below: (the rust visible on the anvil's top surface is that which has precipitated out of solution, and is simply resting there) Here is the anvil, pulled from the tank: It's now ready to be rinsed (and given some light scrubbing with a brush and dish soap), to remove the sooty black oxide present on its surface. I used my pressure washer and a scrub brush - it took all of five minutes. Here are the "before" and "after" shots: And finally, dried off but not yet oiled: This view of the underside shows the original state prior to electrolysis (because of the bubble of air trapped underneath): I then applied a coat of boiled linseed oil to prevent any further rusting: The serial number, 117229 (dating to 1906), can now be made out fairly clearly: As can the "4" present near the heel: The only bad news is the heavy pitting to the top surface: Recommendations on how to properly address (re-dress?!?) this pitting would be GREATLY appreciated. As can be seen above, is fairly substantial. And finally, the before-n-after photos of the anvil in the back of my truck, showing where it began, and how it ended! Quote Link to comment Share on other sites More sharing options...
ThomasPowers Posted October 22, 2012 Share Posted October 22, 2012 Leave it as a texturing surface? Use the Gunter method and build it up True the base to the face and then grind/mill the face as little as possible? Quote Link to comment Share on other sites More sharing options...
monomoit Posted October 22, 2012 Author Share Posted October 22, 2012 Thomas, I do have to say, the texture left on the top surface really IS pretty neat - and uniform! I guess before I do anything, I'll have to see how it works. Hmmmm... a dedicated "texturing" anvil - we all need one of those... Quote Link to comment Share on other sites More sharing options...
ThomasPowers Posted October 22, 2012 Share Posted October 22, 2012 It can be a "signature style" for ornamental work you do! Quote Link to comment Share on other sites More sharing options...
Fatfudd Posted October 22, 2012 Share Posted October 22, 2012 Hmm- Interesting... The shape of the anvil plus the number 4 near the heal and the oval bottom would indicate that the anvil is one of the 3rd variations/shapes which means it was made sometime after 1907/08. At least that's what I read in AIA. One of my HB's with the same configuration as yours would date from 1907 so its possible that the serial number dating we are using from AIA may be slightly off about when the changes were implemented. OR they may have been partially implemented over time. More importantly that also means that the whole top half of yours is tool steel. I can't see a face plate but please correct me if I'm wrong? In that case some re-dressing of the face may not be all that problematic if done carefully. One other thing may be that your serial number of 117229 might mean that the second integer, which isn't quite legible, could be something else like a 4 or 7? Who knows it's just curious. Quote Link to comment Share on other sites More sharing options...
pkrankow Posted October 23, 2012 Share Posted October 23, 2012 I'm impressed. I might have to experiment and add this to my list of cleaning methods. Phil Quote Link to comment Share on other sites More sharing options...
monomoit Posted October 23, 2012 Author Share Posted October 23, 2012 Fat, interesting that you should mention this... looking at the photo again, the second integer DOES look like a "4" (the cross at the bottom, which IS visible, means that it can only be a "1" or a "4"). In light of your observations, I'm gonna go with: #147229 - 1907 Quote Link to comment Share on other sites More sharing options...
monomoit Posted October 23, 2012 Author Share Posted October 23, 2012 Phil!! Oh my goodness! Have a lured you over to the "Dark Side"?!? :D In all seriousness, you owe it to yourself to try this out. There ARE certain things that simply can't be cleaned as well any other way - like the crescent wrench I illustrated on one of the previous pages. Recesses, moving parts, hard-to-reach areas, they all get cleaned - effortlessly. I truly prefer electrolysis from a cosmetic standpoint as well. We've all had experiences with a wire wheel leaving a "blotchy", non-uniform finish that doesn't look "right". As can be seen in the photos above, the electrolytic process produces a nice, consistent, "patinated" surface that looks... well... original. Finally, there's the labor component - electrolysis couldn't be easier. After the initial effort to put together a setup, parts simply clean themselves. All that's necessary after the fact is a quick wash-down with soap and water and then a final coating of oil. Voila! You're done. Quote Link to comment Share on other sites More sharing options...
iron woodrow Posted October 23, 2012 Share Posted October 23, 2012 you use soap? all i use is a ppressure cleaner after electrolysis, works perfectly. (and of course, oil, after a blowdown with compressed air) Quote Link to comment Share on other sites More sharing options...
metal99 Posted October 23, 2012 Share Posted October 23, 2012 That's pretty cool man :) a fellow I met a few months ago was using that process to clean out the rust from a gas tank. Quote Link to comment Share on other sites More sharing options...
monomoit Posted October 23, 2012 Author Share Posted October 23, 2012 Woody, the soap is kinda force of habit, I guess. I clean a lot of small parts that end up being rinsed in the kitchen sink (when the Missus isn't home!), so soap and a scrub brush are standard fare. I used my smaller electric power washer to rinse the anvil, which still left a thin film of oxide on the surface. I have no doubt that my larger 3000 psi gasoline powered unit would have blasted it perfectly clean... Quote Link to comment Share on other sites More sharing options...
VaughnT Posted October 23, 2012 Share Posted October 23, 2012 Very nice work, monomoit. Quote Link to comment Share on other sites More sharing options...
monomoit Posted October 24, 2012 Author Share Posted October 24, 2012 Thank you, Vaughn! Quote Link to comment Share on other sites More sharing options...
SReynolds Posted October 25, 2012 Share Posted October 25, 2012 Question; Why does everyone on this site boil linseed oil or are you buying it thata way? I seem to remember it must be boiled to apply it to any finished iron work. What be wrong with normal, everyday linseed oil? Quote Link to comment Share on other sites More sharing options...
ThomasPowers Posted October 25, 2012 Share Posted October 25, 2012 Boiled linseed oil is not boiled anymore. Now it uses heavy metal driers to make it harden faster. Unboiled linseed oil may take months and lots of UV exposure to make it harden and no longer be sticky. Now if you want to tell folks "Thanks for buying this it will be ready in about a year; come back and pick it up then...) Back in the bad old days it was boiled to speed up the polymerization process. HOWEVER it is quite flammable and so boiling it is VERY DANGEROUS INDEED! Quote Link to comment Share on other sites More sharing options...
pkrankow Posted October 25, 2012 Share Posted October 25, 2012 Modern "boiled" linseed oil, bought at the hardware store is not boiled, but instead has drying agents added. Flaxseed oil (food grade linseed oil) is available raw at many grocery stores. Boiling is heating the oil to start the polymerization, so the oil cures in hours instead of weeks. At one point in time the oil was heated till it started to boil. The chemical dryers in modern boiled linseed oil make it unsuitable for food contact. Phil Quote Link to comment Share on other sites More sharing options...
SReynolds Posted October 25, 2012 Share Posted October 25, 2012 so.....something isn't getting through here. Today, you buy boiled linseed oil, but back in the bad/old days, one would have to boil it, Right? What was it that I used back in the 70'/80's that I applied to my bare walnut gun stocks? I was some sorta linseed oil. I have no recallection of boiled or non boiled. I simply wiped it on and it would soon be dry. Then reapply, like maybe five times, and you'd be done. Quote Link to comment Share on other sites More sharing options...
george m. Posted October 25, 2012 Share Posted October 25, 2012 Dear SR, Yes, you were probably using "boiled" linseed oil. As far as I know that has been the usual commercial product for many years. Also, remember that linseed oil drying is an exothermic process which generates heat. If the heat cannot escape, as in a pile of wadded up rags, the heat can reach the point of ignition. That is why we used to be taught about "spontaneous combustion" of "oily rags" when the fireman came to school to talk about fire safety. The oil that they were talking about was linseed oil, not petroleum derived oils. If I'm throwing out linseed oil soaked rags I always spread them out on the edge of the trash can overnight to allow them to dry. Spontaneously, George M. PS My wife, the fiber person, just told me that the name comes from "linen seed" oil because it is flax seed oil. Flax is the plant that linen comes from. So, if for some reason you wanted un-"boiled" inseed oil you could go down to the organic market and buy flax seed oil. Quote Link to comment Share on other sites More sharing options...
SReynolds Posted October 25, 2012 Share Posted October 25, 2012 Seriously.........that is some good info. The fire inspector stopped by the school once (here where I am working) and spoke to me about the oily rags in my maint. shop. Like engine oil, hydraulic oils ATF etc. He thought they would ignite over night. I never understood that one........ Quote Link to comment Share on other sites More sharing options...
ThomasPowers Posted October 25, 2012 Share Posted October 25, 2012 I know a smith who had a fire because of linseed oil soaked rags. Another trick is to burn them in the forge when done... Quote Link to comment Share on other sites More sharing options...
drewmsmith Posted October 26, 2012 Share Posted October 26, 2012 Seriously.........that is some good info. The fire inspector stopped by the school once (here where I am working) and spoke to me about the oily rags in my maint. shop. Like engine oil, hydraulic oils ATF etc. He thought they would ignite over night. I never understood that one........ While engine oil and atf would require a heat source to ignite, linseed oil can and will ignite on its own. The oxidization process is an exothermic reaction. A cotton rag soaked with linseed oil oxidizes quickly because of increased surface area. If you used the same bucket for all your empty rags you'd probably have quite a fuel source to deal with if it were to catch. Edit: i somehow missed George m's original post and just now realized I repeated him. Please disregard. Quote Link to comment Share on other sites More sharing options...
Wesley Chambers Posted October 26, 2012 Share Posted October 26, 2012 just noticed this post, I use this method of cleaning a lot of my junkyard and auction finds. To do a load of smaller tool heads at once I made a copper wire spiderweb of various sized holes that I can jam hammer heads and such into then just connect the one end of the web to hit all my parts at once, also you can use arm and hammer powdered detergent, makes the backyard smell nice and fresh. For The anode I like to use some scrap plate, something with more surface area to pull onto, this seems to speed up the process to around a few hours. Quote Link to comment Share on other sites More sharing options...
GoodWife Posted January 16, 2014 Share Posted January 16, 2014 I wanted to say thanks for this thread- I know it's an old one but I actually joined so I could see the pictures for how all this was working! Quote Link to comment Share on other sites More sharing options...
Recommended Posts
Join the conversation
You can post now and register later. If you have an account, sign in now to post with your account.