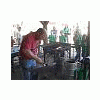
LDW Posted September 28, 2010 Share Posted September 28, 2010 Here is a vise stand Brian and I built to take on the road. I lucked up and got the vise on Craigslist a while back. This is the new and improved model stand, we cannot wait to use it. It will be making its first trip this week when we head to New York. Brian spit shined it today, and we finished off the welding. This thing looks great, I hope these pictures do it justice. Brian has been saying we needed a bigger vise. We definitely do not want one any larger, this thing is not light. http://picasaweb.google.com/LDWynn/StrikingVise# Quote Link to comment Share on other sites More sharing options...
Wesley Chambers Posted September 28, 2010 Share Posted September 28, 2010 I dig it! What type of work do you use it for vs a normal standing vise? Quote Link to comment Share on other sites More sharing options...
pkrankow Posted September 28, 2010 Share Posted September 28, 2010 That is a beast of a vise! That whole kit weigh over 100#? Phil Quote Link to comment Share on other sites More sharing options...
brianbrazealblacksmith Posted September 28, 2010 Share Posted September 28, 2010 That is the best portable post vice setup I have ever seen. Wesley, a post vice can be used for forging. You can use almost any vice for bench work and twisting, but you can strike hard on a setup like this, and it is at a good striking height. Quote Link to comment Share on other sites More sharing options...
Mainely,Bob Posted September 28, 2010 Share Posted September 28, 2010 That is the best portable post vice setup I have ever seen. Wesley, a post vice can be used for forging. You can use almost any vice for bench work and twisting, but you can strike hard on a setup like this, and it is at a good striking height. That is exactly what I was talking about in the post about the vise with the threaded socket for the leg. Glad to see a pic of a "striking vise",it looks both handsome and handy. Quote Link to comment Share on other sites More sharing options...
Eric Farrar Posted September 28, 2010 Share Posted September 28, 2010 Bob, Seeing this vice made me scrap my mounting plan for the vice in the other thread - threaded hole instead of a leg..... LDW, I get that her primary purpose here is striking - either with tooling in the vice or for upsetting stock placed in the vice... How does she do with the other things we do with a vice (bending, twisting, hack-sawing, etc)? I was getting ready to mount my vice on the same stand as my anvil until I saw your setup. Eric Quote Link to comment Share on other sites More sharing options...
brianbrazealblacksmith Posted September 28, 2010 Share Posted September 28, 2010 Eric, it is not just right for striking. It is at a better height for working on handles and certain punches. The right side of the vice has the mounting plate underneath it for upsetting and installing your wedges in a handle at a comfortable height. Also it has mounting holes at the feet so you can anchor it into concrete or spike it into the ground. Twisting and jig work can be done more effectively and comfortabley at this height also. Quote Link to comment Share on other sites More sharing options...
LDW Posted September 28, 2010 Author Share Posted September 28, 2010 The feet have holes for mounting to the ground. Brian has some big nails he made that we use on the anvil stands and vise stands when we are on the dirt. We use anchors on concrete when we can. If we cannot anchor to the concrete we have to be in the dirt. You lose so much energy if you are not anchored. This allows just about anything you can do with a regular vise to be done with this one. We recessed the vise into the plate to make the stand more stable. Brian noticed that if we cut away the plate on one side of the jaws you can clamp something and allow it to stick down below the table. On the other side the table acts as a support, this works great for working on hammer handles. You can place a block of steel on top of the table to give you support for working on chisels and punches. The height is great for doing a lot of filing this allows you to sit down and work. On this one it was Brians idea to put one leg at a 90 degree angle from the rear leg, this way it does not get in the way of any longer pieces you want to put in the vise, and at the same time makes the footprint more stable.. What started as something that seemed simple ended up being a planned strategy, Brian could forsee what the capabilities of this stand were. Each piece that was welded in place was planned out. This represents a pattern in Brians overall character. The same as when you pull that piece of metal out of the forge and it is hot, you need to know what you plan on doing with it ahead of time. This was a great project. Quote Link to comment Share on other sites More sharing options...
clinton Posted September 28, 2010 Share Posted September 28, 2010 That is a nice looking vise, and clean. Nice job an the stand also I am going to set one up like this no doubt, thanks Brian and Lyle for this design. I just need to find a vise with the leg cut off, I can not bring myself to cutting one off, sometimes you can find one with no leg for cheap as no one wants them like that, I will be watching the tailgate sales this weekend Quote Link to comment Share on other sites More sharing options...
HWHII Posted September 28, 2010 Share Posted September 28, 2010 I have a extra 6" leg vise I have been kicking around and would like to have a short leg vise like yours. I haven't had the courage to cut the leg down. After seeing how nice yours looks I think I will go a head and do it. Thanks for the inspiration. Quote Link to comment Share on other sites More sharing options...
monstermetal Posted September 28, 2010 Share Posted September 28, 2010 you know its funny.... I looked at the pictures before there where any reply's and it just didn't register that it was a 6" vise with no leg... I just saw a vise on a three leg stand... after a few posts I went back and looked the pics over again and Im glad I did... I am on the search for a legless (or one I can feel good about chopping up) vise Quote Link to comment Share on other sites More sharing options...
Mainely,Bob Posted September 28, 2010 Share Posted September 28, 2010 Doesn`t hardly get any better than seeing a pic of something you`ve been thinking about building actually done by a skilled hand with tons of common sense thrown in BEFORE your build takes place. Saves a lot of ice cream cones to the forehead. The projection of the plate on one side for support and the 90 degree legs were something I would have been wishing I had done if I hadn`t seen it here first. I was paying attention during the anvil stand post and already planned on staking the base to the ground thru the feet. One of the things I always look forward to is tool posts by Brian,LDW and Pep.I always learn a ton of stuff from these guys and they are changing the way I look at simple things like how I think about the set up and use of primary tools. Thanks for posting this sort of thing guys and keep it coming.I know I`ll always be keeping an eye out for it. Quote Link to comment Share on other sites More sharing options...
brianbrazealblacksmith Posted September 28, 2010 Share Posted September 28, 2010 I'm making the hammer and tool racks for it right now. I'll post some pictures after lunch. Quote Link to comment Share on other sites More sharing options...
jeremy k Posted September 28, 2010 Share Posted September 28, 2010 What is the finished hight of the top of the vise jaws? I didn't see any mention of that measurement. - JK Quote Link to comment Share on other sites More sharing options...
brianbrazealblacksmith Posted September 28, 2010 Share Posted September 28, 2010 28 1/2 inches, one of the pictures show it with the metal ruler in the jaws. Quote Link to comment Share on other sites More sharing options...
Mainely,Bob Posted September 28, 2010 Share Posted September 28, 2010 28 1/2 inches, one of the pictures show it with the metal ruler in the jaws. Yet another good point that`s easy to do yet often forgotten. When we post pics of things ,especially tools and machinery it`s hard to get a feel for scale and measurements unless something like that ruler is included in the pic. Quote Link to comment Share on other sites More sharing options...
brianbrazealblacksmith Posted September 28, 2010 Share Posted September 28, 2010 Here are some pictures of the finished vice and stand with tool racks and steel jaws. . Quote Link to comment Share on other sites More sharing options...
Sask Mark Posted September 28, 2010 Share Posted September 28, 2010 Very tidy setup! Do you notice any disadvantage of the larger vise? I have a large vise (170 pounds), but I don't use it as much as my 45 pound vise because spinning the 3' handle is slow and cumbersome (and dangerous to anyone standng nearby) that causes heat loss in the work. However, if you really want to cinch something in a vise, nothing beats the the long handles. Quote Link to comment Share on other sites More sharing options...
brianbrazealblacksmith Posted September 28, 2010 Share Posted September 28, 2010 If your vice is mounted, like it should be, so nothing moves, a long arm is a pleasure to work with because it cinches and releases with such ease. We alos added rubber bushings by the balls so you don't pinch your hands when the arm falls. Quote Link to comment Share on other sites More sharing options...
jeremy k Posted September 28, 2010 Share Posted September 28, 2010 28 1/2 inches, one of the pictures show it with the metal ruler in the jaws. Thanks Brian - I had only seen the pic in the gallery here on IFI - then I seen the picasa pics then I found that one you talked of. Looks like a great set up. - JK Quote Link to comment Share on other sites More sharing options...
Bad Creek Blacksmith Posted September 29, 2010 Share Posted September 29, 2010 Thanks LDW and Brian for sharing a great project. Always learn from your post. Paul Quote Link to comment Share on other sites More sharing options...
Mark Wargo New2bs Posted September 29, 2010 Share Posted September 29, 2010 Lyle and Brian, that is a great looking set up. Thanks for sharing the project. I see lots that I'd like to incorporate into my stand when I get time to put it together. Keep up the great work. Mark Quote Link to comment Share on other sites More sharing options...
Mainely,Bob Posted September 29, 2010 Share Posted September 29, 2010 One modification I saw that worked well was a handwheel to replace the T handle.The fellow I saw who used it had sized it large enough to be able to spin it easily for adjustment thru a wide range and yet small enough that it didn`t interfere with the work. If he needed more grunt on the wheel to increase the grip he used a cheater bar meant for opening and closing valves in a refinery which hung on the side of the vise.The handwheel was originally from a large gate valve so it made sense to use the tool. He said with copper jaw liners he rarely needed the cheater. Quote Link to comment Share on other sites More sharing options...
LDW Posted September 29, 2010 Author Share Posted September 29, 2010 This has been a good thread. Its nice when questions get asked, answers are given, suggestions are made, and appreciation is apparent in it all. Thank you all for participating. I am heading to Brians to load up and we are going to be gone for 8 to 12 days. When we get back we will have lots of pictures and stories to share. Quote Link to comment Share on other sites More sharing options...
brianbrazealblacksmith Posted September 29, 2010 Share Posted September 29, 2010 Where are we going, Lyle? Quote Link to comment Share on other sites More sharing options...
Recommended Posts
Join the conversation
You can post now and register later. If you have an account, sign in now to post with your account.