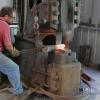
Dillon Sculpture Posted July 18, 2010 Share Posted July 18, 2010 Sorry BUTT it looks to much the same, not intentional! Some quick tooling made up to rough out the shape since I didn't have many to do. 1 1/2" ID with 3/8" wall pipe bent, cut in two with a piece of half round for the top. A large curving bick very useful for many shapes. A couple of 1/2" ball bearings for the butt end. Also a cap rail die and a ball swage for the same project, a reconstruction of some old stuff brought back from France. Quote Link to comment Share on other sites More sharing options...
Fosterob Posted July 18, 2010 Share Posted July 18, 2010 It is always nice to see your posts, they are very informative and inspiring, makes me want to go make something. Keep them coming and thank you Rob Quote Link to comment Share on other sites More sharing options...
Bryce Masuk Posted July 18, 2010 Share Posted July 18, 2010 Sorry BUTT it looks to much the same, not intentional! Some quick tooling made up to rough out the shape since I didn't have many to do. 1 1/2" ID with 3/8" wall pipe bent, cut in two with a piece of half round for the top. A large curving bick very useful for many shapes. A couple of 1/2" ball bearings for the butt end. Also a cap rail die and a ball swage for the same project, a reconstruction of some old stuff brought back from France. Nice looking project, thanks for the idea's I want to make some asscanthus leaves now lol I notice that your C scrolls are to be cut and welded together usually I attempt to make stuff in one piece and its pretty hard to keep it consistant and accurate. I will try your method it would probley work better for me Quote Link to comment Share on other sites More sharing options...
Bryce Masuk Posted July 18, 2010 Share Posted July 18, 2010 I have a question I forgot to ask, I have been playing with barrels and pennys on the ends of scrolls I have made a few nice jigs that are as good as I personally can get. my problem has been making the scroll look right with the penny or barrel on the end of it I have made a new jig to try that I attempted to design it with the purpose of having the space for the end of the scroll it seemed like it was going to work but when I put it into use it doesnt look right. any tips? Quote Link to comment Share on other sites More sharing options...
John B Posted July 18, 2010 Share Posted July 18, 2010 Nice job so far, and an interesting take on tooling and methods, I think you will find that the leaves you have illustrated are known as Water leaves (Tend to wrap around and forgewelded to the bar) and should have the tip cocked over to one side as opposed to Acanthus leaves which are larger, more ornate and flowing and can be forgewelded to the bar if a wraparound one is being used, or more often than not are usually fitted to one side of the bar using rivets or brazing, as a feature to the front of a piece of work such as gates or overthrows. Quote Link to comment Share on other sites More sharing options...
John B Posted July 18, 2010 Share Posted July 18, 2010 I have a question I forgot to ask, I have been playing with barrels and pennys on the ends of scrolls I have made a few nice jigs that are as good as I personally can get. my problem has been making the scroll look right with the penny or barrel on the end of it I have made a new jig to try that I attempted to design it with the purpose of having the space for the end of the scroll it seemed like it was going to work but when I put it into use it doesnt look right. any tips? Not knowing how you use or what you are using as jigs it is difficult to understand your problems To make a scroll jig, you first have to make a scroll I would suggest making a completed scroll freehand using bending forks or whatever that you are satisfied with, and then make a scroll tool that will fit inside this finished one you are happy with. For half penny snub ends or snub or as you call them barrel end (bolt ends) or any scroll that has a solid mass on the end, the trick is to get the scroll's end finished as near as possible to the shape required before even thinking of putting it onto a scrolling jig. When you make a scroll jig for these, you have to leave the centre open to allow the finished end to drop into it, (you may have to raise the centre to allow for wraparound on large scrolls) Then when you put the scroll to be pulled onto the jig Do Not put the end in contact with the jig as you will distort it and tend to pull it open, it is a scroll end/centre not a stop to start from, let it follow the natural form of the scroll, and then use scrolling tongs or bending forks or whatever to secure it to the jig and work it around the tool using bending forks to keep it under control and ensure a smooth curve which will follow the form of the jig. You can quench the snub end before placing it on the jig when starting to pull the scroll, then bend the rest of the scroll to the form whilst metal is red heat, when colour starts to disappear, reheat and continue, if you don't, you will get a kink in the scroll. Take time to make your scrolling jig as good as you can, and remember this form will be smaller than the finished scroll you will produce on it. Hope this helps. Quote Link to comment Share on other sites More sharing options...
Dillon Sculpture Posted July 18, 2010 Author Share Posted July 18, 2010 John, Thanks for the clarification, its good to know the right classification when being professional, guess my inexperience with the history has me at a disadvantage. Being my first attempt at this type of decoration do you have any insight to the usual practice of producing the water leaves? Bryce, It seems John has given great advice for the practice of making the scroll, the only thing I would add is to work your master scroll to your complete satisfaction before you make the jig. As well I will tend to focus on the negative space more than the iron. I have found a stop block on the jig with the use of a pry bar is suffice to start the scroll without opening it up. There are a couple pics of the ones I have made here On the note of my scrolls, my methods usually stem from a production point of view with the highest quality possible, that being said I do not waiver when welding verses more traditional methods of calculating the mass for the perfect length of a C scroll, as long as I carry the craftsmanship out properly. I too will change the design and move elements to give the piece the right composition and balance, this method allows for those situations were I would have to cut the single piece scroll anyway. Quote Link to comment Share on other sites More sharing options...
IanR Posted July 18, 2010 Share Posted July 18, 2010 Nice looking work,great informative photos. It's always good to see photos of tooling and how they are applied, thanks for sharing. Cheers Ian Quote Link to comment Share on other sites More sharing options...
Bryce Masuk Posted July 18, 2010 Share Posted July 18, 2010 those are some nice jigs in your link, why do they hinge? did anyone ask that previously I have noticed I made few errors from johns post I uses the end as a starting point which caused distortion from stretching I imagine. what I intended as a barrel was essentially tapering out a flatbar really thin and rolling it up into a circle like you would make a barrel on a hinge but not overlapping it for a weld just open on the inside most of these problems are probley from lack of time invested I can do them just not like you guys can I will have to invest more time and patience into this often I find I think I have things right and then they arent so I re-do whatever it is, thanks guys I will re read these posts and make use of them Quote Link to comment Share on other sites More sharing options...
brianbrazealblacksmith Posted July 19, 2010 Share Posted July 19, 2010 Nice inovative tooling Danger Dillon. I used to joke with Alfred Habermann about the Lois XVI ornaments. I'd tell Alfred that I didn't blame them for chopping King Lois' head off. They were making those ornaments and even guilding them with gold while the people were starving. Quote Link to comment Share on other sites More sharing options...
beth Posted July 19, 2010 Share Posted July 19, 2010 wicked danger - i love the tools thanks! Quote Link to comment Share on other sites More sharing options...
John B Posted July 19, 2010 Share Posted July 19, 2010 John, Thanks for the clarification, its good to know the right classification when being professional, guess my inexperience with the history has me at a disadvantage. Being my first attempt at this type of decoration do you have any insight to the usual practice of producing the water leaves? Hi Danger, This is possibly the best link I can provide as a guide for this particular item, a pictorial demonstration and the tooling used for making them. (not a million miles away from what you devised) http://www.hct.ac.uk/PDF/CraftPublications/WroughtIron/WROUGHT%20IRONWORK%20PART%204_tcm2-18923.pdf Water Leaves, Lesson 14, Pages 48 through to 52 will give you all the information you need. This is an extract from one of the Cosira books that can be downloaded free from http://www.hct.ac.uk/Downloads/craftpublications.html Quote Link to comment Share on other sites More sharing options...
Dillon Sculpture Posted July 20, 2010 Author Share Posted July 20, 2010 I have two of the Cosira books, highly recommend them. I did find it difficult to get the material to stretch into the shape I wanted just hammering, the tooling I made, roughs the leaf in one heat verses the 5 to 6 with the Y fork. The waves were formed cold so a couple heats with cold forming the rest I feel some time was gained with good results. Quote Link to comment Share on other sites More sharing options...
Double Y Posted July 20, 2010 Share Posted July 20, 2010 Thanks for the shots of the tooling - I really like to see what others have made to accomplish a task Thanks Quote Link to comment Share on other sites More sharing options...
tzonoqua Posted July 20, 2010 Share Posted July 20, 2010 Great sequence - very helpful for me right now as I'm making some daisy leaves and it's great to see what solutions come about by others for different shapes!! And John, I swear I've learned more about blacksmithing techniques from reading the cosira books than I did in my degree :) Quote Link to comment Share on other sites More sharing options...
John B Posted July 20, 2010 Share Posted July 20, 2010 quote name='tzonoqua' date='20 July 2010 - 08:42 PM' timestamp='1279654936' post='178988'] Great sequence - very helpful for me right now as I'm making some daisy leaves and it's great to see what solutions come about by others for different shapes!! And John, I swear I've learned more about blacksmithing techniques from reading the cosira books than I did in my degree Quote Link to comment Share on other sites More sharing options...
tzonoqua Posted July 20, 2010 Share Posted July 20, 2010 I'm still amazed by work like this and in awe of the amount of time they must have taken to produce- today I was at my workshop and spent 5 hours on four leaves... and they are nowhere near the standard of these, of course they're also not to a "pattern" but I march on happily and blindly I've got one (or maybe even two) of those "leafing hammers" I never actually knew what they were for or what they were called, but I've used them a lot for shaping. Quote Link to comment Share on other sites More sharing options...
nuge Posted July 21, 2010 Share Posted July 21, 2010 Thanks for the slideshow John. Usually not my cup o'tea... those first shots are supple, gorgeous pieces. Quote Link to comment Share on other sites More sharing options...
Dillon Sculpture Posted July 21, 2010 Author Share Posted July 21, 2010 Now thats really something I can sink my teeth into! Beautiful work! I keep thinking about what 100 ton may do to a pice of 1/4" plate. HOT! Thanks John, I also looked through Marks videos which were an immense help. I'm with Colleen, these burgers take some patience, maybe more than I have. Here is the original I was asked to fix, a little far gone for me to bring it life. It amazed me how rough some work is still coming over, there was a gem in the basket though, some real interesting techniques in this one. I especially like the bow tie joint made on the flame inside the C scroll. Quote Link to comment Share on other sites More sharing options...
youngdylan Posted July 21, 2010 Share Posted July 21, 2010 Nice work Danger ..... you sure know your way round a set of curves Quote Link to comment Share on other sites More sharing options...
beth Posted July 21, 2010 Share Posted July 21, 2010 john thanks for all that wonderful info - i have had trouble downloading the cosira books before now but i just re tried and it looks ok - some beautiful instruction in there ! i had no idea... and for the register - i would def be interested in a leaf course... :) Quote Link to comment Share on other sites More sharing options...
John B Posted July 21, 2010 Share Posted July 21, 2010 Now thats really something I can sink my teeth into! Beautiful work! I keep thinking about what 100 ton may do to a pice of 1/4" plate. HOT! Thanks John, I also looked through Marks videos which were an immense help. I'm with Colleen, these burgers take some patience, maybe more than I have. Here is the original I was asked to fix, a little far gone for me to bring it life. It amazed me how rough some work is still coming over, there was a gem in the basket though, some real interesting techniques in this one. I especially like the bow tie joint made on the flame inside the C scroll. Glad you liked the pics etc. I like that, a lot to learn in that one, and not that much damage, just results of old age and lack of maintenence Like you say, the bow tie scroll looks cool, the balls help set it off, normally I would have expected a collar to be used, How was it fixed? (square shanked rivet would be a first guess) Just a word on Water Leafs, they trap water, which is why they are prone to corrosion, some used to have drain holes towards the base to try to offset this effect, and some were also filled with pitch up to this drain hole after being painted/finished. They do not take long to do, it is a matter of practice like everything else. 1/8" plate is ok for Water leafs normally, the edges are usually thinned. But that would probably depend on thescale and sizes of the finished piece, I also had trouble editing the previous post, they are known as FLAT FACED , and CUPPED ACANTHUS LEAFS Quote Link to comment Share on other sites More sharing options...
John B Posted July 21, 2010 Share Posted July 21, 2010 One moment for an info commercial. John, thank you for the very cool photos. I looked up the nhig site. You Brits are so lucky. While we in America have lots of craft schools. We have nothing coming close the training programs in Britain. Gerald, we are not as lucky as you seem to think. Us Brits have no accredited training programmes,or qualifications, and born out of frustration with that situation the NHIG was formed some eighteen months ago, and that it is vital to add support and keep the momentum going to take it further and for the longer term. Funds are needed to match the Heritage Lottery Grant if it is not to be lost, if you or anyone else out there can help please donate. www.nhig.org.uk The NETS course has been closed, Funding for the two main colleges with blackmithing type courses has been drastically reduced, and so without this organisation achieving its aims, the future for Trained blacksmiths in the UK looks bleak This is not a new situation, indeed our own Guild www.blacksmithsguild.com was formed in a similar situation in the 1960's when traditional blacksmithing was rapidly declining due to the 'modern world' and mechanisation of the agricultural and other industries that had previously depended on the blacksmiths Our organisation is a non profit making one, and we have a small membership, and will continue in our stated objectives, which are in our constitution a. To foster commercial participation in the Craft. b. To provide expert tuition to foster and maintain a high standard of design and craftsmanship. We have the skills available to pass on, how far the students want to take and develop them is up to themselves. We are not a training establishment per se, and our tutors are all practicing or retired 'smiths and if necessary we will obtain the services of a specialist at a specific skill should we need to, and we tend to have more focus on the skills as opposed to designing, which the colleges tended to cater for. We cover basic skills to the more advanced and specific, we do not have a syllabus and respond to requests for particular course content How long we can continue with our present low cost laid back approach is debatable, but we will try maintain our current situation, keeping the courses open to all, not just Guild members. Some of our founder members work can be seen in the US, five gates made for Church Falls Virginia, each 18ft by 15ft and accompanied by 232 ft of matching railings, made by a group of 15 smiths in Devon, Cornwall, Dorset and Somerset. The gates were ordered by Mr Robert F Marlowe, they were completed and shipped out two months ahead of schedule in July 1968 And this was the reason the Guild was originally formed, to ensure the participating smiths had the knowledge and ability to produce them and the tooling needed to make the component parts.. We are not a substitute for a proper educational organisation/system structured to deliver internationally accredited qualifications, and as such support the aims of the NHIG Quote Link to comment Share on other sites More sharing options...
Dillon Sculpture Posted July 21, 2010 Author Share Posted July 21, 2010 Like you say, the bow tie scroll looks cool, the balls help set it off, normally I would have expected a collar to be used, How was it fixed? (square shanked rivet would be a first guess) Just a word on Water Leafs, they trap water, which is why they are prone to corrosion, some used to have drain holes towards the base to try to offset this effect, and some were also filled with pitch up to this drain hole after being painted/finished. If you look close at the last pic there is a (bow tie) dovetail joint from the C scroll to the flame, with a hint of brazing? I will make an area for water to drain as well I use a epoxy that weeps into the problem areas. I commend your work with the Brits training program and especially appreciate your input here, thanks. Quote Link to comment Share on other sites More sharing options...
John B Posted July 21, 2010 Share Posted July 21, 2010 If you look close at the last pic there is a (bow tie) dovetail joint from the C scroll to the flame, with a hint of brazing? I will make an area for water to drain as well I use a epoxy that weeps into the problem areas. I commend your work with the Brits training program and especially appreciate your input here, thanks. Thank you for that, and you are welcome, It is not my work with the NHIG training programme, we did not get invited in at the start, but I am committed to supporting it, and our Guild will still carry on where we are needed. I did notice the mark, and it looked like a double dovetail 'key'(could have been mistake for a makers mark) and also wondered if it had been brazed in, the other option that occured was a possible round pin through to locate and stop the centre dropping out, and the mark was a peining or cross rivet to secure it if it had been, a dovetail would not necessarily held it firmly enough, and it would have to have been brazed at both sides to prevent slippage. Darn Danger, I feel like I want you to take a torch to it now to find out actually how it was done,(without destroying it, just hot enough to establish something, That's the fun of this restoration discovery work it just sucks you in and its like following the path to enlightenment "grasshopper" Quote Link to comment Share on other sites More sharing options...
Recommended Posts
Join the conversation
You can post now and register later. If you have an account, sign in now to post with your account.