December 9, 200916 yr Can anyone help me figure out how this is made? Sorry about the link. I tried to upload it but got an error. I recently got a necklace with a cross like this so I could look at it and determine how to do it. But, I'm perplexed! Supposedly it's made from a single piece of square stock. Any hints or pointers sure would be great. Thanks, rvb
December 9, 200916 yr They are simple, even though I have only tried in clay. This is a good description.http://www.iforgeiron.com/forum/f7/crosses-more-crosses-15786/index2.html#post146321 Ron Reil did describe how he did it on his website. Quoting Ron from his Gallery page: " I forged this cross for my youngest daughter, Natalie, for her 2001 Christmas present. As is the case in most of my imagery, the picture doesn't do it any favors. The colors range from an intense peacock blue at the base, to a dark blue on the shaft, on up to a straw in the center, and ending in the hot applied brass highlighting at the ends of the cross. The enjoyment of making a "fold-out" cross is reward enough to attempt this little project. This one was made out of a single piece of 3/8" square steel bar about 5" long, and a 1-1/2" x 1-3/4" base plate. The cross is one piece, formed by folding out two perpendicular overlapping saw cuts in the 5" long steel bar, producing a very decorative and interesting center opening." Hope this helps Phil
December 9, 200916 yr Author You're right. My problem is that I don't understand his statement: "two perpendicular overlapping saw cuts" I guess I need a picture. I'll puzzle over it a little while.
December 9, 200916 yr I had the clay out so I took some pics. This is a 1/2 inch square, 6 inches long. I cut from one end 2 1/2 inches, then rolled the bar and cut from the other end 4 inches. On folding out this is what is seen. I then cut the end to have matching top and sides, leaving the bottom long. I can't do much more to help. Get some modeling clay, about $4 for the 5 color pack at the craft store, and give it a try. Just mash up poor results and try again. I use a piece of heavy plastic to protect the table. Phil
December 9, 200916 yr See if this helps on how to cut it...click the attachment twice for a larger view
December 9, 200916 yr Here's the link to how I learned to do these...Saltfork Craftsmen Scroll down the page to Friederick Cross Key Fob, then each page can be printed for reference. They are also known as split crosses. Depending on stock, you have to scale the saw cuts accordingly for proportions to come out right. I had a picture of one I did in the gallery, but the gallery is down right now. Figures.
December 9, 200916 yr This may explain it a little better. First photo is as shown, second photo is with the material rotated 90*. You open one of the splits a bit, then open the other split a bit, then open both to 90*. The overlap of the cuts forms the diamond in the center.
December 9, 200916 yr Attached is from the Alabama Forge Council demonstration by Chris Friedrich on his cross. I think it's the best explanation I've seen so far.SplitCross.pdf
December 9, 200916 yr Pkrankow and jimbob, The content of what you are sharing with us (about how to fabricate a cross) is extremely valuable. But, my appreciation of your willingness and unselfishness along with the many, many other good folks (to many mention) that teach us and share information about blacksmithing with the rest of us, is just over the top with me. You men are just two good examples of the spirit of teaching and sharing what is required to keep the cycle of information flowing here at I forge iron. In my opinion, the truly great men and women of Blacksmithing have no fear of sharing information or teaching the details of a process. And I mean they really want you to know exactly how it is done. Un-like with most of this greedy world, it is refreshing to come in, sit down and click a few buttons and find folks who share freely! Again, it is uplifting to be affiliated with like minded folks as you all! Thank you! Please keep teaching and informing us!! Ted Throckmorton Edited December 9, 200916 yr by Ted T
December 9, 200916 yr Author Thank you all very much! I tried it in clay when I got home from work. I've been racking my brain over this and had many unsuccessful attempts with the clay. I thought the cuts were made in one plane only and that the ends were twisted! Thanks again. I've been away from the forums for awhile. Glad to be back!!!
December 10, 200916 yr Wow- thanks guys. I was scratchin' my noggin for a while over that, and Rick beat me to the question. Can't wait to fire up and give it a shot. Gotta get me some clay, too. Steve
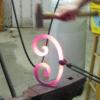
December 11, 200916 yr I was inspired by all the additional responses, and after getting my anvil unfrozen I gave a try in iron. Opening the cross is harder that it looks, and getting it even is difficult too, but I am pleased with my results. I used 1/2 inch square hot roll. Cutting with a hand hacksaw requires a lot of effort so I won't be making very many of these till I get a bandsaw. I'm disappointed in the finish. I originally did temper coloring on cleaned steel, but when I applied shellac, I learned that my shellac had gone bad, curdled and got gummy. I reheated and applied a Crisco finish hot after cleaning the bad shellac off. Using 1/2 inch square makes it a little big for an ornament. Use of 1/4 inch stock might be better for that. I used the dimensions JimBob posted, but I added 1/4 inch to the top when I cut so I had material to punch a hanging hole Phil
December 11, 200916 yr try a brass brush while its at a blue heat then paste wax/linseed oil mix and burnish with a soft cloth. I took and old chipping hammer and rounded the edges to a little over 1/8" round works really good to texture the cross. another note on your hack saw tighten the blade as tight as you can get it and then some...it will cut a lot better
December 11, 200916 yr you can play with the size of the diamond in the middle...the trick is the more the overlap the more diamond...the closer those two cuts are to meeting, the smaller the diamond...when the cuts are equal you get a dot....but then they r real hard to open....i took a piece if strap and made a sharp end on it and i stick it in the hardy and that helps pry it open....i use a hacksaw all the time...safer....it also improves your sawing skill ...see if you can make a smooth cut
December 11, 200916 yr I think a new hacksaw is in order then, I had this one cranked all the way down and the frame was flexing. Does the tightness of the saw affect blade life also? Phil
December 12, 200916 yr Phil, I agree with Ted. I make those crosses and don't have any problem with them, now. But I also had a problem understanding the process, when I first started making them. The demo in clay was excellent. Thanks for sharing.
December 12, 200916 yr Rick, I've made a few of them crosses as gifts for friends and family, I learned how on a web site called anvilfire. go to the section called iforge. scroll through and you'll find that cross as and instructional lesson step by step. that whole section is very educational. good luck to ya!cross 1cross 2
December 12, 200916 yr I think a new hacksaw is in order then, I had this one cranked all the way down and the frame was flexing. Does the tightness of the saw affect blade life also? Phil If you get a new one look for one of the newer type with a screw up the handle they seem to work better ...cheap blades don't last long the bi-metal seem to last the longest for me
December 12, 200916 yr On a side note, when I made my crosses I used the ball end of a ball peen hammer to give them a rough texture, and like other members have said, I hit it with a brass brush and it leaves a hint of brass highlites on the high spots! Again good luvk to ya!
December 12, 200916 yr I make quite a few of these in 1/2 inch stock and got tired of all the sawing. Even on the band saw it is tedious work. I have a jig which is a piece of 1 inch by 4 inch stock about 8 inches long. There is a 1/4 inch deep rabbet on the end which is 1/4 inch minus half the blade thickness in width. I fasten this in the vise so that it just touches the blade in the band saw. Then mark your stock and clamp the stock in the rabbet with a visegrip and start sawing. You have to watch as the saw approaches the mark and stop appropriately. this will leave a slightly angled cut because the saw blade is not going to full horizontal. Finish in the bench vise with a hacksaw, about 6 or 8 strokes. Rotate, switch ends and repeat for the other cut. Works great. If you are doing a lot of them you can also fabricate an extension for the shutoff switch so that it shuts off automatically.
December 12, 200916 yr Hey Jim, could you post a few pix of the jig that you made? I make quite a few Crosses and that sounds like a better way to cut them. Thanks.
December 20, 200916 yr Here's a couple I did this afternoon out of 1/4 inch keystock. I went by the chart posted earlier to make the bigger one. Kind of spindly looking, IMO. The small one is another cut down to make a pendant for a friend. I think it looks better with the size of the stock used.
December 21, 200916 yr well i keep seeing everyone making small ones so heres the biggest i have made so fare it made from 7/8 stock its for my pop to hang in his new house out in Arkansas the bigger you make them the more of a pain in the butt it is to twist them and for cutting them i think the next big one i do i'm going to clamp it in the mill and use the slitting sawas it was a pain trying to keep the saw straight for the long of a cut
December 21, 200916 yr Author This is awesome to see everyone doing this! I asked the darn question and have made 3 of them in clay, but none in steel yet! But, I just bought a 100 lb. propane tank and the forge needs to be fired up! I'll be sure to do it soon and post some pictures.
December 21, 200916 yr well i keep seeing everyone making small ones so heres the biggest i have made so fare it made from 7/8 stock its for my pop to hang in his new house out in Arkansas the bigger you make them the more of a pain in the butt it is to twist them and for cutting them i think the next big one i do i'm going to clamp it in the mill and use the slitting sawas it was a pain trying to keep the saw straight for the long of a cut I think on the larger stock you should use a hot cut
Join the conversation
You can post now and register later. If you have an account, sign in now to post with your account.