Rick Barter
Members
-
Joined
-
Last visited
-
I found this which was interesting: You need to create a solenoid. Get acquainted with Lenz's law and a few other things pertaining to magnetism (any A-Level physics book will contain those things). Just take copper wire, and coil it around a paper tube of the diameter you need. You then need an alternating current source, or alternating movement. Let's say you have a 9V battery attached to a coil wrapped around a paper tube (use a resistor in series with this or prepare for fire!). You want to demagnetize a nail. You can use a constant DC current and move the nail in and out of the paper tube to simulate alternating magnetic fields, or you can provide alternating current. That, is as simple as using a "push to make" or "push to break" switch in the circuit, placing the nail in the paper tube and attempting to see how long it takes to contract arthritis. Either way, you want the magnetic "grains" to line themselves up uniformly, for a magnetised object, and to demagnetise, you need to throw them out of order. Read more: http://www.physicsforums.com Perhaps the "wiping" people are talking about is enough to "simulate alternating magnetic fields" as in the excerpt above. Or, as it also says above, "you can provide alternating current". In any event, I would like to see if wiping the anvil with current would do it. PLEASE do not drop back ground colors in behind your text, it makes it very hard to read on some screens and is a royal pain to edit out
-
Dogsoldat, You must be talking about a Fontanini anvil. I've been talking to Steve about that. He tried dropping it while I tried another route. My Fontanini came magnetized. I just successfully de-magnetized it. At work we have a Blachard grinder with a 36" magnetic chuck. We put the anvil on it face down and ran it through a few cycles. It took 7 cycles and some creative positioning (to get the side shelf to cross as many rings as possible) to get the job done. I am interested in the other posters' responses about wiping it with a welding lead while welding. I don't know if any of that would work, but someone please try it and post your results! And Eseemann, a magnetic anvil is a royal pain! Think about it. Ever see one of those arrow magnets after you grind near it for awhile? It's hairy with grinding dust. Now imagine you're working at your anvil. Scale is falling off and collecting on your anvil. You go to wipe the scale off your anvil (so you don't mar your work or press scale into your work which flake off sometime after it's painted and installed in your customer's home, taking paint with it) and it just slides all around. It doesn't come off. My $0.02. (WHY IS THERE NO CENT SYMBOL ON KEYBOARDS?!!!)
-
I'm confused. Is there an actual organization now? I signed up for the mailing list, but have yet to get emailed about a meeting. I admit, I was laid up for a few months with a badly broken ankle, but am now back in circulation. From the other groups I've been involved with (Houston, Texas and Indiana), there were monthly meetings. That way, everyone knows when the meeting is (e.g. 2nd Saturday of the month). What are we missing? A place to meet? What is required for that? Do we have to have forging stations for everyone or just one forge used in giving a demo? What's a meeting consist of, demo, eat, socialize, leave?
-
As I said, I heard about the meeting via an ABANA email. I don't know if they've gotten as far as compiling contact lists from KBA.
-
I thought it might an old treadle for a press or something.
-
All, There was a meeting this weekend (1/26/2013) at Maynard Studios in Lawrenceburg, KY. I was alerted to it via an email from ABANA. I will post the email below. The meeting was to gauge interest and to see about revitalizing the Kentucky Blacksmith Association (KBA). I met Matthew and Karine Maynard, Lewis Meyer, Scot and Laura Kellersberger, and Daniel (I'm sorry, Daniel. I forgot your last name). The consensus was that the majority of people were there to network and learn. Lewis was the past Treasure of the KBA and was going to work on figuring out what was left in the old accounts. Daniel was going to set up some IT resources for emails and a possibly a web site. I was very late and am recounting this from memory, so I may not be 100% accurate with the details. I also believe Lewis is going to host a hammer-in at his Louisville shop in March. We all put down our names, phone numbers, and email addresses to be contacted in the future as things progress. I would urge any interested in participating to get Karine (http://www.maynardstudios.com) their information. I will also post any new information I get to this thread. ABANA email regarding revitalization of the Kentucky Blacksmith Association: Kentucky Blacksmith's Association "Call for Revitalization" Matthew and Karine Maynard would like to host a meeting to discuss the revitalization of the Kentucky Blacksmith's Association (KBA) from 1 to 3 pm, Saturday the 26th of January at Maynard Studios. Maynard Studios is located at 1986 Fox Creek Rd, Lawrenceburg, KY 40342. (Business only, no forge required). If you have any questions, please contact Karine Maynard at (502) 604-3000 or at http://www.maynardstudios.com/.
-
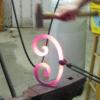
Well, I wrestled with making the jig, but got it done. It then required some tweaking, but it was looking good. So, I tried it. It worked, but I realized I had a flat spot in the jig. I reworked it again with the help of my brother-in-law and re-formed the scroll on the jig. I find it very challenging to be patient and easy with the torch and the scroll wrench. It is definitely a finesse thing. But, I feel good that I got a nice scroll and the customer is happy. Therefore, I will be able to finish the remaining 7 scrolls. They are about 16" each. Thanks to all who gave advice and guidance. It definitely helped. This craft is very humbling and rewarding. I'M HOOKED! ;)
-
Mr. Hofi, Thank you for sharing your knowledge and techniques! Did you make the template and then cut it into segments or did you make each segment and then fit them together. Also, for large templates (1/2" x 2"), would you hand forge them hot or bend them cold with a scroll fork to get the template right? Thank you for your time.
-
Good advice. Thanks, FCIron.
-
If I had large enough stock, I could, but I don't have anything larger than the 3/8". The largest I have is 1/4" x 2".
-
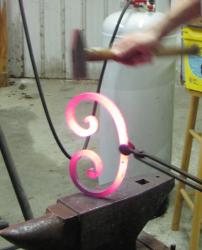
[ BEWARE: This is a bit long, but I said I would update everyone when I started and I think it may be of value to others ] OK. I got the steel from the ornamental iron company and started work today on the scroll jig. Full Discloser... it did not work as I planned (whenever you get cocky, the gods make you pay)! But, do not fear, True Believer! Where there's a will there's a way. It may be kind of a goofy way, but I have to get this stuff done and get the dough-re-mi (pun intended). Leave it to me to completely underestimate just how much effort it takes to forge 1/4" x 2-1/2" stock into a graceful scroll of 15" - 18". And, by the way, the stock I need to scroll is 3/8" x 2"! So, my scroll jig started to get all out of whack while forging it. And, having learned it's unwise to throw a fit, I backed off, took a breath and analyzed the situation. The beginning of my scroll jig was nice. So, I cut it off and put it aside. Then I set about to make the larger portion of my jig. I did it and marked where the first jig left off and the second jig took over. Then I grabbed a test piece (5/16" x 3/4" I think). It worked pretty well except I didn't have vice grips handy to clamp the start of the scroll to the jig. I got some vice grips and carried on with work. Heating, clamping, bending with scroll fork. It worked out ok. So, I bravely grabbed a 5' piece of my 3/8" x 2" stock (they gave me just enough for the job :o) and started heating in the coal forge. I tapered the stock a little and then was ready to start my scroll. I am doing them freehand on the anvil to start and then going to the jig. I pu the piece in the jig and bent it around. Great! This is easy (I'm sure you all know what's coming)! So I go back into the fire for another heat. I come out, clamp the stock to the jig and start bending around with my body and my scroll fork. Nice! it's coming along just fine. Except I got a little impatient and decided to see what would happen if I did some cold and tried to get more bang for my buck. BAD IDEA! I got a kink. So i had to stop, heat it back up, hammer out the kink as best I could, and go again. I wound up getting it squared away for the most part, but I still see it a little and may go back and tweak it with the torch and the scroll wrench. Now it's time to go to the second operation: larger jig. So I heat up the piece and am disappointed that I can only get about 6" or 8" of a heat on the piece. But I go slow and just do a little at a time. Patience is something I am continually trying to learn (I've had mixed success). It came out ok. I don't love it, but it's a scroll. It's 16" or so and I've sent a picture to the ironwork company for which I'm working. We'll see what they think. If they're happy, I'll make the rest and live to fight another day. If not, it's back to the anvil. I have learned a lot about what doesn't work. I have a lot to learn. But, isn't that always the way? That's why I am taking Frank Turley's class this year. The important thing is to DO. I find I don't learn a darn thing unless I'm DOING IT. Every time I do something, I improve. I'm no Francis Whitaker. I am, however, striving to get better. Anyway, I figured my experience might help others. So, here's what I learned: 1.) Bite off more than you can chew. It's the only way you'll grow. 2.) Make sure you use the heat you have. Don't try and bend a little bit further cold. Even heat (or non-heat) is best. 3.) You can only heat up so much at a time. I need to learn how to heat up more of my bar or just refer to #2 above. 4.) I need to learn to use a coal forge better or build a permanent one with a chimney insid!. I was buried in smoke because I have to forge outside and have no chimney to get the smoke out of my face. 5.) I need to make better fire tools and get more training. I have a LOT of questions. Thanks, everyone for reading this. I hope it wasn't too boring. P.S. - If anyone wants to share the best way to heat and make large scrolls, I'm all ears!!!
-
I am going to try something. I agree with Frank. All this formulaic nonsense is really just spitting into the wind when it comes time to make something. I need to make some scrolls for a job. I need them to be 15" to 18". We're blacksmithing here. We aren't building an aircraft. Here's how I started. I got a piece of soapstone and stood at my crappy, little welding table and drew out a scroll about that size. How did I know it was that size? I guessed! You develop your eye after you make stuff for awhile. I put a tape measure up to my freehand scroll and voila! It was about 20". No problem. I just don't need to make them as big. So I took my hand and erased some of the soapstone line. :D Next, I took some mason line and "traced" my soapstone mark. I then stretched my mason line out and measured with my tape. I found that to make about an 18" scroll I need about 5' of steel. Boom! Now I know about how much stock to use to get what I want. Now I have to fire up the forge, heat up some steel, and freehand a scroll to "match" my soapstone drawing. To quote Randy McDaniel, 'How are you going to make a scroll jig if you can't make a scroll freehand'? It takes practice. It takes pain. It takes suffering. It takes diligence. It takes perseverance! I will update you as I proceed. I need to get an estimate together because I need to price out how I will make 8 of these bad boys for a local ornamental iron shop. Stay tuned!
-
This is so well-said and helpful. Thank you, Frank!
-
Thanks, BigRed. I'll look into it. Lots of good information in your post! rvb
-
Thanks!