wd&mlteach
Members
-
Joined
-
Last visited
Everything posted by wd&mlteach
-
Wow, you are a true master and I bow to your greatness. I have visited this post before and it leaves me speechless each time.
-
IMHO that is why they are called ASO, becasue they are not anvils. In my neck of the woods I would spend the time and energy searching CL or local auctions for a real anvil. I would not bother trying to plate an ASO.
-
Looks good so far but I would caution you in a few areas. One, leave it modular as you may find you need to adjust the firebox for some of your endeavors. Two, line those blocks with something as they are not really abrasive resistant and they WILL not hold up to the use of flux. It will eat through them sort of like pee does with snow. There are some coatings out there or you could just get a liner block, I did both. Also I guess you plan on drilling through the blocks for your burner. Please make sure your are outside and wear a respirator. Do a search for which coatings and where to buy, it will come up.
-
I love the hood that I have on my forge. It is modular and I can take off what I need to fit in pretty much whatever I want/need. It is a life saver as it removes the nasty stuff that buring coal makes. It also, as mentioned allows for a more constant viewing of the color of the metal. Another advantage to the hood that I have found is that it helps to minimize the unburnt gases from backing down my blower pipe. My forge is portable and when it is outside the prevailing winds always blow from right to left. My hood was open on the right side, so it goes straight at it. Once, I had a backfire after I added some green coal. Sounded like a shotgun going off and blew my blower pipe completely off. I did some research on here and the experts explained that I had some rather nasty explosive gas back down my blower pipe and just sit there. When I replaced my work into the fire I knocked some hot coals down into the gas and well, boom happened. Since I have enclosed my hood I have had less of the gasses going down after adding green coal. Before that I could hear little chugs or puffs for lack of a better term and I knew I had to be careful and crank a bit before replacing my work. Now, it is not as much of a problem as there is a constant draw up the chimney and a wind break.
-
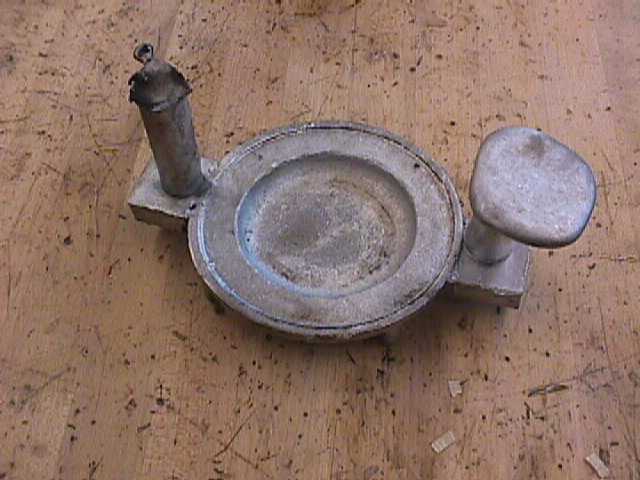
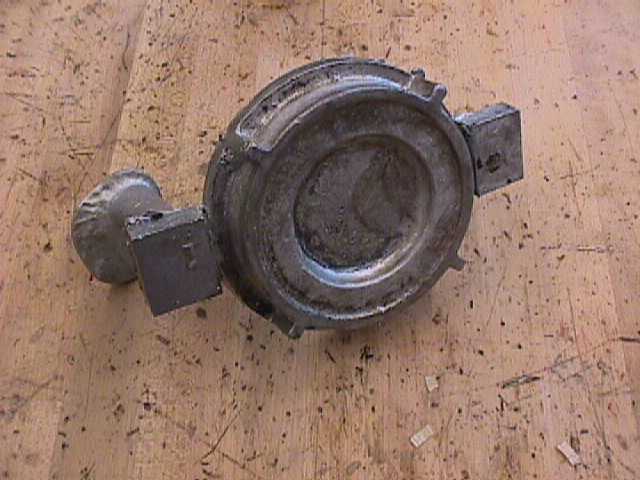
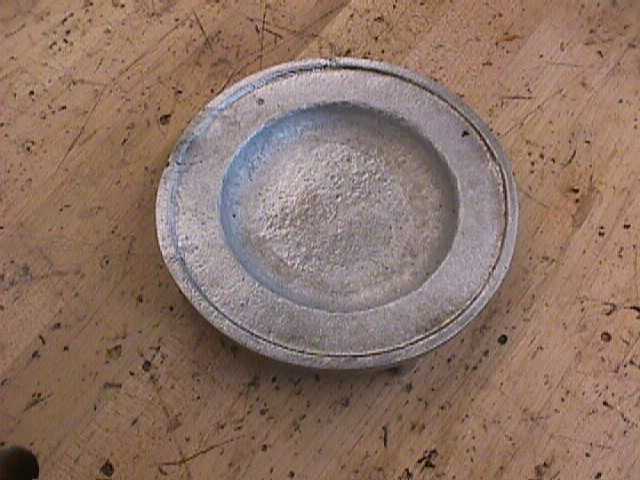
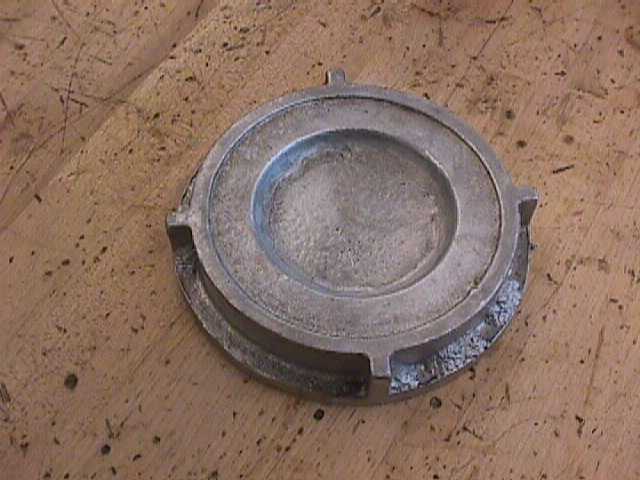
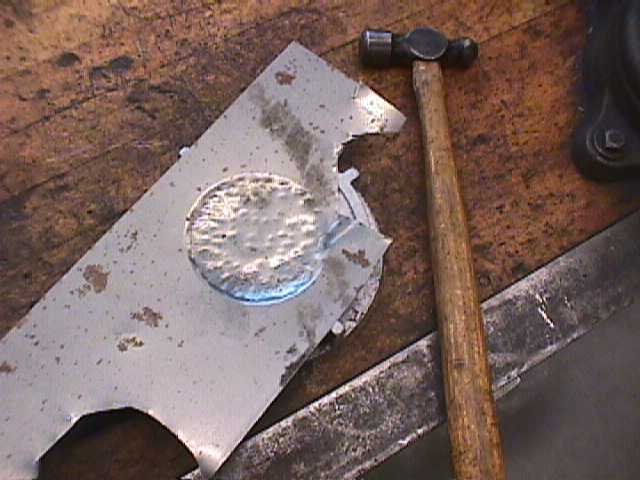
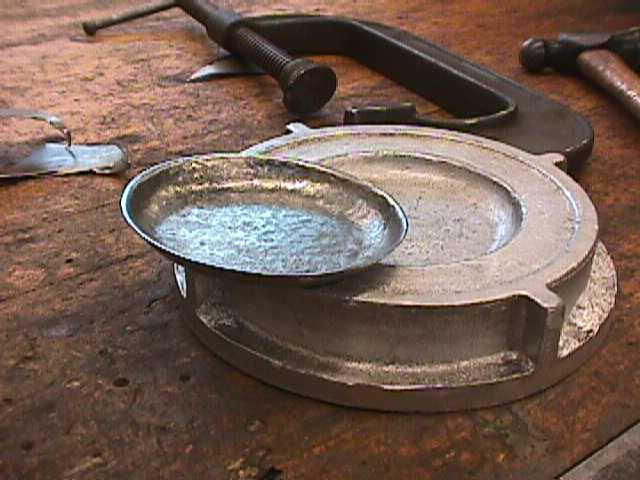
Colleen you are correct there are numerous ways to get this done. For me this took about 2 hours to do once I had the whim. I have since made a few dishes from the form and it seems to be holding up fine. I bet if I made a hundered or so it might start to change, but for now it is working. The operations that you suggest are they formed hot or cold? Not the welding of course but the actual cup? Also if you have any of these forms done I would LOVE to see a picture of them or at least a link to where I can find them.
-
John N, you are correct. Removal of a guard or any piece of safety equipment is not advised as it was there to keep you and others safe. However, I respectfully disagree with this statement when you point out its danger in the following line. To be honest I have myself performed this type of operation and I know the risks associated. For me the risks are too great for this to be a common occurance. For you they may be within your acceptable limits and your skill level, for my kids at school no-way. My occupation and possessions are in their hands, literally. As a result I believe that safety is part of the decision of viability. Personally, I do not buy large cuttoff wheels for school as I believe that their drawbacks with newer folks outwiegh their benifits. It is just my opinion, I am sure others and yourself might disagree. And I am okay with that. I believe that cuttoff wheels like most hand held power tools deserve a bit more respect when operating, handling and storing. For my kids moving stuff around, dropping things off tables, plopping them in cabinets, and just learning this stuff in general, the risks are too great. I prefer the bandsaw as it is to me is the safest operation. They can clamp it, lube it, turn it on and stand back while it autofeeds in. When it is done it shuts off and the next one goes at it. It may be slower and a little burred but I will take it over a kickback or disk failure any day. I am not trying to kick a hornets nest here, and I hope that I have not offended you as that is not the goal here. I am just sharing my opinion and experience as well.
-
I have a WellSaw at school and a HF special at home. Both of them will handle cutting through metal that thick and thicker. Yes, it is a slow process but remember metal is a pretty durable substance, that is why it lasts so long. I constantly have to tell the kids this. Sure there are faster ways of cutting but it is usaully a compromise. A big shear will cut through that in a blink but it will not maintain a nice edge and will deform. An OA setup will slice through that in seconds but is a bit tell-taling and unless you are good and consistant it will be rough. A cuttoff wheel on a good sized saw will also blaze through it quite quickly. One on a dremel will snap off and hit you in the face. A hacksaw will also give you a snapping good time. With my saws the right blade really does make a difference as well as coolant. Maybe I missed, it but I am surprized to see that nobody has mentioned the importance of coolant in an operation like this. Coolant in an operation like this keeps the blade cool and retains the cutting hardness in the teeth. It also helps the chips to clear out and reduces the chip load per tooth. And lastly it leaves a better surface finish. It also extends the blade life by not dulling or knocking the teeth. You can still knock the teeth off of the correct blade if you do not clear out the chips. You can also bind the blade nasty tight if you are not clearing them out. I only order one blade for my sawas although I cut lts of different materails. I opnly let the kids cut steel as they really do not comprehend feedrate, coolant, lubrication, and clearing of chips. Trust me, one of the great joys of teaching high school it that you are constantly reminded of everything that can go wrong in an operation like this. If I do not constantly remind them the fisrt thing they do when they jam a blade is lift up on the saw frame. That instantly bends the blade and pops it off of the drive wheel. I can usaully get it out with a bit hammering but it never cuts the same and it does the hula everytime that spot goes past. If I missed any other references to coolant being mentioned previously, please excuse my ramblings and carry on with life.
-
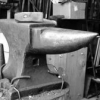
All of those blocks seem fantastic and would be great to manufacture. From what I know about casting and manufacturing, *if I am going to do it, it might as well be bigger. I am not sure what a matchplate for a Hunter maching costs. What I do know is that the real brains and cost is usually with setting up the pattern, gating, risers, and a sprue base, after that it is just pounding sand. When I get a minute to start planning this I am going to feel out the optimal size for me, which would be in the neighborhood of 100 pounds. Anthing less than that I should just go with the SFC block as it is cheapest and seems very well thought out. Anyhting more might become tough to move on a whim or need. John, thatnks for the input on size, through holes, and establishing a radius. As I said I plan on using ductile cast and I can spec which material I need. Form what I know it is better than straight cast, but still can crack. That stuff is tough. I have an NC Tools anvil and according to AIA, they are cast form ductile..
-
Thanks Sam, I thought somebody might like to see what I do. Most of the patterns I have are antiques left over from the 50's. I use to have the kids cast one to teach them the casting process. However, most of the kids would toss them out in the trash as they left my class. It took me a bit to figure out what to do with them so that they really cared about their project.
-
Casting the cups was an avenue that I never explored. It might be a nice option as I have AL, Brass, Bronze, and CU. One pattern could have many options. However, the end product would be quite a bit thicker than the 22 g sheet.
-
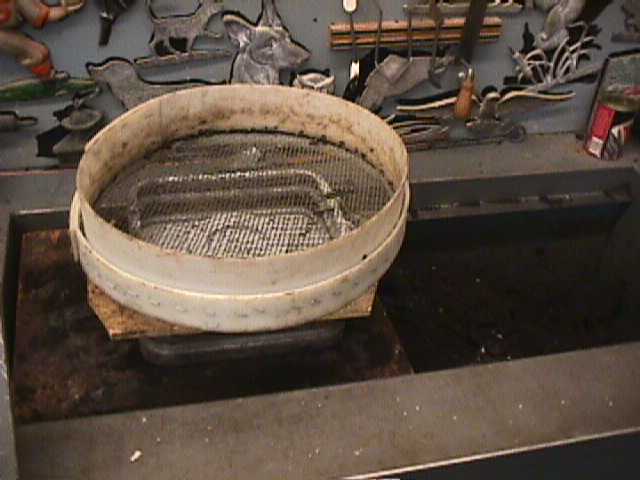
Phil, Here is my build of my forge in 2009 if that helps, I am glad I that I took pictures as I am forgeting exactly how I did this. I also can't remember if I have posted these before, but hey here you go. My original firepot was a cast iron base from a flagpole or something. I made a rotating clinker breaker and it worked okay. The only problem with it was that the opening to the firepot was too small and it restricted the air flow too much. I eventually welded a firepot together in 2011 and increased the overall size of everything. Way, way better and I love it! My firepot is centered on the table with no supports, nor is it bolted down. It just sits there and so far I have had no problems. The plate is 1/8" thick and shows no signs of sag or warp. I originally envisioned the blower bieng mounted on the table but with the firepot and hood, I found there was no room. I eventually made a table to hold the blower and counter balance the whole system when moving. Works great and I can easily move it to where ever I want. My work support is a roller stand that I drag around when I need it. I found it at school when I first was hired and removed it from service when a kid crushed his finger adjusting it. I will try to get pictures of the stand today if you want. The hood is made from 18 g sheet and has been an evolutionary process. I started out with what you see in the pictures and since then I have been adding to it until it is now closed on three sides. None of the additions are permanent and can be removed to allow for large pieces. The pieces I have added have really helped with lessening the occasional breath of sulfur I was getting before. The last two things I added to mine were tool racks and a lifting handle. The tool racks are great and work as needed. The lifting handle works as a tool rack when needed and a mount for hand powered grinders, oh and a handle too. I also keep a 1" x 6" steel plate and a small ball pein hammer on my forge table to aid in quick small forge welds. I hope something here helps, if you want any specific pictures let me know.
-
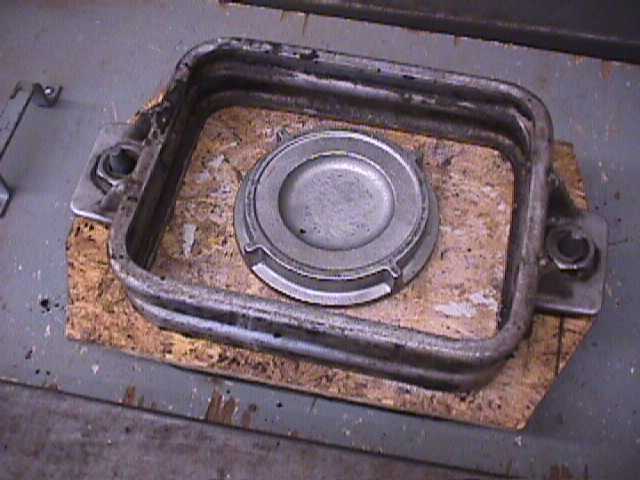
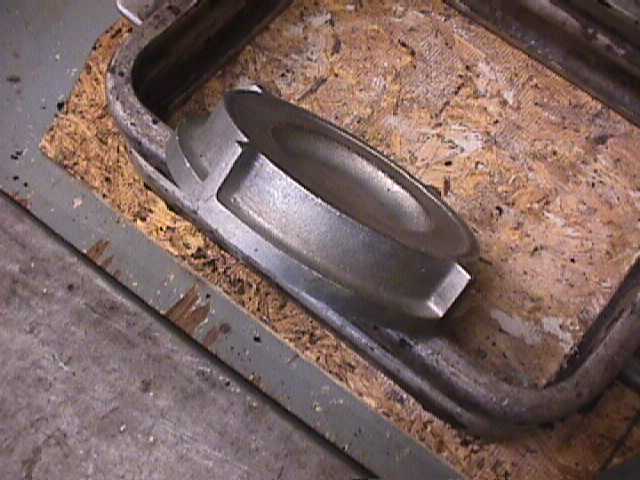
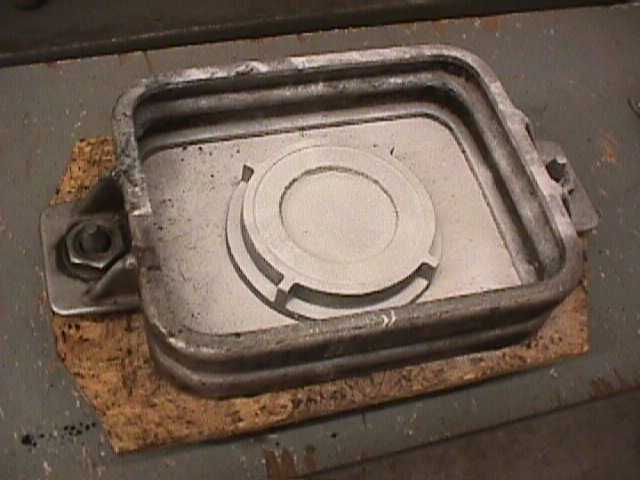
Thanks for the feedback folks. I think I will spend some time designing a block and making the pattern. I will then run it past the PABA members and see if any of them are willing to bite as well. If I get enough to make it worthwhile, then I will have it cast. My next step is to start designing. I know there are a bunch of threads on this already, so I will start looking. However, I would like ask the group what size is optimal and what features do you like? The SFC block seems to me to be a great compromise for handling, shipping, and surface features, do you really need more? Those of you that have one, what would you improve, if you could?
-
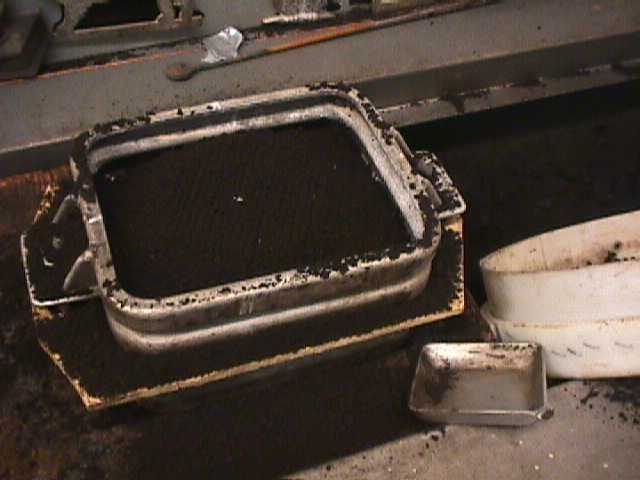
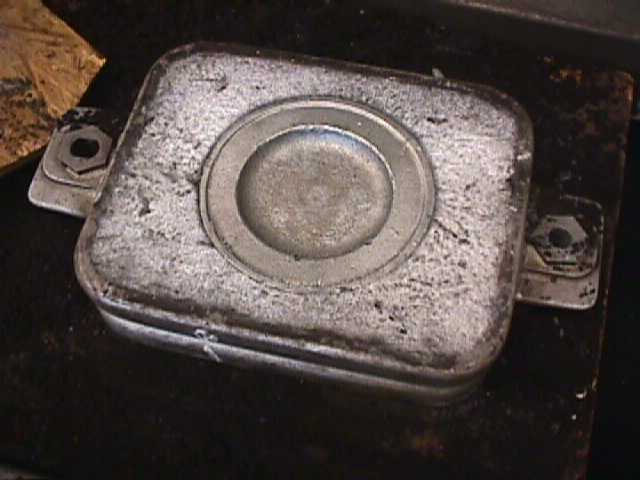
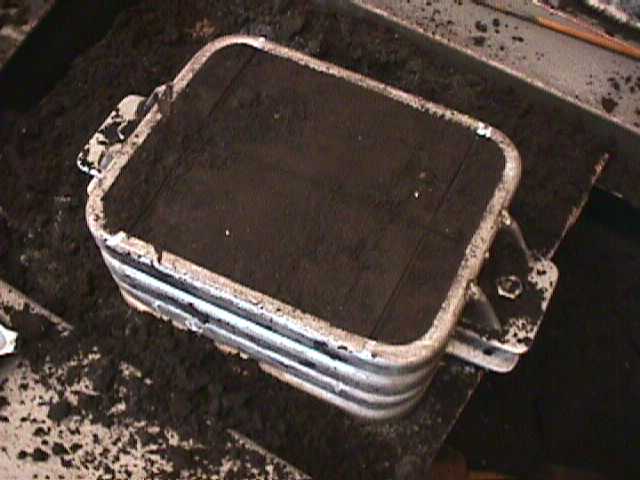
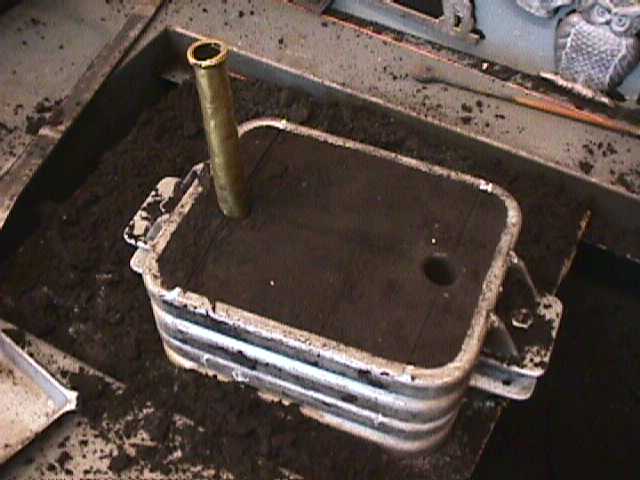
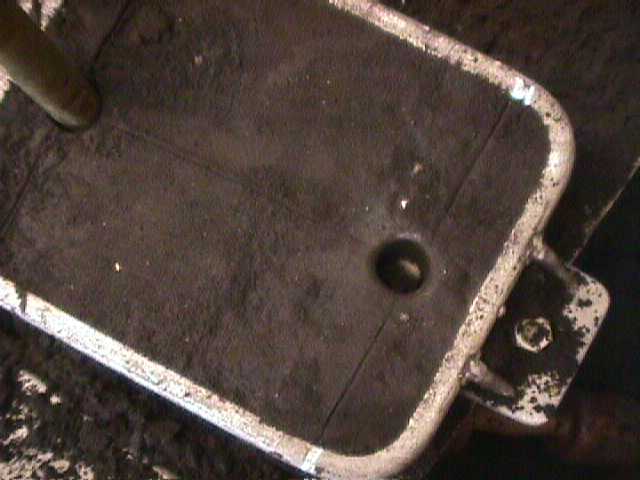
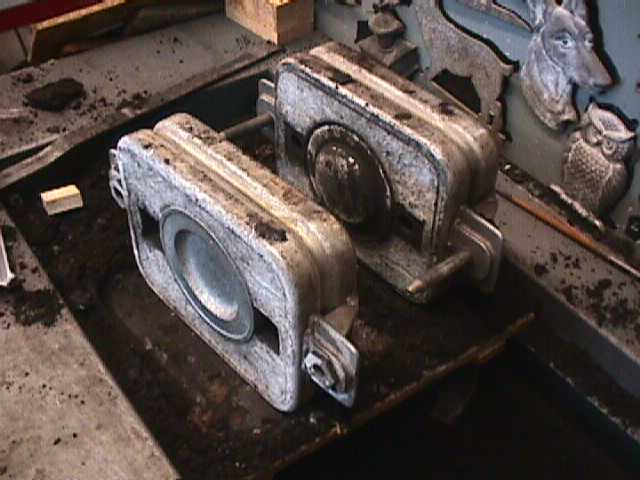
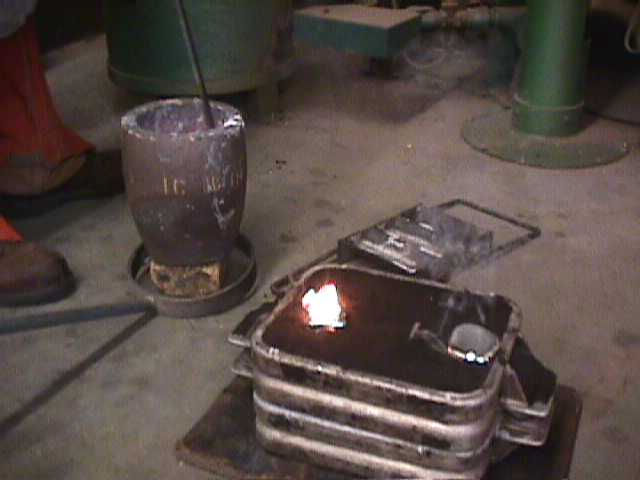
I have been pondering designing my own swage block for some time now. I have a small foundry and I have made patterns/matchplates before, that is not the problem. What is the problem, is that my foundry only has a 16# crucible, not much of a swage block. I recently contacted a local foundry as priced out a short prodcution run. They indicated that If I made the pattern, ordered the right match plate (Hunter 20 x 24), they would only charge for time and materials. A small block the size of the SFC block would cost about $77 to cast out of ASTM A536, plus whatever the matchplate costs. What are your thoughts? If I was just to do one it is a no-brainer to order the SFC block and just bite the bullet on S&H. But if I ordered a bunch say 30, it could bring the cost down Of course what would I do with 30 of them!?!
-
If they are not too deep as you are suggesting I would use a belt sander. I would also search this out as others have asked this question before. If I were cynical I would have suggested a leather strop.Attila. You or anybody else can put them to use for the right reasons. My personal opinion, the right reasons are to go out and find anvils to be used! Mr. Powers I salute you and anybody else that has your mentality in mind when accquiring anvils and passing them on to be used. Attila, if you do use these slogans and print one post a picture. If you are planning on printing a bunch and selling them, send me one. If you make a boatload of money off of them, send me an anvil! Hah! Those were just the first ideas out of my head I will keep thinking and posting. How about this... I (heart) anvils Please Strike-Up a Converstaion with MeI have a shirt from the Pennsylvania Artist Blacksmith Association and it never fails that somebody will start a converstation with me when I wear it. Usually it is something like, "Boy that is a dying art" or something and I assure them it is not. Then I inform them as a technology teacher I incorperate it into my metals classes every year. After that I am always sure to strike(pun) up a converstaion about anvils. I always thought about a shirt with a slogan would be great. You know something like "Will work for Anvils", "Got Anvil?", "Wanted: Anvils" ( and then have pictures of differnet makes) or "BETA: Blacksmiths for the Ethical Treatment of Anvils", or "Anvil Collector". Well maybe not the last one as it may communicate that I have enough money to support such a habit, LOL. Anyway, I am sure somebody else has already thought of something like this I just can't find them anywhere. When I get a chance I will burn a screen and make my own.That truly is an amazing price. I regularly check CL, actually I use google reader to do the search for me, and I see that there is almost a new anvil daily in a 3 hr drive from my PA area. Most of which never approach a monster price range unless they really are a monster anvil.Nice Stand. If I were going to be moving an anvil around on a regular basis I would choose either a mobile base for shop equipment. Shop Fox makes one that handles 700#. Or I would go to HF and buy a hand truck, appliance dolly, with solid wheels and use that. I have one a school that I use and I keep the anvil on the stump for the whole move. It is a refridgerator dolly and I use the fabric strap to help keep the anvil put. However, I am sure a fabric strap will not keep the anvil from leaving the stump if it decides to jump off if I hit something wiht the dolly during the move.To be honest, I knew it was a good deal at $150, but I really was not sure about the weight. Like I said, I measured my Trenton for reference before I left, the Budden was only 1 1/2" longer tip to tail, about a 3/4" wider across the face, and 1" taller. I knew it had to be heavier but it just did not seem all that much when I compared the measurements. However, when I lifted it into my Suburban and wrestled it accross the tailgate, I knew it was NOT the same and I was really glad to have jumped when I did. I actually contained the celebration and uncontrollable smiling until I drove out of sight, I am still smiling. Now that I have them side by side there is a major difference between the two and I can "see" how good of a deal it was. We are only a 1.25 income family and parting with money needs to be justified in the familie's best interest and not just mine. I joke and blame it on my wife but really it is a mutual decision.The only deal that I have had that was better, was with my first anvil. I know it is a different class of anvil than this one, but it was a GREAT deal. I got a Big Face NC Tools anvil ($295), a NC folding stand w/clamp($245), a Whisper Momma forge($510), two benchtop HF drill presses(69.99 a piece), a 6" HF grinder(49.99) with a Multitool attachment($253.99), a bucket of horseshoes and four hoof rasps(24.99 each) for a grand total of $100. I did have to rebuild the Whisper for around $170 shipped, but that was still a good day.It rings great, hurts my ears with the slightest tap of the heel or horn, the neighbors will love it! The ring is why one of my stock YJ U-bolts is in the pritchel, it helps a bit with the ring. Actually the guy I bought it from is a scrapper. I have decided to throw all of my useless metal junk and debris his way just because it is a good thing to do. I also have a 180# of lead bricks I was given, I was planing on melting them down for bullets, but that has not worked out. I might donate a few to his cause, I am still going to keep a few for my muzzle loader though.I found this one locally on CL, so I contacted seller and set up a meeting. It was real close, like 1/2 mile from my house local. The fellow wanted $250, out of my budget, but I figured I would check it anyway and just see it. I mean, the address was my grandaparents old house and I knew the trip would be good enough for old memories if anything. The CL ad had no make or weight so I took my AIA along for the walk and I measured my 127 Trenton just for comparison. When I looked at the anvil it was covered with a dirt crust so deep I could not make anything out. After a bit of rubbing I made out a "Hay Budden" and took some meaurements. we looked it up in the book and the closest we could get was that it was around 150. I asked him how low he would go and he said $150, still too high for an on-the-spot purchase without wife approval. So I told him the truth, that I was interested, but I would have to negotiate with the other half. I thought about it some more and decided to hold out for a larger anvil. So I called him back the next day from my treestand, told him the news and went on living life. A week later he calls me and lowers to $100, I jumped. I know it is far from perfect, but certainly it is a usable piece, and in my opinion not bad at $100. There are better deals out there I just have not found one yet, but I am still looking.....Shock resistant woods for hammer/axe handles Ash, Elm, Hickory, Locust, & Oak -but Oak is my last choice. Locust if it is dry as it is prone to checking, whatever the species make sure the pith is out. Of course if you are near PA get the Ash while you can it as it is under attack by an invasive species. For lathe chisels and the like I use whatever I have in 8/4, most of the time Maple and banded/pinned with Aluminum pipe sections. But I would not use Maple for hammer handles as it is dangerous when it breaks. I have seen some baseball games where Maple bats broke and the pieces looked like spears. I have also heard fruit woods make nice handles for tools, not hammer, but other tools.Here are some picutres of the design process that I teach. For my metals kids I have them make sculptures out of old spikes. I saw these characters at a craft show and I thought it would make a great project to teach Metals 1. I first started out with sketching all of the parts but high school kids nowadays do not have the same technical skill sets that kids used to have. They can all send a text faster than I can even find that section in my phone, but they absoltuley cannot sketch anything legible, becausue they do not have the skill sets to do so. I have tried to instill these skills but whatever I do is temporay as they do not use it outside of my class and it is all forgoten in a matter of weeks. So what I have done is to have them scribble some pretty sorry ideas together so I can vaguely figure out what they are doing. Then once they have proven to me that they have some sort of logical solution to the problem, I have them construct a cardboard mock-up of what it is that they paln on doing. This has proven to be very successful, first it gives them something to do with their hands and it serves as a full scale pattern for them to follow. They can easily make the parts to match the cardbaord ones and I can easily point out where the problems are. Hope that helps, somebody.As the rest of these replies have indicated, in much fewer words than what is below, you need to establish experience. That can come from books, mentors, YouTube, or experimentation. Established sources are usually the best, but may be out of reach, so do what you can with what you have; be creative an innovative! Do not give up and do not be afraid to experiment, the only mistakes you do not learn from are the ones that cause dirt naps. Below is my take on the situation if you care to read. I teach design and production in wood and metal. What I see posted here is all good stuff. What you are finding out is that it takes some sort of knowledge and skill related to blacksmithing to really truly make the end product match your original intentions. It is the same process that engineer-type professions use to solve problems. I say engineer types because this type of problems solving is used for problems that are naturally more technical in nature but is used by far more people than just engineers, but I will refer to it as engineering anyway. The engineering approach to problem solving is usually based on prerequisite knowledge. This prerequisite knowledge helps engineers solve problems through past experiences. It is sort of like a mental toolbox, if you will. Inside this toolbox are solutions to various problems that they have solved in the past, as well as knowledge gained from educational experiences. These past experiences can be small or complex but the solutions and intelligences associated with them are there. When an engineer approaches a new problem they can look at the problem as a whole and select the best method or methods to solve that problem and reach the desired goal. It is the same approach an accomplished chess player uses to win a game. If you have ever been schooled by somebody who is really good at chess it is similar. A really good chess player can look at the game as a whole, not as a particular move. And they will try to get you to fall into one of their finishing techniques. A novice designer or chess player on the other hand does not have those experiences or associated intelligence to draw from. When they are faced with a problem, they focus on a particular stage of the process. Once they solve that stage of the problem they can move on to the next perceived stage or problem, until the process is complete. At the end then they will often go back and review what has transpired. Once they have the full experience they can cite where the process could have been improved, because they now have a comprehension of what has transpired and how to improve it. This is one of the greatest challenges that I face as an educator. I am in a constant battle figuring out when and how much is needed to give students so that they can successfully design. What I have found out is that if I spend too much time teaching the design aspect, the process is more experimental in nature. They just throw things together and hope that it works if it does not then they continue to try again until they are satisfied with the outcome or they are out of time. The other approach is to establish pure skill with perceived drills. This is has some merit in the beginning but kids are creative and quickly realize that this approach is stifling, hampers creativity and higher level thinking of Blooms Taxonomy. The best is a more balanced approach, supplying key knowledge and experiences in both areas and hoping they can scaffold and make connections between the knowledge groups. If you need more information on the stages and standards associated with design Google: International Technology Education Association and look for the Standards for Technological Literacy.