
wd&mlteach
-
Posts
224 -
Joined
-
Last visited
Content Type
Profiles
Forums
Articles
Gallery
Downloads
Events
Everything posted by wd&mlteach
-
I figured that I was just messing with you, but it does happen to be spattered right under the point. I made one spike knife and I have respect for anybody who can make a knife shape. Post a picture when you get them assembled and polished up.
-
Sorry about the tongs man, I would love to see a photo anyway. Do not tell anybody but I have not made a pair of tongs yet. I can usually find them for $5-10 a pair at flea markets. When I think about time and materials I feel that is a bargain.
-
They look nice. I like the drops of blood in the background of the first picture it adds to the danger aspect of the knife. Is that your blood?
-
Consider the small wheels gone as soon as I get the stand back to the shop. When I was building the stand I found a set of cast wheels for $5 at a flea market, they are real nice. At the time I opted for the smaller ones because they were the faster route, they already had mounts and rolled. I thought they might give me trouble and well I was right. In fact when I drug the stand out last night it hewed off a 3/4" x 4" chunk of my concrete floor by just dropping out of my shed , nice!
-
problems with welding fillets
wd&mlteach replied to manothewoods's topic in Welding/Fab General Discussion
Lots of questions, sorry. What rods are you using(number & diameter)? How do you store them? How old are they? What is the thickness you are trying to weld? What welder do you have? What amperage are you setting it at? and What does clean metal mean to you? -
I have worked with stabilized wood for a number of years and it is wonderful stuff. It is strong, durable, waterproof, machines easily, and what I find the greatest is that it is extremely predictable. I use it mostly for turning game calls and pens. Stabilizing is not the same as a top coat finish like poly, lacquer, or shellac or an oil finish like Tung, linseed, or Danish. In fact it is not a finish but more of a process where wood is infused with a polymer. I think it is acrylic under intense pressure and maybe heat which forces it through every fiber of the wood or material. It is great for woods that are soft and punky or full of burls and bark inclusions. I have a couple of corn cobs done like this for pens they look cool. There is a local company near me that came to my woodturner's club. They charge per inch and the piece to be stabilized cannot be over 2" thick and completely rotten. Other than that they will try to do it. If you are looking for another product there are some pretty cool layered woods out there. I buy all of my turning stuff and the stuff for school from a company called Hut Products. Check out the Dymondwood section. All of the layers are 1/16" poplar dyed different colors and glued under high pressure. Hope this helps.
-
Thanks Don, glad to inspire post a picture when you get it done. I would love to see it. I have not done enough research to know exactly why the old bracket was designed like it was. My guess is that the manufacturing process for these vises was intensely laborious but really not held to close tolerances. Sure they all look the same but when dealing with metals and fitting, tolerances are the most important. The traditional design to me looked as though it would make up for variations in thickness and width of the main support. I knew my vise is the only one I was going to mount so the mount I made was custom fit for the variations of my vise. The main support is more trapezoid shape rather than rectangular. I though about welding for a bit but out of respect for the post vise surviving this long, I could not do it. As far as the spring goes I do not need it at all. I got the vise off of eBay for $40 from a guy in Maryland. It came with his new house and barn. He decided to keep the house and barn. It was frozen solid when I got it and after about two weeks of hammering and every rust penetrant I could think of, I roasted it free on my forge. After everything was apart I cleaned all of the surfaces real nice and polished the main bolt, covered everything with grease, and put it back together. It swings nice and after crushing my fingers on several occasions while building the mount I realized something. Why not just mount it so that gravity pulls the jaws open? So that is all I did and it seems to work great. It may not be totally traditional, but works for me.
-
Man rolling around one of those sounds pretty tough. I can roll a gas cylinder pretty good but it is round and balanced. A post vise I would think would be pretty awkward to try to roll any distance, but I am sure it can be done. In fact it may be easier than moving mine, heck when I am done I can plant corn in the furrows. I will change that as soon as I can.
-
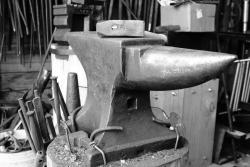
I know they have been done before but I thought I would post pics of what ended up being my solution to being "a portable post/leg vise". I started out at the scrap yard lugging pieces around. I soon became aware of something that I already knew corners poke, gouge, and are always bent at a scrap yard. Therefore, I went with rounds. I found three that looked like they wanted to come home with me and I could easily lift into my the back of my truck. The sizes I found were 28" dia x 1/4", 18 1/2" dia x 1 1/2", and 9" x 3 1/4". I cleaned them all up and tack welded the 1/4" and the 1 1/2" together. I then used two pieces of C-Channel to form a vertical I beam. Height was based off of interference and clearance of the post vise. I then cold forged two U brackets out of 1/4" x 1 1/4" x 6", welded some plates on the I-beam, and welded a piece of 1 1/2" dia pipe on the base for the leg/post. Then I mounted the vise and drilled the brackets for mounting. The last step was to mount the wheels on. I utilized a set of solid steel wheels that I had lying around the shop and welded them to a piece of C-Channel. Then I welded the C-channel to the 1 1/2" base. Overall the design works good and is stable. There area only two problems that need to be resolved with the design. The first is that there is a little bit of flex in the 1/4 plate when you and really putting some twisting power on it. The second is that the wheels need to be wider in order to support the weight of the stand while pulling it through my lawn. Right now the wheels sink in until the reach the main channel and create lots of drag. Basically it is all I can do to move the thing, but once it is moved it works great.
-
Swage Blocks: Do you guys have them and if so do you use them much?
wd&mlteach replied to wd&mlteach's topic in Swage Blocks
Thanks Glenn, that is exactly what I need to make. -
Swage Blocks: Do you guys have them and if so do you use them much?
wd&mlteach replied to wd&mlteach's topic in Swage Blocks
No you are right on track with the second solution. The Wife won't let me cut a hole in the roof of my shed so everything has to come out each time I forge, anvil, stand, forge, tooling, and the like. Here is a link to my first post showing my forgehttp://www.iforgeiron.com/forum/f85/new-blacksmsithing-first-forge-13230/ It may actually be a good idea to work outside since I store the mowers, gasoline, paint, LP gas and everything else flammable in the shed and it might just be safer to do this stuff outside. Right now my leg vise is lying on the floor in my shed and I have not used it yet. So in order to use it I need to build a mount that I can move out every time. I thought about mounting it to my forge but the height of the vise is around 40" and the forge is 34" so that might get in the way. I also thought about mounting it to my anvil stand. I got one of those NC anvils and the stand to hold it, I know it is not designed for blacksmithing but it was cheap. Or I could just a build seperate stand. I saw the designs for the tripod stand but I know me and I would trip on that. I think the way to go for me is to build one out of plate steel with a vertical support. I have a ton of 1/4" structural C channel in 5-8' lengths that would work perfect, I just need to find a bottom plate. -
Swage Blocks: Do you guys have them and if so do you use them much?
wd&mlteach replied to wd&mlteach's topic in Swage Blocks
Thanks a lot Glenn that is perfect. The only problem is that I have to make a portable mount for my leg vise. I have been searching the forums a little better this time and I have found a few plans that I can make work to my style. Once that is done then I will post some of my "swage-ifications". -
*New to Blacksmsithing and First Forge
wd&mlteach replied to wd&mlteach's topic in Solid Fuel Forges
Thanks! Oak Hill Forge please post some pictures I would love to see it when it is finished. -
I have a piece of RR track and I still use it for heavier work. It is great! I bought it for $17 US at the scrap yard and it weighs 38 pounds. Used it until I could find a good deal on an anvil which took me about a week. I found a NC Big Face anvil, folding stand with a foot clamp, two table top drill presses, a 6 inch grinder with belt/disk sanding attachment, and a NC Momma forge for $150 US. The only bad is that the forge needed a complete rebuild.
-
*New to Blacksmsithing and First Forge
wd&mlteach replied to wd&mlteach's topic in Solid Fuel Forges
That shop is Priceless! thanks for the picture. If I could keep mine indoor I would opt for a detached hood that hung over top rather than one that is bolted down. But if you plan on moving it or demoing with it, then bolted down is the way to go. I someday, when I at least look that I know what I am doing, plan on taking mine to school to teach my metals kids how to forge some things. Right now we use an Oxy-A torch and a Johnson tempering furnace to shape stuff or just work cold. Not the best, but it works for some of the projects. -
Swage Blocks: Do you guys have them and if so do you use them much?
wd&mlteach replied to wd&mlteach's topic in Swage Blocks
Thanks folks for the responses. Philip that link was perfect. I am a visual learner and to me pictures really do it, thanks that site had plenty of illustrations depicting usage. UnicornForge I will make a couple of those smaller assemblies this week, when I get them done I will post pictures. I understand the design and operation of a welded jig and have made bunches of them in the past. Glenn I never thought about gears, way cool! The scrap yard has tons of them. I still think I am going to try some of the CNC plasma shapes though they are just too neat to pass up on. -
Swage Blocks: Do you guys have them and if so do you use them much?
wd&mlteach replied to wd&mlteach's topic in Swage Blocks
Thanks matt87, I am still new to forums and did not see the topic on the first search page so naively I thought the question might not have been asked. That post has all of the information I need on justification. But let me tell you the real reason for asking. I know that I have a very slim chance at owning a real swage block, and I am always looking for a challenge. Could one of these be made from steel and not cast? The local scrap yard has a mountain of structural and plate steel. Most of the plate steel in the mountain is the leftovers from CNC plasma cutting in a variety of wonderful shapes. At the bottom of this mountain everyday, there are guys there cutting the plates with torches. The plates come in full size and their job is to cut them down into more manageable pieces, then use the magnet crane to top off the pile with the cuts. I asked the guys working and they are more than happy to cut me any piece that I want or get any tidbit off of the pile. What I am asking is if it is worth it to get a bunch of different shapes and weld them together into a big piece forming a sort of swage block? All of the structural steel is $0.40 a pound and any thickness you could want. -
*New to Blacksmsithing and First Forge
wd&mlteach replied to wd&mlteach's topic in Solid Fuel Forges
That is a nice looking forge Billy. I really like the flanges on the front legs. The front legs on my forge are just vertical angle iron. So far they have not given me any trouble but the ground is pretty hard now. I thought about welding plates on to stop it from sinking but I was pretty sure they would end up chewing my shins up when I moved it. I also love the large work space you have on the table. If you put a hood on like mine it might limit your work space. Do you have it indoors? -
*New to Blacksmsithing and First Forge
wd&mlteach replied to wd&mlteach's topic in Solid Fuel Forges
Thanks I love it and it was a hoot to build! The hood works well, not perfect, but good enough. When I first light it or toss on some more coal it puts out a good amount of smoke and I far as I know that is the way coal is. As long as I am on the blower or the fire is big enough and the draft is good, it does what it needs to do. When the fire dies down the smoke wanders a bit. Another nice thing about the hood is that when the smoke does wander, it gives me a place to hide while cranking the blower. Improvements could be made on the length of the stack, I know it should be higher and the mount. I went to Lowes and bought regular ductwork piping and a tab mount. The mount was as tight as I could get it but when I fired the forge up for the first time the heat loosened it up the thin metal. The stack height is 5' and it should be higher, but until I fix the mount I can't raise it. Hope this helps. Scott -
I am new to blacksmithing and I have been looking and learning a lot about the tools a techniques, the biggest thing I have learned lately is that I know less than I thought I did. Anyway, I have been looking at swage blocks and they seem pretty expensive. Yea, I know a giant piece of cast iron on a stand will last the rest of my lifetime and the next guys but, at first glance they seem pretty specific. What are they used for and what do you guys find them indispensable for?
-
Charlotte you are right I do not know what I was thinking. I melt Aluminum all of the time in my crucible furnace and I know(or at least I think I do, lately, I do not think I know anything) that is around 1200 F. I also know Brass has a higher melting point, so what I said earlier does not make sense. Is 800 F the temperature that the flux starts melt? Why is that temperature in my head stored under the brazing file?
-
I do not think brazing would hold up to high temperatures around the tuyere, but I could be wrong. I have not worked with brazing much, if my memory is correct I think the melt temperature is around 800 degrees? I am not sure how hot the actual firepot gets but I would think it could get to this temperature or go over easily, especially if you were trying to weld in it.
-
*New to Blacksmsithing and First Forge
wd&mlteach replied to wd&mlteach's topic in Solid Fuel Forges
The forge is only three weeks old so it still looks like I do not use it. I also swept out the firepot so you could see how it was made. Right now it is dirty and full of coal and coke. Last night I used it to roast my stuck leg vise. I got the 5 1/2" vise for $40US but the hinge was frozen fast and no mount. The guy I bought it from found it in his barn when he bought the place and never even knew what it was, what a deal! It took me about fifteen minutes of heating and beating to break it free, whoo hoo! Picture is aweful, the wife took it but it gives you an idea of scale. -
UnicornForge I do not think you are an idiot. According to my Forney ARC welding book that is exactly how it is done, weld a bit, allow it to cool down while light hammering, and weld a bit more -repeat. The whole process is kinda like stitching it back together with short welds to keep the heat down. From what I understand the Nickel rods are also designed to stretch a bit to help with the cracking. The whole process makes sense to me, you might have inspired me to give it another try. The next time I am at Sahd's I will pick up some more cast and try it again. Maybe what I tried was too thin, hummmm?!?
-
I am not an expert by any means but that crack is a tough one. Your firepot is made from cast iron and from my experience cast iron is really tough to weld. Back in my younger days somebody once told me that you can't weld cast iron and I set out to prove them wrong. So I went to the scrap yard and got a brake drum, cracked it with a sledge hammer, tried to weld it back together. It ended up looking like a fish skeleton by the time I was done. I then researched into some other methods and tried again, still it did not work. What I have found out is that if you want to weld cast iron you have to heat the whole thing up to cherry red. This can be done in a furnace or have a bunch of guys painting it with rosebud torches. It takes a bunch of guys because it is hot work and it is nice to be able to change out when you really start sweating. Then when the whole thing is hot enough weld it quickly and control cool down rate. The whole time pray you do not get any more cracks. If you do not have a furnace big enough or a bunch of guys with Oxy-A torches your fixes are limited to finding somebody else to weld it(good luck with that), have a new one cast(too expensive), construct a new firepot and stand( my choice), or physical band-aids. If it were me I would choose to construct a new stand and firepot but I do not know what is available to you as far as tooling or supplies. The other option that might buy you some time is some band-aids made from 1/8” x 1” x 2” HR steel. Firepots are usually pretty thick and can be drilled and tapped. I would make a couple of these band-aids and strategically place them around the crack on the outside of the pot by drilling and tapping some holes maybe