
wd&mlteach
-
Posts
224 -
Joined
-
Last visited
Content Type
Profiles
Forums
Articles
Gallery
Downloads
Events
Everything posted by wd&mlteach
-
My initial problem was with frost, in my opinion, due to the tank being overfilled. My theory is that the tank did not have enough vapor head space and it actually was allowing liquid propane to enter my forge system. Frost completely covered the regulator, line, and shutoff valve during 30 degree weather in less than five minutes. It also decreased flame production during this time, stiffened the hose, and actually continued to “run” after I shut the valve off for what seemed like an eternity, but more like 5 seconds. The valve was new and not worn. However, this is just a theory and since I never tested it again with this configuration I cannot prove it. Also I really do not know if this is even possible. However, I guess that is what I get for not knowing anything about propane and propane tanks. Anyway after my experience I figured I better learn a bit about this propane thing, so I did some research and here is what I found out. If I go by weight and what the manufacturers say my 40lb tank is rated to hold 9.4 gallons of propane, so I weighed the filled tank and it came in at 79.2lbs. According to most sites a 40 lb tank empty, should weigh around 29.5 pounds. Subtracting the tank weight from the total leaves 49.7lbs for the propane. Obviously 49.7 is overfilled, since it was only a 40lb tank. A gallon of liquid propane weighs 4.24lbs, so that means 11.72 gallons of propane were in my tank. This made some sense to me, because when I took the tank in to be filled it still had some propane in it. When it was at the filling station they put in 11.3 gallons, I saw the meter, paid the bill and have the receipt. OPD valves are designed to prevent the over filling of a tank. My tank has one, and I guess is not working, since it did not shut the tank fill off at 80% when it was being filled. The capacity according to the manufacturer is 9.4 gallons and if this 80% of the actual volume or where the OPD shuts off, then entire inside volume of the tank, if my math is correct, should be 11.75 gallons. 11.72 gallons actual, is/was just way too close to 11.75 internal volume limit to be safe so I looked for a safe solution to my problem. The store I originally filled it at was closed January 2nd for the observed holiday and I wanted this taken care of ASAP! Propane is stored as a liquid under pressure. It boils at -44F, those of you who live in Alaska could actually see this happen I guess but where I am from we never get that cold. Anyway, since the pressure or really vapor pressure is what keeps it liquid in the tank, it only makes sense that pressure in whatever tank it is in, would remain the same. This means that a 20lb propane tank is subjected to the same pressure dynamics that a 1000lb propane tank is, if I understand that correctly. So my quickest solution to an overfilled tank was to buy a two tank manifold kit from the neighborhood Tractor Supply $29.99. I figured this was a win-win situation, if I have to trash the 40lb tank because of a faulty valve I can easily find 20 pounders in the future and I could use the manifold to solve my current problem. I hooked the manifold up to an empty 20lb propane cylinder and the 40 pounder. Then I just cracked the 40 lb valve and left it slowly equalize the pressure in both tanks, about 5 minutes untill it stopped hissing. When I was finished I figured the 40 lb tank would be a little lower and the 20 would be pressurized with just gas, if the 40lb just boiled off. However, the 20 lb tank now has liquid propane in it, bringing me back to my first theory that started it all, -the overfilled tank was indeed flowing liquid propane into my regulator, lines, and fuel rail of my forge. If it were not, then the level of the propane would have been too low in the 40 lb tank to flow liquid propane to the smaller 20 lb tank when it boiled off to equalize pressure, I think. Anyway after tapping some propane off I disconnected the 20lb tank and set the forge back up with the 40lb. After pressurizing the system and testing for leaks, I fired the forge up and ran it at 7lb of pressure for 30-40minutes, no frost at all. The final weight of the 40lb cylinder after draining and running it for that amount of time is 72.6lb. I know that means that it is still in overfilled condition but is has got to be safer at this point. I plan on running the tank until it is empty and then taking it to an actual propane dealer and having them recertify the tank or condemn it. I will end this with the following: This is what I have concluded from various manufacturers’ websites and other web resources. I do not claim to be an authority on anything related to propane, I am only a user. I have learned a valuable lesson I hope to share with others when dealing with propane. That lesson is to buy a new tank and fill it at a reputable place that specializes in only propane.
-
I had the tank filled at a local hardware store. The guy who filled the tank did not fill it by weight he just hooked it up to the storage tank and ran an electric motor/pump device until it stopped at 11.3 gallons. The WC rating for the tank is 95.2. I know I will catch it for this but the bottle was not new, has a manufacture date of 2007. OPD Valve installed, may have failed?
-
Thanks for the advice, but I think I might have figured out the problem and found a new one. As I said I just had the tank filled and I checked the receipt. They filled the tank with 11.3 gallons of propane, from what I found on this site and other manufactures a 40# tank should hold closer to 9.7 gallons of propane. What is the safe way to handle this problem? http://www.missiongas.com/lpgascylinders.htm
-
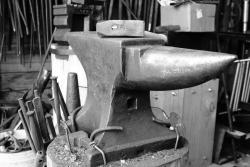
Is it normal for the regulator, gas line, and shut off valve to have a layer of frost when the gas forge is in operation? I have an NC Tools Whisper Momma and a 40# LP tank(Just Filled) running a 7lbs pressure for about five minutes. I have only used the forge three times since I relined it and I had a borrowed 20# tank. I never ran the forge for a long (more than 10 minute at a time) and I never saw any frost on the lines with the 20# tank. I am completely new with a gas forge and when I saw the frost, it was a new developement and I shut it down. I am now asking you folks is this normal? Forge image attached the way I was using it, only the garage door was opened at the time of operation.
-
I finally finished all of my coursework needed for my master's(4.0 GPA, woo hoo!). In addition to that I have also finished writing the proposal for my research thesis and now I need to have some fun before I spend the winter conducting research and writing about it! The fun I need to have is to make something out of metal and last week I decided to start a new project, a gas forge with a support cart. I currently have a NC Whisper Momma that needs a relining. I never even fired it up but I can tell you it is in pretty bad shape right now. I took it apart last week straightened it out and was about to buy the reline kit when I started searching for other ideas/models. There is a bunch out there and I think some might be better suited for general blacksmithing than the forge I have. I have also seen some cheaper re-line kits than the ones offered at NC; Diamondback kits are about half as much. Knowing all of this and the fact that I have a complete metal & wood shop at my disposal I got to thinking, would it be better to build a new forge or just reline the one I have. This is my thoughts: If I reline the one I have I will move the openings from the middle of the forge to the ends and patch up the existing openings as well as to move the gas line away from the end. This will give me a firebox for longer stuff and possibly make it a bit more efficient by taking the ports from the middle to the end. I called NC last week and they quoted me $8 for the cast sleeves needed for the ends and 14 for the sleeves with flaps. Therefore, moving them is really not a problem or costly. The total then for this option would be $159 plus ship. The other option I see would be to make a new case, line it, and use burners from the momma and make the firebox a bit higher and shorter. The Momma's case is made from 14g sheet and I have the tools to work it, but would have to buy the steel. I do have a full sheet of 16g that might work for a new case or I could use 1/8" plate and just weld it together. I guess what I really need to know is will the Momma work to weld in? And how is the space inside the forge, should it be higher? I have a full coal forge setup and I use it for larger items. This gas forge would be used for knives, tomahawks, and other things that can fit inside or need forge welded. Any thoughts
-
I am sure it will, I will pick one up for you next time I go. Scott
-
The blower cost me $10, by the pound price for mixed Al & Steel. The outside diameter of the casting is about 7 1/2" the inside fan of the one I have is steel finned, others there were cast Al, like the case. The gears look like steel. Some of the input shafts were milled others were not. They are out in the rain and elements so they have some water in the blower section and might be in the gearbox. They way I checked out the blowers was to try and turn the fan first and go from there. When I could get the fan to spin then I put an adjustable wrench on the input shaft and gave it a crank or two. Most of them hummed away pretty good and blew dirty water, leaves, and the occasional mouse nest all over me. Some had a little noise but nothing binding. Since I do not know the actual condition of these things, I cannot guarantee them other than a good spin test. If you are really interested let me know I will go and get one for you. I hate to see these things go to waste and would like to help others out. I would like to let them go for as cheap as possible, blower plus S&H. That being said do not ask for all of them. Let me know, Scott Here is a couple more shots of the blower gearbox and fan rust.
-
I know it has been a bit since I was on here, but I had to tell somebody that might actually appreciate what I found today. I told my wife and from the look on her face she couldn't have cared less. In fact I think she even said don't you have one of those? Today I went to my favorite scrap yard and spent about four hours walking around with some friends. The walk started out pretty depressing. Last time I was there they had a couple tons of high carbon 1/4" rod that I was hoping to snag more of, but the whole pile was gone this time. That made me sad, so I spent some more time walking around and stumbled upon two really good finds. The first major find was two steel tubs of Champion Forge Blowers! I quickly snagged one of the samller ones, a model 60A, that turns freely. The second find was a 4 3/8" Iron City Post Vise in great condition! I spied it about a 1/4 of the way up one of the scrap mountains, quickly climbed up, and yanked it free. The total bill for a blower, a post vise, and a couple of springs $38.00, -Not bad. Scott
-
Yea, it sure was heavy stock took me all day to draw them out. I did not get a chance to finish them yet and like you said they are heavy, too heavy for what I do. However, it was a great learning process for me and I got a chance to learn first hand what works and what does not work during drawing out. The funny thing is that I just wanted a small pair only around 8-12" long, HAH! Next time I will pick on some 3/8" square stock.
-
Thanks guys, that is the kind of answers that I was looking for. I know wrought iron is hard to come by these days and I figured that was what you were working on, being a blacksmithing organization and all. My real reason for asking is that I am not familiar with the operation of a bloomery. I would also love to take or have some pictures and more information on this operation for teaching my metals students. From my best guess I think you guys are about 2 hours from where I live, might be worth the drive.
-
What do you do with the iron once you pull it furnace?
-
Muttt I think you will be pleased and your knives will look great! Just in case you are wondering here is a picture of the two products side by side. It is a couple of old call parts I turned a few years ago. The stopper is made from the Field & Stream Dymondwood Pattern and the larger, tone chamber, is Spalted Stabilized Oak. You can really see the difference in the Spalted Oak, it has no open grain, they have all been filled during the stabilization process. Both of these products are from Hut as pre-drilled call kits. He does sell this stuff any size you want and un-drilled. Someday I hope to make it to the knife making process when I do this is the first place I will go for supplies. He always has great stuff and he is always cheaper than Woodcraft.
-
What kind did you end up purchasing?
-
A Visitor, that sure is a nice looking stand and vise, do you ever have problems with it wanting to tip while working with it? Frosty, I do remember those type of wheels. In fact I recall there was a sort of chattering whine sound that was emitted right before the bottom half of you stopped and the top half kept moving forward. The wheels I have now are solid steel and about 2 inches in diameter and so far there has not been a problem with small items stopping the wheels, the real problem has been the battle with the lawn. I never really weighed the thing but to my best guess it is close to 250 or 300 pounds. Far too much weight to be supported by 1 1/2" wheels. The cast wheels I will put on are much wider and should help with the ruts.
-
Thanks for the tips Frosty, what diameter spring do you use? Or does that depend on the job at hand?
-
Oh yeah it is definitely a cold chisel, I have tons lying around. I will convert one to a slitting chisel and give that a try. I am assuming the design and angle for the slitting chisel resemble something more along the lines of a hot cut, correct?
-
Today I learned that making tongs is enjoyable, tons of work, but enjoyable none the less. Yesterday I learned that you can use a pair of tin snips with a brass hammer to cut a slit evenly and very quickly. I have been trying to do the whole chisel thing for making hot dog forks and it has not been working. I know somebody is going to give me grief about the hot dog forks, but that is where I am at right now (Hooks, hot dog forks, nails, tongs in two or more days, that is it, -you want something else go elsewhere;)) Anyway, I can heat up the stock fine and flatten out, but after that that the problems start. My biggest problem is that is that the work that I am trying to split wants to wander and dance around when I start to hammer, which leads to not hitting the exact place twice type of thing. The snips work great for me. I can grab a hold of the work with one hand and brass hammer with the other. When I reheat I cool the snips in water and then repeat the process. The snips I use and abuse are an old dull pair that only acted like a hand sized box and pan brake when used with sheet metal anyway so sacrificing them for this duty is no loss. They are not the aviation type, I do not think they would hold up to the persuasion of the brass hammer. Hope this helps somebody, it helped me.
-
 Randy, that sound a lot like Country Meadows or whatever they call it now. I get my coal there for the same price. They said the price will go up the next time they get it trucked in.
 -
Thanks, Hey I bet that is what the book meant by "only use mild steel". As nakedanvil pointed out you should not get your tongs to red heat, but you get them at least that hot and hotter during the manufacturing process. Now that I have some experience at making them I can say that there were times that I had to quench in order to switch sides or just to be able to handle them. And that quenching would have made them brittle. I had some experience with this recently. A couple of weeks ago I was searching the scrap yard for some steel and found a motherload of round 1/4" x 2', great stuff for making hooks I thought. So I bought some, made a hook, and quenched it when I was done. It looked good except it needed tweaking a little on the end. So I placed it on the anvil and gave it a tap. The perfectly formed scroll snapped off and hit me square in the mouth. I do not know what type of steel that stuff is, but I can tell you it is not mild.
-
Thanks, I built the forge in June, and found the anvil and stand in July. I am still pretty green at all of forging stuff, heck I am still pretty green at most things. The only two things I am really good at is cooking and eating.
-
nakedanvil, it is a term used at a local welding shop that I get some of my metals from. He refers to 4140 as half hard and O-1/W-1 as hard. I guess the term is not universal, my apologies. By the way I tried making tongs today. I started out with 1/2" x 1" x 15" and after many hours I only got as far as this. I had a blast doing it but I had no idea how long it takes to draw out two pieces like that, holy cow! I now have a new found respect for anybody who has made a set of tongs! Got them this far I will try to finish on Monday.
-
Nope I think there is a hole there. According to the author that knife is made from a leaf spring and it may have been the bolt hole that held the pack together.
-
I believe you should use mild steel for tongs. 4140 is half hard steel, as you probably know, and your tongs will become hot while working. If you quench them while working in your slack tank they may become brittle and possibly break. You do not have to listen to me since I have not made a set yet, but I bet somebody else can confirm.
-
problems with welding fillets
wd&mlteach replied to manothewoods's topic in Welding/Fab General Discussion
I would also try welding something a little thicker to start out. I know I am not the best welder in the world but I am better than my students and that is all I really have to be. When I start them out I show them this PowerPoint from Lincoln and I give them this Handout from Miller. I also start them out with 1/8 inch (3.175 millimeter) rods and 1/8" x 1" band. For beginners it is easier to maintain correct arc length with a bigger rod. You said you are using 2mm thick stock and rods. If my math is correct that is a thickness of 0.078740" or **14 gauge sheet metal, pretty thin stuff to be welding. I am not saying this weld can't be done, but thicker with my experience seems to be easier for people to learn, that is if your welder can handle a thicker rod. I also agree with Chrispy, he has it right. A magnet clamp with thin stock can make the metal do weird things. -
You are probably right about the making thing. I will have to give it a try tomorrow and I will let you know how I make out, even if they loose a jaw:)