
bluerooster
Members
-
Joined
-
Last visited
Everything posted by bluerooster
-
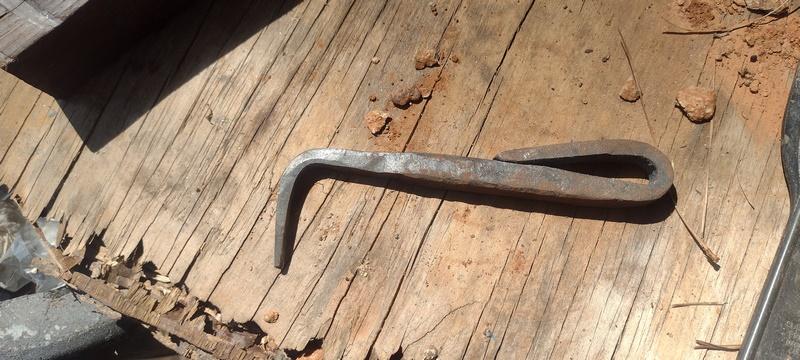
My first forging. Didn't know what to make, but we had horses at the time.
-
To go from zero to a drop tong welded multi directional basket twist handled fireplace poker, in 4 days, tells a lot about you as a teacher. No need to apologize.
-
Frosty, Yes, the curve came in the quench. It was desired, and expected. What was kind of expected, but hoped to not happen, was the warpage. I immediately clamped it (had the clamping apparatus ready), And let it finish cooling, then left it clamped while in the temper. Still slightly warped.
-
Alexandr, That's an interesting pattern for a stair rail. It screams to me for some different colored glass to be installed. Today I had to cut the grass out to the Goldfish pond, and around the barn. It was getting snakey. Then I built a new forge to evenly heat the length of the latest blade. Here It is with the blade in it heating. The quench tank is in the foreground. The quenchant is water, with about an inch and half of oil on top. Used peanut oil, it smells like deep fried turkey when the hot steel makes contact. Here's the hardened blade
.jpg.0f416f6e1849367dd3a6013a6dd5f89e.jpg)
.jpg.2817b430a92e92cfb4aac08a0d820c8a.jpg)
-
I did on this one. But apparently, the core is a tad off center. It showed up when I quenched it. It took the nice curve that it's supposed to, but decided to also take a turn to the right, then left. I immediately clamped it, in hopes that it would come out kinda straight. Nope, so I clamped it again, and put the whole thing into the oven. Held it at 435 for a couple of hours, then allowed it to cool, and un clamped it. Another one for the wall of shame. I don't think I'll even clean this one up. Here's the side view And looking down the edge
.jpg.9bfe334f1102c6f4295d5dc71eedc82f.jpg)
.jpg.7e467498f57359580c0cb0584dd68dd1.jpg)
-
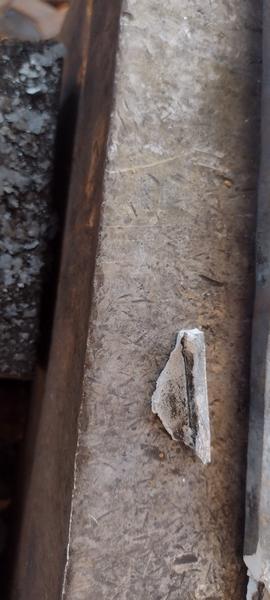
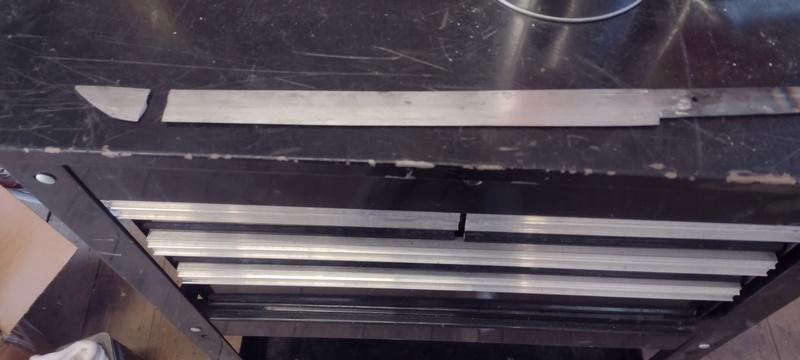
I had decided to make a Wakizashi some time ago. The plan was to make one of the Kobuse style. So, I grabbed some old re-bar and went at it. (no I didn't) I have plenty of known steel kicking around in the 1085/95 range, and plenty of low carbon for the "heart" of the blade. Started with the HC steel, about 5/16" thick, and cut it, to length then folded it into a "bun", to accept a piece of the LC as the "hot dog". I used a piece of 5/8" square for the "dog". Got it all put together, and started welding. That was an interesting experience. Two different steels, that like two different temps to weld. Plus the scale loss from the HC. What a fiasco. The "bun" too thin, and the 'dog" too thick. Made for a loong day at the forge. So, after a couple few days at the forge, I had it getting close to file time. Just for spits and giggles, I decided to sacrifice this blade to see what I'd done. I heated it up until a magnet wouldn't stick, then held it there for a few minutes. Then quenched it in the slack tub. It took on a very nice curve, and remained straight laterally. I figured that I'd snap it off over the edge of the anvil, and get a look at it's insides. No luck. It didn't snap off, It didn't bend, I clamped it in the vise, and smacked it with the 5 pounder as hard as I could. As the hammer was comming back at me, I thought I heard a slight "tink" sound. Sure enough, the HC edge, had cracked. But the blade remained straight. Wow! I'm on the right track. I removed it from the vise, and a chunk of the edge fell out. As you can see, I didn't get a good weld. At least in spots. I went ahead and destroyed that blade doing the research. Then started another. As you can see, (which I didn't know at the time), the "dog" is thicker than the "bun". That caused some problems down the road. By the time it was finished to the point of filing, there wasn't enough HC on the outside to file. I didn't get a picture of where I filed through the HC layer. But decided to continue with the blade to completion anyway. Got it finished up, and "clayed" it using refractory cement. The following week, it was heat treat time. Now, this is a longish blade, and my forge will only heat about 4" at a time, max. So I built a quicky JABOD that would heat the blade in it's entirety. Got the vise ready (just in case), heated it up to just over critical temp, and held it there for a bit, then immediately into the quench. It took a slight bow, so into the vise immediately. Other than the spot where I filed through the HC, it appeared to have come out perfectly. Came out of the vise straight, with a nice curve to it. I was happy. I turned to lay it on the bench, and bumped the vise. "Plink" and the end hit the floor. Now, on to the next one. I learned quite a bit from the last two. First, The LC doesn't have to be all that thick, the HC needs to be fluxed through the whole forging process, to reduce loss due to scale. (Thanx Frosty) And need to Keep it at or near welding heat even while drawing out. (just to be sure everything is welded good, throughout. And another thing, is to keep track of hammer blows on each side. Also make sure you get good hits. This is not something that you can forge thick and grind thin. You want to forge as close as you can to final dimension, if possible, with as few hammer marks, and burnt spots as you can get. (I'm still working on that) Mabe even plannishing as a final step, to get as smooth a finish as you can at the forge. Saves time filing later. And there's gonna be a lot of filing. Been filing on this latest one for two days straight. There's a hammer mark that I'm afraid to try to remove completely as I've already removed a lot of material. But it's straight, and that's the only imperfection so far. Ready for heat treat.

.jpg.65fb7a6b0f849717f9909b1d6daf4bc6.jpg)
.jpg.b1602a27476aba02f090ee3353399639.jpg)
.jpg.bcc43d9efdebdcca2ae99f4c46c5e168.jpg)
.jpg.160ce09eb41320e22c7e8bbe9a9c78e0.jpg)
-
Frosty, I use both blue and red. Depending on what I'm doing. Red shows better on some things. JHCC, I like that yarn ball, looks just like a ball of yarn. Das, All kinds of neat stuff on that wagon. I spent the day filing. I wish I'd forged closer to dimension, and I need to learn better hammer technique. It has some imperfections that I'm scared to try to file out, lest I go through the HC layer. And I need to learn to get the exact same number of strikes on both sides, per heat. I'm going to run with it, but it's not exactly what I was going for. May heat treat next weekend. Here it is, all beveled: You can see the hammer mark in the middle of the blade But, it's reasonably straight Both directions And weighs exactly 16 ounces, which is a tad heavy I think.
.jpg.5c172c1f657feffd577a92ad7c91d8b8.jpg)
.jpg.60efd08856917788c388f1a76cb6d69e.jpg)
.jpg.f496bddcf108a720870dac4b4628d57a.jpg)
.jpg.9d1b42986797611c511f90b7fb86402a.jpg)
-
Alexandr, Beautiful work. Spent the day filing. I'm about worn out. I now wish I'd forged to a finer finish, and at least started the bevel. Dyekem has become a good friend to me. Put a coat on the blade, scribe a line, and file to it.
.jpg.f2a68b02f62d35d690cbe1604370bf8f.jpg)
-
Today was rainy and cooler. So I got a few hours of forge time. Got the blade project forged and ready for finishing, then heat treat. It's pretty straight and I think this one might come out alright. Blade is 19 1/2", plus nakago. I'll finish with a file, and drawknife, then heat treat, and final sharpen, and polish. I still have to punch the hole for the mekugi, I may try to drill it.
.jpg.6bc4706712419b0e61fca8b161c0e426.jpg)
-
I've been away from the forge for so long now, everything is growing rust. Been hot and humid here like 100/100. Not good forging weather. But I did manage to work on another project which involves a lot less fire and heat. The landing gear on my Taylorcraft project was in need of some attention. The right side had been repaired some years ago, and doesn't match the left side. So, I set about replacing the tie strut on the left side to match the right side. Using the old one as a pattern, I made a new one. I went down to the local aircraft parts supplier, and picked up some 4130 seamless streamlined tubing, and a piece of 4130 flat stock. Came back, and went to work. I ran out of Argon on the first weld. So much for tig. So, I had to gas weld the whole thing. Was good practice. The end where it attaches to the axle The old one with measurement New one installed
.jpg.e672cf3953bd55caed3579857f58b565.jpg)
.jpg.535fd3aab1a84dddcab16fdb29e8455f.jpg)
.jpg.643de136b75420cb29aa34d90f9fd44d.jpg)
-
Could be cast iron, or could be cast steel, (but I doubt it).
-
No forge time here. Projects languishing on the anvil. Temps in the 90s, and not a breeze to be found.
-
here's what followed me home yesterday: pair of mufflers to be installed on my pickup complete bumper jack for 1970 Chevelle and various bits of spring steel. The coil is for a Toyota Corolla, brand new never used. The 3 long rods are trunk springs for 67 Camaro, and (I think) Mustang. Not sure what the damper hook looking thing is, but it's steel. I've no clue what the sway bar came from, but I figure it to be useable spring steel. All free for the taking.
.jpg.c599b2c83a942b8f70f325b321a8694b.jpg)
.jpg.c0d1214ecbe8cae6e280308403201a31.jpg)
.jpg.8cc978549472a7998271c56b7fd2d169.jpg)
-
And you'll find that it's a very handy tool that will cut anything that electricity will flow through.
-
Latest blade so far:
.jpg.28bd23f14576957ffddfb92e72d5ab83.jpg)
-
Got a little more forge time in today, worked on drawing the blade, and kinda forging the bevel. Long blades are kind of a pain in the ear to get the taper just right without lots of grinding later. Being a "hotdog" I don't wnt to do too much grinding, lest I grind through the hard layer. Next session, I'll cut off the handle, forge out the tang, and finalize the blade.. In the fire the blade, about 18" of cutting edge. The rest will become tang.
.jpg.becf7ed8d841acd96de39929c8895922.jpg)
.jpg.305c6966826fcb4e5a6eeff662e92bbf.jpg)
-
alexandr, As usual that is one awesome chandelier.
-
Too nice a table to use in the shop. Jennifer, Yes, as it stands now, I can hit it with a flapper disc, to dress out the nicks, and dings.
-
When I got new glasses, I made a few stipulations. #1 Trivex lenses, (UV protection is inherent, and better impact resistance than polycarbonate) #2 Must have added IR protection. (to prevent blacksmith cataracts) #3 Ray Ban aviator style frames #4 Cable temple pieces (hook behind the ear) Cost a fair penny, but mostly due to the Ray Ban frames, and my astigmatism. I have detachable side shields, available for about 5 pair for $10.
-
Thanx Jennifer. It has served me well over the years. I'd like to figure out how to hard face it. But mabe it's best that I don't.
-
Frosty, The grate in question is 3/8" steel plate with holes drilled in it for air flow. I installed it last year. And have not had this problem until the last couple of fires. I gave it a slight dome shape in hopes that the molten slag/clinker would run away from the air holes. It had been doing that with no worries. And big donuts could be pulled out without disturbing the fire too much. Mabe I just got a bad batch of coal, with lots of clinker in it. Got a couple of hours forge time in today. Finished up the welding of the 'hot dog" blade, and started drawing, and shaping. Keeping the bar fluxed has helped considerably with scale production, (and added to the clinker) Thanx for the advise to whoever it was that told me about that. (I think it was Frosty) Fluxed.
.jpg.d8f32d716d9e7996e36ef585d2964ad0.jpg)
-
Frosty, It's a steel grate. I never had this problem until the past couple of fires. Fire is 4" deep at a minimum. Jennifer, That's a good lookin' chisel.
-
I got some forge time in yesterday. I needed a tool to push the pins out of some soft magnesium door handles. These pins have been in place since 1946, and the latch mechanism is mounted in a very light door, so using a hammer and punch is out of the question. I had an old coil spring from a '65 GMC pickup front end. So I used that. Worked pretty well, but would have been better if I had a socket head screw, instead of a hex head. I used garage door spring for the "pusher". While the fire was hot i decided to work on the blade project some. Between the flux, and the apparently dirty coal, I was getting a good amount of clinker, which in and of it's self would normally be no worries. But lately I've been unable to just pick the clinker out without pulling out the fire grate. It seems that the clinker sticks to the fire grate, and the only way to get it off is to tap it on the anvil. End result, after a few welding heats, I've got to pull the fire out, remove the grate, peck on it until it's clean, put it back, re start the fire, and forge on. It used to form a ring, that could be hooked, and pulled out. What changed? I dunno.
.jpg.0419783d6c1be705505c1e8eec925e10.jpg)
-
BillyO, that's an awesome widget.
-
It would take me a gallon of dyekem to get the bevels right. That's a nice looking blade.