bluerooster
Members
-
Joined
-
Last visited
Everything posted by bluerooster
-
I know this has been beat to death in other threads. I'd rather not resurrect an 8+ year old thread. And my point has not been mentioned in any of them. The point is this: The use of rice straw, rice straw ash, and rice paper, VS any other straw, ash, and paper. This comes from the point of view of the casual observer. I haven't tried it myself. But i can see the principle behind it. In Japan, Rice is a principle crop. So, it follows that there is an abundance of rice straw to be had for the cheep. Here in the U.S. wheat is a principle crop, And as we all know wheat straw is abundant and cheep. Rice straw is used in Japan, not because it's better than any other, but because it's abundant, and cheep. Rice paper is, in fact, not made from rice, but usually (but not always) the bark from Mulberry tree, but can be made from other plants as well. It can be had here in the U.S. quite easily, and not expensive at all. Mulberry is all over the place in Asia because, well, silk. So, In my opinion, rice straw, and ash, and rice paper, are not the be all, end all, of protection for the initial welding of your Tamagahane billet. I believe you can use any grass straw, rice, wheat, oat, etc. along with any paper that will be thin, and hold together when wet, to protect the initial weld of your billet, from oxygen. And still be "traditional", as they used what was on hand, and worked well.
-
Tap Bang, Food for thought; In my smithy, I can crank the blower, wipe off the anvil, swap hammers, set a tool in the hardy hole, etc. all while still cranking the blower without pause. I need to turn at the waist, but take no steps. Some folks may think of it as a cramped space, but for me, everything is within reach from one spot in front of the forge.
-
That pile can be used for all manner of things. I'd wager the curly parts are HC, and the rest is good tough low to mid carbon. The wheels, can be used for all manner of things, carts, dollys, etc. Even the ones without the tires can probably be used for something.
-
Making the lights "dance" to the music?
-
Got some time committing forgery today. Got a good start on a dragons head. I used 3/4" square, which is kinda tough for what I'm after, but it's what I had. 5/8" would have been better. Flattened and tapered the end then split it for the horns. Then tapered, and rounded the horns. Then drew it down to about 9/16" for about 1 1/2-2", folded it back on it's self and welded, Thus giving me about 11/16 square, about an inch long for his face. Then started forming the basic shape of his face. Then it started getting dark in the smithy, and the dry cracks on my hammer hand started acting up, so I put the fire out, and will finish it mabe next week. What I have so far.
.jpg.26a71a66965ac153a80a84ae7895e8f8.jpg)
-
Spring fuller? Like this? For 1/2" round.
.jpg.074d972d58e778a51fc0b8cffc95305a.jpg)
-
What's neat about fine threads is, that while they are usually easier to tap, they are a stronger hold, with less chance of stripping due to the gripping surface area. Now Acme threads and all bets are off. Oh, and if you should happen to snap a tap off in the hole, Don't Panic. taps are brittle. Use a relatively hard punch, and break it into little pieces that can be fished out with a magnet, or poked through, if the hole has no bottom.. Goods, that's a good lookin' lilly. ;d Got some forge time in today. Figured I'd take a little time and make a fireplace poker for the guy I work for. What I found out is that I need to spend more time at the forge. It normally takes me about 45 minutes from striking the match, to a fire poker. Took 2 hours today. I thought everything went pretty smoothly, except the basket twist kept wanting to get wonky. And somehow, I didn't do one of the twists far enough, and the hook is 90 degrees off. But it will work. All the welds took on the first go, so there is that. I did have to re do the basket to shaft weld, but that was a non event. I didn't get them just where I wanted them when I touched them together. And They stuck, tightly. I had to put it in the forge and separate them, then re stick them. With the drop tong weld, you can tell if it's going to be a good one or not when you put them together. You can actually feel them stick together.
.jpg.c4bfebac58698d583286642d1bf03d06.jpg)
-
Shanarue, For the longest time, I didn't own a tap handle at all. That's why almost all my taps have a nut swaged on. I'd take the tap and find a nut with a hole just smaller than the square part, and press it on in the vise. For round dies, these are quite handy, and made of steel. https://www.mcmaster.com/products/dies/die-adapters~/
-
Th' Ol' Lady is eating some Christmas dinner left overs while watching TV. Puppy has forgiven all "transgressions"
.jpg.fc371281cd4cb579040ce20e29b4fa90.jpg)
-
The Puppy went out today and wallowed in something stinky. Here she is sulking after the bath.
.jpg.e7471738f4a99c300d99037f7863891e.jpg)
-
I dunno, those cheep ones that look like a bent screwdriver are, to me, incorrect.
-
Merry Christmas everybody.
-
Billy, there are some nice woods available, but the price is higher than Boulter, including shipping from MA. Here's a nice burl veneer I got from them week before last. Nothing like that available here. JHCC, I don't use stain. I use the color of wood that I want. I did however, use some Poplar on a house. But it was very dark. They called it "Viking Wood". It's how it was cured. Dried in a kiln and brought to the verge of becoming charcoal. It's very dark brown, and smells of wood smoke. Rot, and bug resistant, better than pressure treated they say.
.jpg.0ba713716679c50f84ea00ccdec0f026.jpg)
-
I have 2 piles out at the forge, and one pile at the shop. Short stuff is in a bucket, that I have to dump out from time to time.
-
Frosty; The ones that were crusty/dry on the outside, and still pretty fresh on the inside were the best for throwing, and still go "SPLAT".
-
Billy, I started using Boulter Plywood for most of the "exotics" that I use. All that's available 'round these parts is Oak, and Poplar, without special order, high price, and long wait. I've been busy on a project in the shop that has used up almost every available minute of my free time. So no working at the forge. But I have been working with metal. I needed a tool to install the four bungee cords on the Taylorcraft project. So, I could either buy one $150, or make one. I elected to make one. I had everything I needed in the scrap iron pile. It's a mix of mild steel, and 4130. Worked just fine. Yes, the two verticals are galvanized, But I do all my welding outside, and the wind was 18 gusting to 30, so I didn't think it too much of a problem. It was fun welding it together. The top piece is ~3/16" thick, the two bottom pieces are 1/8" thick, and the two galvanized tubes are mabe .030" at the most. Used a #2 torch tip, and 1/8" rod. Here's the bungees installed On to the next project. I need to punch four louvers in a sheet of .032" 2024T3 aluminum. So today I made a bottom die to allow me to punch two at a time. The "top die" is a 1x4 hardwood block with a 1/2" radius along one edge. To be smacked with a hammer. Here's the bottom die: And a scrap to "test drive" it. I need to rework (make another) the top die. but I think it will work fine.
.jpg.c33ef6d26547e039b73f3da49f0c3fe1.jpg)
.jpg.0e7a155cc96e90130da4b7ec0eab749c.jpg)
.jpg.1cacf9f6ca098401823989bef8821627.jpg)
.jpg.9b5224fab530d34231fc631ea664a927.jpg)
.jpg.13c82b190ffa5e729835421dbd5811f6.jpg)
-
After seeing those gigs that Shane made, Th' Ol' Lady decided I needed to make her a trident . So, I got some forge time today attempting just that. First time in a long while at the forge. Anvil had a layer of rust on it, forge was full of leaves, but at least I'd had the forethought last time, to oil the hammers, and tongs. I usually put a thin coat on the anvil as well, but for some reason I didn't. I had a trunk spring from a 1970 Chevelle that was just about the right size for the tines. I decided to make the points and barbs much the same way as a fireplace poker. They did ok, but next time I'll do it differently. The center tine was supposed to be double barb, but the wire wheel snagged one, and sent it across the shop.
.jpg.d8fca00dfba09fea1241c807b4177fad.jpg)
-
Goods, some awesome tomahawks, And I like the skillet and fork too. JHCC, that will be a real nice candle holder. Snail hooks! I'd have never thought of that. Looks like it would work quite well to hang a gravity feed paint gun.
-
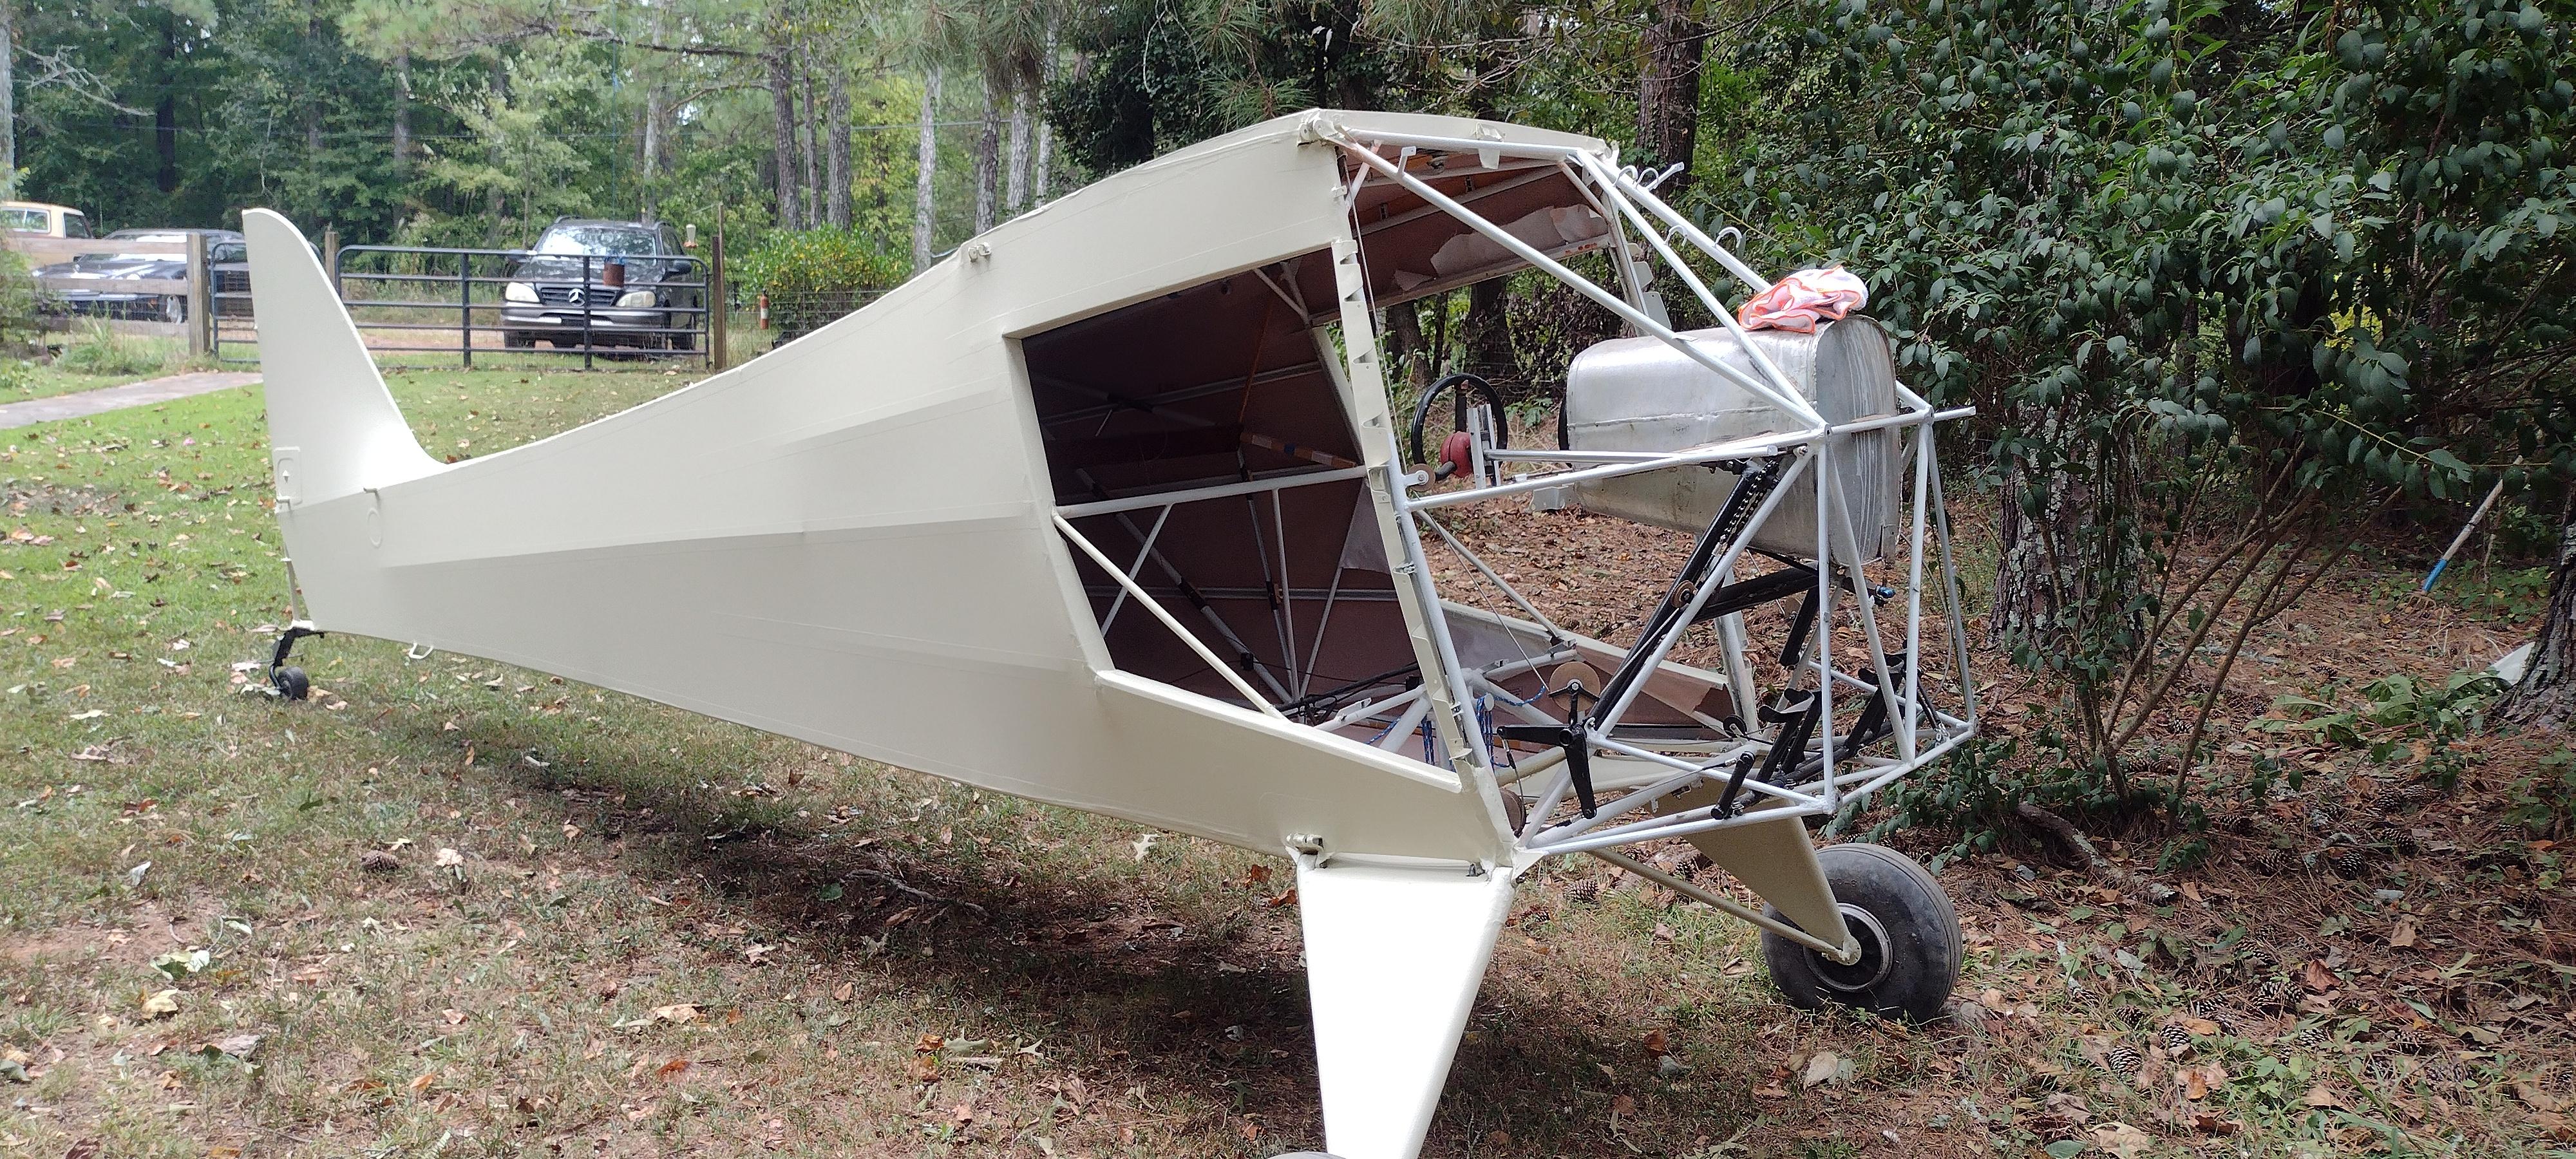
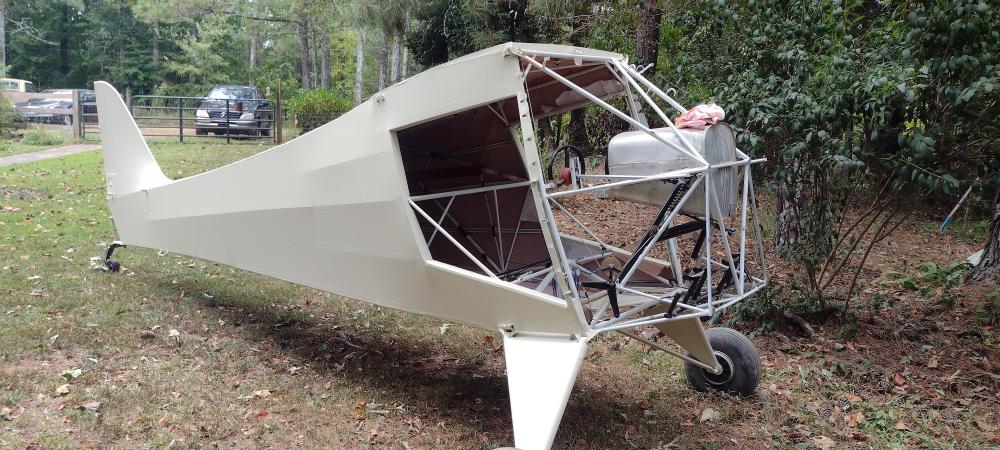
The skulls are all kinds of cool. I'll have to try one if I ever get back to the forge. The brew shelf is awesome. Jennifers scissors are a testament to her skill, and attention to detail. Natkova, if that strap on the stretching table were to snap, you'd be singing soprano for a while. My take on forge blowers, with experience limited to the one that I have, is that while some pins, and bushings can be a pain to remove, It may be best to destroy the part (pin or bushing) and replace with new. But bear in mind that "new" does not allways equal "store bought". I've had so much going on of late, I haven't been able to get any forge time at all. I've got a brand new bag of coal, unopened, just waiting to coke up in the forge. But I have a project in the shop, that I need to get to a certain point, before I can take a break from it. But I'm getting closer. Mabe I'll be able to get back to the forge some time in Dec. Here's a few pics of the project that's taking all my time of late. Finally got it on it's own 3 feet: Firewall, and motor mount installed: Engine almost ready to install: Did an "IRAN" (Inspect Repair As Needed) on Carburettor: So that's what I did in the shop. Shainarue, My Ol' Lady saw those gigs, and has informed me of my next forge project. I am to fabricate for her a full size trident. Thanks for her inspiration.
.jpg.bfc77c3d365642c30a370323eaf94aca.jpg)
.jpg.b64b85a9e9284aba6e6045b135b401a6.jpg)
.jpg.af7ddd84d2343df9bc55eb0e5432d9eb.jpg)
-
Das, skulls lend themselves to all manner of things. Depending on size, they can be gear shift knobs, turn indicator knobs, Radio knobs, Toppers for walking sticks .... And you are doing a bang up job making them. Now you have me wanting to try to make some. Mabe a full set for the dashboard on a hot rod. Jennifer, quit hurting your self!!
-
There are all manner of "dogs" out there. Log Dogs, which keep the log from rolling while squaring it up, the Dog you use on a lathe when you are turning an odd shape that must be held between two centers, RR spikes ("dogs"), Just to name a few.
-
Haven't tried it. And not sure how they work, based on your short description. But I guess I'll pick up your book when it comes out, and read about it.In the meantime, I'll concentrate on my hammer blows, to keep the core centered in the blade.
-
Straightening sticks?
-
I was not allowed to take shop classes. Mom allowed that If there was anything I wanted to learn in the shop, Dad could teach me. I did manage to sneak in one semester of wood shop. And dropped it after that semester, because I wasn't allowed to use the tools and equipment that I routinely used at home.
-
I have a blade that I made from welded cable. It wound up on the wall of shame due to many cold shuts. But I found it to be good for cutting charcoal to size. Well, apparently there was a rock in the bag, that looked just like a lump of charcoal. It nicked the blade. So, I spent several hours today, with an oil stone getting the nick out. I never did put a handle on it. But it works well for cutting charcoal.