
Jon Kerr
-
Posts
293 -
Joined
-
Last visited
Content Type
Profiles
Forums
Articles
Gallery
Downloads
Events
Everything posted by Jon Kerr
-

Forge My Wedding Ring
Jon Kerr replied to Smelt_It_Delt_It's topic in Blacksmithing, General Discussion
The first bit of "forging" I ever did was to make our wedding rings. Fortunately, there are "experience days" here in the UK (eg/ Oldfield Forge in Hereford) which let you forge your own wedding rings. The process they follow is fine even for absolute beginners. Starting with little nugget of bar stock, you punch the hole to your ring size. Then, polish the inside face with files, and then use stock removal with a vice and angle grinder to shape the outer surface of the ring. From there, you can polish to your preference. I have no idea whether this is anything like a traditional ring-forging method but it works great. The particular forge I went to offer to plate the ring with gold etc if you prefer, but a basic stainless ring won't rust when worn thanks to natural wear and skin oils. I'm sure there must be similar outfits in the US which offer similar experience days.... and I'm sure if you wanted to use a particular material (damascus) they could oblige for additional cost, or you can provide the stock. Damascus billets are available on ebay for knife making and an experienced smith could easily bash this into a round bar for making a ring. Now..... if you are talking about pattern welding your own billet etc, thats very different. I wouldn't bother buying your own forge, anvil etc if unless you're serious about picking up the craft. If all you want to make is a couple of rings, do it in the safety of an established forge under the guidance of an expert. -
Hi DallasRector, thanks for this comment. Im really glad the thread was useful to someone else! My recommendations are: - Avoid spending lots of money early on. You can pretty much burn cash faster than coal in this hobby if you get excited. Almost everything can be found cheap or free if you look hard enough. - Aquire some decent tongs which work well for the types of stock you will be making. Ideally, learn to make your own tongs. - Learn fire management. Not sure what type of forge youre using, but you need to be able to control airflow properly and deliver high volume low pressure air. - Make use of this forum. There are so many knowledgeable helpful folk on here, and so many posts which will already exist to answer your questions. Search existing posts first but dont be afraid to ask if you cant find what you need. Your ring looks cool! You're doinv better than me, I'm struggling with drifting. What did you use?
-
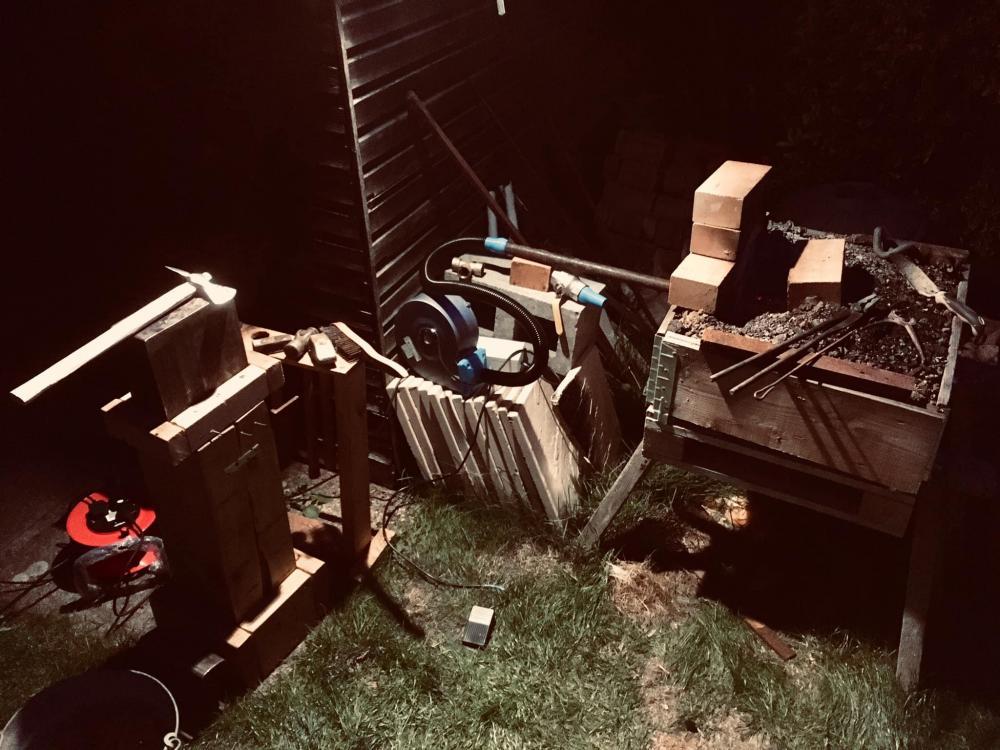
Thanks Das, Frosty and TP, great suggestions. This will really help me get going again! This is a great idea, thanks Das. I hadnt thought about using another wood stand. I might make a wooden stand with a 1/2" metal plate on the top and cut a square hardy hole and a couple of smaller bolster/pritchel. I can bore a nice deep hole under the "pritchel" in the wood itself. That should work great. The motorcycle chain hold down is brilliant- ordered myself some drive chain to copy this. It will work perfectly with my anvil and stand. Will post pics when I get going again! Ahh- I didnt realise the ASO was more of a derogatory thing! Yes, I'm actually really pleased with my block anvil. Its got a great mass, decent rebound, and its nice and hard. And best of all, it was free. I just need to solve my issues with lack of hardy/pritchel!
-
Daswulf- that is an absolute work of art! You have an incredible talent for seeing opportunities where others would see scrap. Inspirational. I hope you're getting a seriously hefty pricetag if you're selling it! The right customer would pay a hell of a lot of money for that kind of work.
-
This weekend I tried to forge a bottle opener. Emphasis on TRIED! The aim was to have a go at a "dice twist" handle. First of all I needed to make tools. I made a quick-and-dirty punch from rebar (groan! I will replace eventually) and a reasonably nice drift from an old masonry chisel. I havent heat treated it yet but it did the trick for now. I started with a 15mm square piece of mild steel stock. I had good success upsetting the end, and then spreading the head with a combination of round face and ball peen hammer. I then managed my first ever punch which went great (depsite the scrap rebar punch!). I don't have a hold down tool but tried the "hole the stock between your legs" method which worked ok. My anvil is maybe half an inch too high which makes this... *ahem*. Awkard. Then I tried to drift, and I just couldn't make it work. My anvil lacks a pritchel or hardy hole (see pics above) so I was trying (and failing) to drift off the edge of the anvil. I'm considering getting my friend to weld some 3/4" square tube to the end of my ASO to use as a hardy/pritchel, which will allow me to make some hardy tools/hold down but still might not help with drifting. I gave up drifting (for now) with the intention or coming back to it later. I started focusing on the handle. I started to chisel in the cubes for the dice, but again with no hold-down and no hardy hole this was a real challenge. I managed to get it chiseled all the way around, but not deep enough for the most part. It was getting dark so i decided to go for the twist anyway- as expected the cubes twisted too much due to the shallow chiselling. Probably my most frustrating smithing session so far due to lack of tools and no ideas for solutions. Things I desperately need: -Oil to quench -New better tongs, or more variety! -Some method of hold-down -Some method of holding hardy tools. Any suggestions how I might be able to drift and/or hold material down with the ASO I'm using? Or a method of holding hardy tools? I still have my old 6" piece of rail track. I could easily mount this to a sleeper and modify this to include a hot cut/chisel. Could I modify it somehow for drifting?
-
The Chupacabra's are doing great though! Patrick- let me know when you're settled back in the UK and hopefully we can meet up!
-
Beautiful gift ideas in this thread- I'll be revisiting this before next year for some ideas The window box I especially love, and as soon as my shop is built later this year I'll be stealing the idea! Not to hijack the thread but..... did anyone RECEIVE any good shop-related gifts this year? My wife got me a voucher for full day's Blacksmithing tuition at a local forge Super happy.
-
Screen Time vs. Anvil Time
Jon Kerr replied to Jon Kerr's topic in Blacksmithing, General Discussion
Thanks everyone- hopefully nobody takes my comments the wrong way, I'm certainly not arguing against some of the incredibly experienced gents around here! I guess in the end what I'm trying to say is that my time spend reading this forum, reading books, and watching YouTube when I'm unable to be at the anvil has been extremely useful when I do finally get to forge! As a result, my time spent forging has been more efficient and productive that it otherwise would have been. Thanks! -
Screen Time vs. Anvil Time
Jon Kerr replied to Jon Kerr's topic in Blacksmithing, General Discussion
Note: I'm mainly coming at this question from the perspective of someone who, by necessity, is having to teach themselves without access to a tutor or experienced smith (other than friendly folks online or in books!). "immediately looking up the answers in a way cheats yourself." I agree, to an extent. Obviously theres value in figuring out how to solve a problem or forge a particular item on your own..... that said, there are techniques, skills and methods handed down throughout generations which really ought to be learned from someone else. Lets take the example of forging a simple hook. You could have a complete beginner take a piece of round stock, a forge, hammer and anvil and tell them to get the metal hot and turn it into a hook. You could show them an example of a tapered, scrolled S-Hook with a twist, as a "target". They could do try it. If they keep trying, they will come closer and closer to the example and get more efficient. However.... if you instead gave them a basic blacksmithing book explaining the techniques for tapering, twisting, scrolling etc and had them read those pages first, I reckon they'd get closer to the end result much faster. Furthermore, lets say another beginner decides they want to make an axe. Which no experience or reading whatsoever, and no knowledge of common blacksmithing techniques, could they do it? I doubt it. A better use of time would be looking around on this forum at the various methods (punch and drift the eye, or folded and forge welded eye, etc etc), various types of starting stock (dependant on the method) and the tools and skills required for each. They can see what tools they have, what they need, and when they go back to the anvil have a plan for exactly how to achieve what they want to do. There's still a huge amount of learning required which can only be achieved at the anvil.... but without that prior learning/reading/watching they wouldn't have a hope. TL:DR....... In my opinion, beginners should spend JUST ENOUGH time at the screen/book to have planned and learned exactly what they need to do during their next session at the anvil. -
Screen Time vs. Anvil Time
Jon Kerr replied to Jon Kerr's topic in Blacksmithing, General Discussion
I agree with the mental health bit for sure.... I have something of an obsessive personality. Some days all I can think about is that I wish I was at home (rather than stuck in the office) to be able to do some forging, and I sit and obsess over this forum. Living vicariously I guess. That said, on the bright side, it does mean that when I do get to forge I have a plan, I've done my research, and I can get on and make progress. -
In the "Common Basic Mistakes That Beginners Should Avoid" thread, ThomasPowers said: The following reply has been split into its own thread for further discussion: Is #30 necessarily a bad thing early on? One of the most-posted comments on this site has to be "Pack a lunch and a cold drink and sit down and read the information on this forum.".... usually in response to a question that has been asked over and over again. If you're fortunate enough to have an experienced smith standing nearby in your shop, who can answer your beginner questions and pick up on your mistakes, then you can follow rule #30 without hesitation. Otherwise, in my humble opinion, spending a considerable amount of time reading this forum, books or watching (decent) YouTube videos before going back to the anvil will pay off. Its good to have a plan for exactly what you're going to do with your hammer time, and exactly how to do it, and you can get that by watching/reading/learning. Obviously looking at a screen is never going to be a substitute for actually swinging a hammer, but as a beginner I think you need to do both? What do you think TP? Happy to be corrected!
-
What did you do in the shop today?
Jon Kerr replied to Mark Ling's topic in Blacksmithing, General Discussion
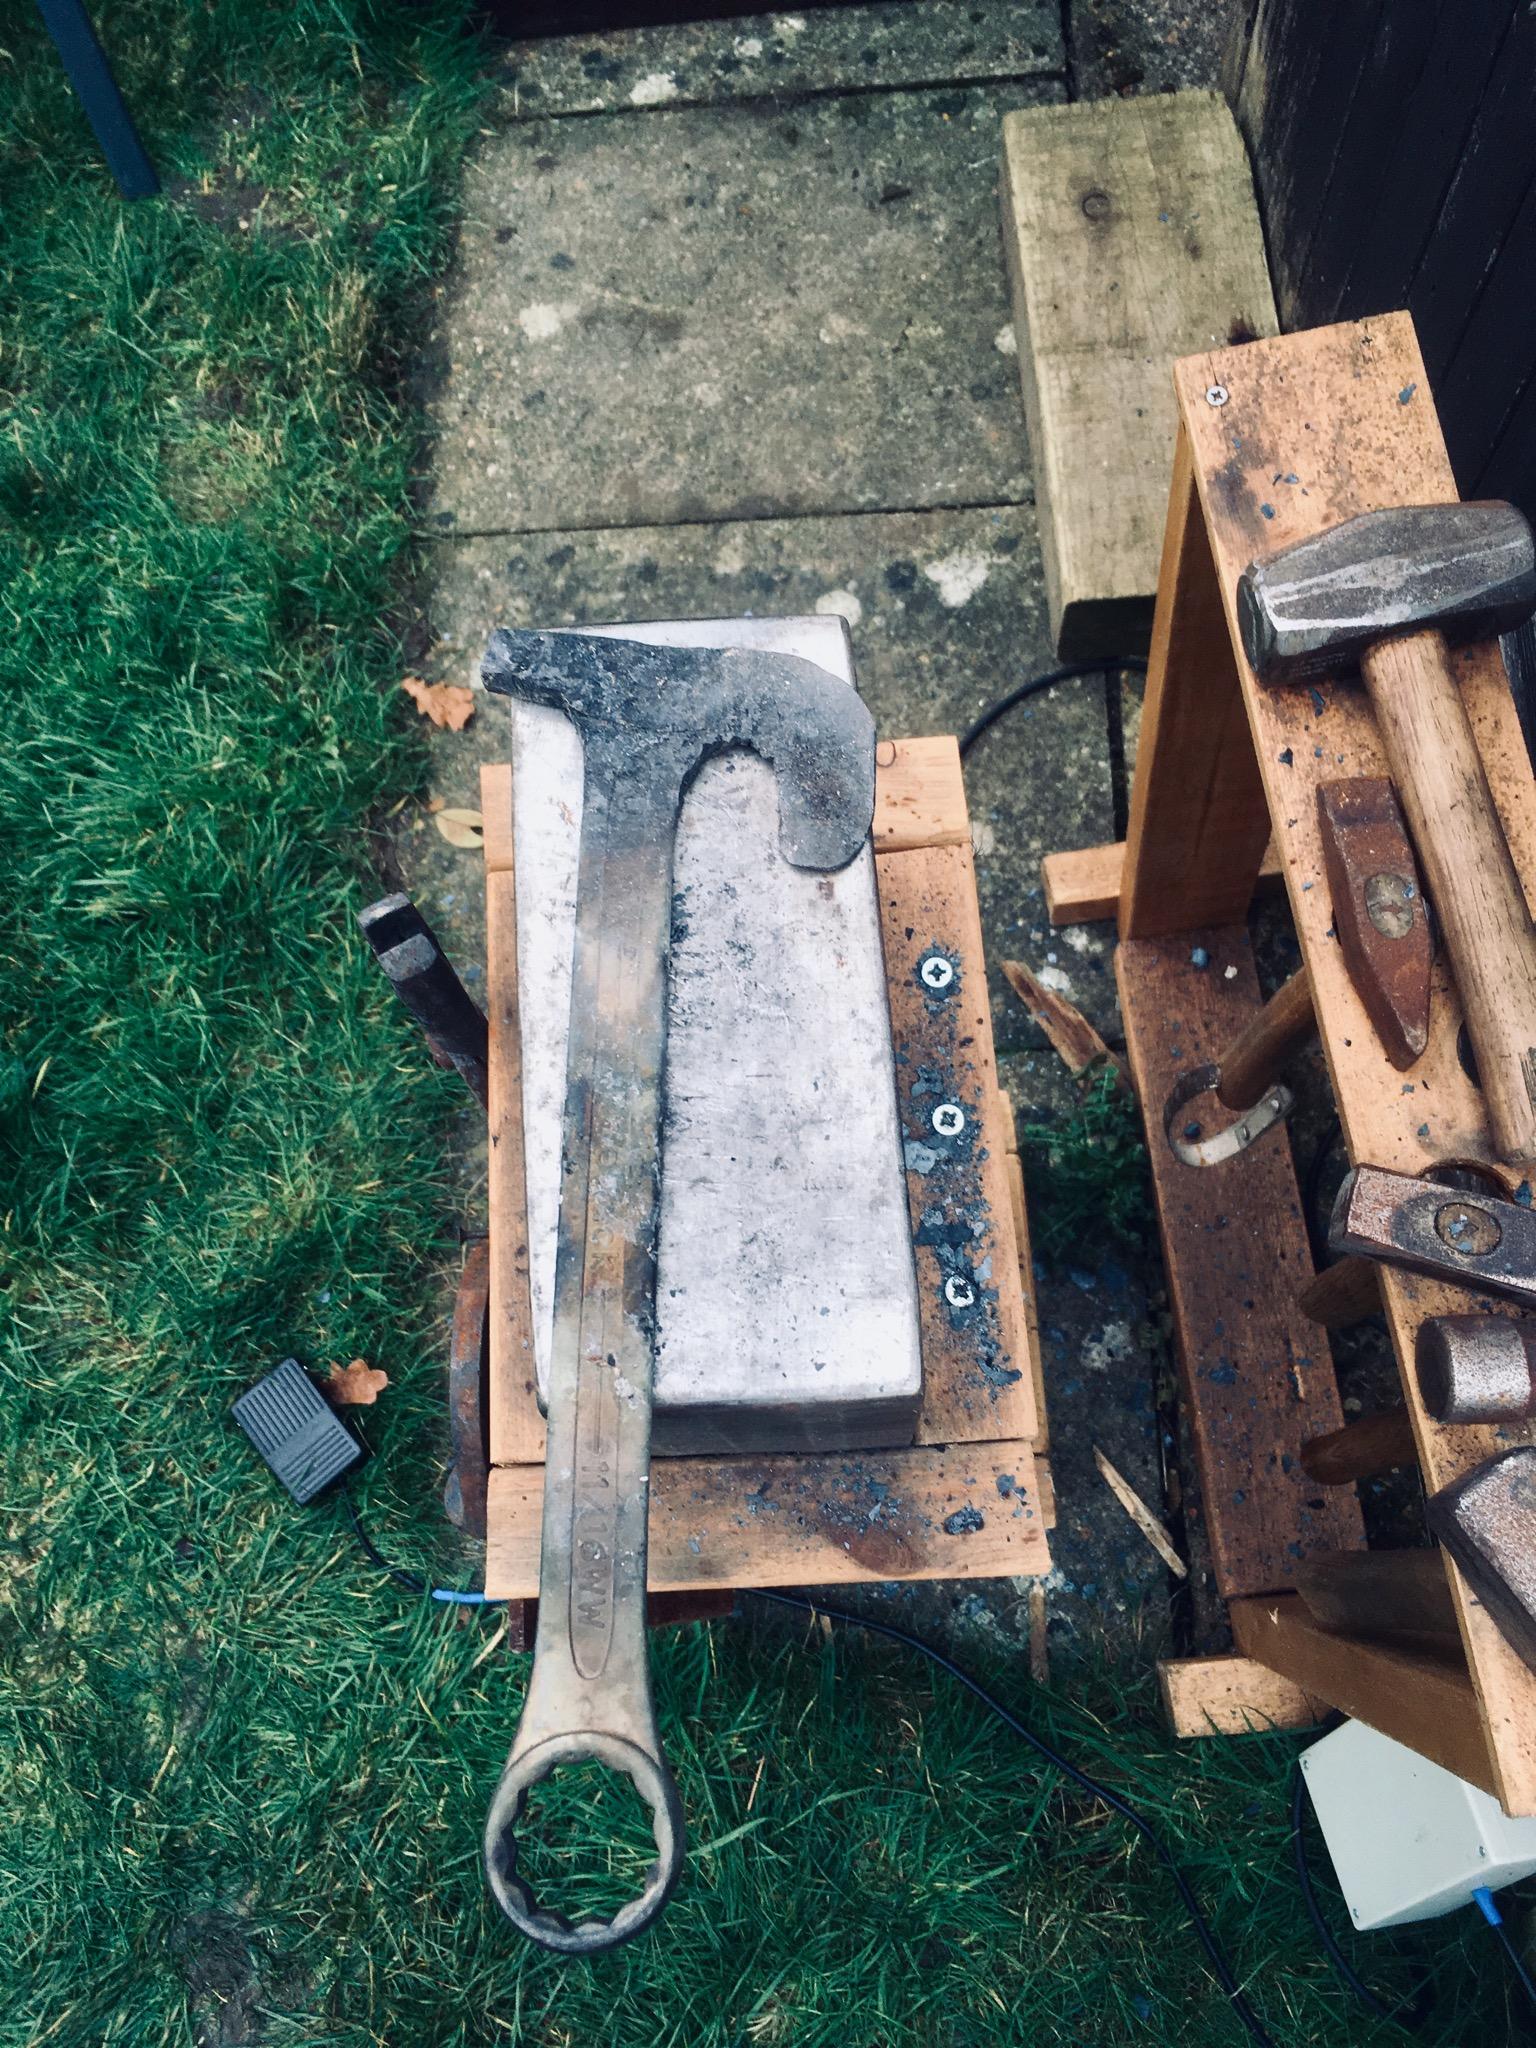
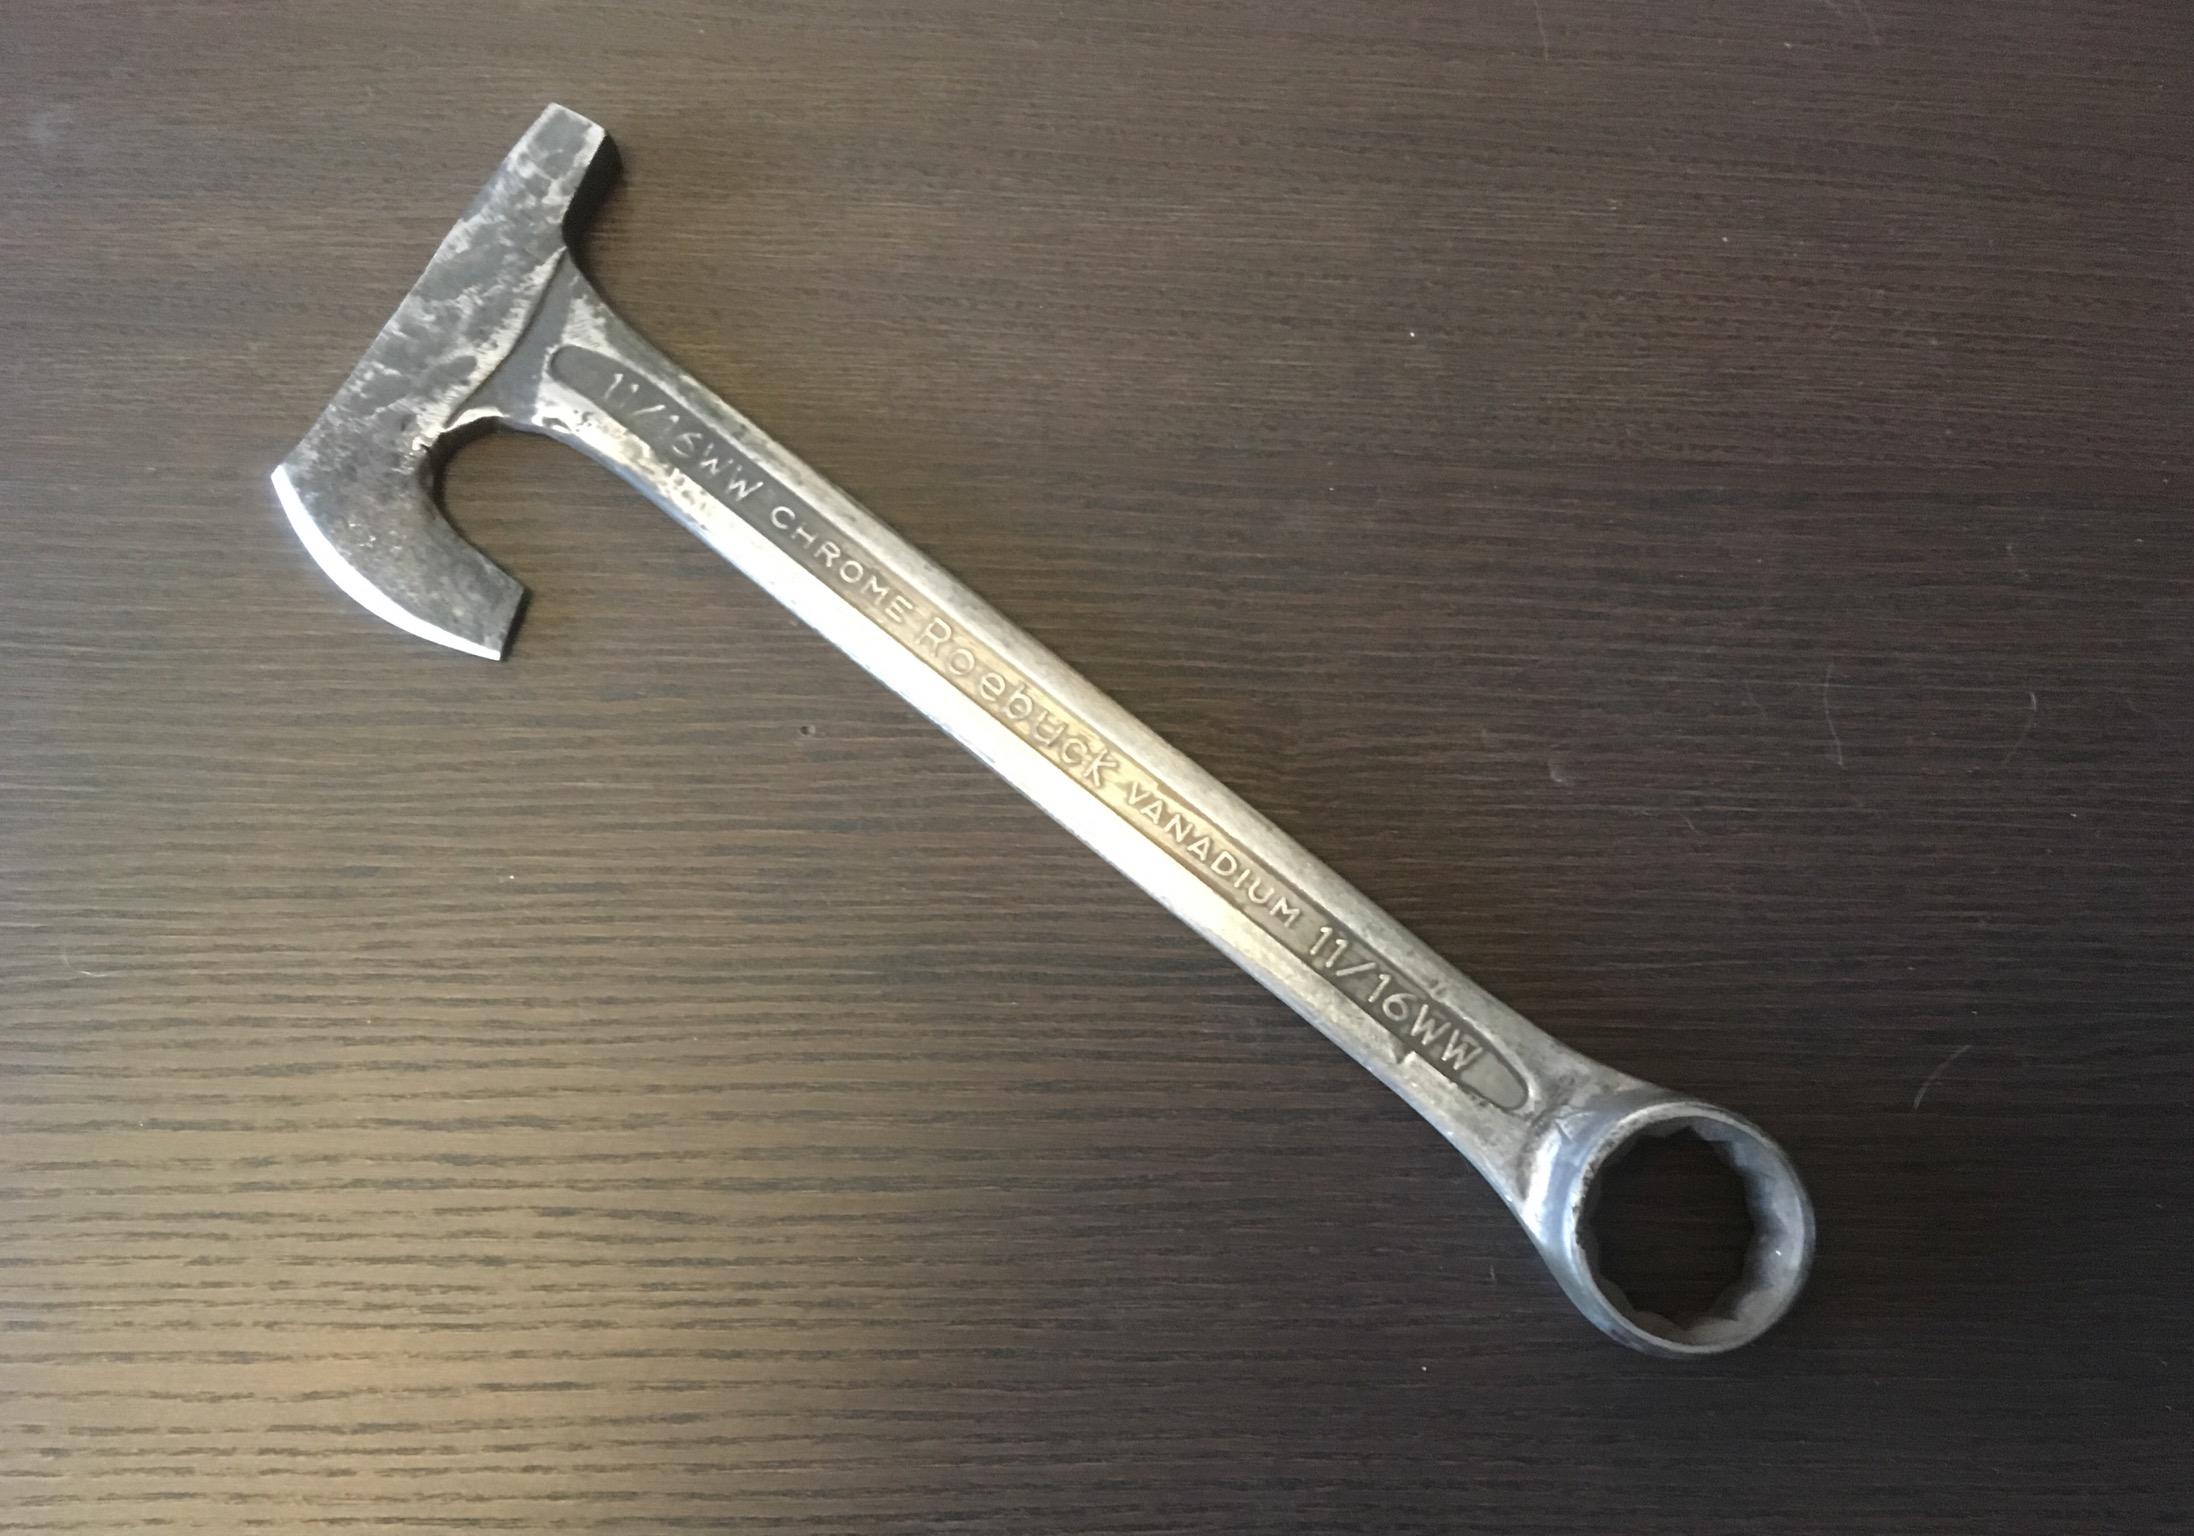
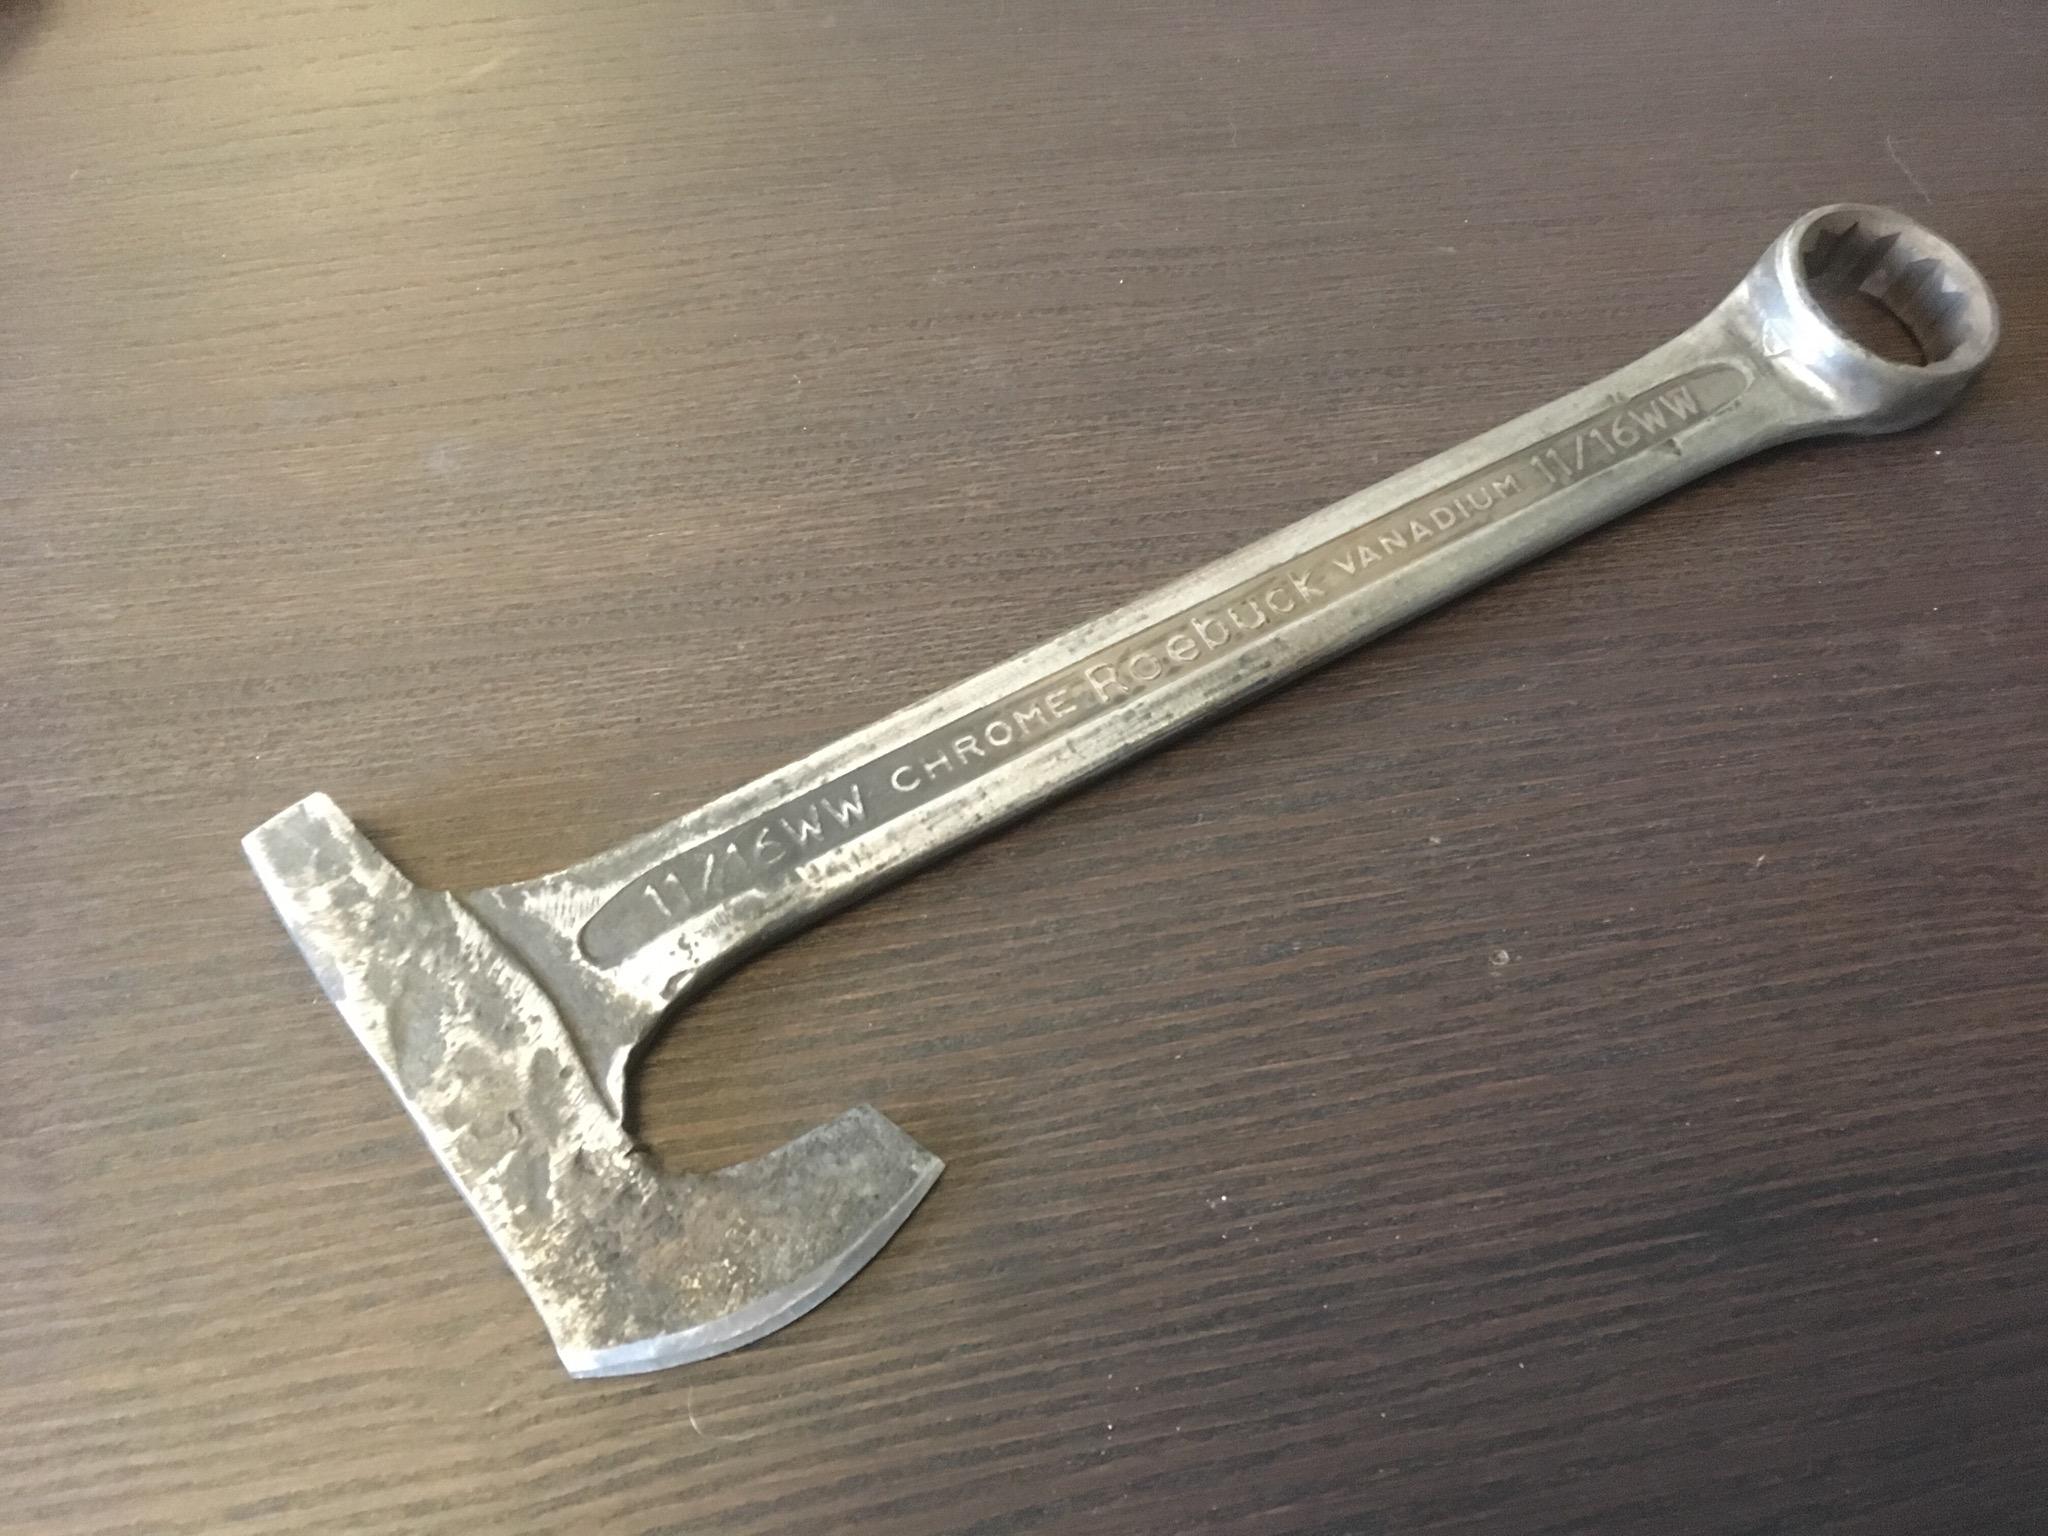
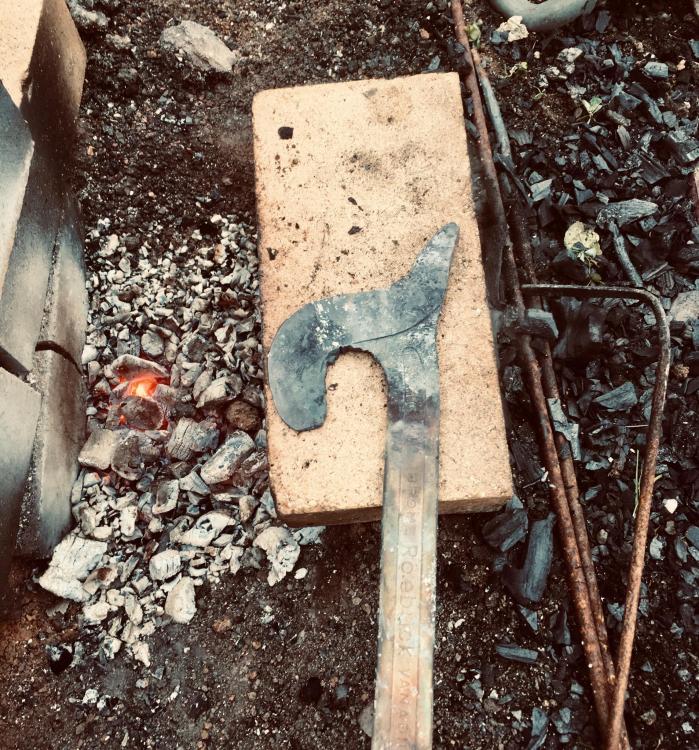
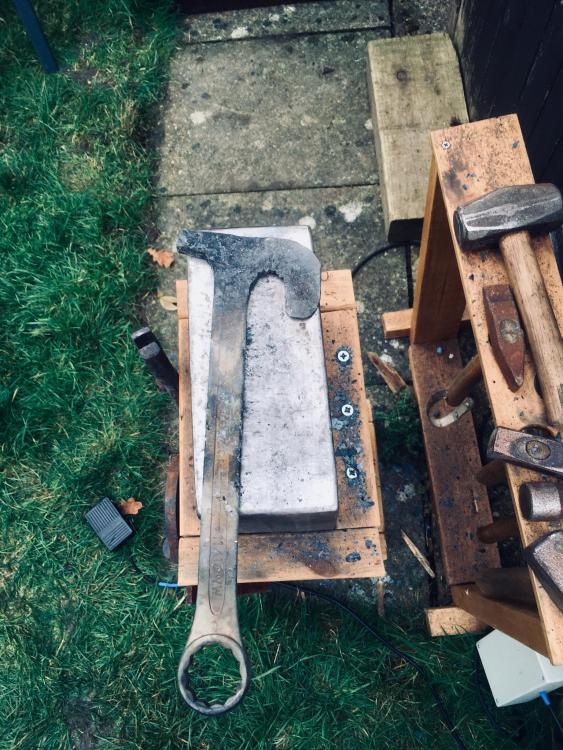
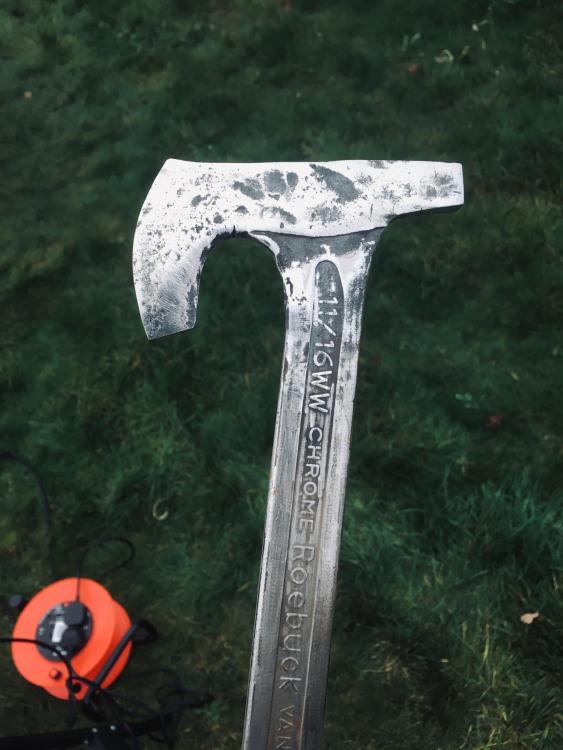
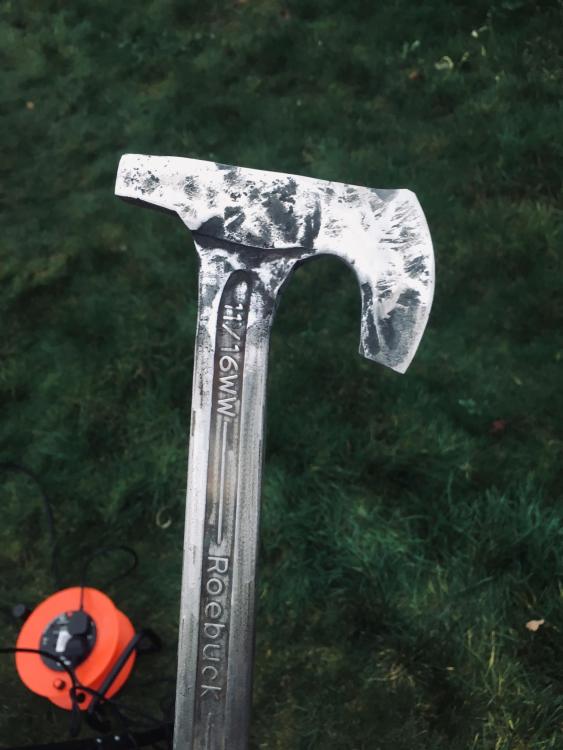
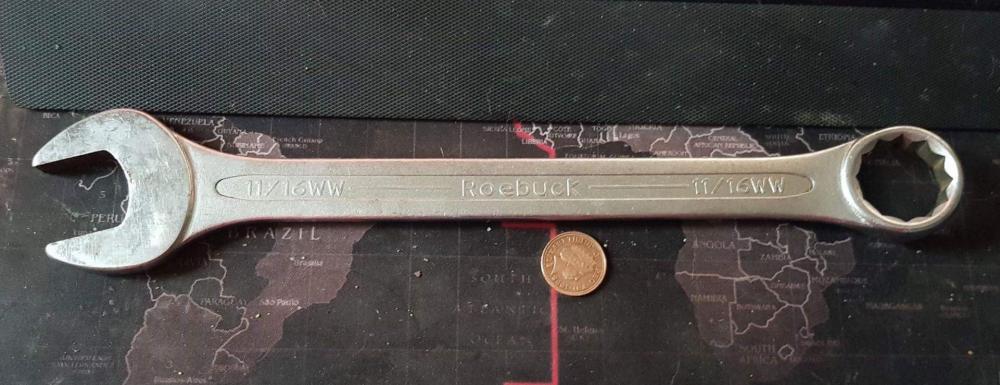
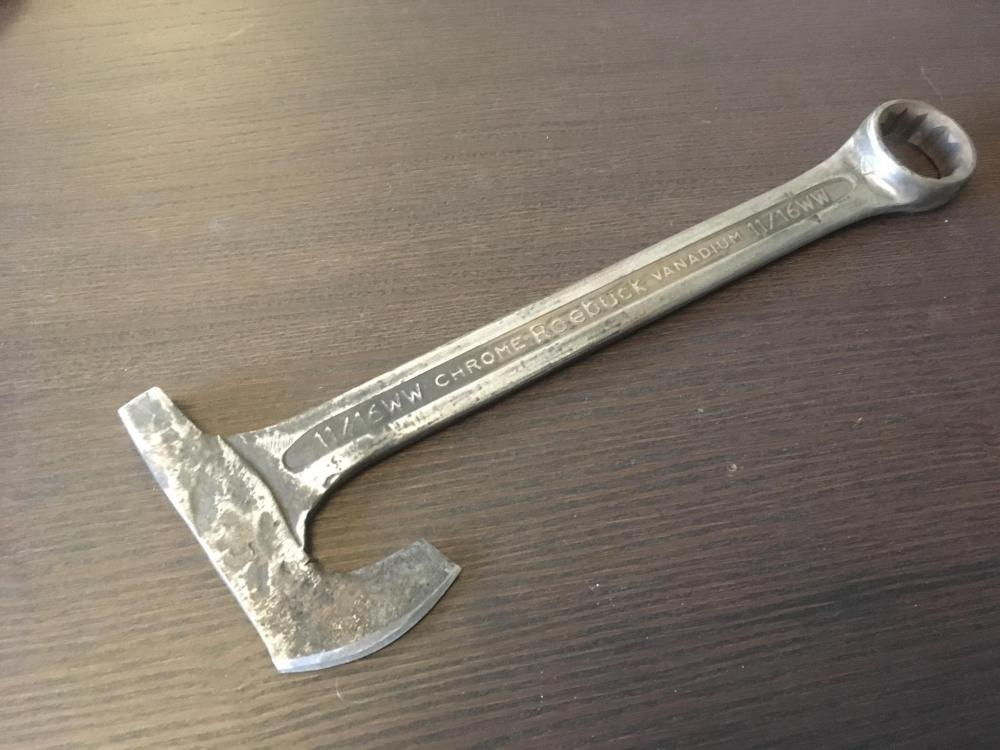
Das- that guitar looks amazing. Great work! I did a little upcylcing this weekend- forged a spanner into an axe as a bit of a novelty for a friend. All the boring details and more pics in my thread, I won't repost here.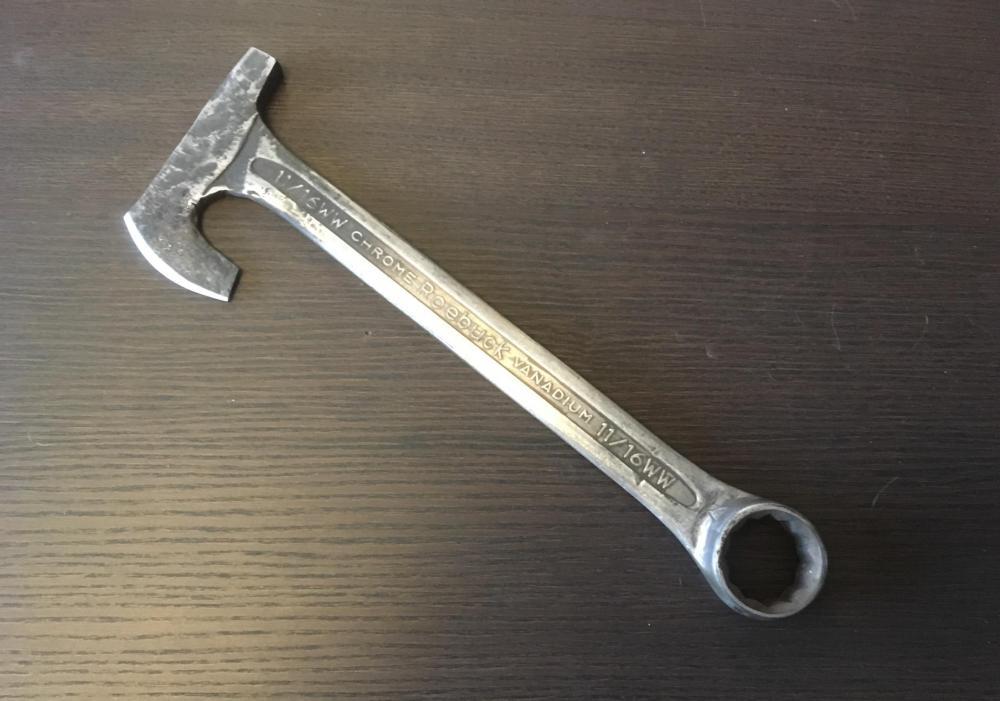
-
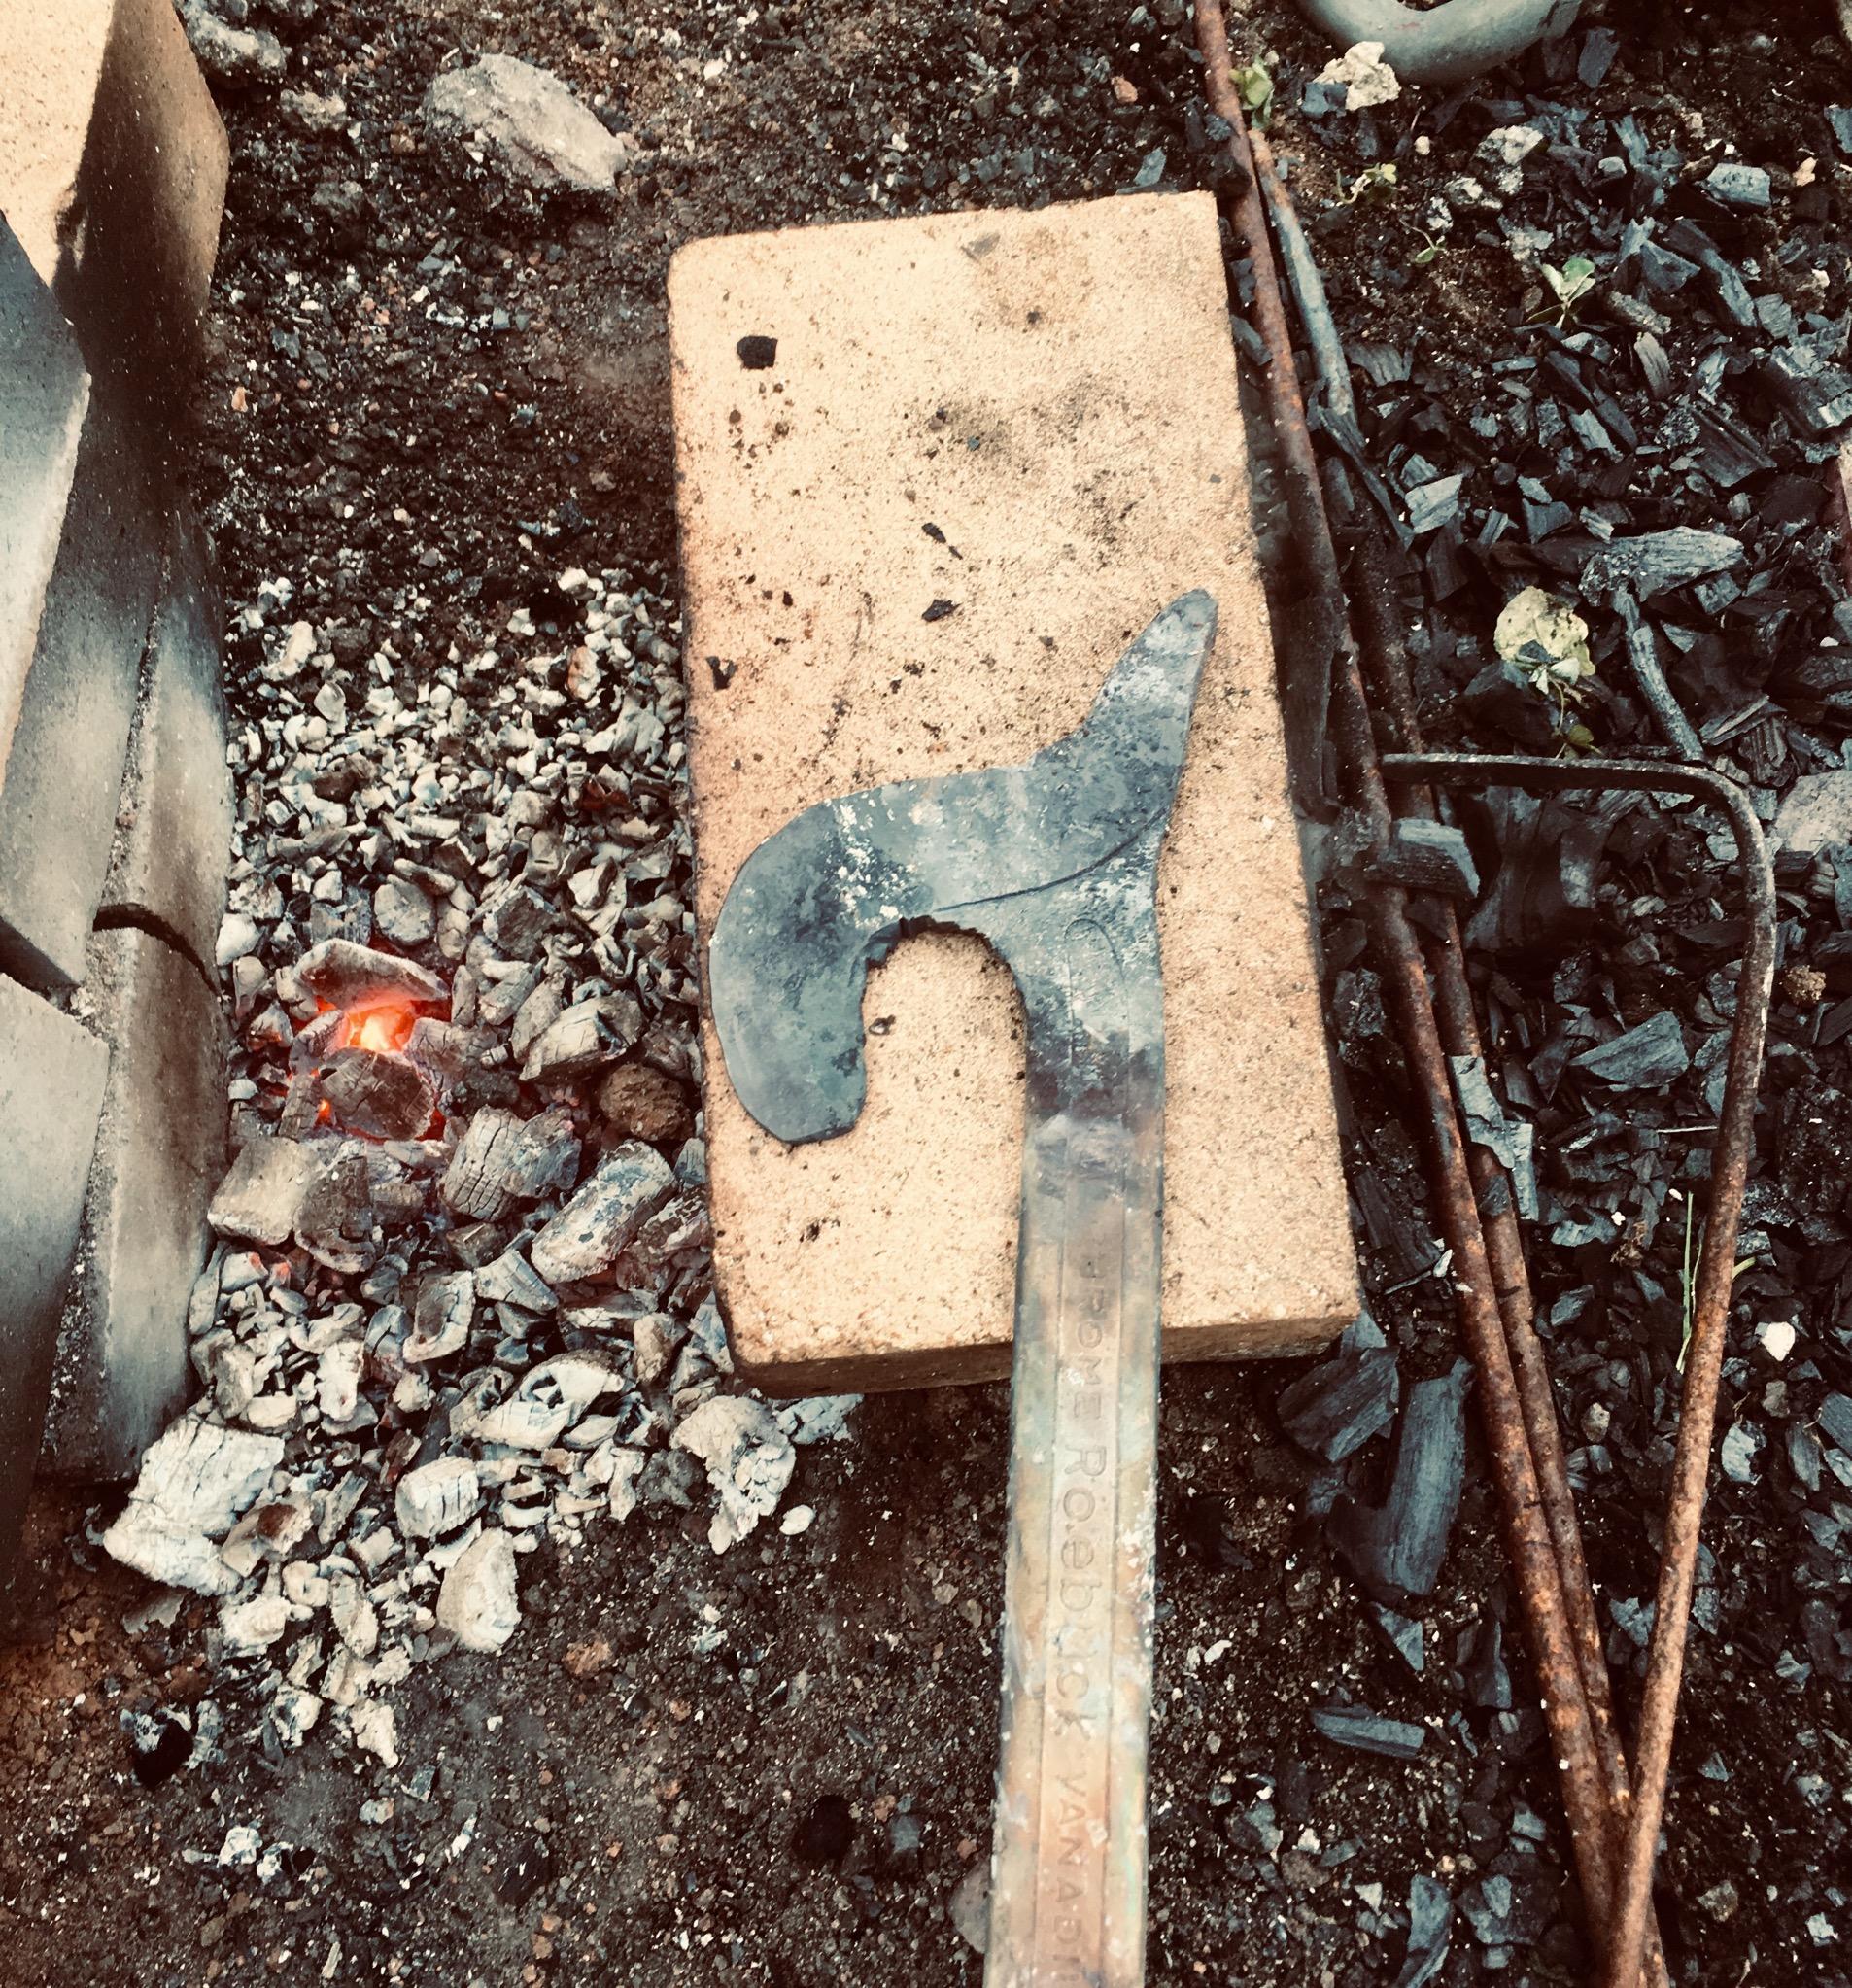
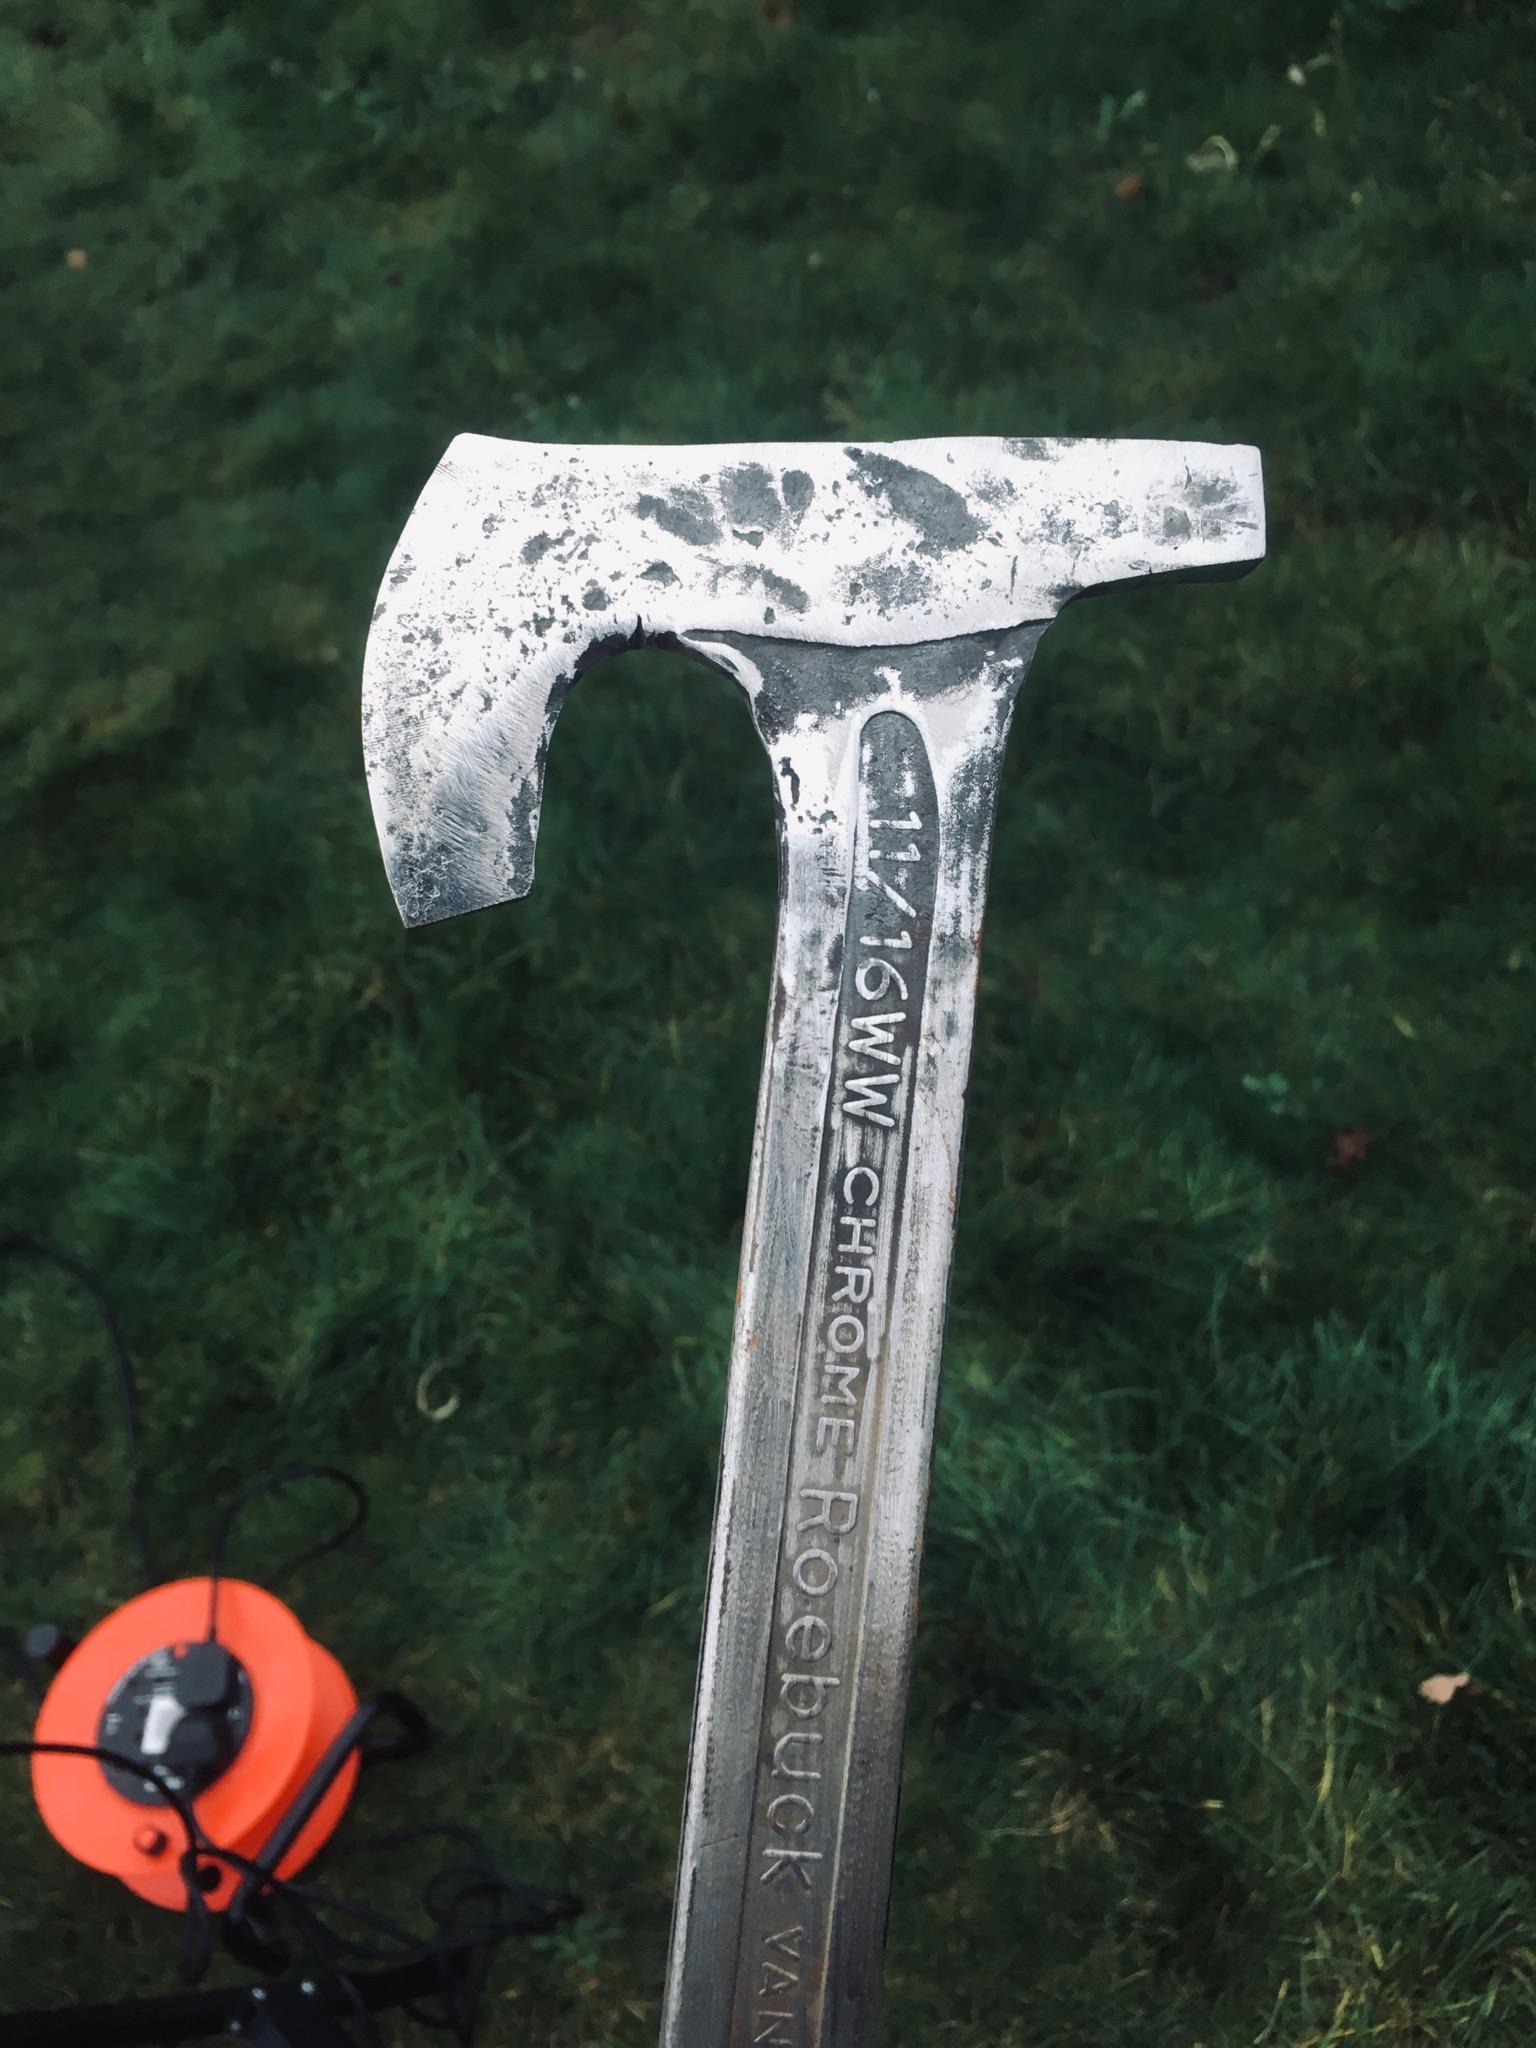
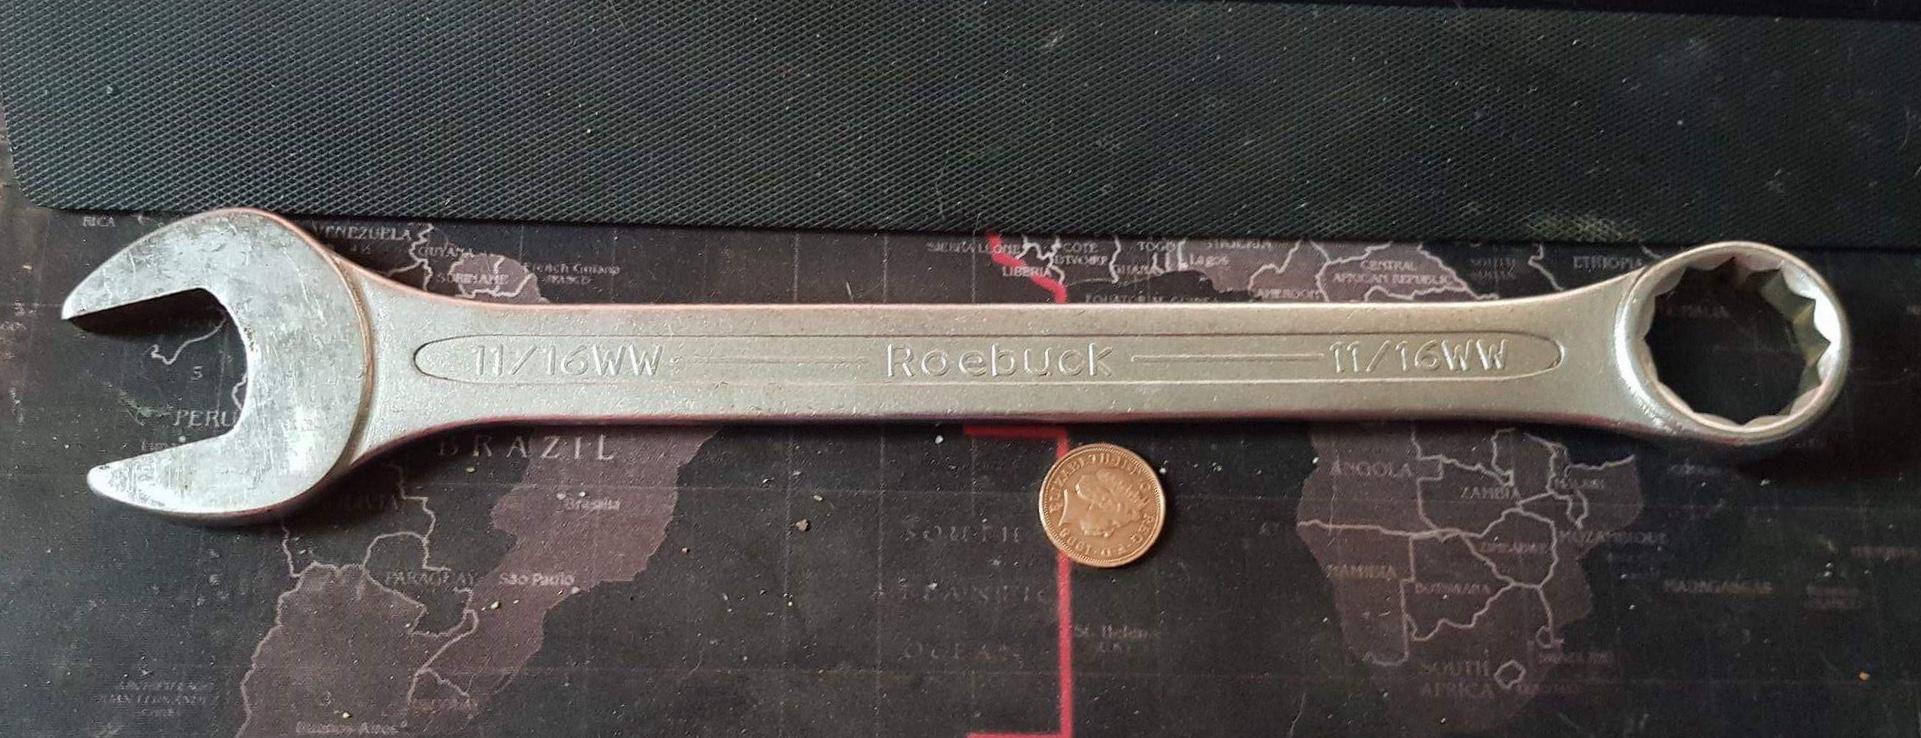
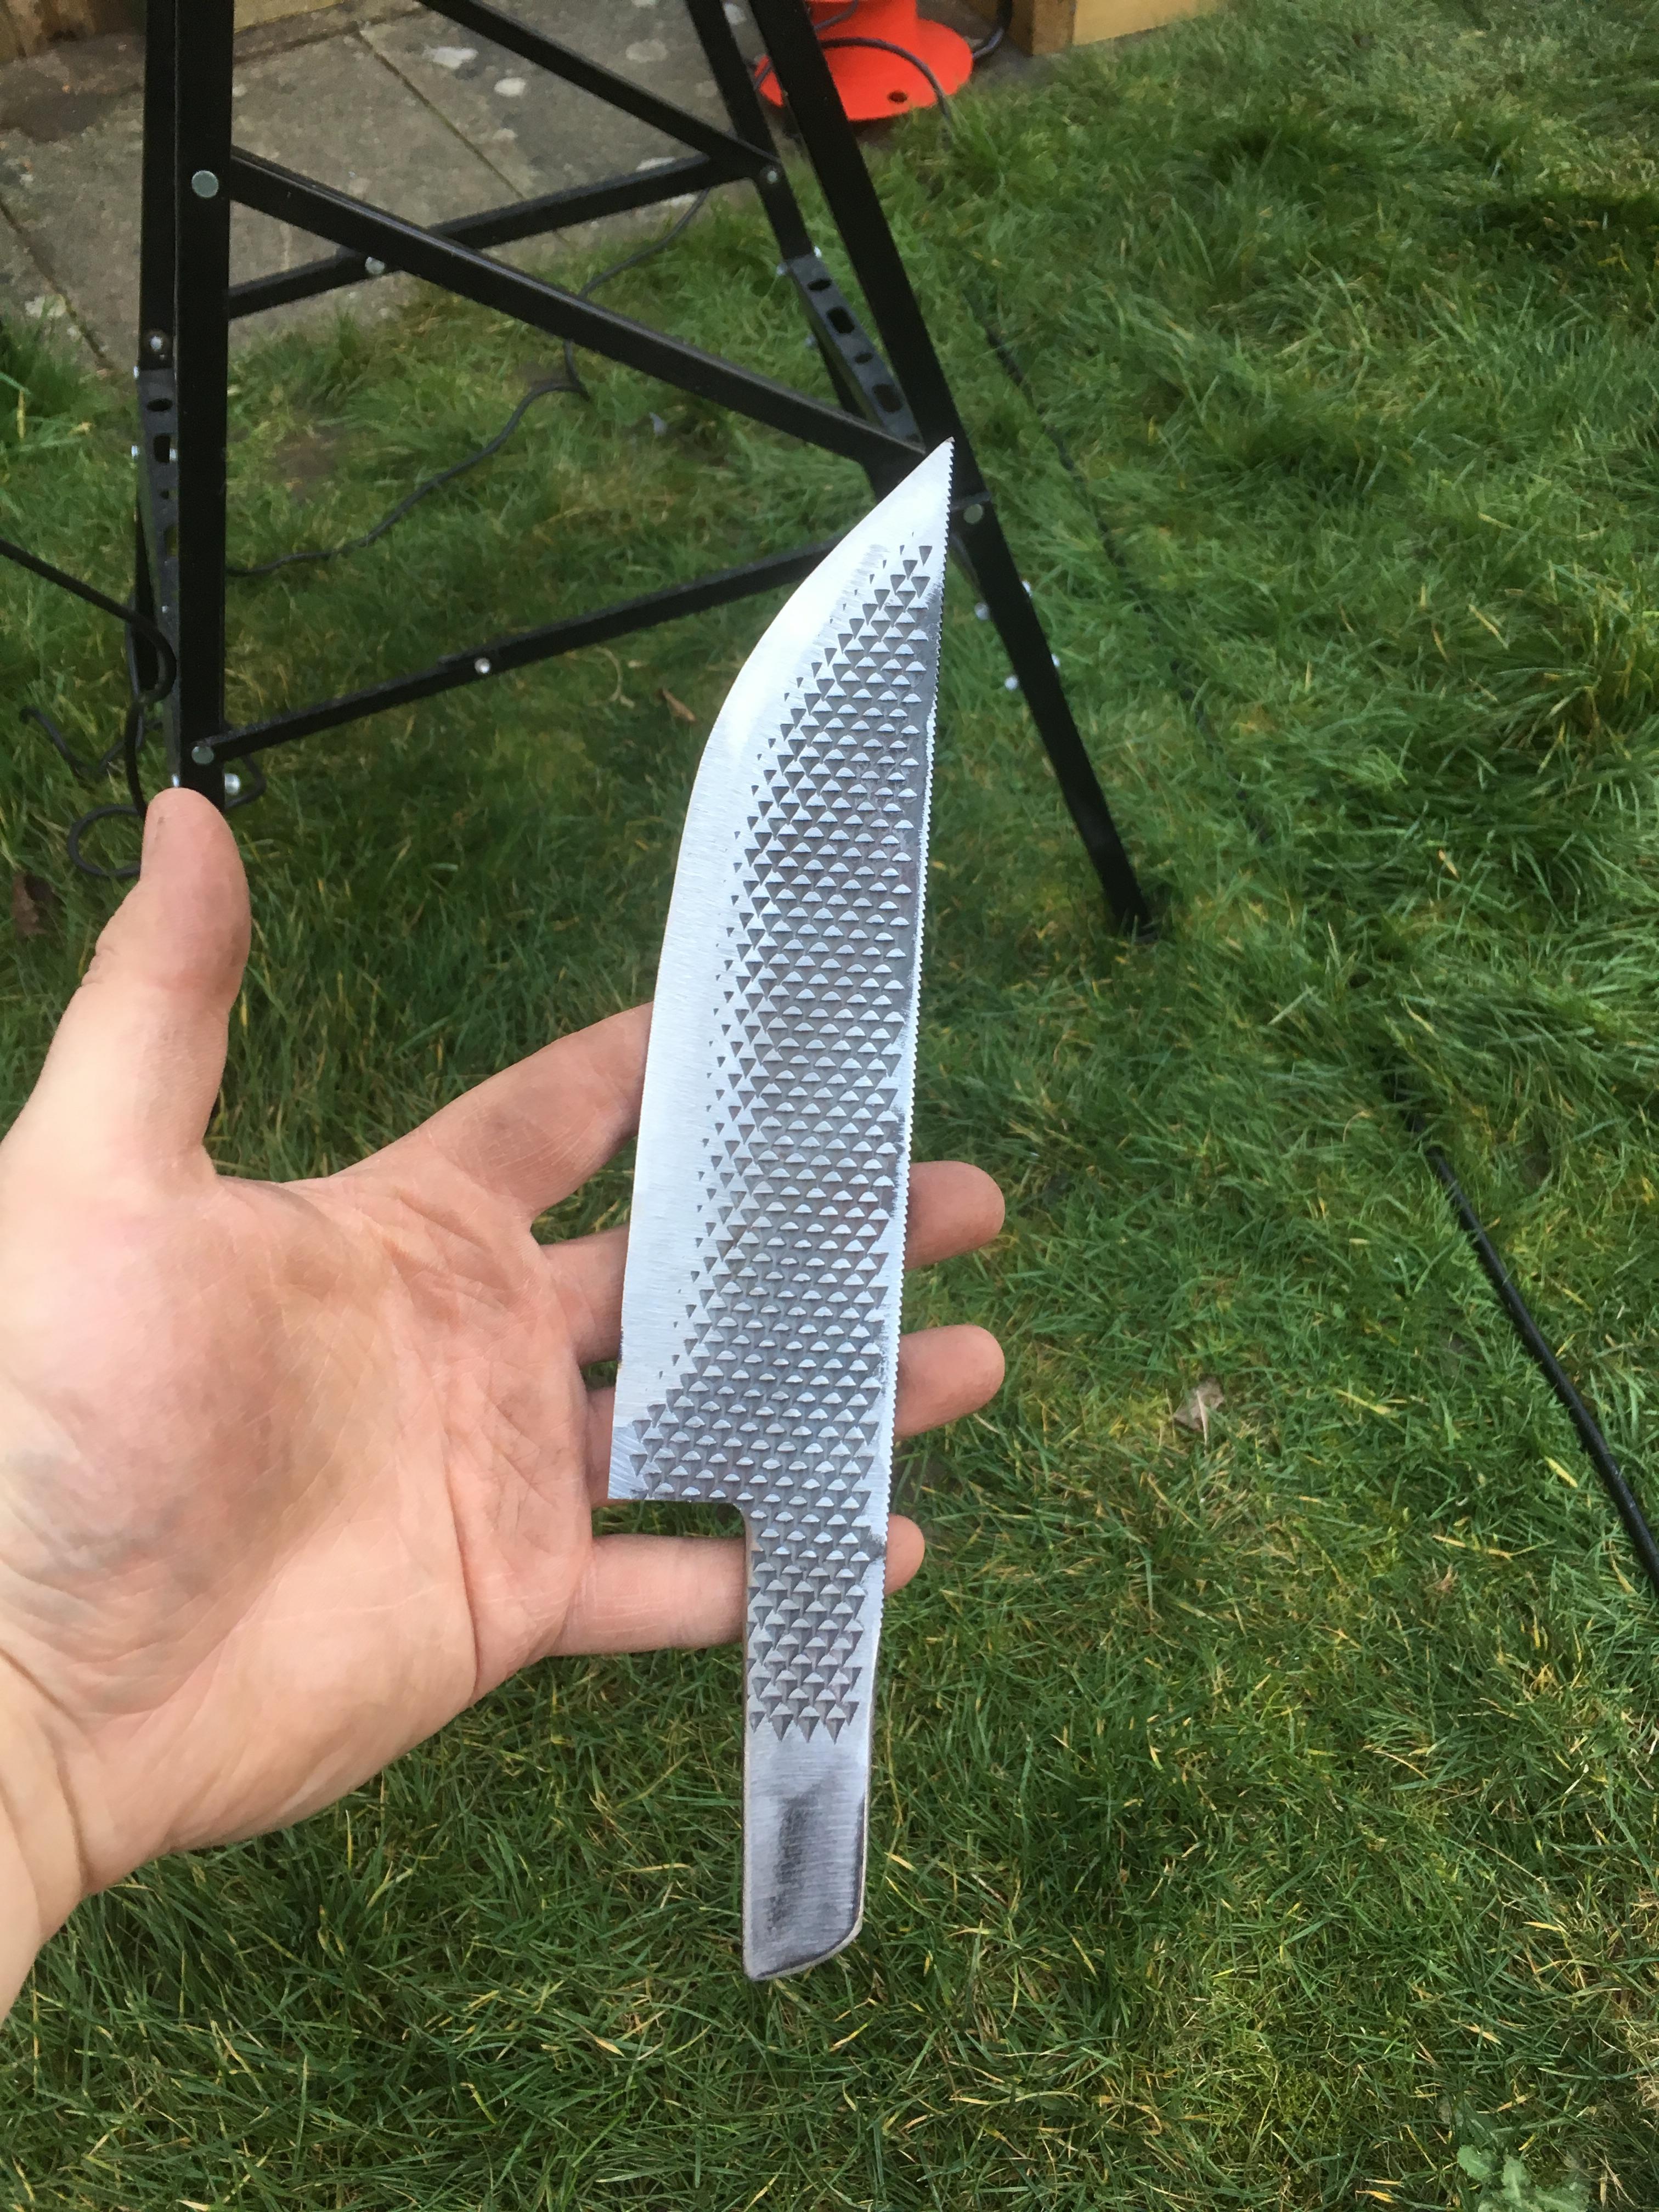
Hi all- little update on my progress.... I havent had much time for forging in the lead up to Christmas so I was glad to have this weekend free for some practice! My best friend saw a video online of someone upcycling an old spanner into a hatchet. He asked me to have a go with one he’d found lying around. I had a chap I work with remove the chrome plating with some kind of chemical process before I started, for safety. This particular spanner didn’t have that much meat for turning into an axe, so I decided to try and draw it into a kindve bearded axe shape to maximise the final cutting edge width. Really pleased with how it came out. Tried another simple heat treat on the mystery steel (three normalising cycles, quench, and oven at 190c for 1.5hrs before final sharpening.) Hardened nicely (tested with a file) and sharpened up nicely. Unfortunately immediately after sharpening I realised I forgot to polish the handle...... during polishing, I dropped the axe and my immediate reaction was to catch it in mid air. It bit nice and deep into the side of my hand in thanks, resulting in a bloodbath. Won’t make that mistake again! (..... Actually. I probably will.) While waiting for the axe heat treat I took the opportunity to anneal a farriers rasp I had lying around. I want to make a kitchen knife by stock removal as a house warmjng gift for a friend. This is my first go at a knife. Cut and grind went pretty well- I like the shape and got the taper and edge looking right. The tang probably wasnt ideal. In the end I was really pleased with the blade. I used a file to get the plunge line reasonably nice, and was ready fo try a heat treat. Unfortunately, I still don’t have any oil as a quenchant. I knew there was a likelihood that using water woukd crack the blade, but I decided to try it anyway....... I did a couple of normalising cycles, followed by a quench, and the blade warped. I reheated, gently straightened the blade in the vise, did one more normalising cycle, then tried a second quench. This time I felt a deep thud and... you guessed it.... the blade had cracked. Its still in one piece but utterly useless now. Nevermind. I’ll invest in some oil before next time, and I learned a lot from this first try anyway. In other news, my wife bought me a full day Blacksmithing tuition at the Much Hadham forge here in the UK. I cant wait! Hoping to get booked in asap.


-
First try at a bearded axe
Jon Kerr replied to Matthew Paul's topic in Axes, Hatchets, Hawks, Choppers, etc
Sorry to resurect an old thread- but I found this incredibly helpful. The progression photos for your method of making a bearded axe are fantastic, thanks! Can't wait to have the skill and tools to try this! -
What did you do in the shop today?
Jon Kerr replied to Mark Ling's topic in Blacksmithing, General Discussion
Hi JHCC- I have a series of newbie questions, sorry. I havent seen this technique mentioned before. When you describe using a pre-drilled hole for punching eyes... is this really "drifting", or are you still punching (and removing a plug)? If its still punching can you describe the benefit of the holes? Do you end up with a kind of polo-mint plug? Also- any tips for cutting that thickness of material with a 4-1/2" angle grinder? Do you use any water (or coolant) or just grind away? Have you annealed the steel first? Same with drilling the holes- I've never even tried as I don't have a pillar drill. With a carbide drill bit and a handheld drill (mains powered) can it be done? -
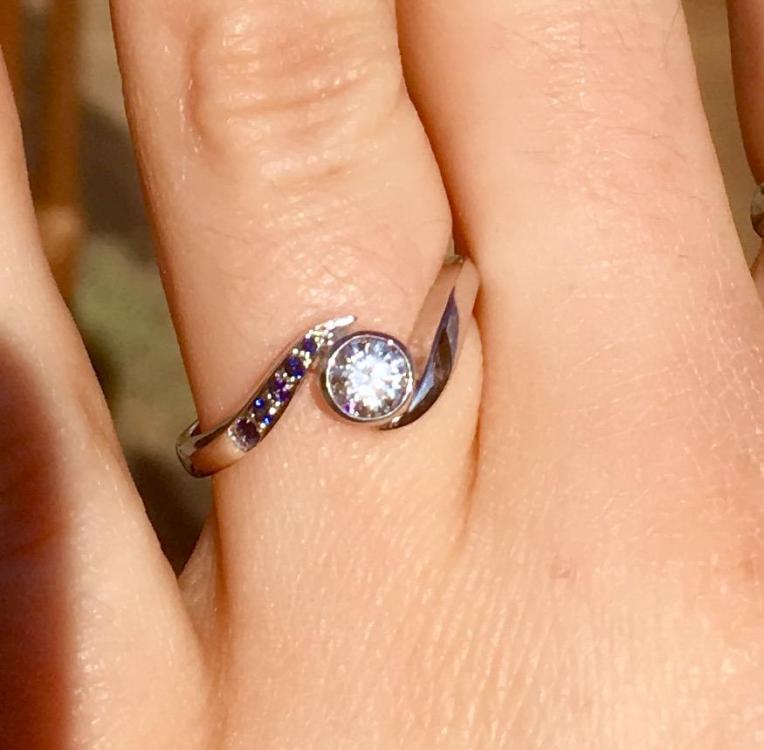
My advice, for what its worth. I just got married in August. I went through a similar thought process with wanting to make my own engagement ring. I knew "my girl" would love the sentimentality of it. The fact is, though, its not worth the risk and whatever you do will never look as good as one done by a "proper jeweler". If you fork out for an expensive stone, set it badly and it falls out, good luck getting the insurance company to pay out! Additionally- engagement rings are often complex in design, delicate, etc- which requires lots of skill and experience to make. In the end, I found a perfect middle ground for myself. I found a local semi-professional jeweller. She doesnt work as a jeweller full time, but is fully trained with a portfolio of work as evidence. She even had contacts in Hatton Garden in London to get a top-quality, decent price stone. I'm sure you could find someone similar locally if you dig around facebook/google, and ask people you know locally if they know any jewellers. She made an engagement ring exactly to my design. I drew up all the sketches and took her advice on settings etc. The ring turned out great, and when I asked my (now-wife) to marry me she was thrilled, and loved telling all her friends I had designed the ring. Later, we forged our own wedding rings together from stainless steel (though, a word of warning; this has then resulted in a headache with the threat of the steel band wearing on the white gold engagement ring. We're having a sacrifical ring made to sit between.) By contrast, wedding rings are EASY to forge with almost zero skill. You just punch a hole, drift to your ring size, and the rest is grinding and polishing till you're happy. Like I said, for me this was the best of both worlds- a beautiful engagement ring I DESIGNED, and a couple of simple wedding bands we MADE.

-
I do thoroughly enjoy our "car boot sales" here in the UK, which I think are pretty much the same as your flea markets? Unfortunately they're coming to the end of the season as winter draws in as they're generally held in fields which will be wet and muddy for a few months. My current list of things to look out for: -Hammers (no more than 50p each, especially if handle is old and broken) as it seems like there are loads of good projects to make things from old hammer heads. -Large masonry chisels and steel pegs to turn into punches and drifts. -Long handled pliers and horse hoof nippers to turn into tongs. -Files and farriers rasps for making knives. If anyone has any other good tips of things to salvage I'd love to hear them!
-
Helium tank slack tub and quench tank
Jon Kerr replied to JHCC's topic in Heat Treating, general discussion
Awesome, thanks very much. -
Helium tank slack tub and quench tank
Jon Kerr replied to JHCC's topic in Heat Treating, general discussion
Hi John, How did this go in the end? Any final photos? Any tips for safely cutting open the bottle? I might copy this but don't want any explosive decompression..... -
Some, but I guessed not enough to quench a 2lb axe head. On that subject- is there a general guide on litres of oil to mass of steel for quenchant? I did some googling and read some calcs, and it seemed like the answer was 20litres was a safe amount for quenching steel up to 2-3lbs (hammers and large knives/swords). Also- any tips on a cheap/free sealable quench tank? I've read about ammo boxes but we don't have those in the UK. I'm struggling to think of what kind of cheap metal container I might be able to find/use. I'd like something with suitable dimensions for both axes and knives, really, to "future proof" it.
-
... it is a good point, and I agree wholeheartedly. If anyone were to ask me for a #1 tip for a new blacksmith, it would be that! Unfortunately they're just so expensive in the UK... I need to learn to make my own ASAP.
-
Thanks Thomas, I knew the cold shut was happening but struggled to do anything about it and made the decision to carry on regardless and grind it out later. What I underestimated is how deep it would go. I started off badly and should have hammered the edges down first to prevent the cold shut occuring. My big problem was struggling to hold the piece initally with my crappy tongs (I became better at this later on) which caused my hammer control to be terrible early on. My next plan, eventually, will be to grind off the edge completely, ensure the cold shut is gone, split the face into a "V" and forge weld in a high-carbon tip..... but this requires some forge welding experience and practice and I'm nowhere near there yet. As far as the heat treat... I'm almost scared to post as I'm sure I did this wrong: - I thermo cycled it 3 times- up to glowing orange and left to cool naturally in air to non-visible heat. - Then I heated again to orange and quenched (in water). I didnt check the magnetism at any stage. I didn't have oil available. - I then tempered in the kitchen oven at 250C for 1.5hrs. I could see straw colour in the body of the axe, and perhaps blue in the edge. I believe this may be wrong also? - I then ground my edge. I wonder I did too much grinding at this stage and the heat from grinding would mess up any heat treat. How far do you grind before heat treat?
-
Hi Patrick! Where abouts in Essex are you based? I'm from Benfleet, SS7, so if you every fancy meeting up to swing a hammer and have a beer please let me know! Keen to meet more local blacksmiths as I'm very new to all of this. The advice in your post make for interesting reading so thanks for that!
-
What did you do in the shop today?
Jon Kerr replied to Mark Ling's topic in Blacksmithing, General Discussion
Love the jewellery stand Das, and the jewellery itself! Inspiring as always. I'll have to have a go at making some leaf jewellery for my family. Thanks! -
I'm sorry for all the stupid questions. The learning curve is incredibly steep without anyone experienced to forge with early on..... I need to find the cash for a class ASAP. I've been wondering about oxidation and fire regions. Obviously I have little to zero experience of these things and nobody to look over my shoulder and say "you're burning your steel". Does the axe look over-oxidized to anyone? I don't know how I would tell. I'm still concerned about my fire management, really. It's possible my JABOD set-up isn't exactly perfect in terms of size and depth of the firebowl. I was previously struggling to get things hot, especially if I stick to the "keep the stock horizontal" rule. Im finding it difficult to maintain the fire to stay hot enough at "ground level" (by which I mean, my JABOD dirt surface level, ie/ the top of the fire bowl) to get steel for forging temperature. With the axe, I allowed the axe to be buried a little lower than the ground level and had much fewer problems getting it hot. That also allowed me to use far less charcoal and forge for longer without adding more charcoal. I'm now concerned I might have been letting the fire die down too far (not enough charcoal to raise a mound), and shoving the axe right into the oxidising region of the fire. Is there any way to tell what by eye where each of the fire regions are? Another thing I noticed is a green hue to the flames at some point. This could be from staring at the fire too long, or it could be because it was getting dark and I've never forged in the dark before. Whats this? Steel burning? Firebrick burning? Normal?