
Jon Kerr
-
Posts
293 -
Joined
-
Last visited
Content Type
Profiles
Forums
Articles
Gallery
Downloads
Events
Everything posted by Jon Kerr
-

What did you do in the shop today?
Jon Kerr replied to Mark Ling's topic in Blacksmithing, General Discussion
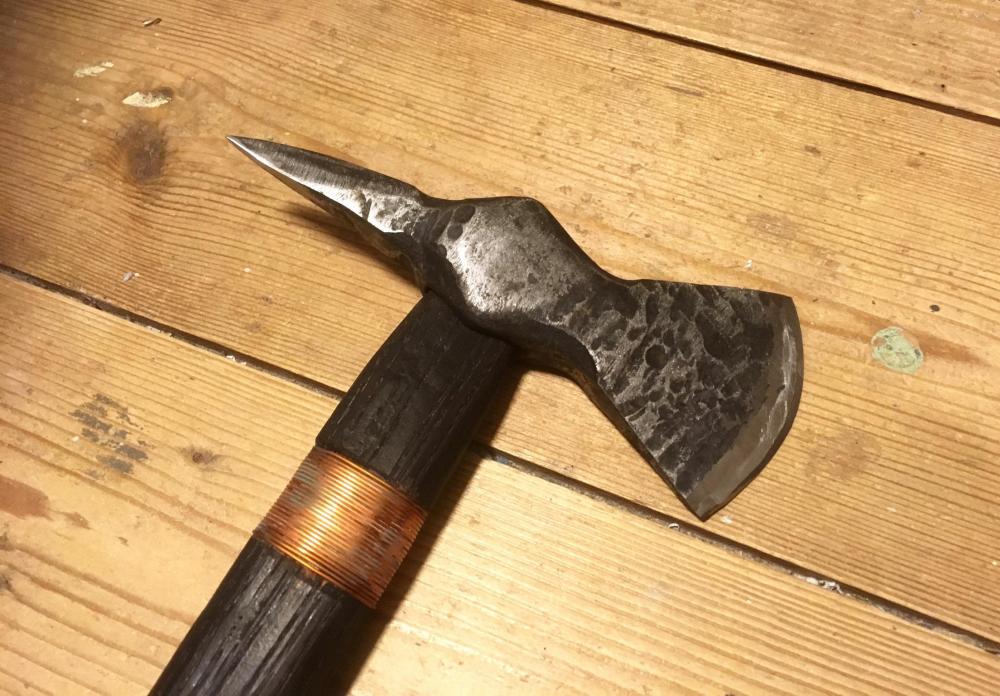
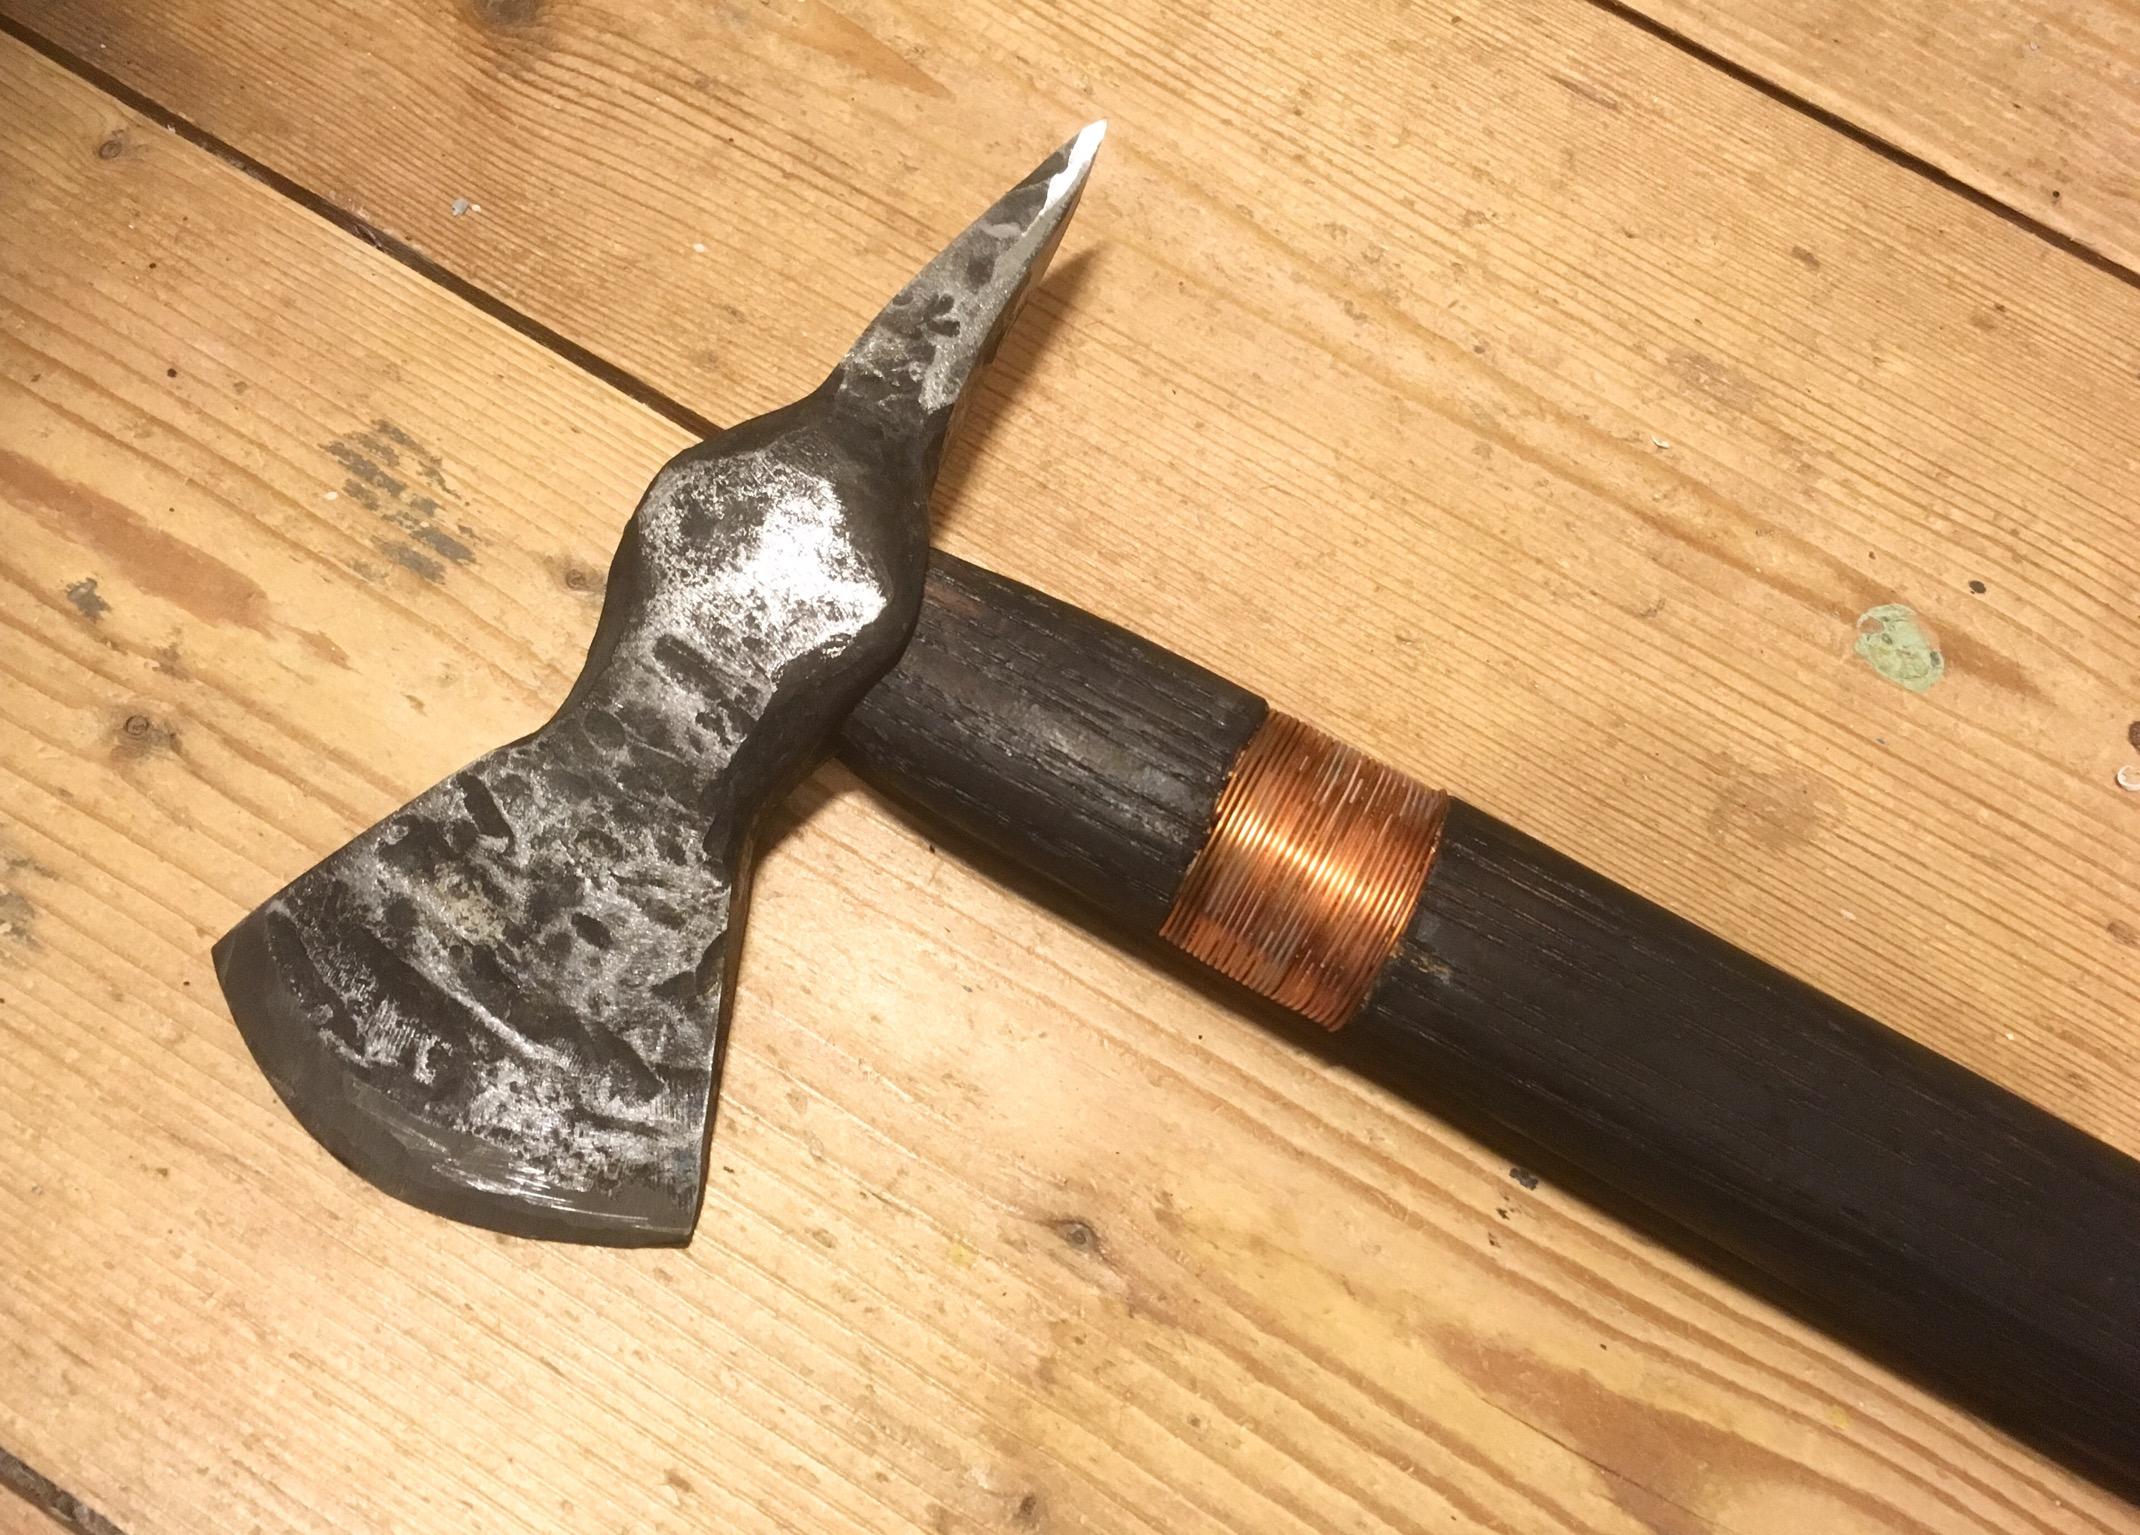
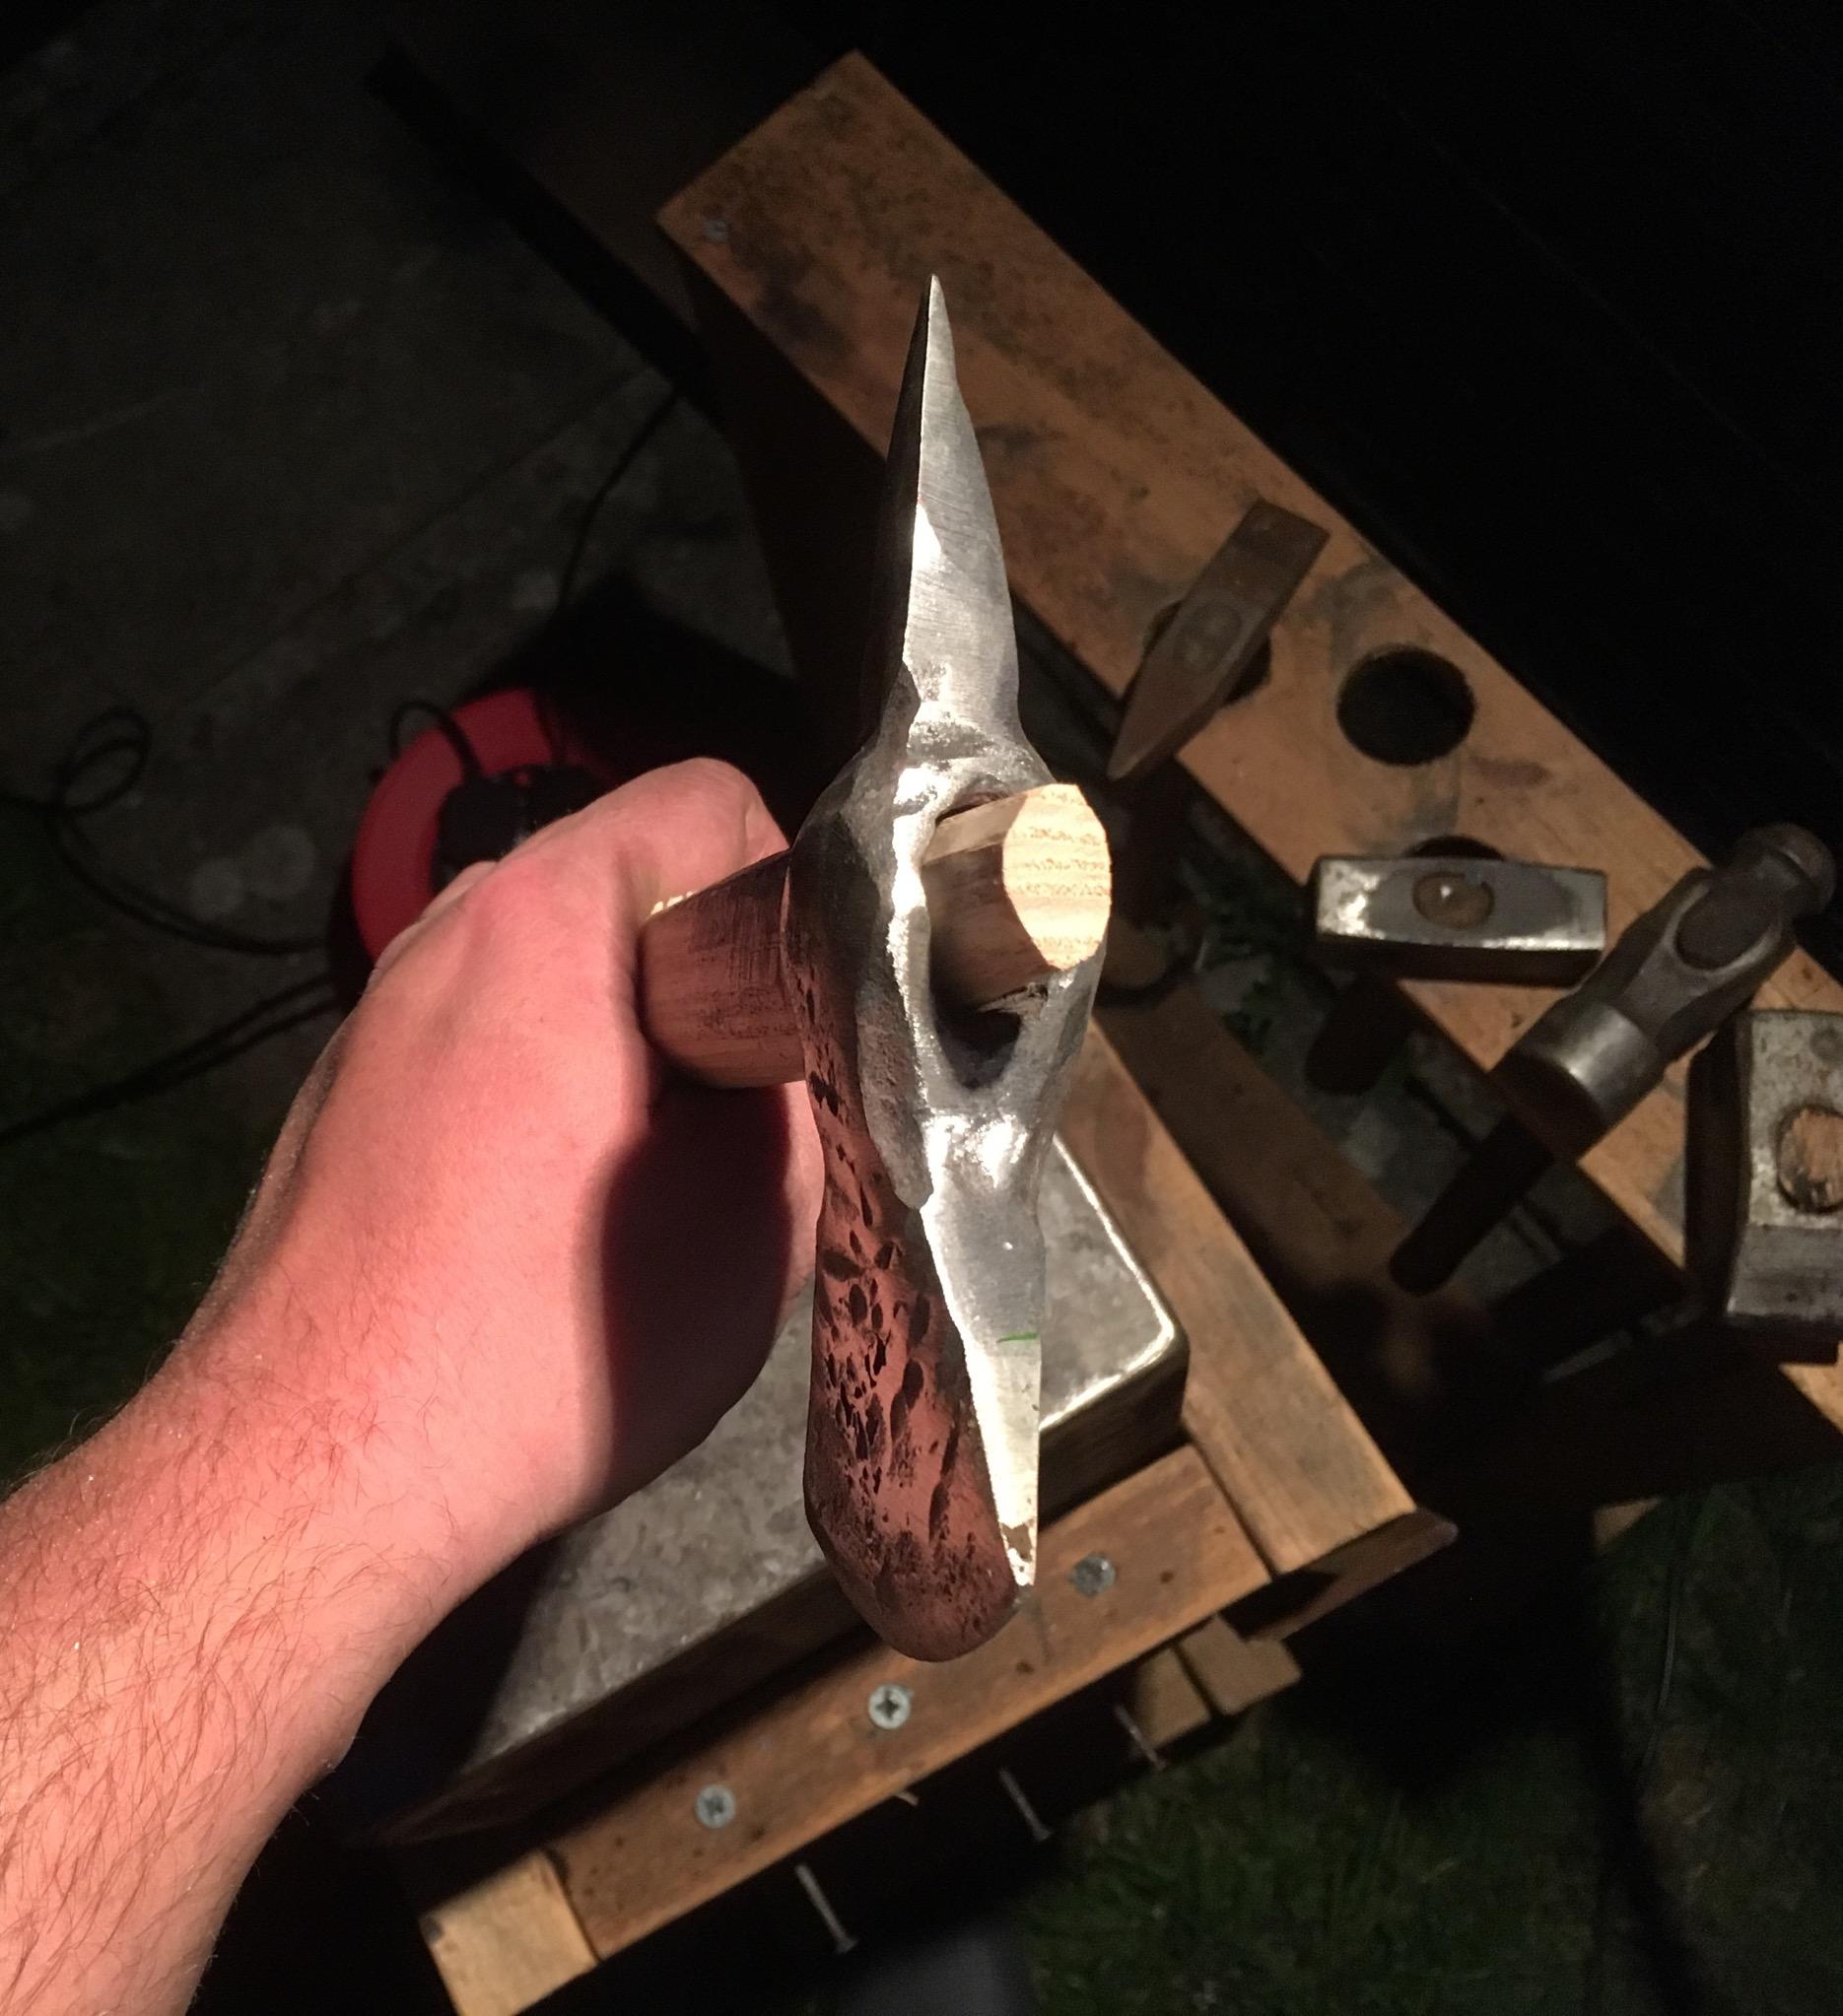
I finished my axe tonight. Not good by any real blacksmith’s standards but I’m really happy with it as one of my first handful of projects. Details in my project thread so I wont repeat here.
-
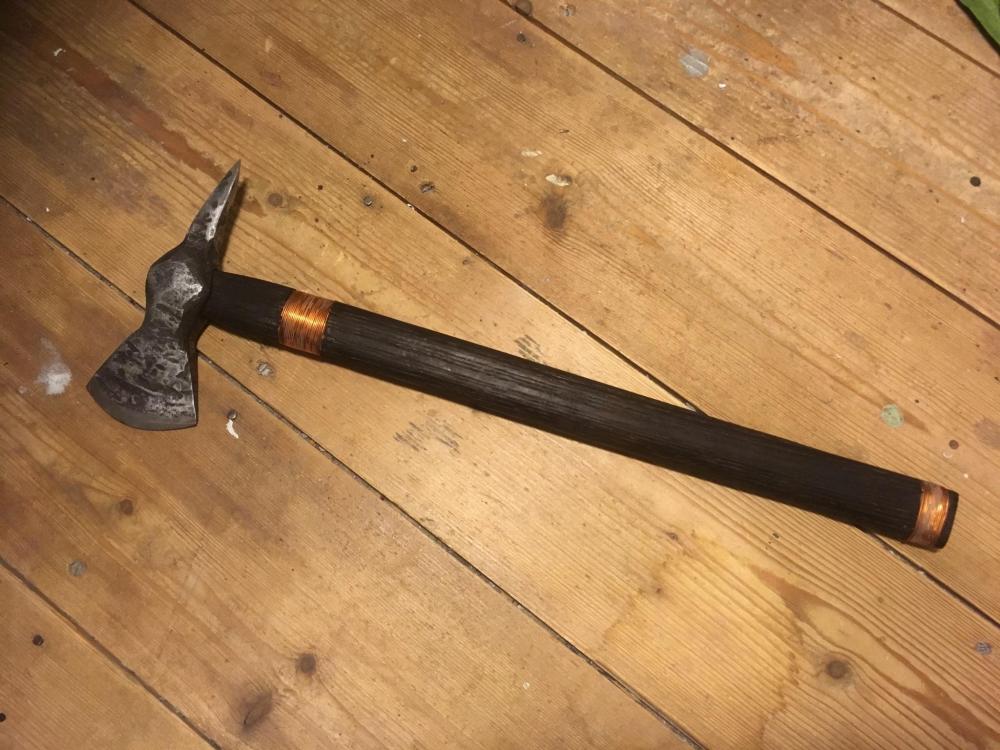
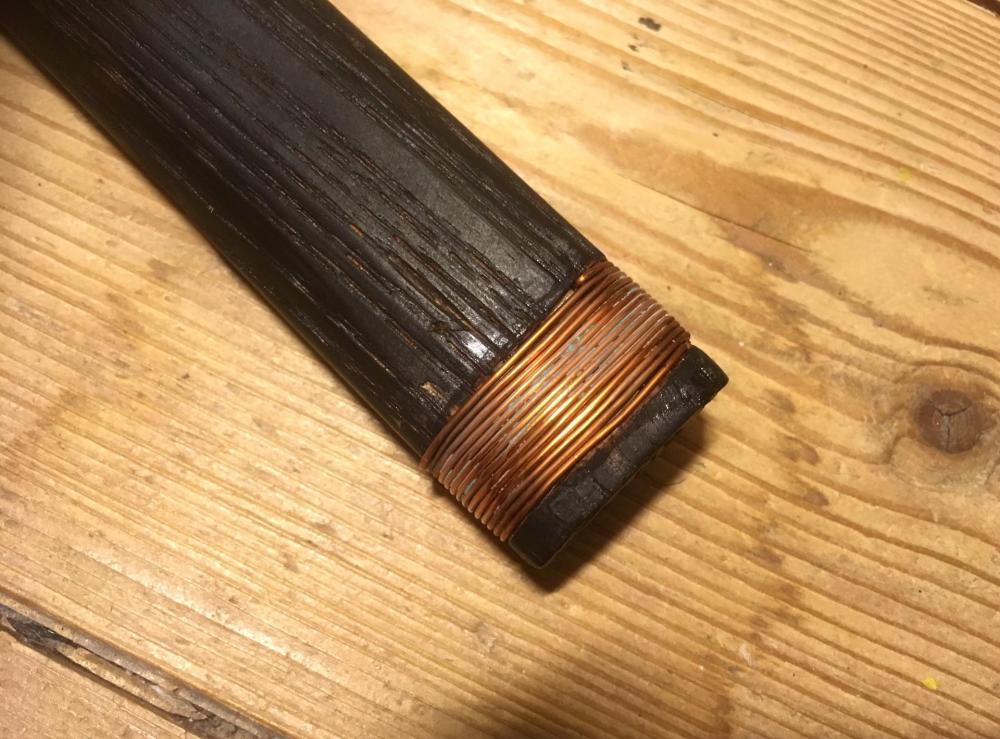
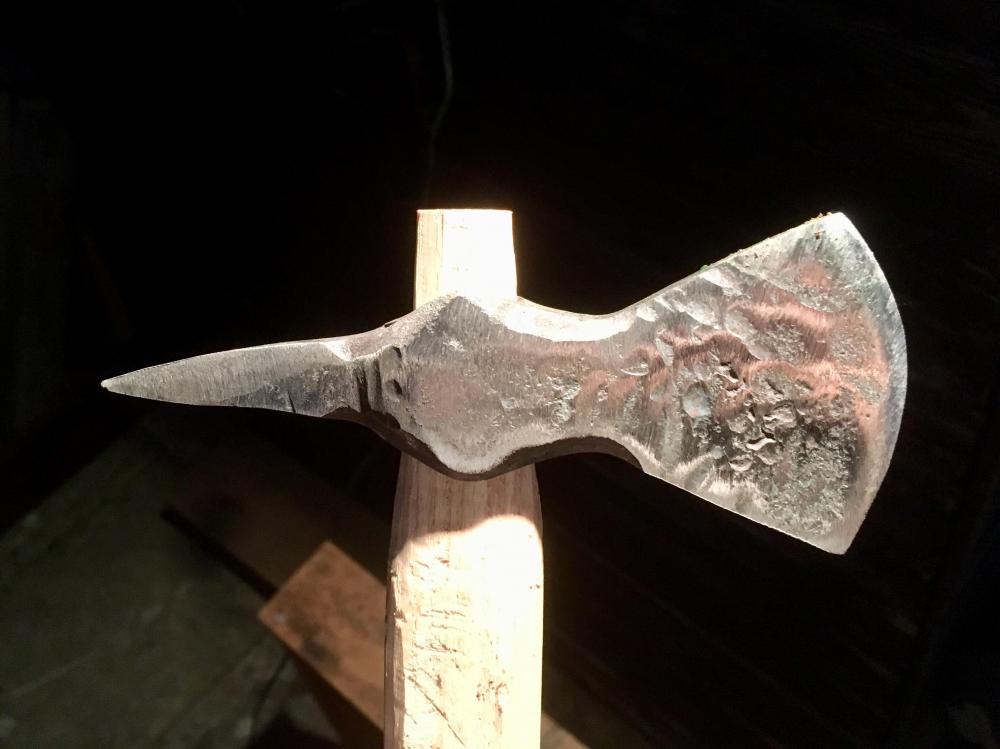
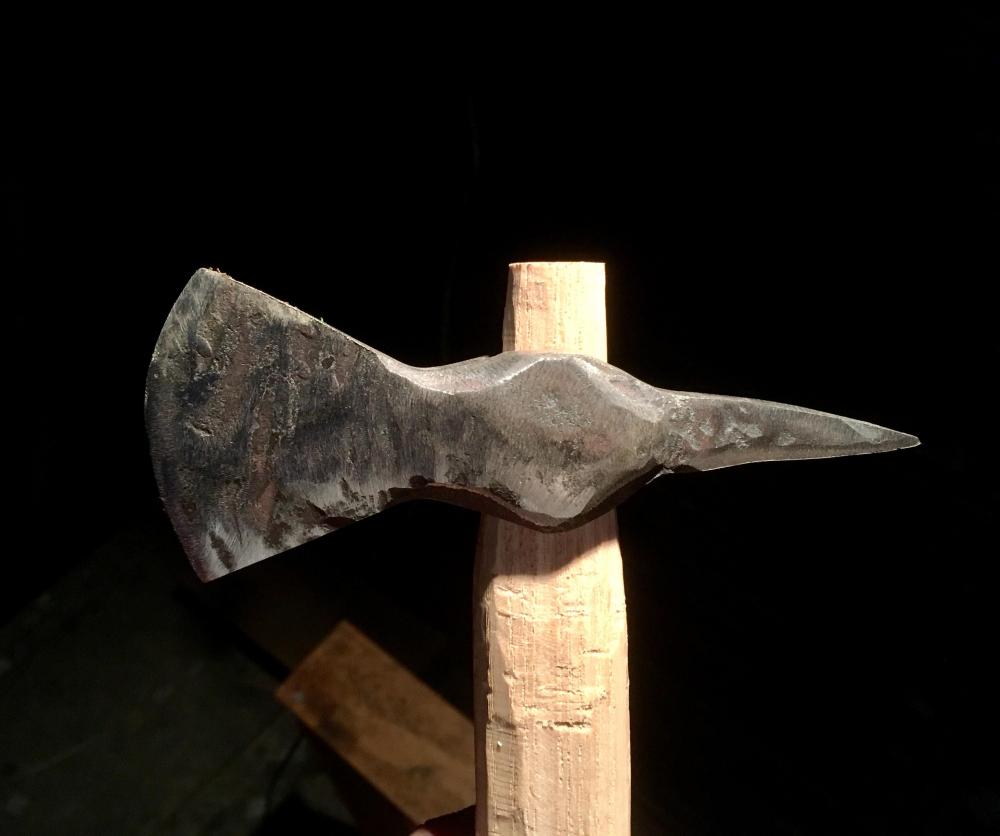
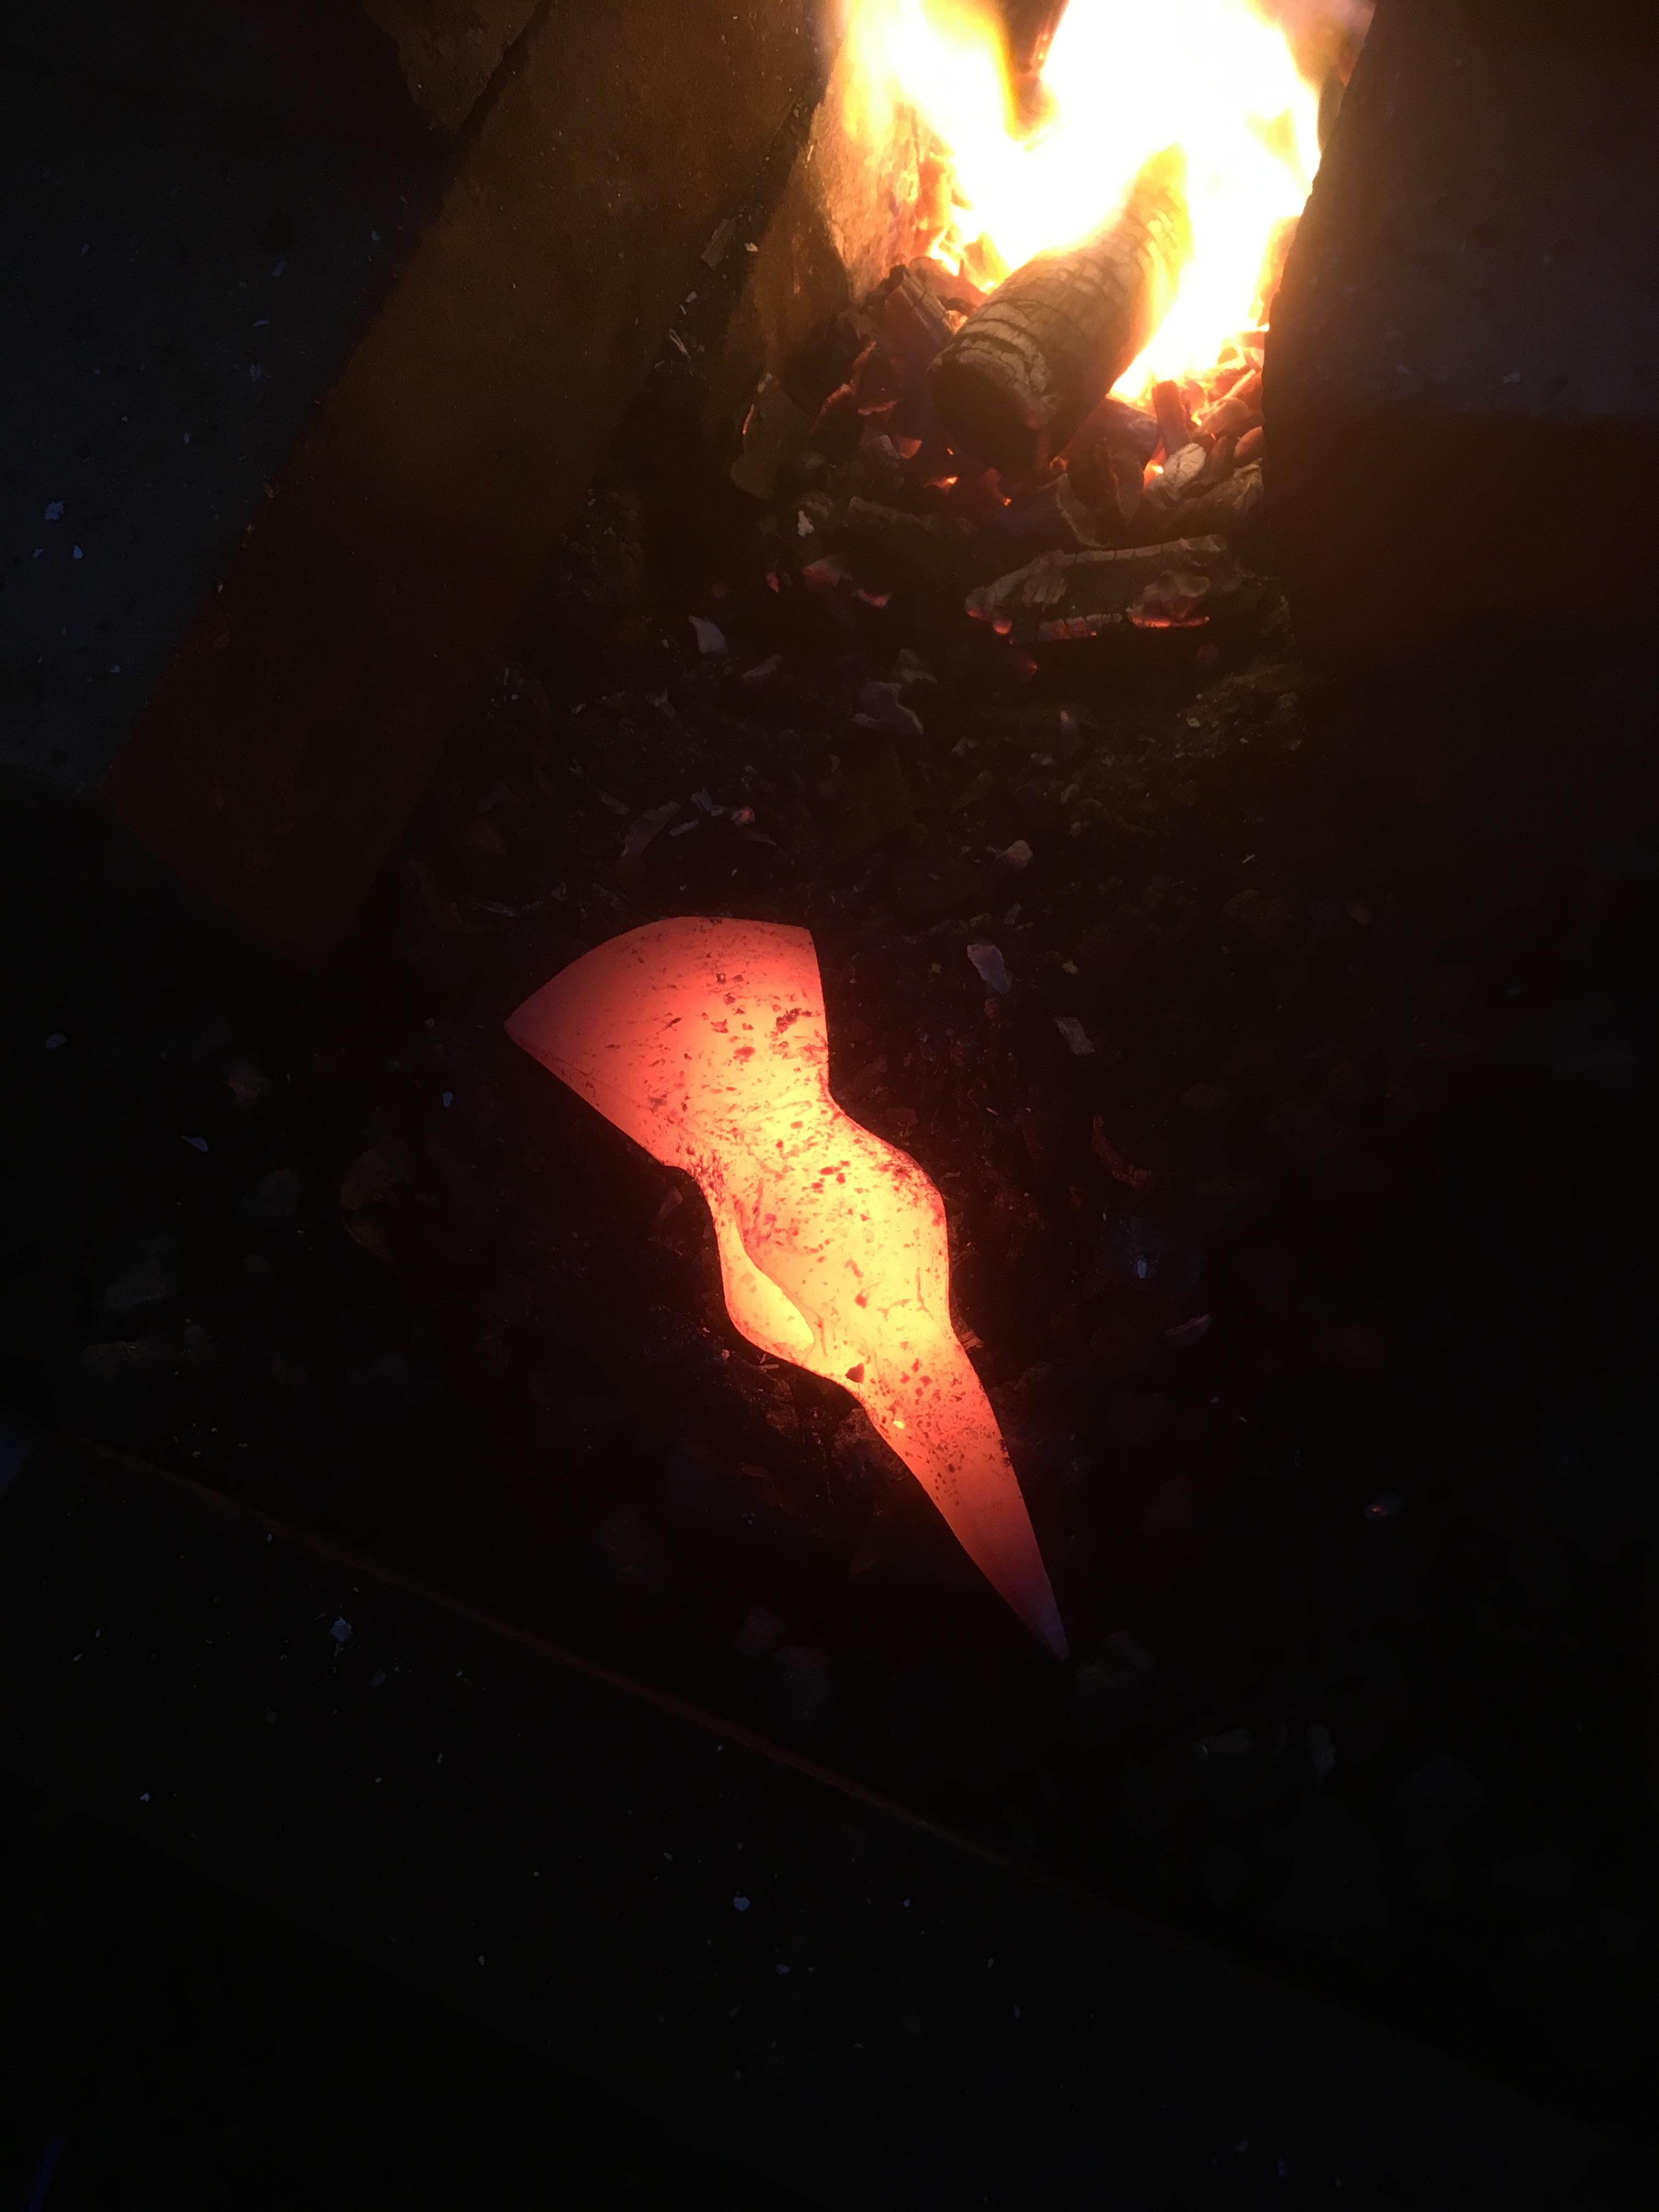
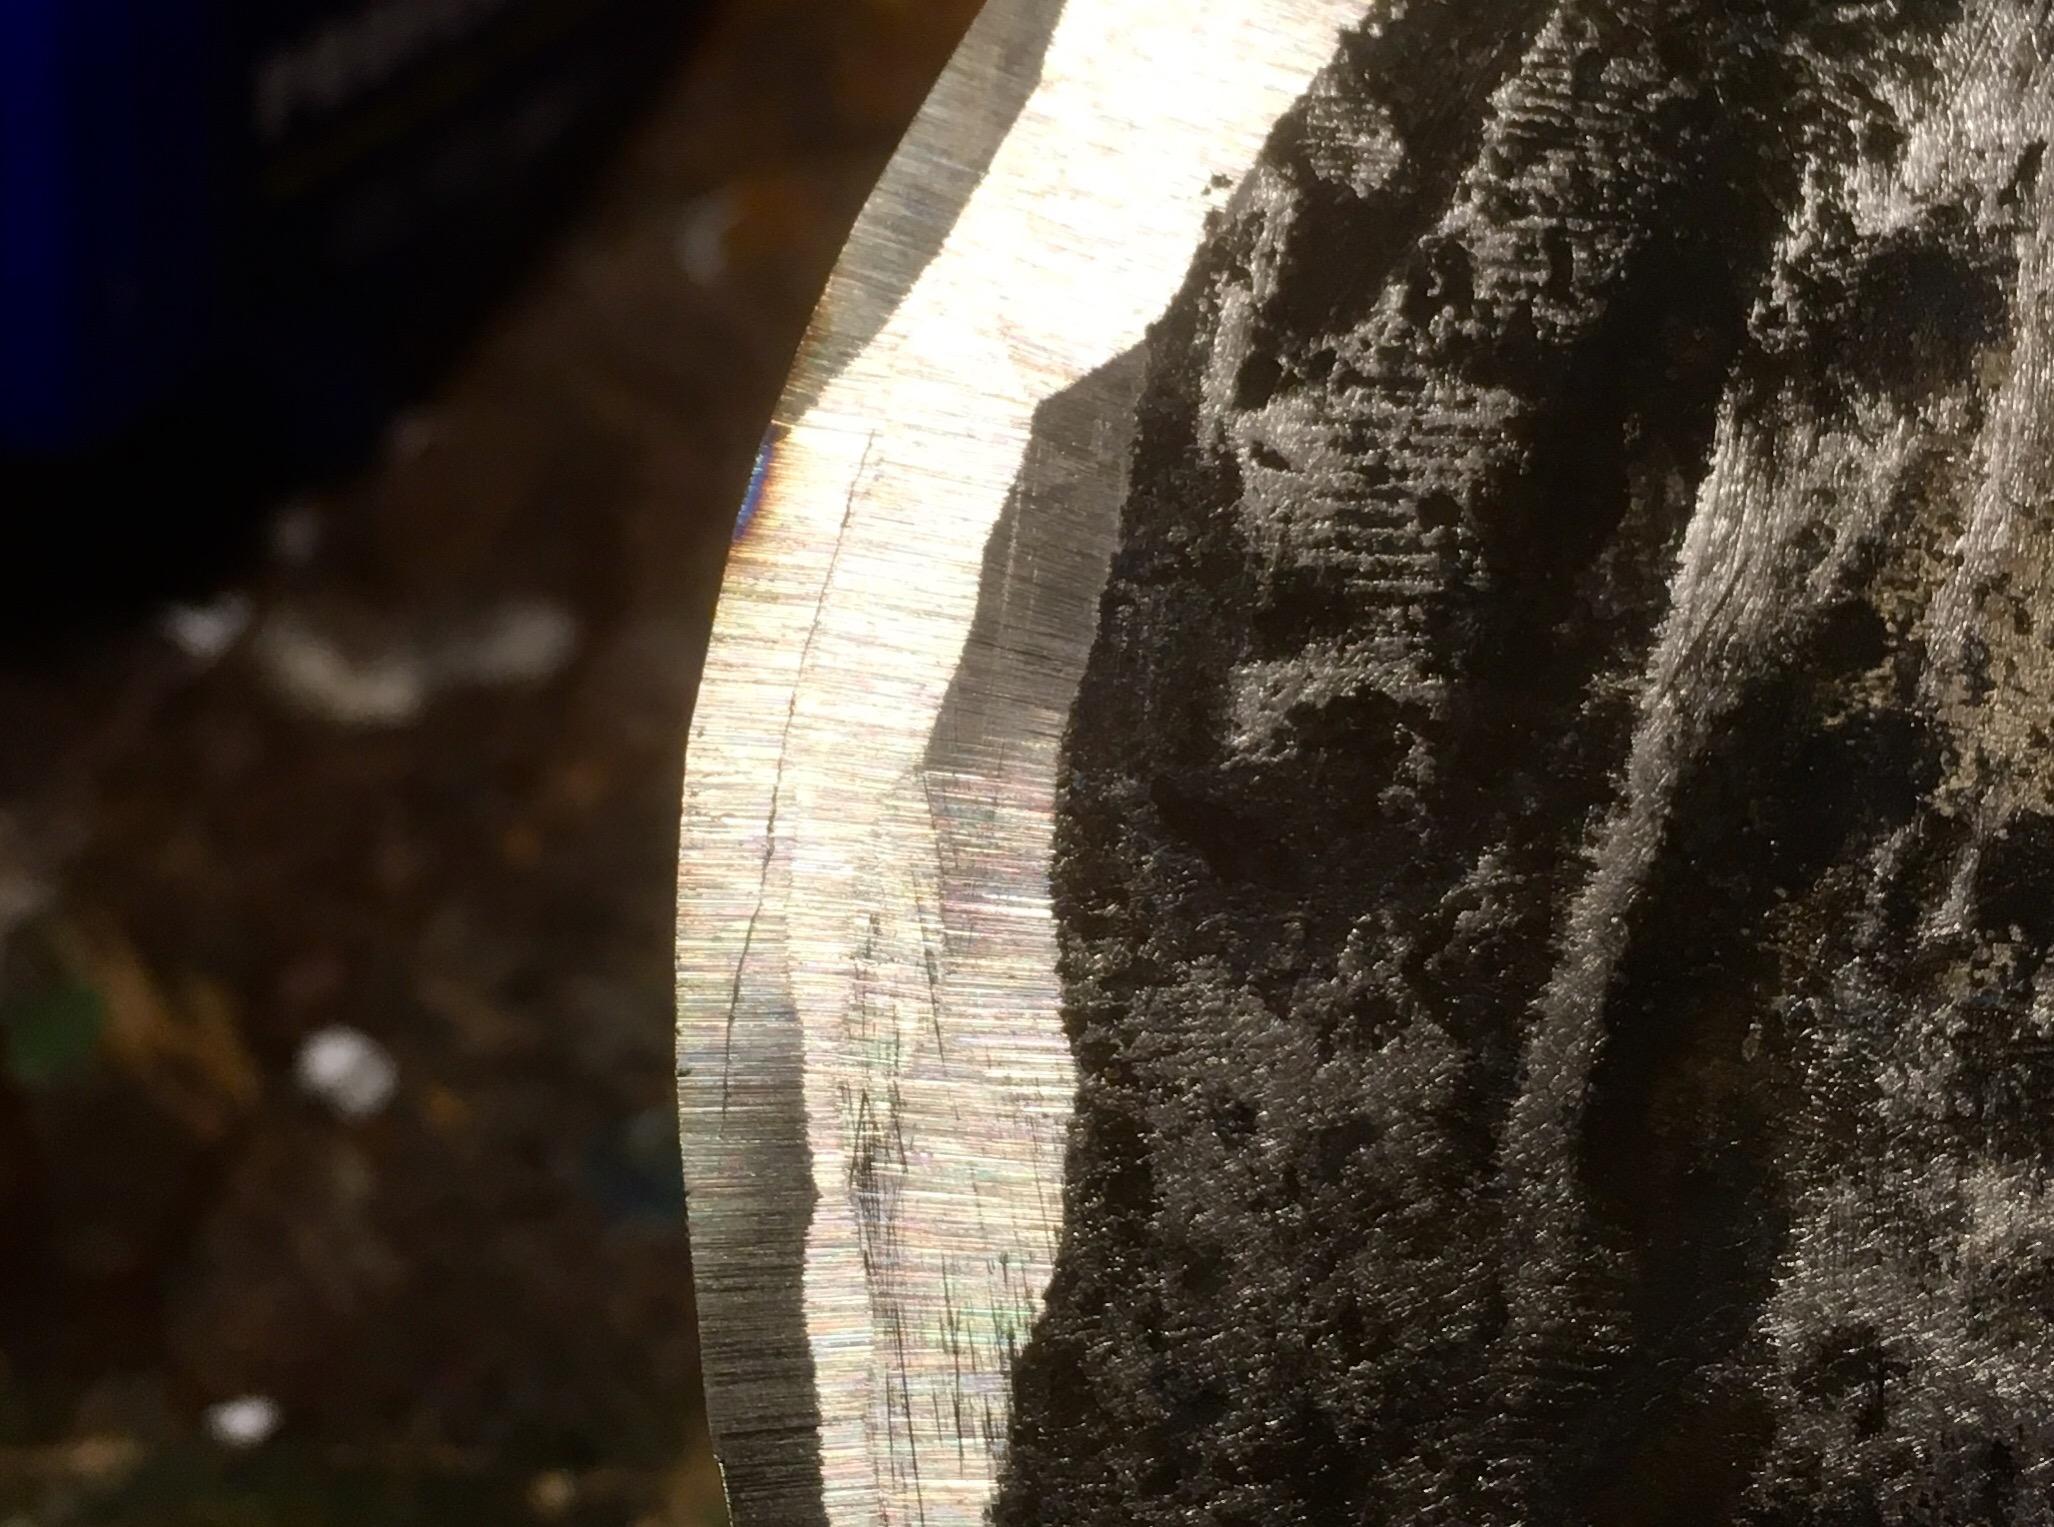
I finished my axe! Rubbish by most standards but I’m really proud of it. I decided to have a go at charring the handle. I also carved out some recesses for some decorative wrappped copper in a couple of places, just for aesthetics. (For anyone interested in the copper wire process. I drilled a small hole to poke the wire into to start, wound really tight, and drilled another small hole and cut the end just right to poke in to the end hole. Dab of superglue to secure. Held the wire really tight and worked great. No idea if this is a common method but it worked for me, and meant zero wire overlap.) This was my first try at heat treating. Its still not very hard in the end (tested with a file) so perhaps the steel is just shoddy. Unfortunately, during the final grind I discovered a hairline crack. I’m not sure what the cause is- I did introduce a cold shut during forging but I was sure I had ground it all out before finishing forging. Perhaps not. Or perhaps caused by quenching in water rather than oil.... Any comments and criticisms welcome.


-
What did you do in the shop today?
Jon Kerr replied to Mark Ling's topic in Blacksmithing, General Discussion
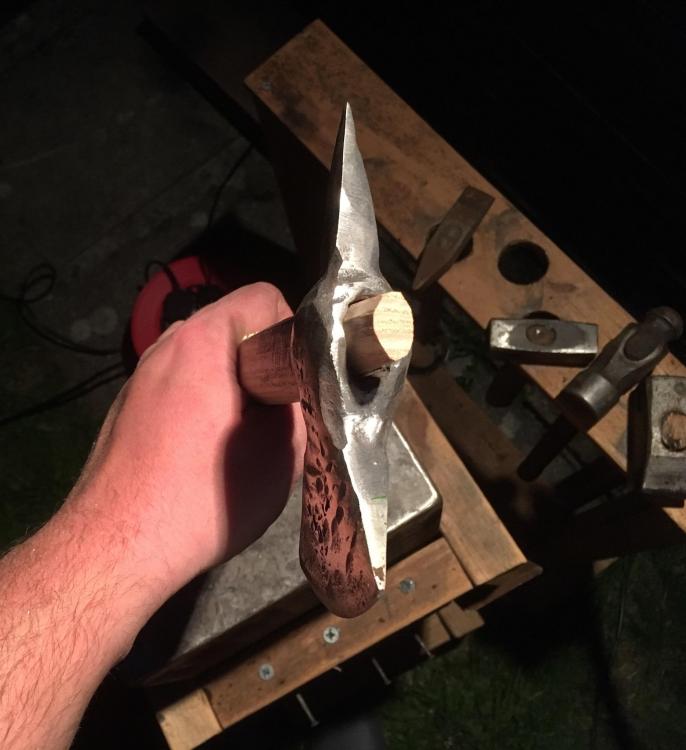
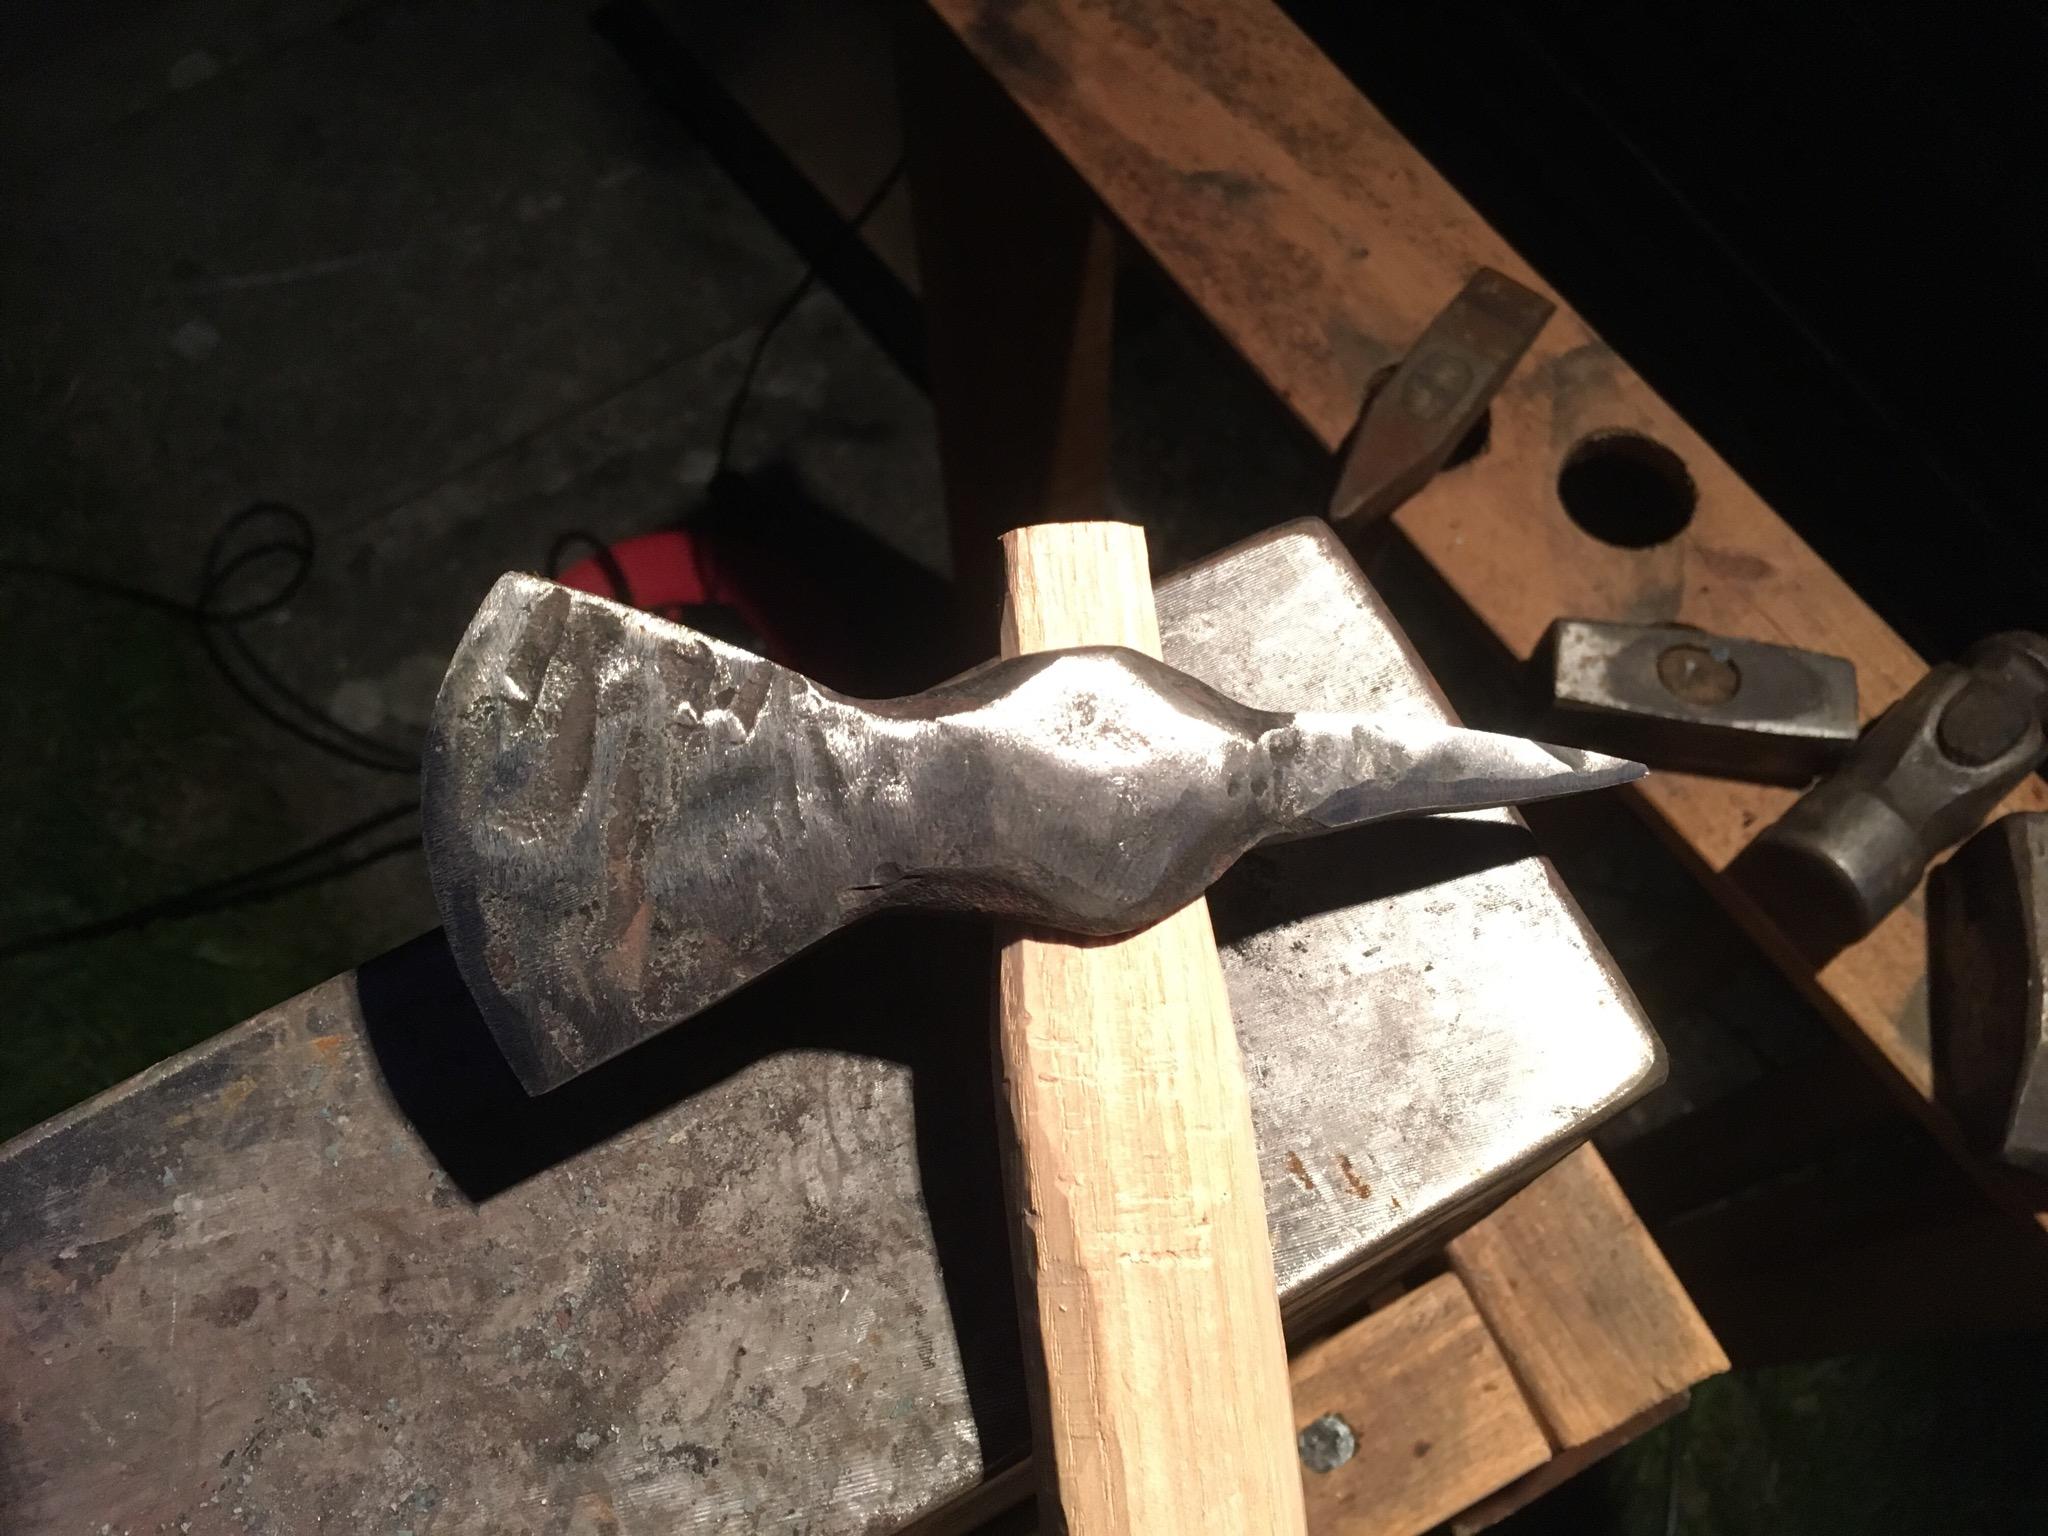
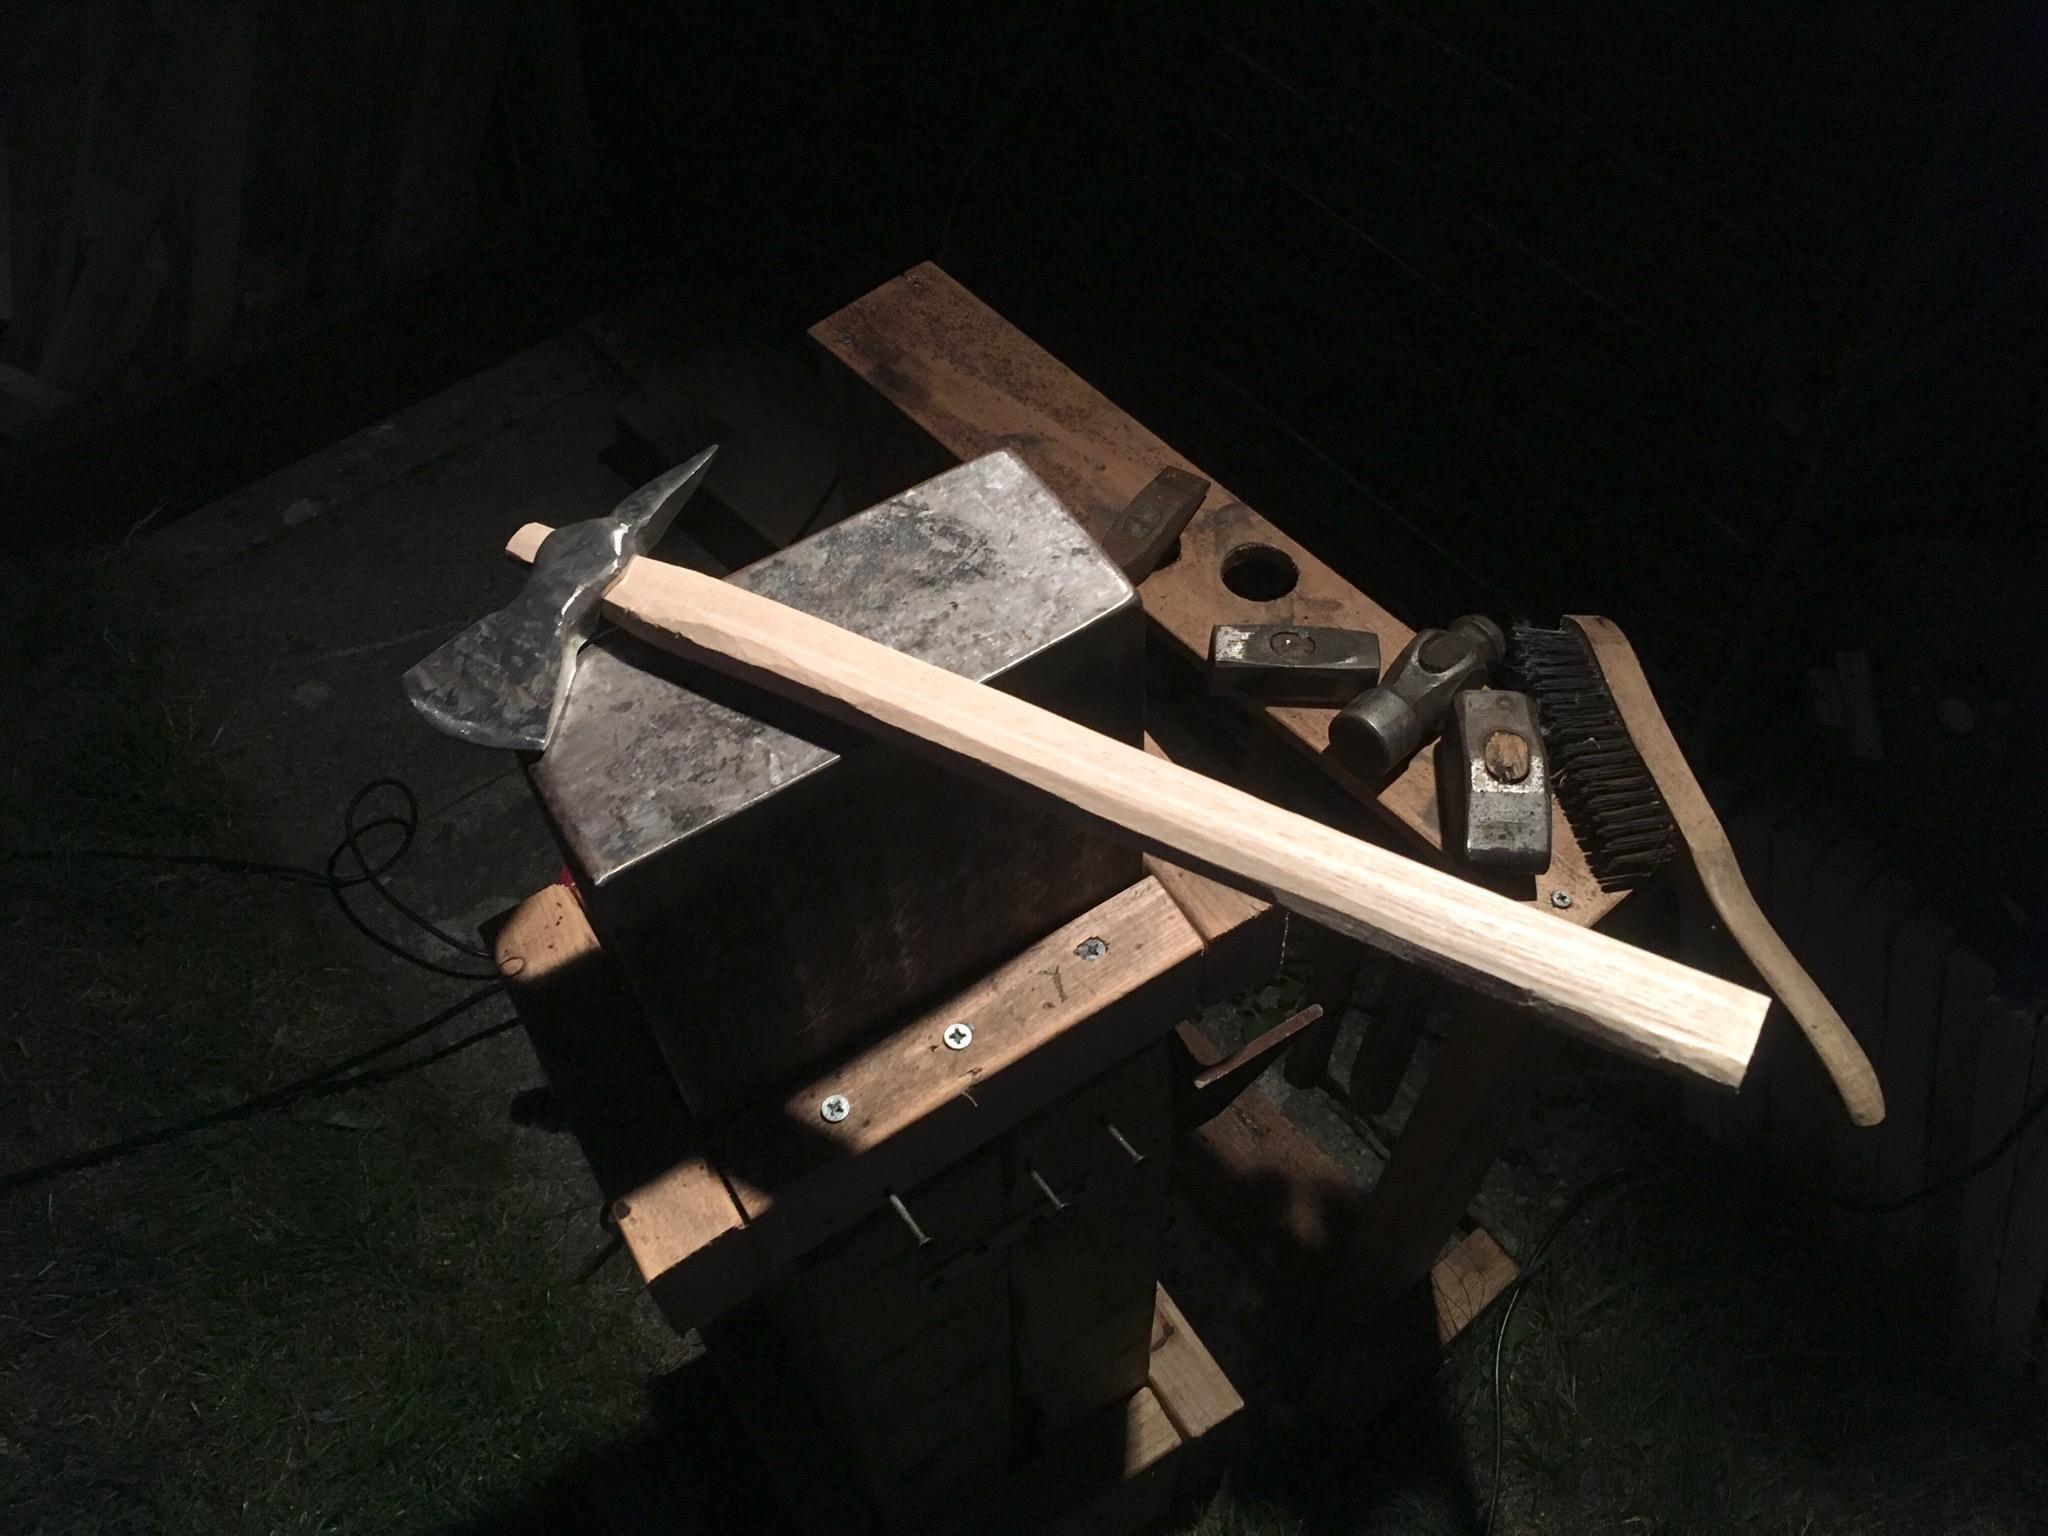
I had a go at turning a small ball pein hammer into an axe. Really pleased with the outcome (my first axe!). Also wired up my blower with a foot pedal, which was super handy and conserved a lot of charcoal.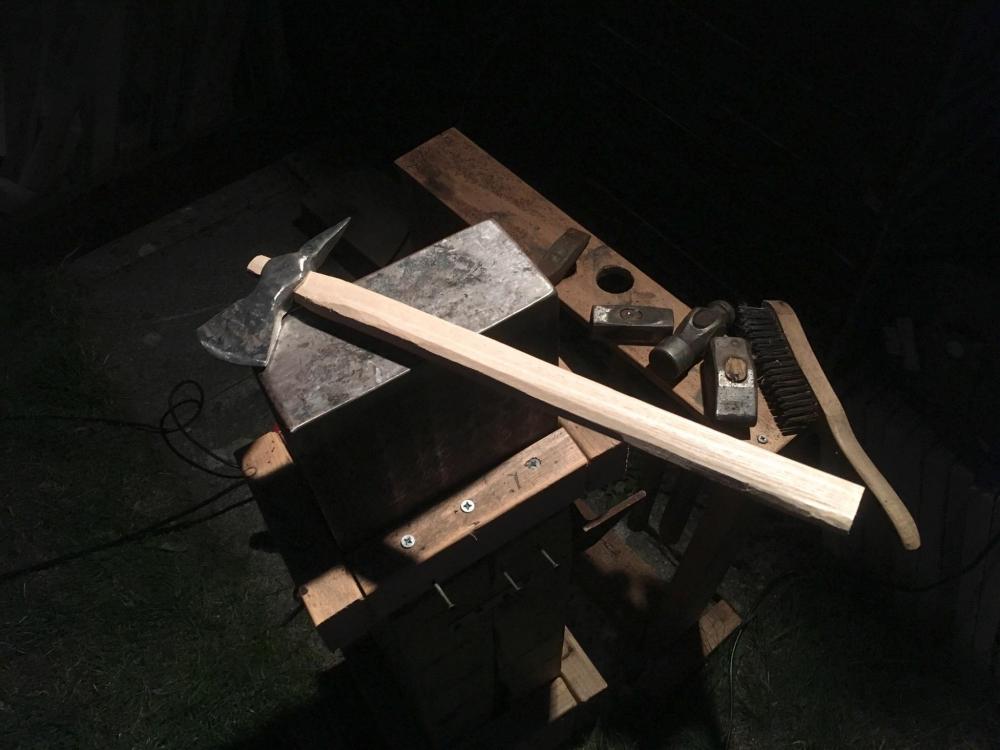


-
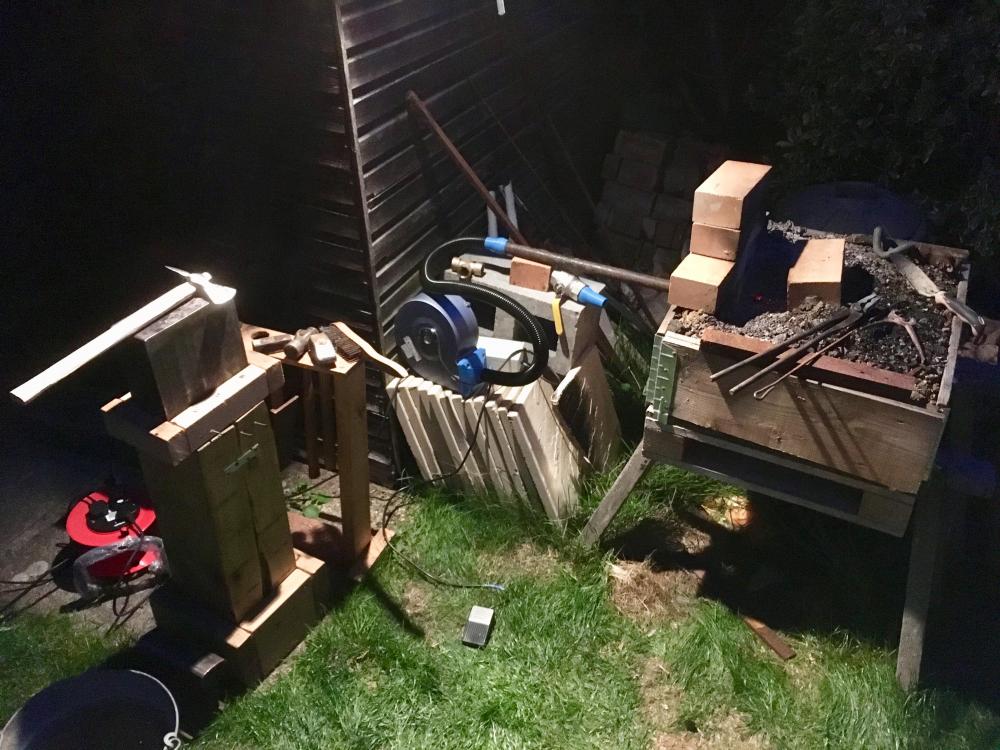
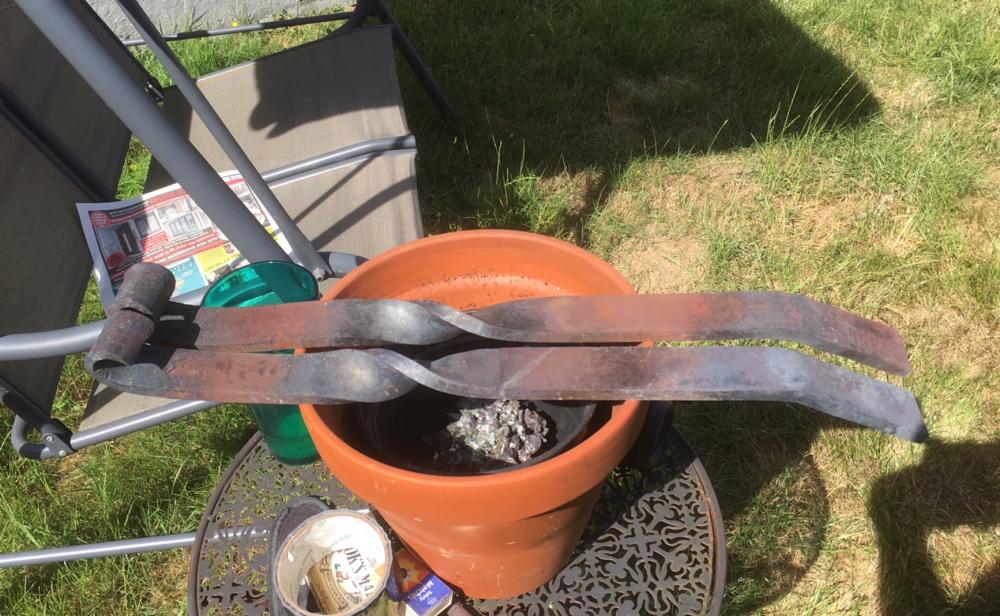
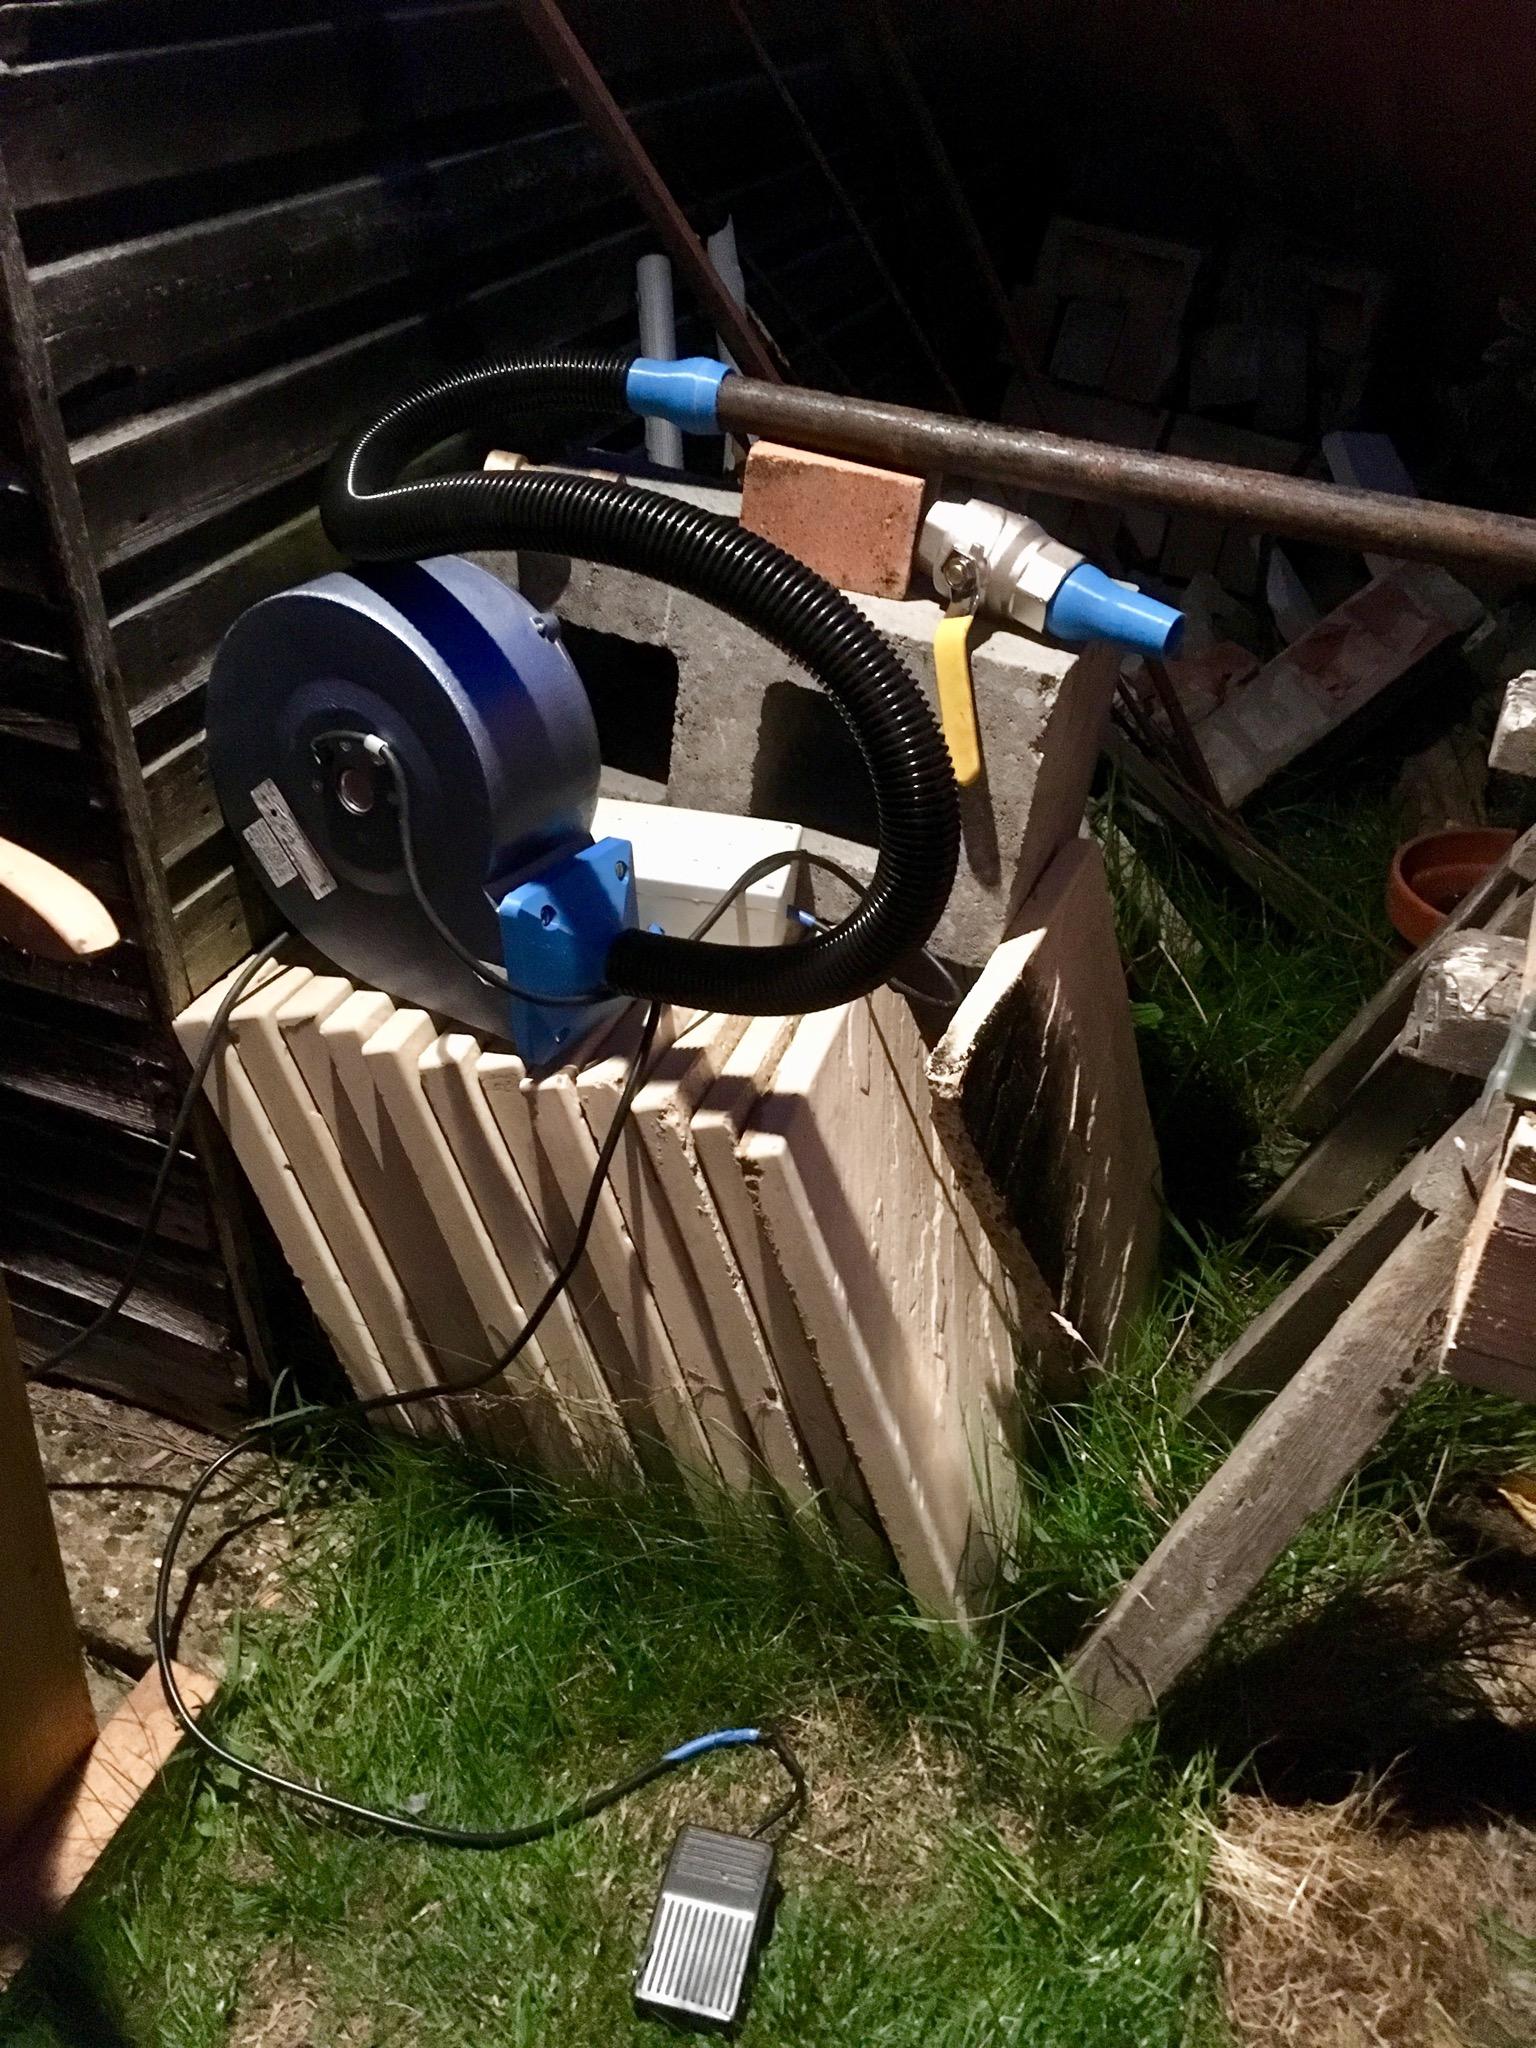
I finally got back around to doing some blacksmithing..! In fairness, I’ve had a busy couple months since we just got married. In the mean time, I’ve been watching lots of forging YouTube videos and reading old threads on this site to try and soak up as much information as possible. Firstly, I wired up my forge blower properly. It needed a startup capacitor and I wanted to add a foot switch. It works great. I can actually control the air flow by turning the fan on and off rather than using the valve. I’ve been desperate to try my hand at turning a ball pein hammer into an axe/tomahawk, so thats what I tried to do today. I’m really pleased with how it turned out. No idea what the steel is so it may not hold an edge- in future I’d like to repeat the project and forge weld in a high carbon tip. For now though, I just wanted a simple axe for splitting kindling! Lessons learnt: I’ve started breaking my charcoal into much smaller lumps, approx 1” square. Much better. My forge is working much better with the blower and foot switch. Much quicker and easier to heat metal. My main problem now is my tongs are pretty rubbish, and I need to make a couple of new pairs for specific stock sizes. I’m having trouble hanging on to the workpiece, and its causing the stock to bounce. I can’t possibly turn the work piece between blows as I barely have hold of it as it is! Any tips/comments/criticism about the axe would be appreciated! Ive also attached some pics of my current set up for any other beginners who might be interested...


-
What did you do in the shop today?
Jon Kerr replied to Mark Ling's topic in Blacksmithing, General Discussion
Daswulf- the Oobala is incredible. I absolutely love it. Bending the fingers like that into various gestures give so much life and character! I wish I lived closer, I'd totally commission you to make me one!! -
Ah I see, thanks. Is the same true of annealing? Is the "weakening" proportional to the carbon content?
-
*sigh* True!- although if the legs were quenched after being in the forge (though not tempered), would that then increase their strength again? I have no idea how it works. I need to read a metallurgy book I think. ..................................................................... ITS STRONG ENOUGH FOR A FEW LOGS!
-
Of course, you're absolutely right on all points! I do actually happen to be a structural engineer....! In reality, in my real job, I would do this sort of analysis in FEA (Finite Element Analysis) so i could take into account all the material properties, geomety, and plot stresses on the 3D model. My hand calc was incredibly crude and done more for amusement than anything else. In actual fact the yield strength I used should probably be even lower than 250MPa due to the weld affected area. Perhaps 180Ma would have been more appropriate. The bend in the leg is also a stress raiser and this would result in a concentration. The buckling of the bowl is indeed also a probable failure point! Its worth remembering though that the 180/250MPa is the YIELD stress, at which point the material starts to deform through the plastic region (and won't flex back). The failure stress, whereby something actually breaks, will be higher. With a 3 legged structure (much like a 3 point hoist/lift) you're likely to get a fairly even load distribution through the legs, even if the firepit was stacked off centre. By my hand calc, the "Factor of Safety" was 24. Even taking the lower yield strength of 180MPa (approx half my value), that leaves a Factor of Saftey of 12 (on yield). Even if the dish begins to buckle (and I doubt it), its highly unlikely that any catastrophic failure will occur causing burning embers to tip over the floor! All that said........ for anyone wishing to build a similar firepit, I would probably not copy the design of my legs. They were done that way more to account for my lack of forging skill than any other design choice. Taking Thomas Powers suggestion of an additional large scroll, (on each leg) to sit under the centre of the dish would be a good idea, though it would use at least double the material for the legs. Alternatively, welding stiffeners under the centre of bowl where it attaches to the legs wouldn't hurt.
-
Beautiful! Thanks for the idea.
-
Great suggestion thanks Snuffy! Anyone got any more? The flaming curmudgeons had me worried for a second so I even had to break out the pencil to prove it.....! (No disrespect to TP! All in jest.) For those interested (probably not many...!): Bending Stress is S=My/I (where M is Moment, y is distance from neutral axis, and I is Second Moment of Intertia). For a rectangular bar as in my firepit legs, I=bh^3/12 (where b is the width, 40mm, and h is height, 20mm). Since we're interested in maxiumum allowable mass in my firepit, we can rearrange S=My/I to give M=SI/y. The yeild strength of mild steel is in the region of 370MPa (so S=370MPa). Therefore, the maxumum allowable Moment M= 986642. Moment= Forcex distance, and Force=massxgravity. So F=1973N. Therefore...... The allowable mass on each leg before bending is (believe it or not) 200kg. Since the firepit has 3 legs, thats a total allowable mass of 600kg. There's no way we'll be putting more than 25kg (50lbs) of wood in the firepit at any given time, so we have a healthy Factor of Safety of 24. You never know... someone might one day wish to do a similar calc.
-
What did you do in the shop today?
Jon Kerr replied to Mark Ling's topic in Blacksmithing, General Discussion
Good idea- Thoman Powers suggested similar. I think its a symptom of the photos, as I said its bigger than it looks and the stock is thick (half inch). I've just stood in the pit without the legs bending, and I weight 250lbs. The pit will never experience more than 50lbs of wood in operation. -
Like I said, the picture makes it look smaller than it is. Those legs will be easily strong enough to survive logs being thrown onto the fire. Scrolls to contact the ground is a good idea though, and definitely something I'd consider in future if I made a smaller version with thinner stock legs. I believe my buddy has already added a drainage hole, and has purchased a small circular grill to add into the bottom to allow some ash to settle out.
-
What did you do in the shop today?
Jon Kerr replied to Mark Ling's topic in Blacksmithing, General Discussion
I finished forging the legs for a big firepit. My first proper forging project complete! Couple more photos in my thread here..jpg.81cd41fdccd188d7794b962ad2178dd2.jpg)
-
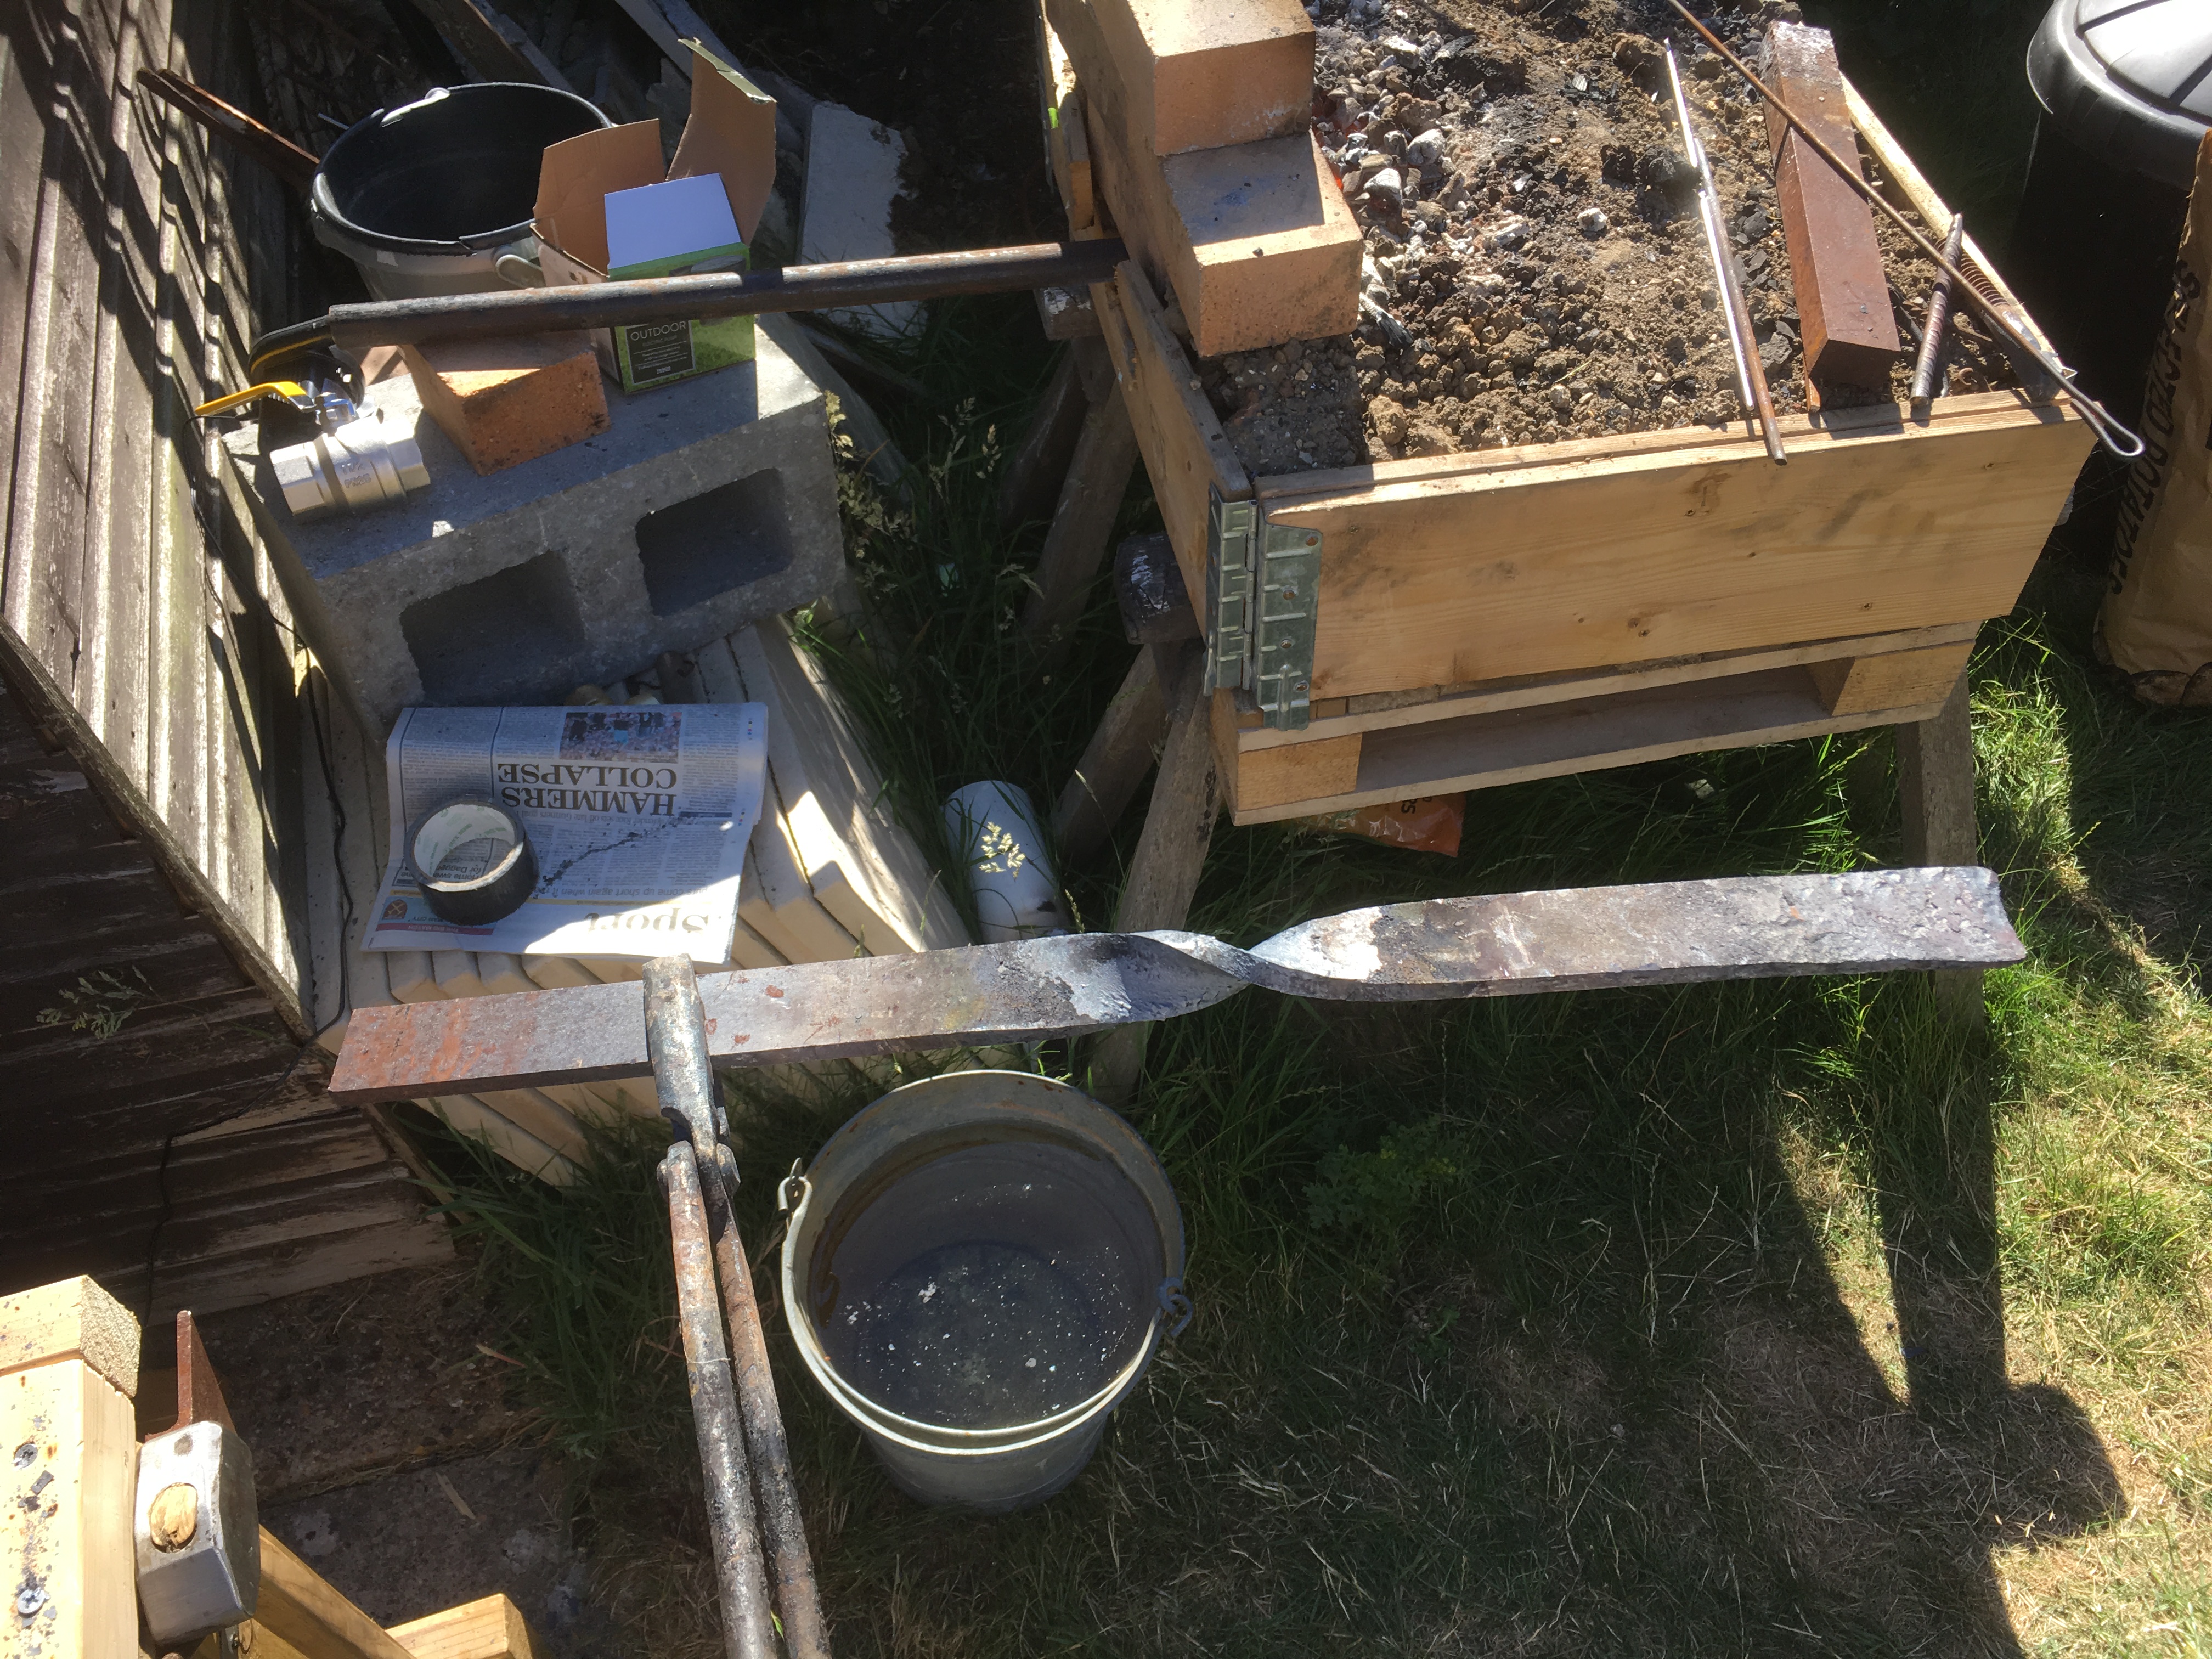
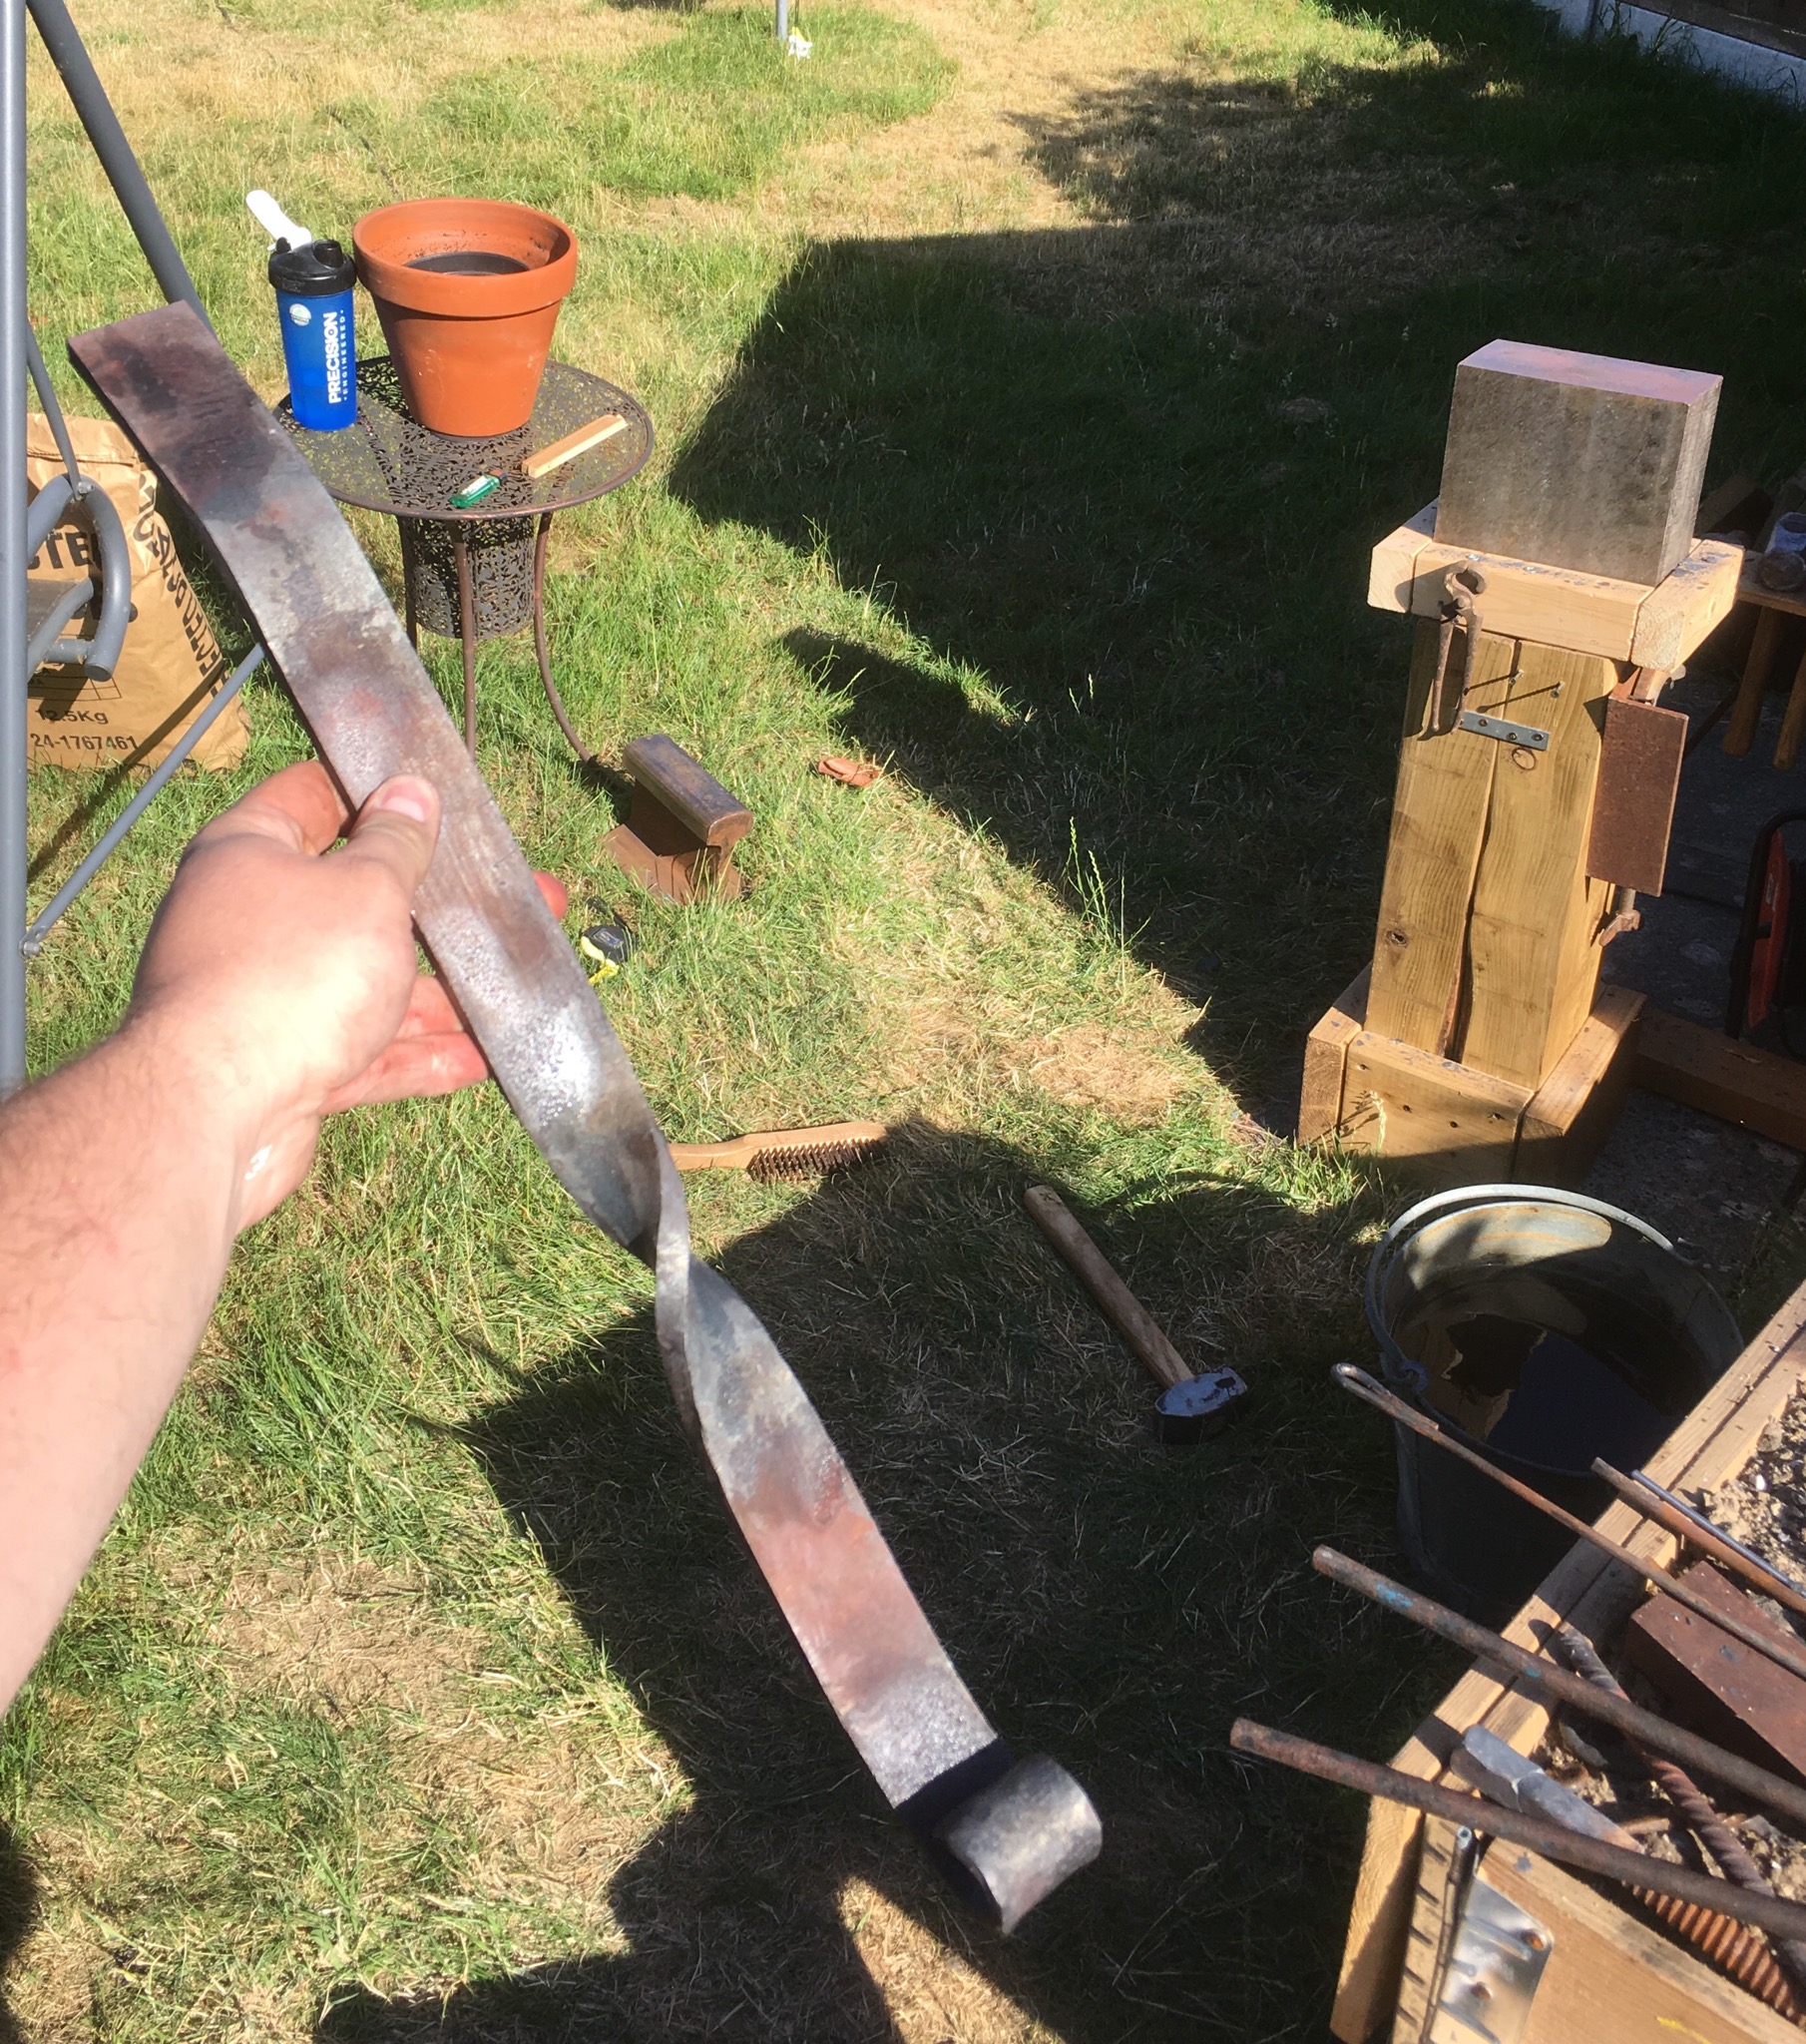
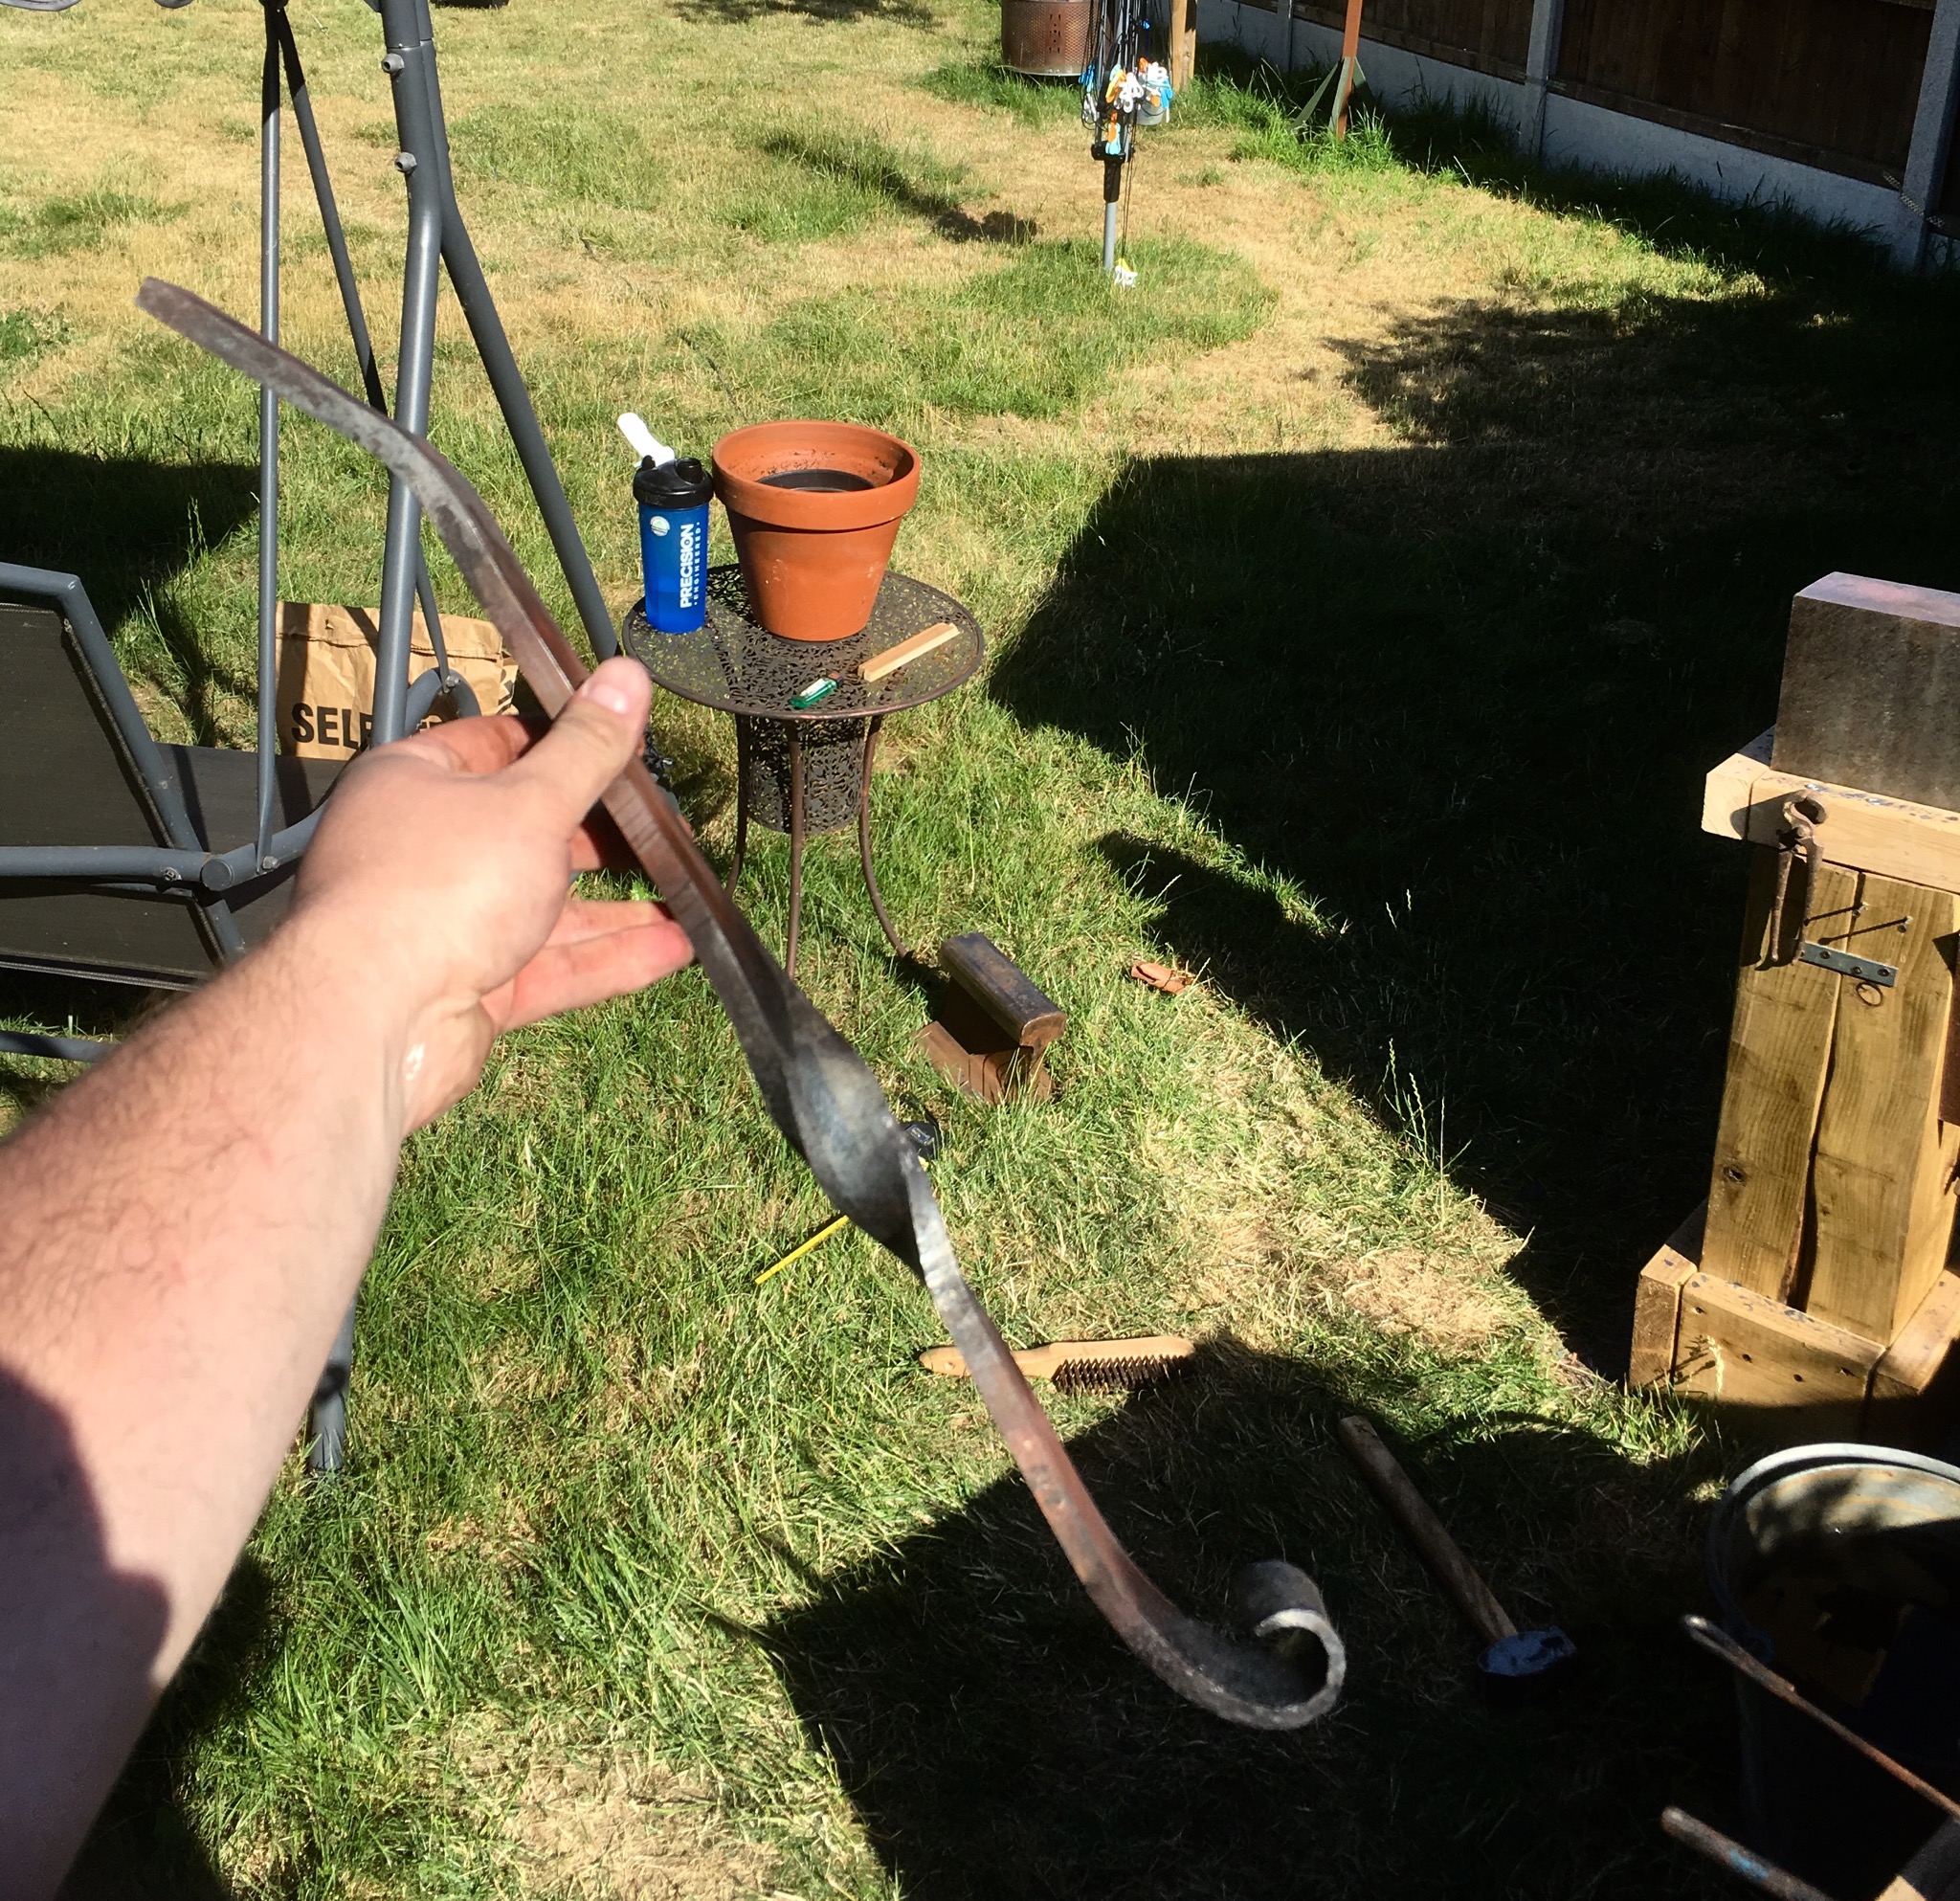
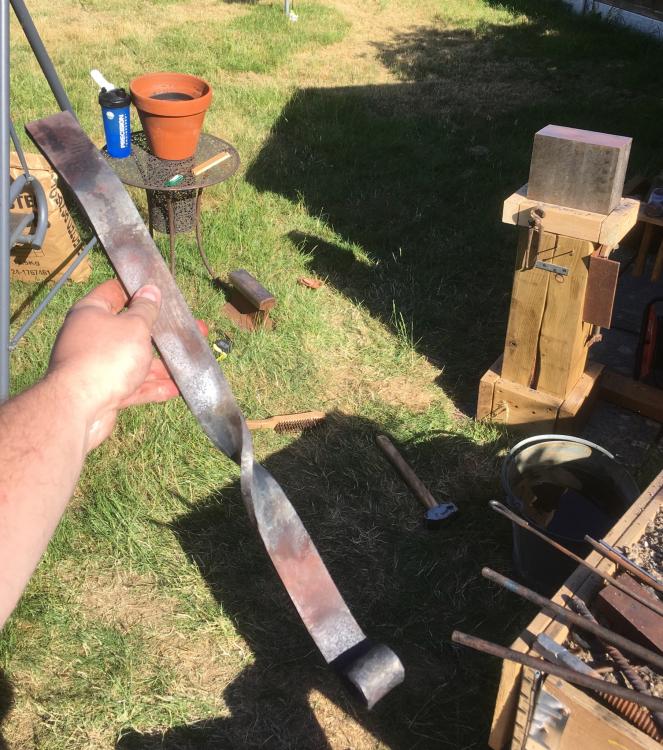
Well, I finished the 3rd of the firepit legs and handed them over to my friend. He's got them welded up straight away and is really pleased. First happy customer. I feel like a real blacksmith (I say customer in the loosest sense, although he did pay me with four bags of high quality charcoal!) The pictures make it look small, but its actually huge. The dish is over 3 1/2' feet diamater, and each of those legs are forged from 1 1/2" by 1/2" stock. (Note. The dish was obviously not forged by me, only the legs. He purchased the dish online.) In other news: My fire management is improving, slowly. I used approx 3kg of charcoal to forge the last leg, which is an improvement. It still seems like a lot. I'm learning where the sweet spot is in terms of air flow for heat. Next step is to wire up my new foot switch so the air automatically shuts off when I step away from the forge to the anvil. Next session I'd really like to try some bottle openers with a dice-twist. My fiance's birthday is coming up this month, and our wedding is in August. Does anyone have any really nice gift ideas I could forge?
.jpg.a81a055aab433f22cfd0445de6a323f8.jpg)
.thumb.jpg.4cf3ed4b13afe482368fb1f0f3c6cc8f.jpg)
.thumb.jpg.6f155e5e82d5a6e22a26836ec96c29c7.jpg)
-
based on the context, I'm pretty sure he meant "IS".
-
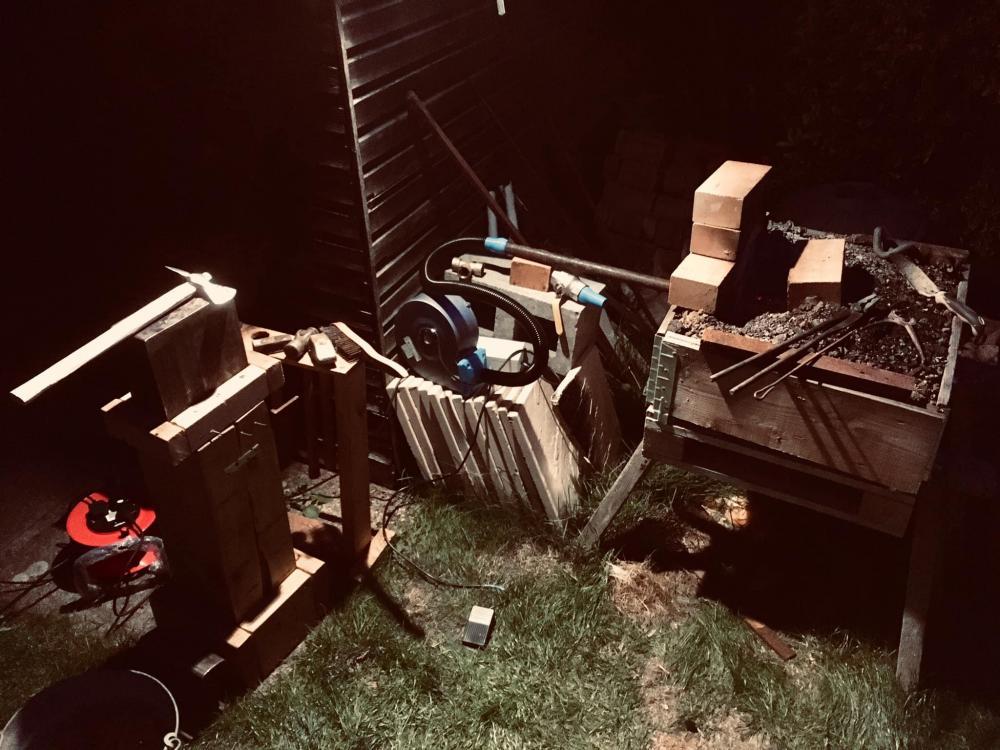
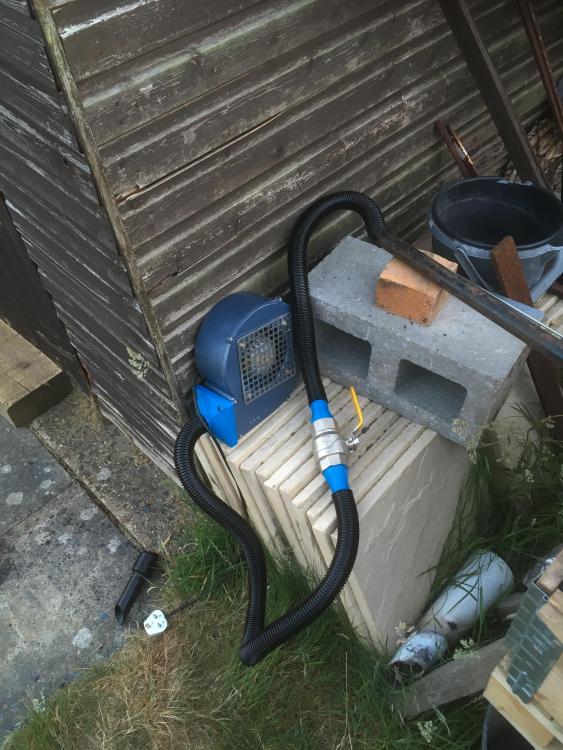
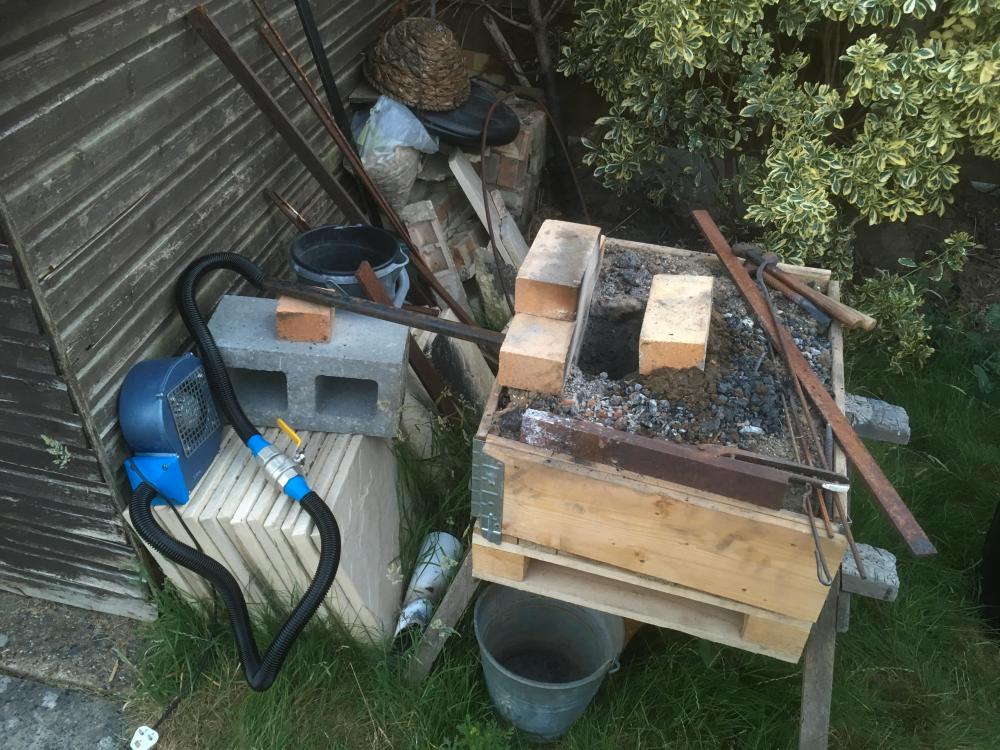
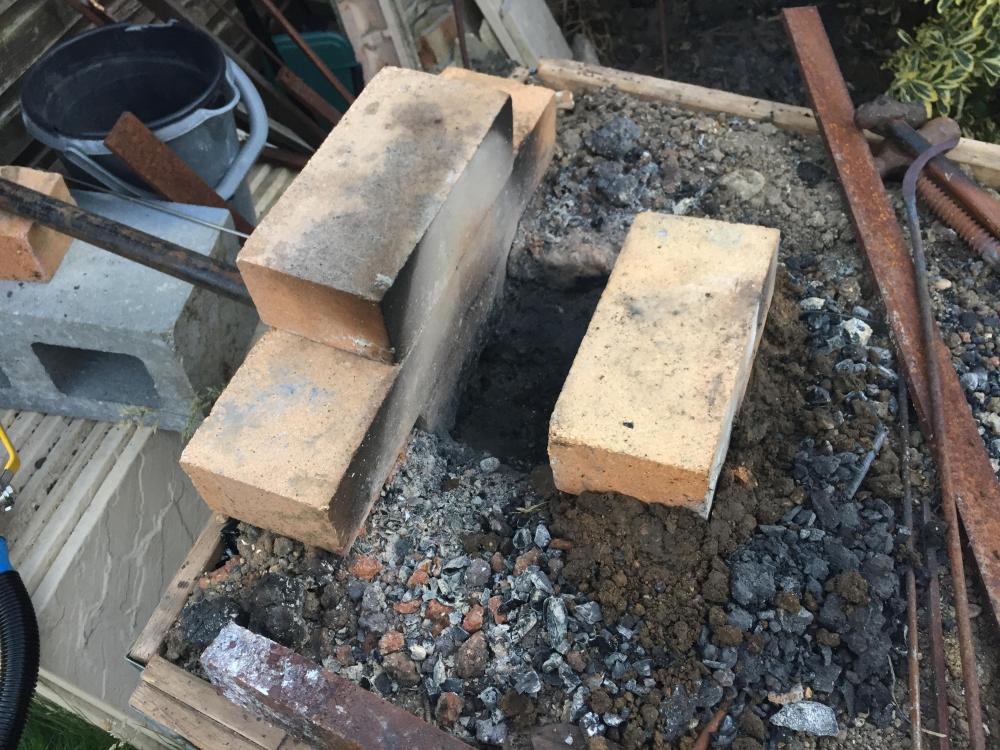
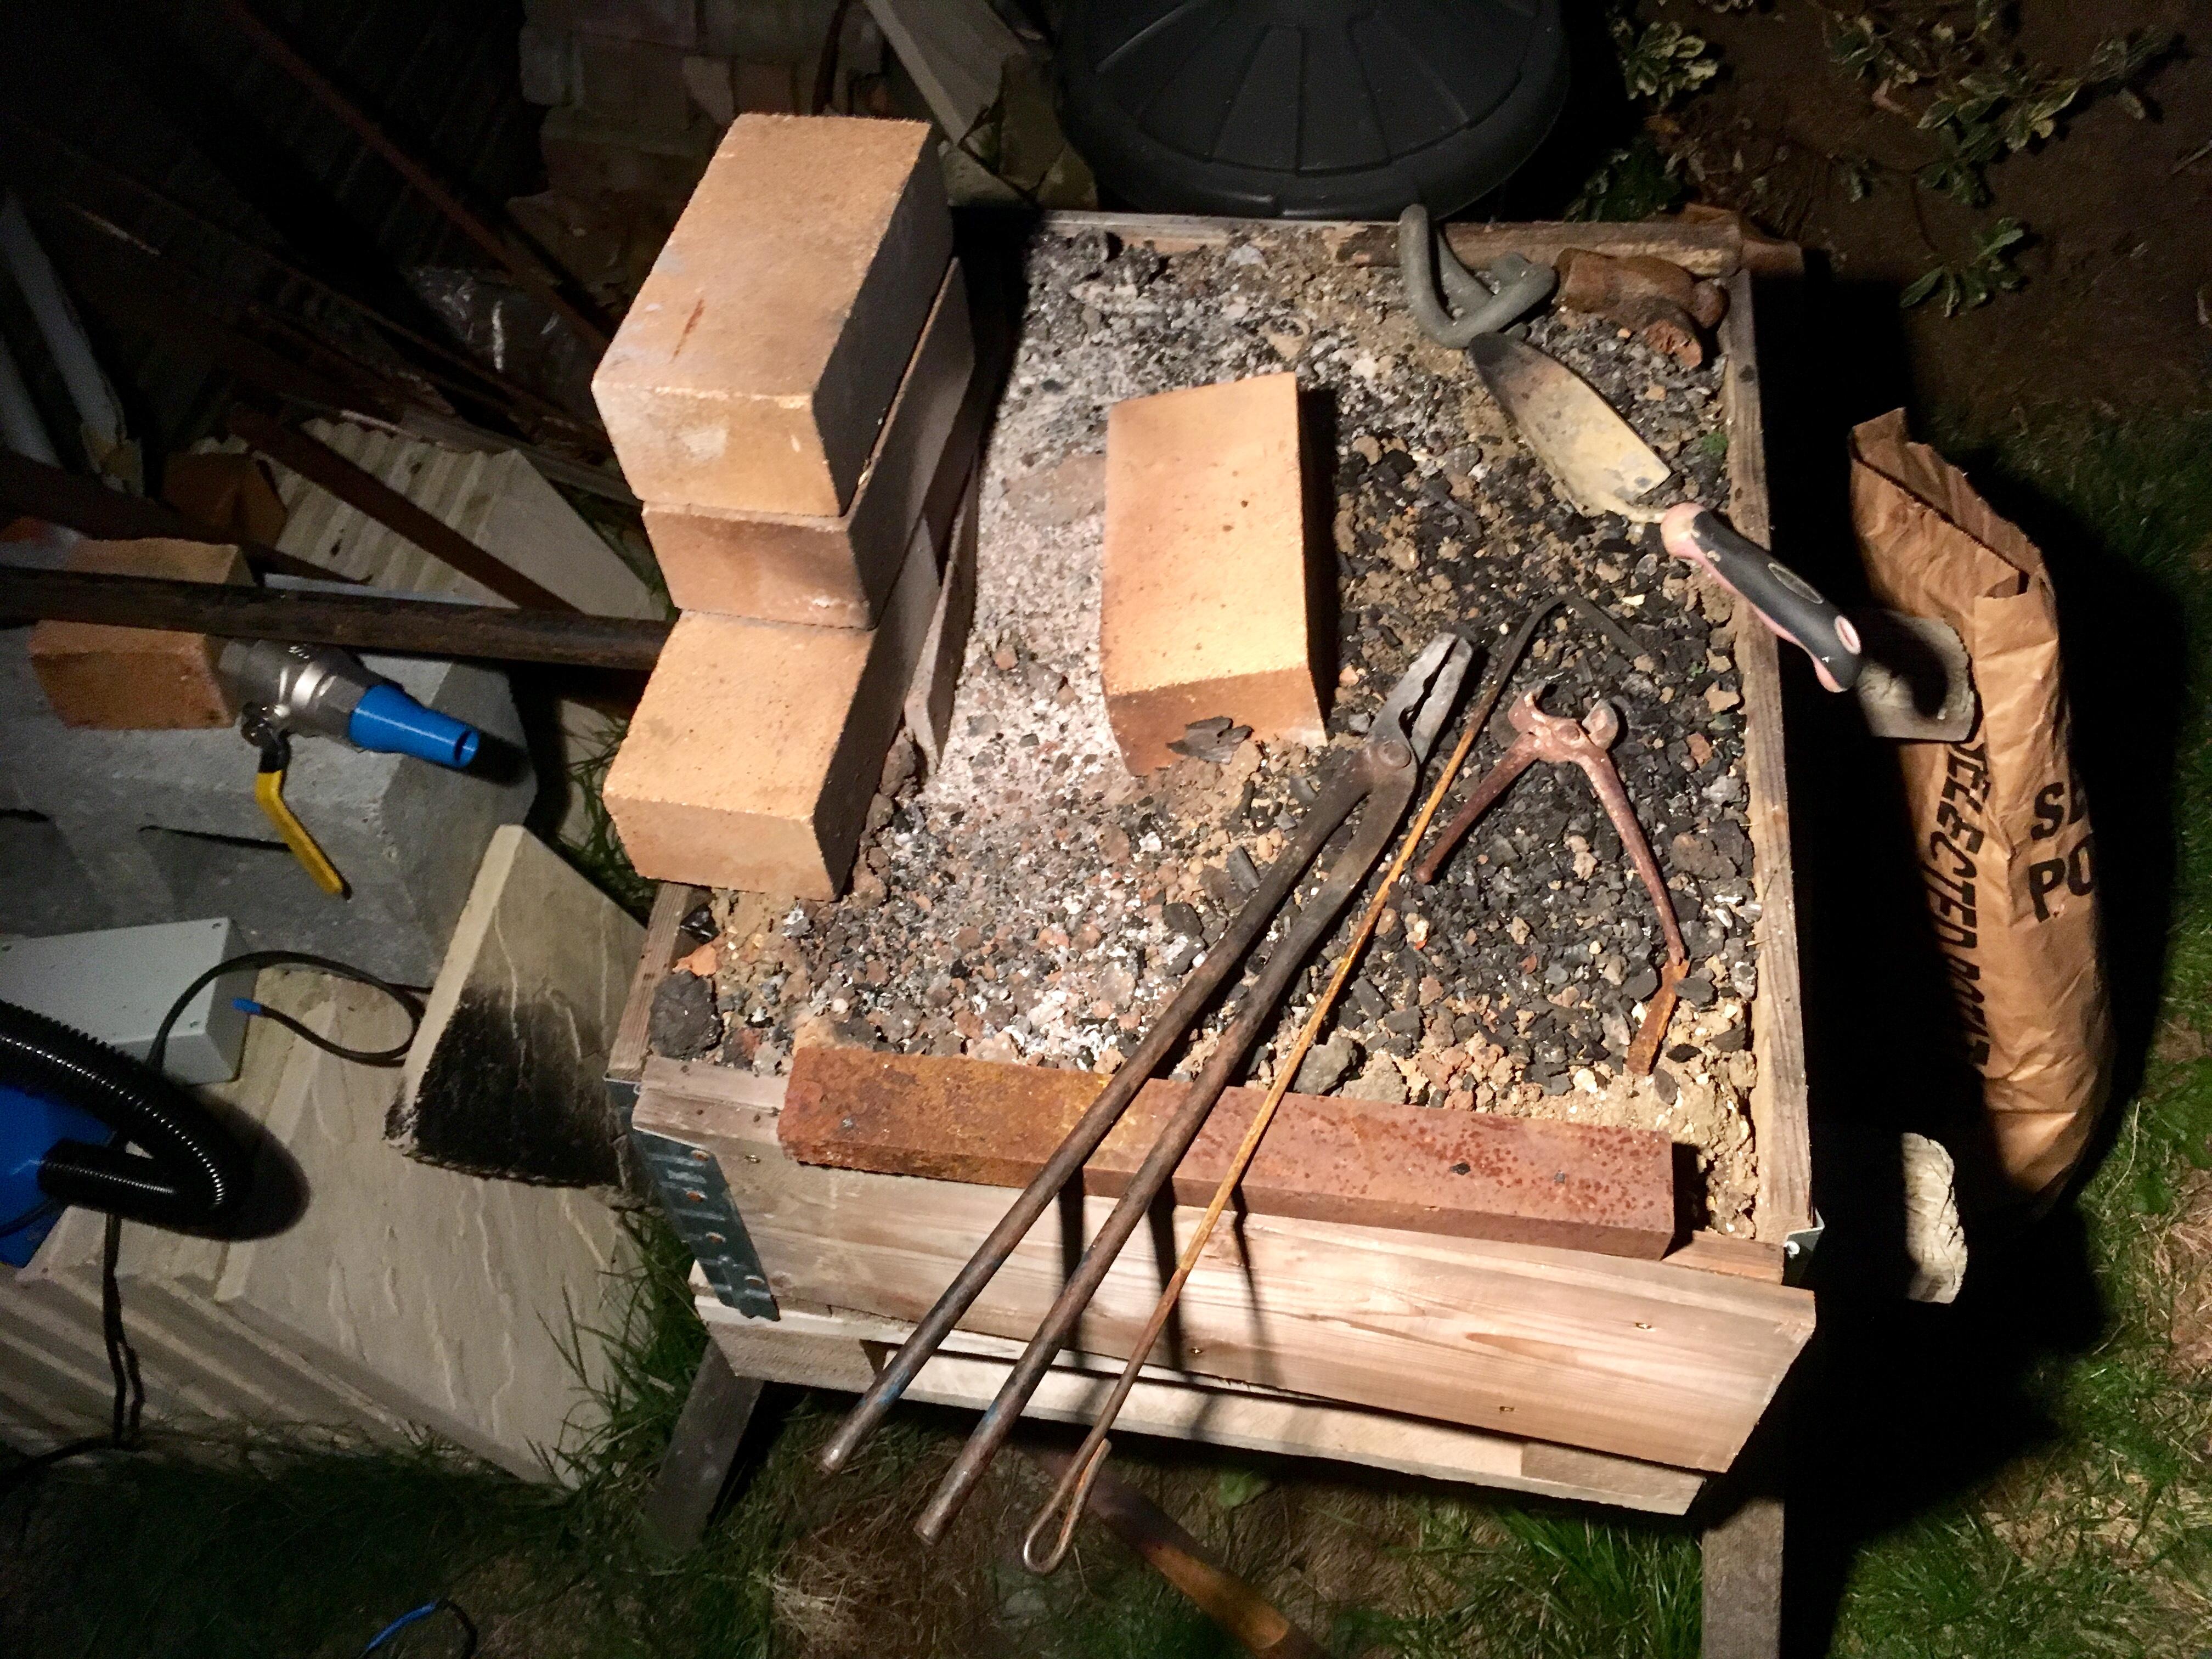
I 3D printed a nozzle and adaptors for my new forge blower. Attached a picture of it all hooked up. Also attached a pic of my current set up, for what its worth. Took Frosty’s “trench” suggestion and added the extra brick. Hopefully that will help my consumption issues. Will try breaking the charcoal up next time and hopefully that will solve my metal heating issue. Hopefully with the trench, new blower and smaller charcoal next session will be less frustrating! Perfectly, I’ll do as you describe thanks. What about really tiny chips (are these called “fines”?)? Do I need to seperate them? I’ve seen charcoal prep tables consisting of a series of metal meshes to let small bits drop through.
-
What did you do in the shop today?
Jon Kerr replied to Mark Ling's topic in Blacksmithing, General Discussion
I gathered that! but I still can't think of a kind of plug that needs a dedicated cutting implement?! Is this something specific to blacksmithing?. Electrical plug? nope Bath plug? Nope Ear Plug? Nah. Rawl Plug? Maybe?? Unlikely. Googled: Plug tobacco? EDIT: Upon further googling, it must be plug tobacco? Now such a beautiful tool makes sense! -
What did you do in the shop today?
Jon Kerr replied to Mark Ling's topic in Blacksmithing, General Discussion
Looks great but..... whats a plug cutter?! Beautiful. Indeed! I didn't fancy my chances at getting all four on the ground- especially since the firepit will be on grass often. These legs are easily heavy-duty enough for just three anway. -
Ah! Unfortunately I can't make it this weekend which is a real shame as I'd have popped up and said hello. I'll try breaking it up- I hadn't realised it needs to be so small! Any tips for this? I assume the dust etc is bad, so you don't want charcoal coated in dust produced during the breaking up? I've seen examples of a mesh cutting table, where the dust/tiny bits drop through to a lower layer. Is this the best option? Would you use a hand axe or just smash with a hammer? I'll add another firebrick as you describe to try and achieve the "trench". That sounds like it will work great for the long stock I'm using.
-
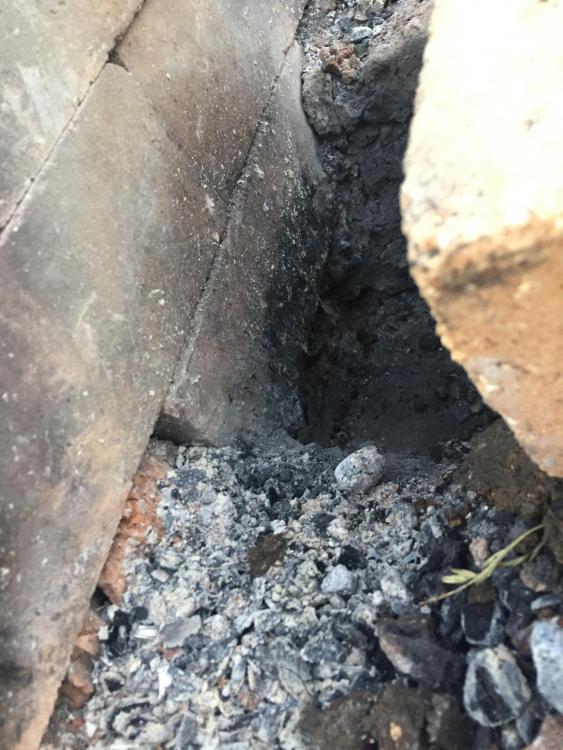
Sorry gents, I AM running a JABOD. I've followed Charles' design pretty much to the letter. I've upgraded to the forge blower shown above (NOT PICTURED), attached to a 1" ID Tuyure. I wonder whether the size of my charcoal is now an issue? Some pieces are 2" x 3" pieces? I try to break it up a little as I go by bashing it with my rake. Since the edges of my fire bowl have broken away with use, the size of the bowl is growing a bit. I guess that could be one of the problems?
-
What did you do in the shop today?
Jon Kerr replied to Mark Ling's topic in Blacksmithing, General Discussion
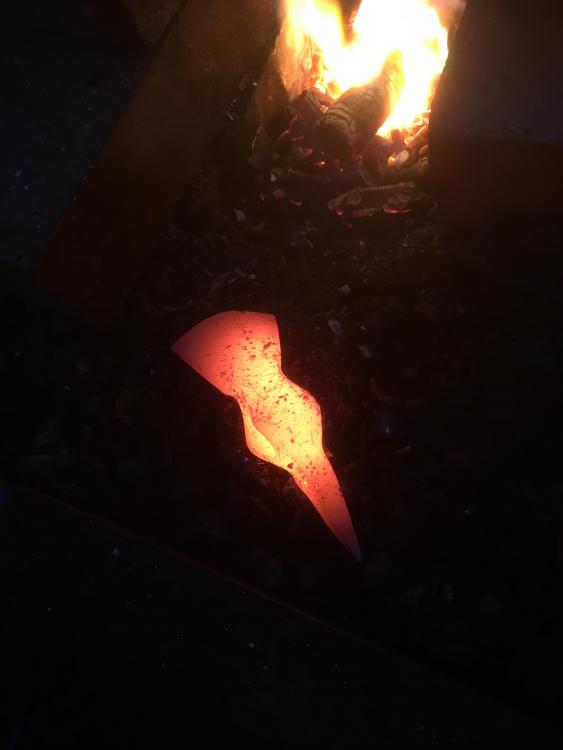
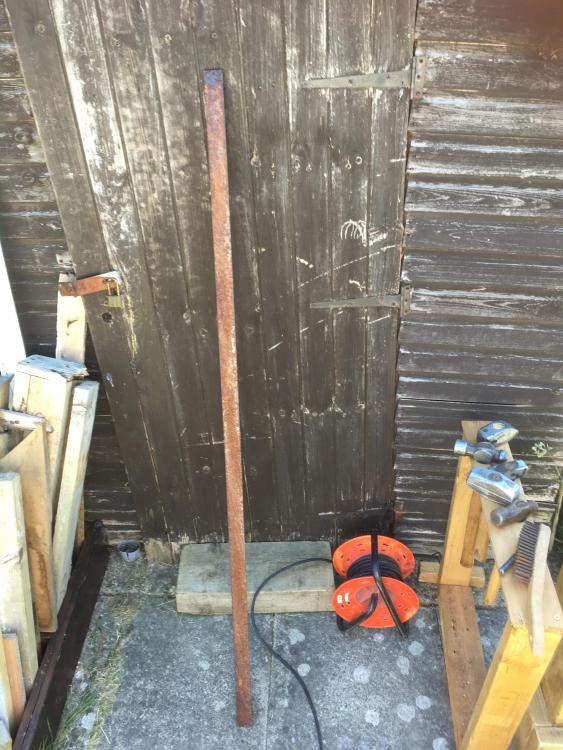
I made two out of a set of three legs for a friends firepit. This is only the second thing I've forged, ever, so I'm fairly pleased. Hopefully my friend will be happy. He's going to weld them to a 1m steel dish. Here's hoping the third (and final) will match the first two!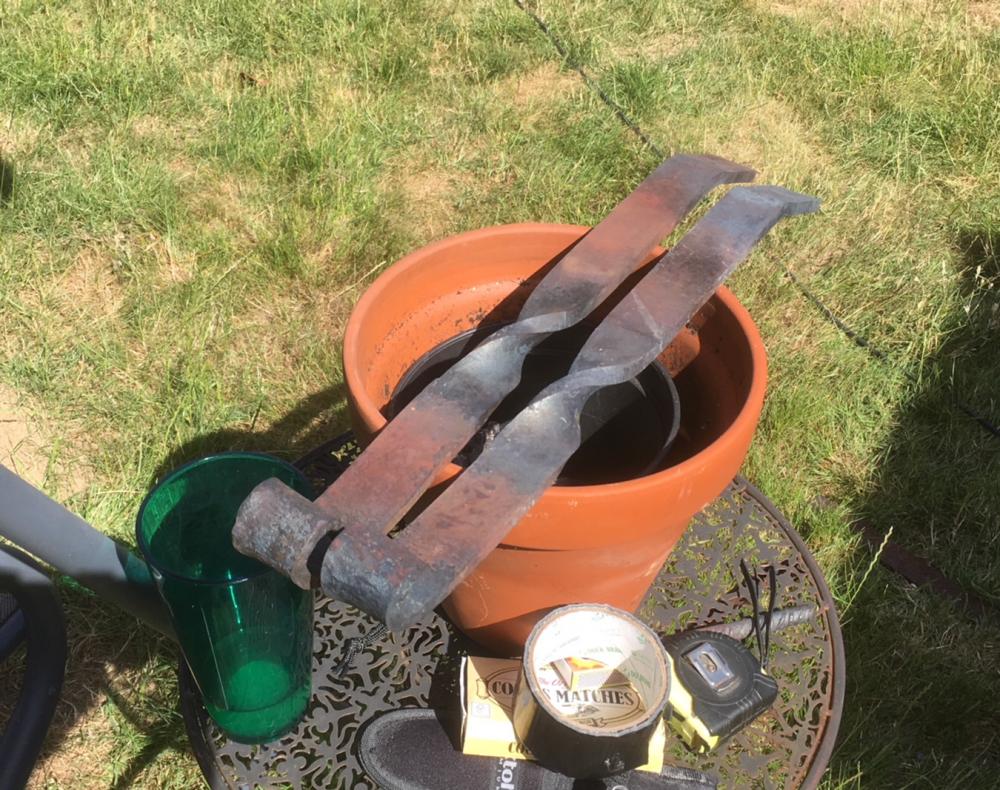

-
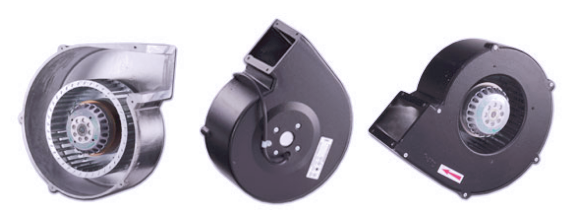
I'm saving up the cash to try and book in a course with your Copper Elf! My financial situation is far from ideal so please don't judge me too harshly... ....unfortunately despite my best efforts (googling, searching IFI, checking the BABA database), I can't find anyone local (essex) at all! I found a couple of commercial blacksmiths/bladesmiths nearby and dropped them emails but no luck. Progress shots of my firepit legs below. The second leg matched the first reasonably well! Success. One more to go! I fitted the new "proper" forge blower, although there were lots of less than ideal duct-tape joins while I gather together to different hose/pipe adapters I need. Unfortunately I still burnt 4kg of charcoal in approx 2 hours, and am still struggling to get metal hot while I literally stand and watch the charcoal disappear before my eyes.I turn the air supply off between heats, but I find myself adding new fuel EVERY time I put the metal back into the fire because I lose so much so fast. I've tried varying the air flow (on a ball valve) between nothing and full blast and I have no ideas whats "right". The new blower is this one: Link removed Motor Type:External rotor motor / shaded pole induction IP44 Nominal Supply:230V 1Ph 50/60Hz 115V 1Ph 50/60Hz 400V 3Ph 50Hz Ancillaries:Inlet & discharge guards, spigots, inlet filters Materials:Fancase – cast aluminium LM6 Impeller – galvanised sheet steeel Finishes:Unpainted or stove enamel as std (black) Mounting Options:Foot, Inlet & discharge drillings Noise Levels:75.5dB(A) Free Air, 1 Metre Weight:4.8Kg/10.58lbs

-
Does this mean the charcoal is bad? Or the forge is *too* hot? It didnt seem to heat metal fast. I did have a layer of clay/soil that was added (wet) to the firebowl later. I had hoped it would smooth it out. Maybe this layer vitrified and dripped to the bottom.
-
Thanks everyone!
-
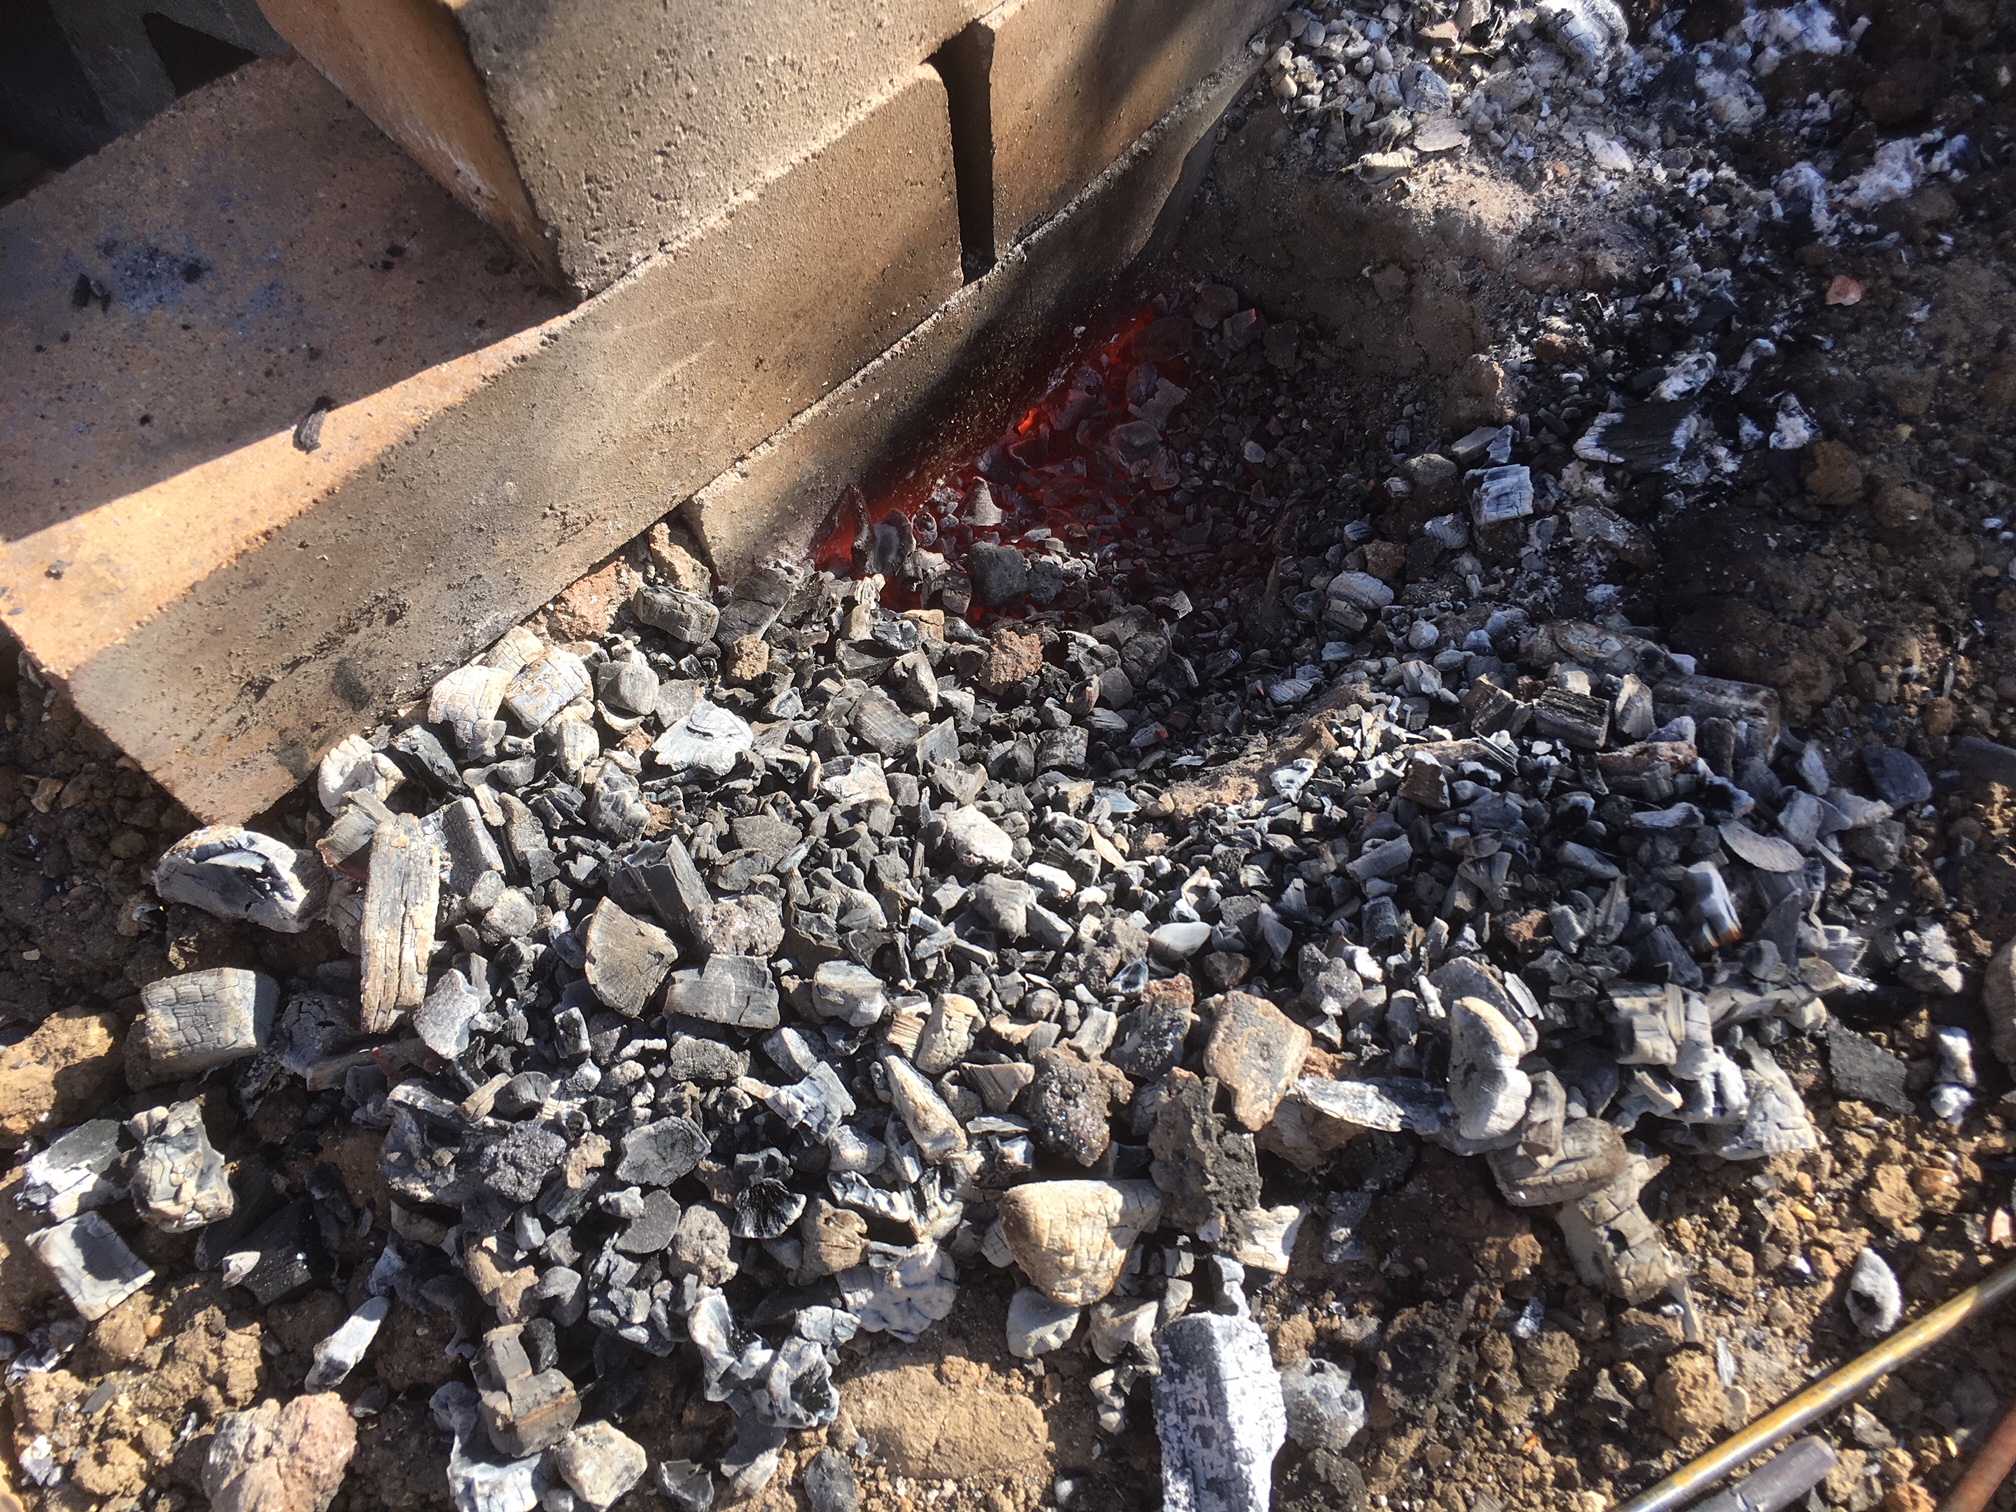
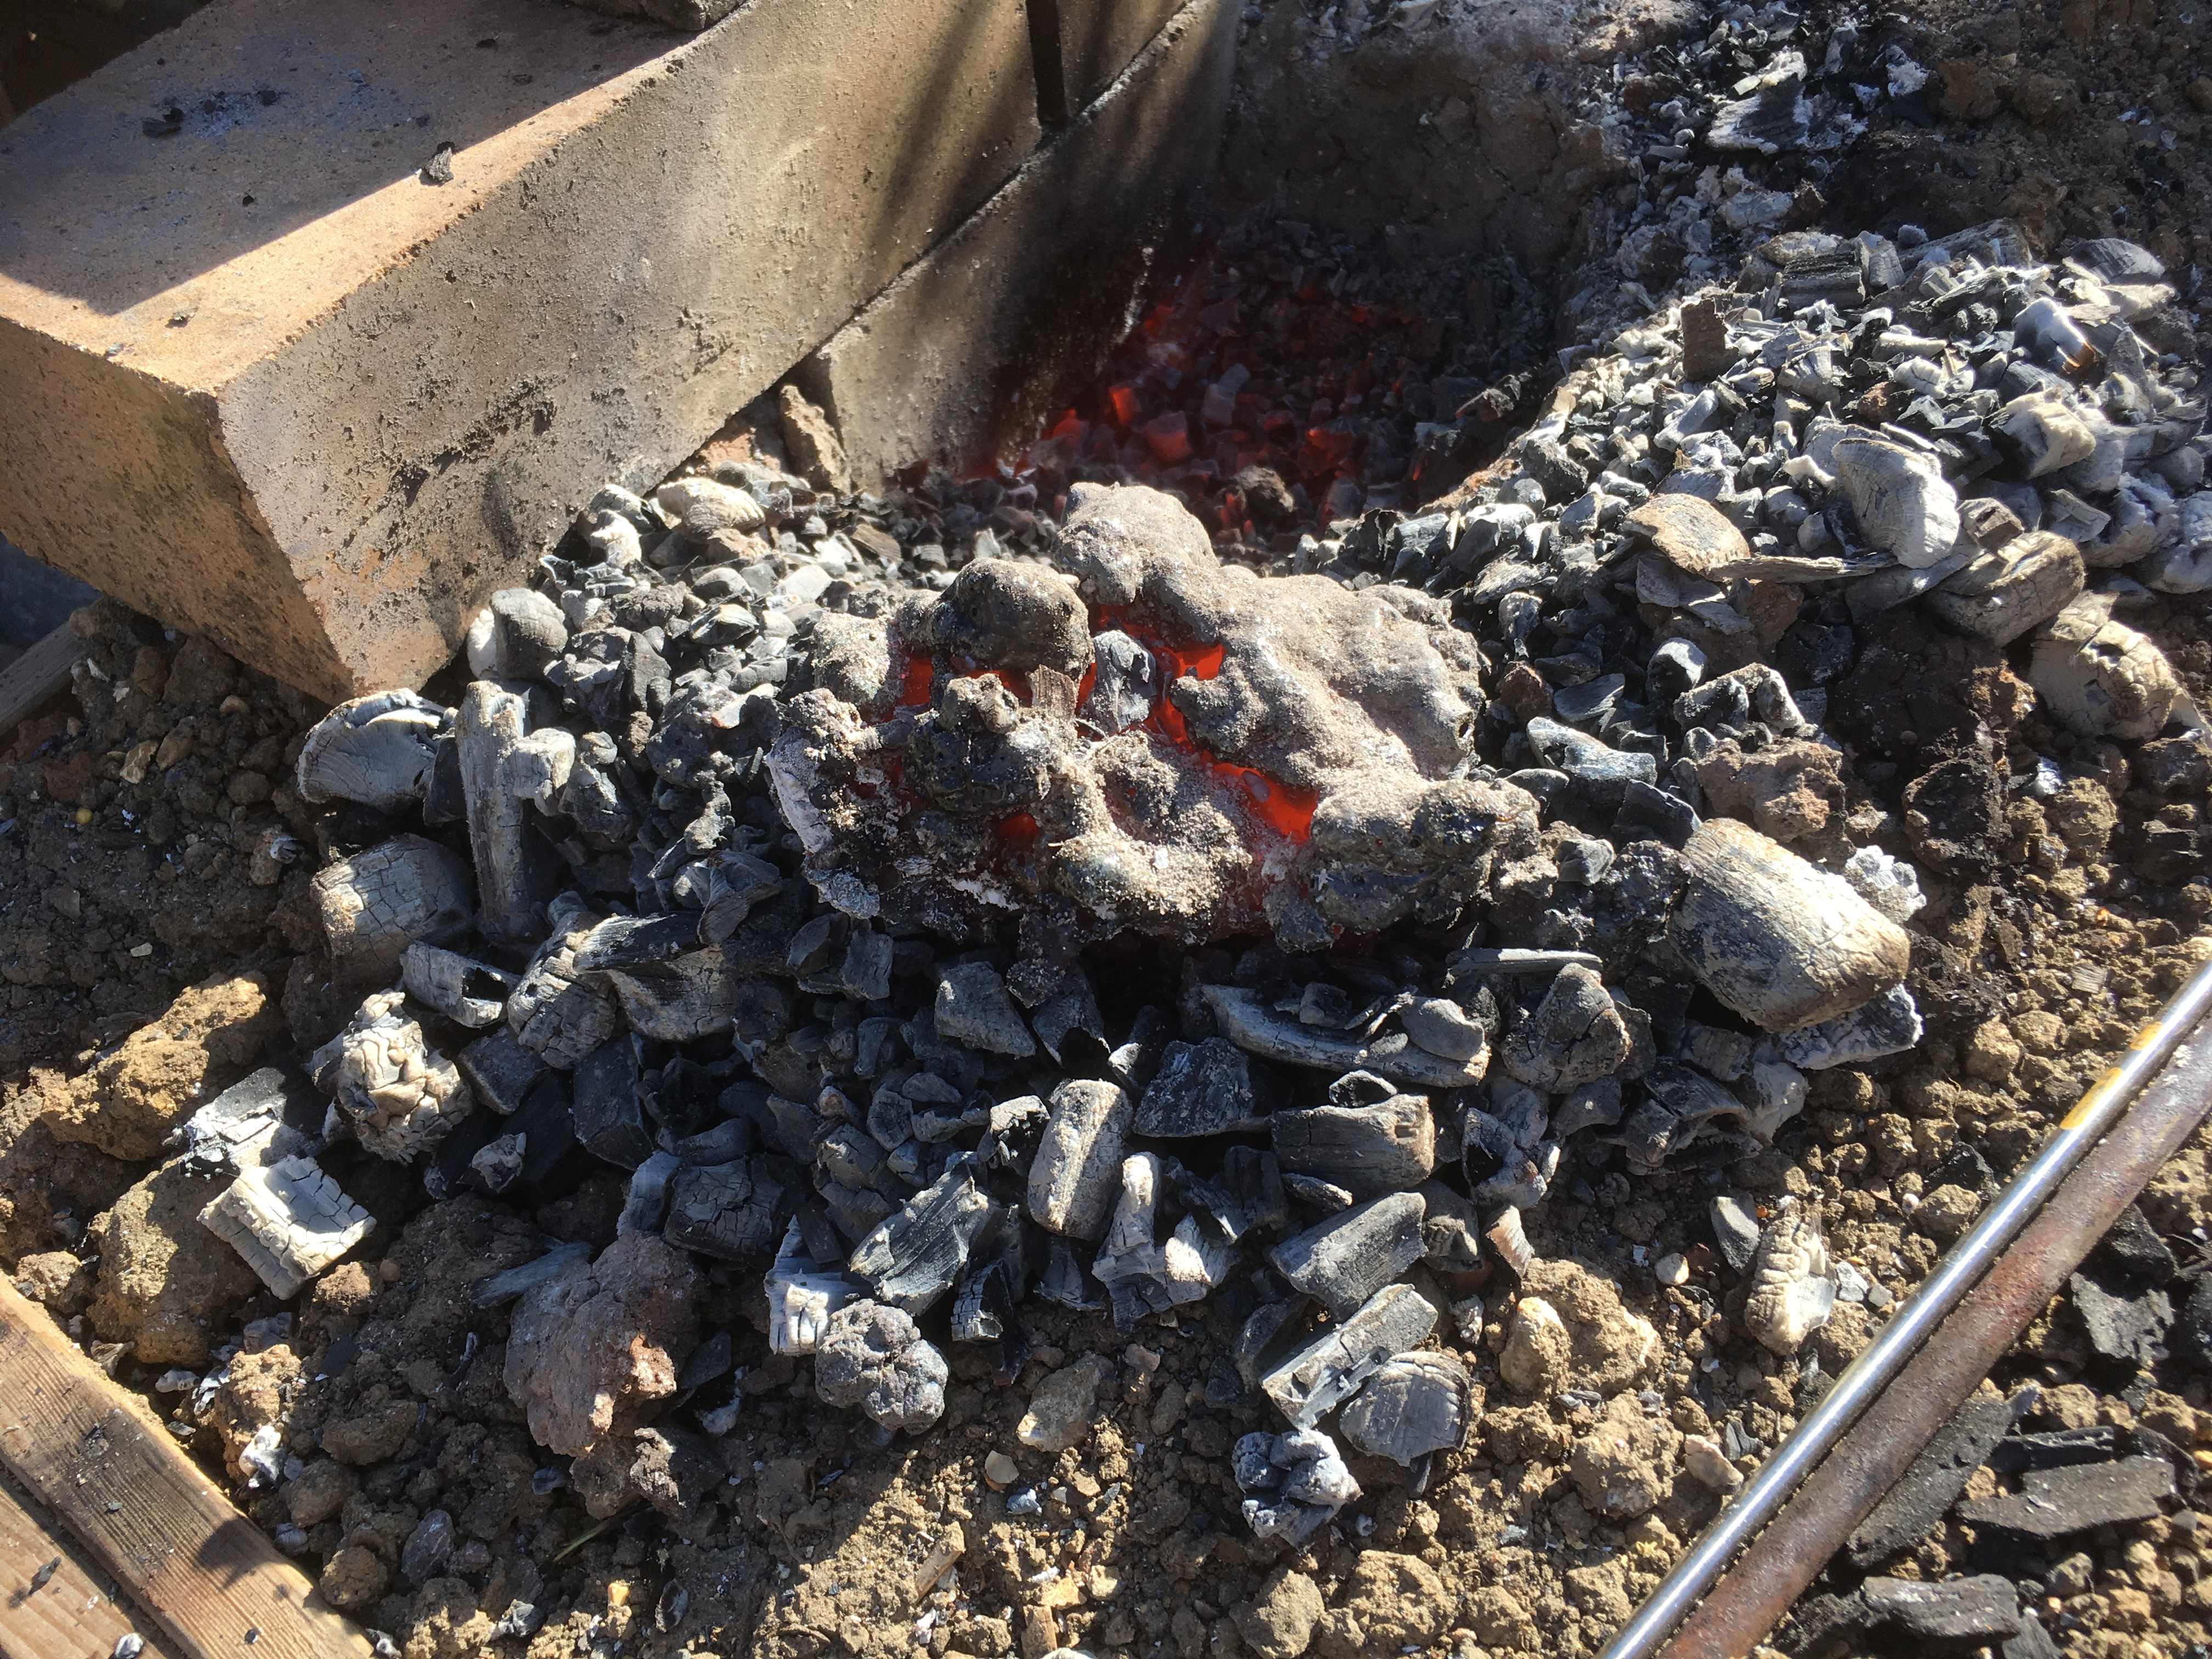
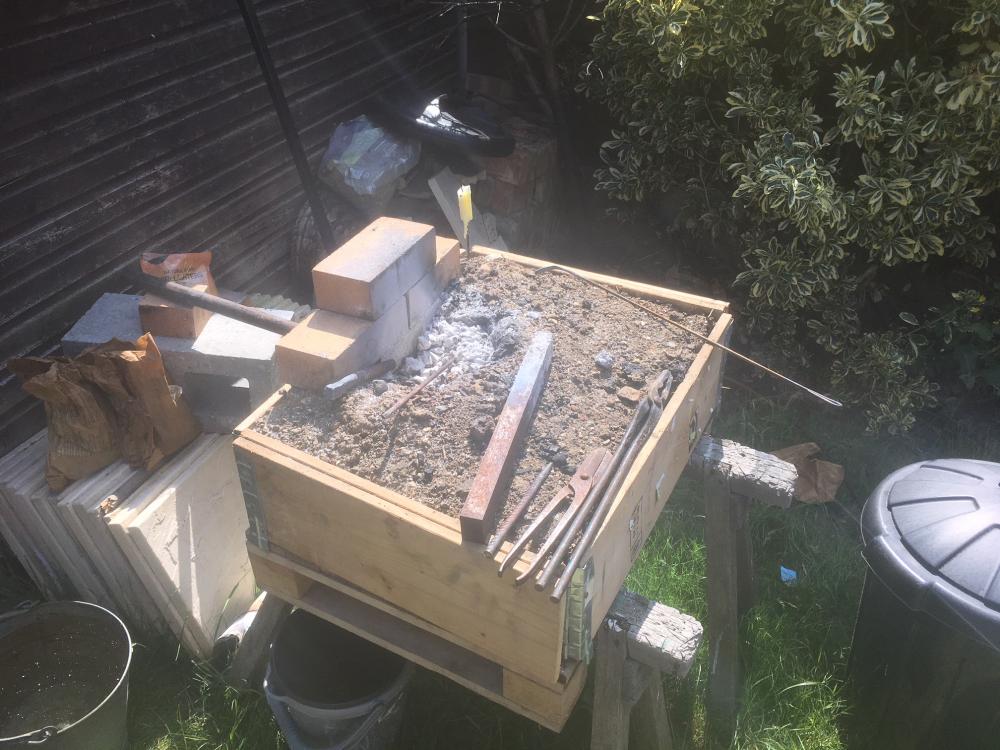
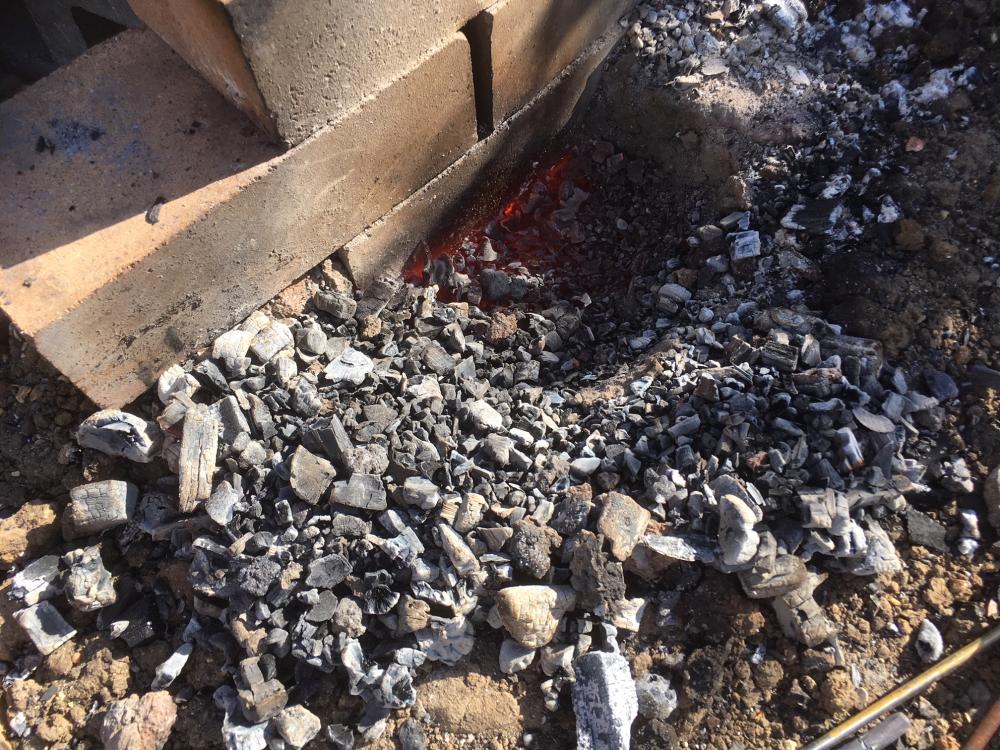
I finally got time to ACTUALLY hit hot metal with a hammer rather than just think about doing it all day.... First run out for the almost-kindve-inspired-by-hofi-ish-style hammer. It was brilliant. Much better than just a ball pein, and I tried out using the cross pein to draw out etc. After reading the “how metal moves” post on IFI I did still pick up the ball pein at certain times to get the metal to shift just how I wanted. I made a leg for a friends firepitz He’s making the firepit for his sisters wedding, and its pretty big (1m diameter) so he wanted heavy duty legs to weld on. Really pleased with the result- especially since this is pretty much the first thing I’ve made after a hook....! In other news: - I got a supplier of charcoal- a local place. Its hornbeam charcoal, which apparently burns hotter, apparently the romans used it and sent it back to the empire. Its MUCH better than the awful instant-light and no more crazy spitting and sparking. - Unfortunately my fire is still not good and I spend more time faffing trying to get metal hot than I do hitting it. The bed pump is simply too much pressure, not enough volume. Fortunately I found an old forge blower and just need to wire it up, and fit a ball valve. I might 3D print some adapters so it all fits. - I burned an entire bag (4kg) of charcoal in about 2 hrs. Is that normal? In the end (again) eventually the fire was popping fireballs out and the pot was full of very small bits of charcoal which were just choking it up. At the bottom was the mother of all clinkers which had literally filled the pot past the tuyere. Is this just because I’m blowing too much air to compensate for the rubbish bed pump volumetric flow rate? The pot being full like this basically stopped me forging in the end until it cools and I can scoop it out. Is that normal? I took the clinker out and its bigger than my fist.


.jpg.0fad66c6a24b3663ebd078fad39bee31.jpg)
.jpg.41bfd9bc4d8b5039beddb4a8af796e7a.jpg)