
Pault17
-
Posts
974 -
Joined
-
Last visited
Content Type
Profiles
Forums
Articles
Gallery
Downloads
Events
Everything posted by Pault17
-
mike, Yours was the final idea or plan that most appealed to my uses. I promised my wife not to prowl the forum until after Easter , or I would have known who to mostly credit. but, thanks for the great inspirationafter the fact!
-
Frederick's crosses from RR spikes
Pault17 replied to Sam Salvati's topic in Blacksmithing, General Discussion
Sam, Here is a picture of the dottom die for flattening the bottoms of the spike heads without totally deforming the upper part (when the spike cross is standing). I made this from a chunk of leaf spring from a dumptruck. It took three heats to drive the spike I was using as a drift through the spring. -
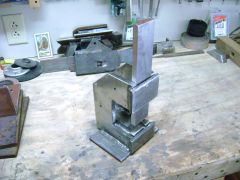
I have been taking a "stick 101" course at the locak tech college (wife gifted it to me for Christmas). I asked the instructor if I could "practice my beads on some of my own scrap metal" and he said sure. This started out as two pieces of 1/2" scrap plate from a place that makes big steel beams, and a small section of heavy angle-iron from a construction site. After using up 10+ thin cutting discs with my 4.5 inch grinder, several mason jars of elbow grease, a lot of filing with a 12-inch mill file, and a bunch of hack-saw work, I ended up with this. I know the welds look rough. I was under a tight time frame, and I still have to weld on the hardy post. I have several more of the plates to make die sets from. As I don't have a powered band say or other cutting rig, I use a lot of the little cutting discs. The dies are 1/2" by 2", with the bottom being 2-2.5 inches and the tops being long enough to stick out the top. The backing plates for the dies are pieces of angle iron that provide both the bearing surface for the top and bottom, and lateral support to keep the whole thing square. I cut the dues from the plates and made them a little big, so I can fit them more precisely. When I fitted the bearing plates, I used a scrap piece of plate with a business card for fit.
-
I gave up banging iron for lent, but was allowed to scrounge. I managed, in the past 40 days before Easter, to accumulate just under 50 RR spikes, probably 100 lbs + of RR tie plates, enough container devices to make four more gasser forges, and a bunch of other metal to work with:D
-
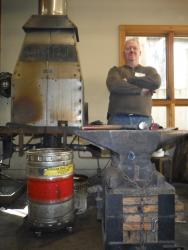
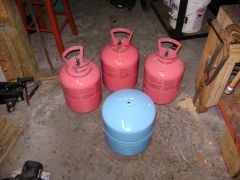 Base shels for making several more forges
 -
 about 50 spikes intotal. some from me walking with my eyes open and some from a favored nephew doing the same.
 -
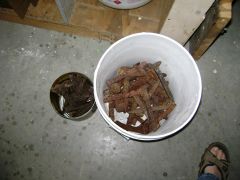
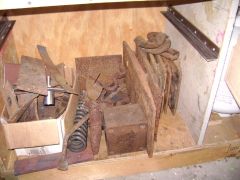 Several RR tie plates from 3/8 to 1 inch thick. random pieces of spring, rod and plate
 -
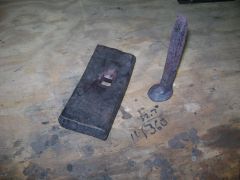 Made from a section of dump truck leaf spring. It took three heats to finally drive a spike through it. Drop in a spike that is forge hot on the head and you can flatten the spike without totally deforming the other side of the head
 -
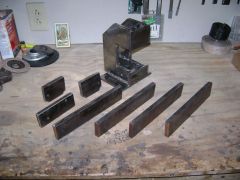 I cut out a bunch of blanks for the die-sets. I just haven't made any yet. I still have to weld on the hardy post
 -
 welding class project. whole lotta elbow grease. used up 12 thin 4.5 inch cutting discs, many hours of filing and hack-sawing. about 20 or so rods of 3/32 7018.
 -
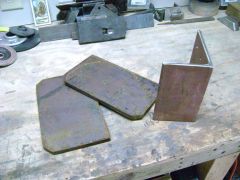 raw materials - two pieces of 1/2 inch plate, one chunk of heavy angle iron from construciton site
 -
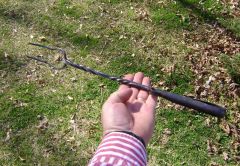 My oldest daughter told me that my in-laws' grilling fork was broken so I cobbled this together from a piece of 3/8 round.
 -
I don't have a formal sign as yet. I did cut one out of plywood and painted it up real purty for a Christmas bazaar this past Christmas to hang hooks and ornaments on. I will have to get a picture. Mr. Hoffmann, I noticed your initials and actually have a very similar mark. My initials are PAT and I started using mine in the 6th grade, back in 78-79 time frame. If you look at the bottom of the knocker backing you will see my mark. I cut and filed my stamp out of the end of an old cold chisel. The problem is I cut it out like I make my mark, and not in mirror view. So now all my marks are backwards. My wife calls it my dyslexic mark:D
-
Jayco, that is so amazingly simple, it's simply amazing. thank you so much for thinking it up
-
Pete, thanks for the links. all, thanks for not beating me to death. I do help my drill speed cranked way down. I have just finished drilling several 1/2 md holes in 1/2 inch and one inch steel with little clatter and no burnt bits:D
-
Frederick's crosses from RR spikes
Pault17 replied to Sam Salvati's topic in Blacksmithing, General Discussion
They are fun Sam. If strength wasn't an issue, you could incorporate one as a hilt on a spike knife or something. Taking a suggestion from one of the forum members, I took a piece of inch-thick truck leaf spring and (with several heats) drove a polished spike through it. I made a die that would let me make the surface of the head flat, to sit on a table or shelf, and not lose the spike-look of the bottom side of the head. the only catch is now all my crosses look very similar. -
Larry, Congrats on the attempts. I am part way through a stick welding 101 class (we are doing vertical up and headed towards overhead) and I learned early on that those that are good at it make it look super easy Next time I go to class, I will take some pics maybe. I will agree with what has been said already, speed is key, and watch your puddle.
-
For the last year or so, since my wife gave me a small 10-inch bench-mount drill press, I have been burning the drill bits up like no ones business. After searching the forums here recently, and having seen various comments made (not on the subject of burning drill bits, but of just drilling holes) I realized that drilling dry is no way to go:o you don't need oil when drilling wood! I recently picked up some real "cutting oil" and a little squeeze pump oil can, and WOW!! what a difference. drilling metal is now a whole lot more fun. Thanks for leaning me a new lesson... Now I just have to pick up some new bits of all sizes..
-
LDW, you make a sweet blade.
-
has anyone made a metal scribe?
Pault17 replied to saintjohnbarleycorn's topic in Blacksmithing, General Discussion
I was given a small, heavy bag of carbide tips from some CNC machines. He said they were dull:) -
How do you earn your living?
Pault17 replied to larrynjr's topic in Blacksmithing, General Discussion
home inspector. been doing it for 6 years. tech consultant for home inspections for 6 before that. built homes for ten before that. -
Hand hammers: your preferences?
Pault17 replied to matt87's topic in Blacksmithing, General Discussion
My most used is the 2.75 Lb diagonal pein I made from a cheap HF 3-Lb'er My smallest is a 16oz ball pein . largest hand hammer is a 4 Lb hard sledge. keykeeper, this one only took about 2 hrs without re-harden and temper, neither of which I have even done yet since making it. -
Larry, I didn't do any re-harden or re-temper as of yet. I have used it to forge even re-bar with no marking on the face on pein. Yet. . . I initially did it with a cheap hemmer so there would be no serious loss if it didn't work out.
-
Larry, nice job! I did a similar thing, but with a little cheapo three pounder . I cut (using a metal cutting blade in my skill saw) the angles to make a diagonal pein and then cut a guesstimated amount off the face. I tuned the balance of the head with a flap-disc on my (then relatively new) 4.5 inch grinder. when I demo-ed at the NC state fair, one of the other smiths "borrowed" my hammer for an hour and a half. This one weighs in just a bit shy of 2 3/4 Lbs. and is my favorite hammer to use.
-
out of curiosity, where are you? If you go into your User CP, you can give everybody a better idea as to where you are and if anybody is close by. I did not see L6 in this one, but here is an interesting site Diehl Steel - D-2 Air Hardening tool Steel