jlpservicesinc
-
Posts
5,776 -
Joined
-
Last visited
Content Type
Profiles
Forums
Articles
Gallery
Downloads
Events
Everything posted by jlpservicesinc
-
Yes, yes.. juts more complex.. Shutters in the hood, Venturi stack assist, smoke sucker to feed back into fire.. and adjustable butterflies for both... The Forges for the school will have a system like the Buffalo.. but I might also include a preheated firepot air system that feeds heated air into the tuyere..
-
keep in mind, it's the unburnt gases you want to send back.. Not the heated gases that are lighter.. There are butterfly valves to change the way the air is both taken in from the lower port or lower tuyere and pushed thru into the firepot.. There is also a butterfly valve for the upper discharge valve that pushes air out the top.. This creates a venturi effect and blows the smoke up the chimney as an assist. you have what I like to call the "throttle Valve" this controls 2 aspects at once from what I can tell.. These units are more troublesome to to use if you don't have experience as they need to be adjusted in use to be used to maximum efficiency.. The heavy smoke when first starting the fire is the smoke that will be drawn into the lower smoke reclamation intake.. The flame once established is supposed to go up the chimney and not recycled thru the blower. I'm excited for you.. But it will give you fits until you figure it out.. An 8" flue is very small considering the amount of volume and velocity it will need.. That is why it has the air or venturi assist. There is are some minor differences between the 6660 models and the 660 models.. from the photos it's hard to tell if you have the secondary butterfly valves but from your clean-up photos I believe I had seen one of the valves in the photo..
-
Nice.. Be great to see how the shutters and controls for the pressurized air and the intake air make a difference..
-
The blower blades are markedly different than the standard 200 blower blades.. It's neat that they reinforced the blades to deal with the extra heat of the incoming hot air, smoke, etc.
-

What did you do in the shop today?
jlpservicesinc replied to Mark Ling's topic in Blacksmithing, General Discussion
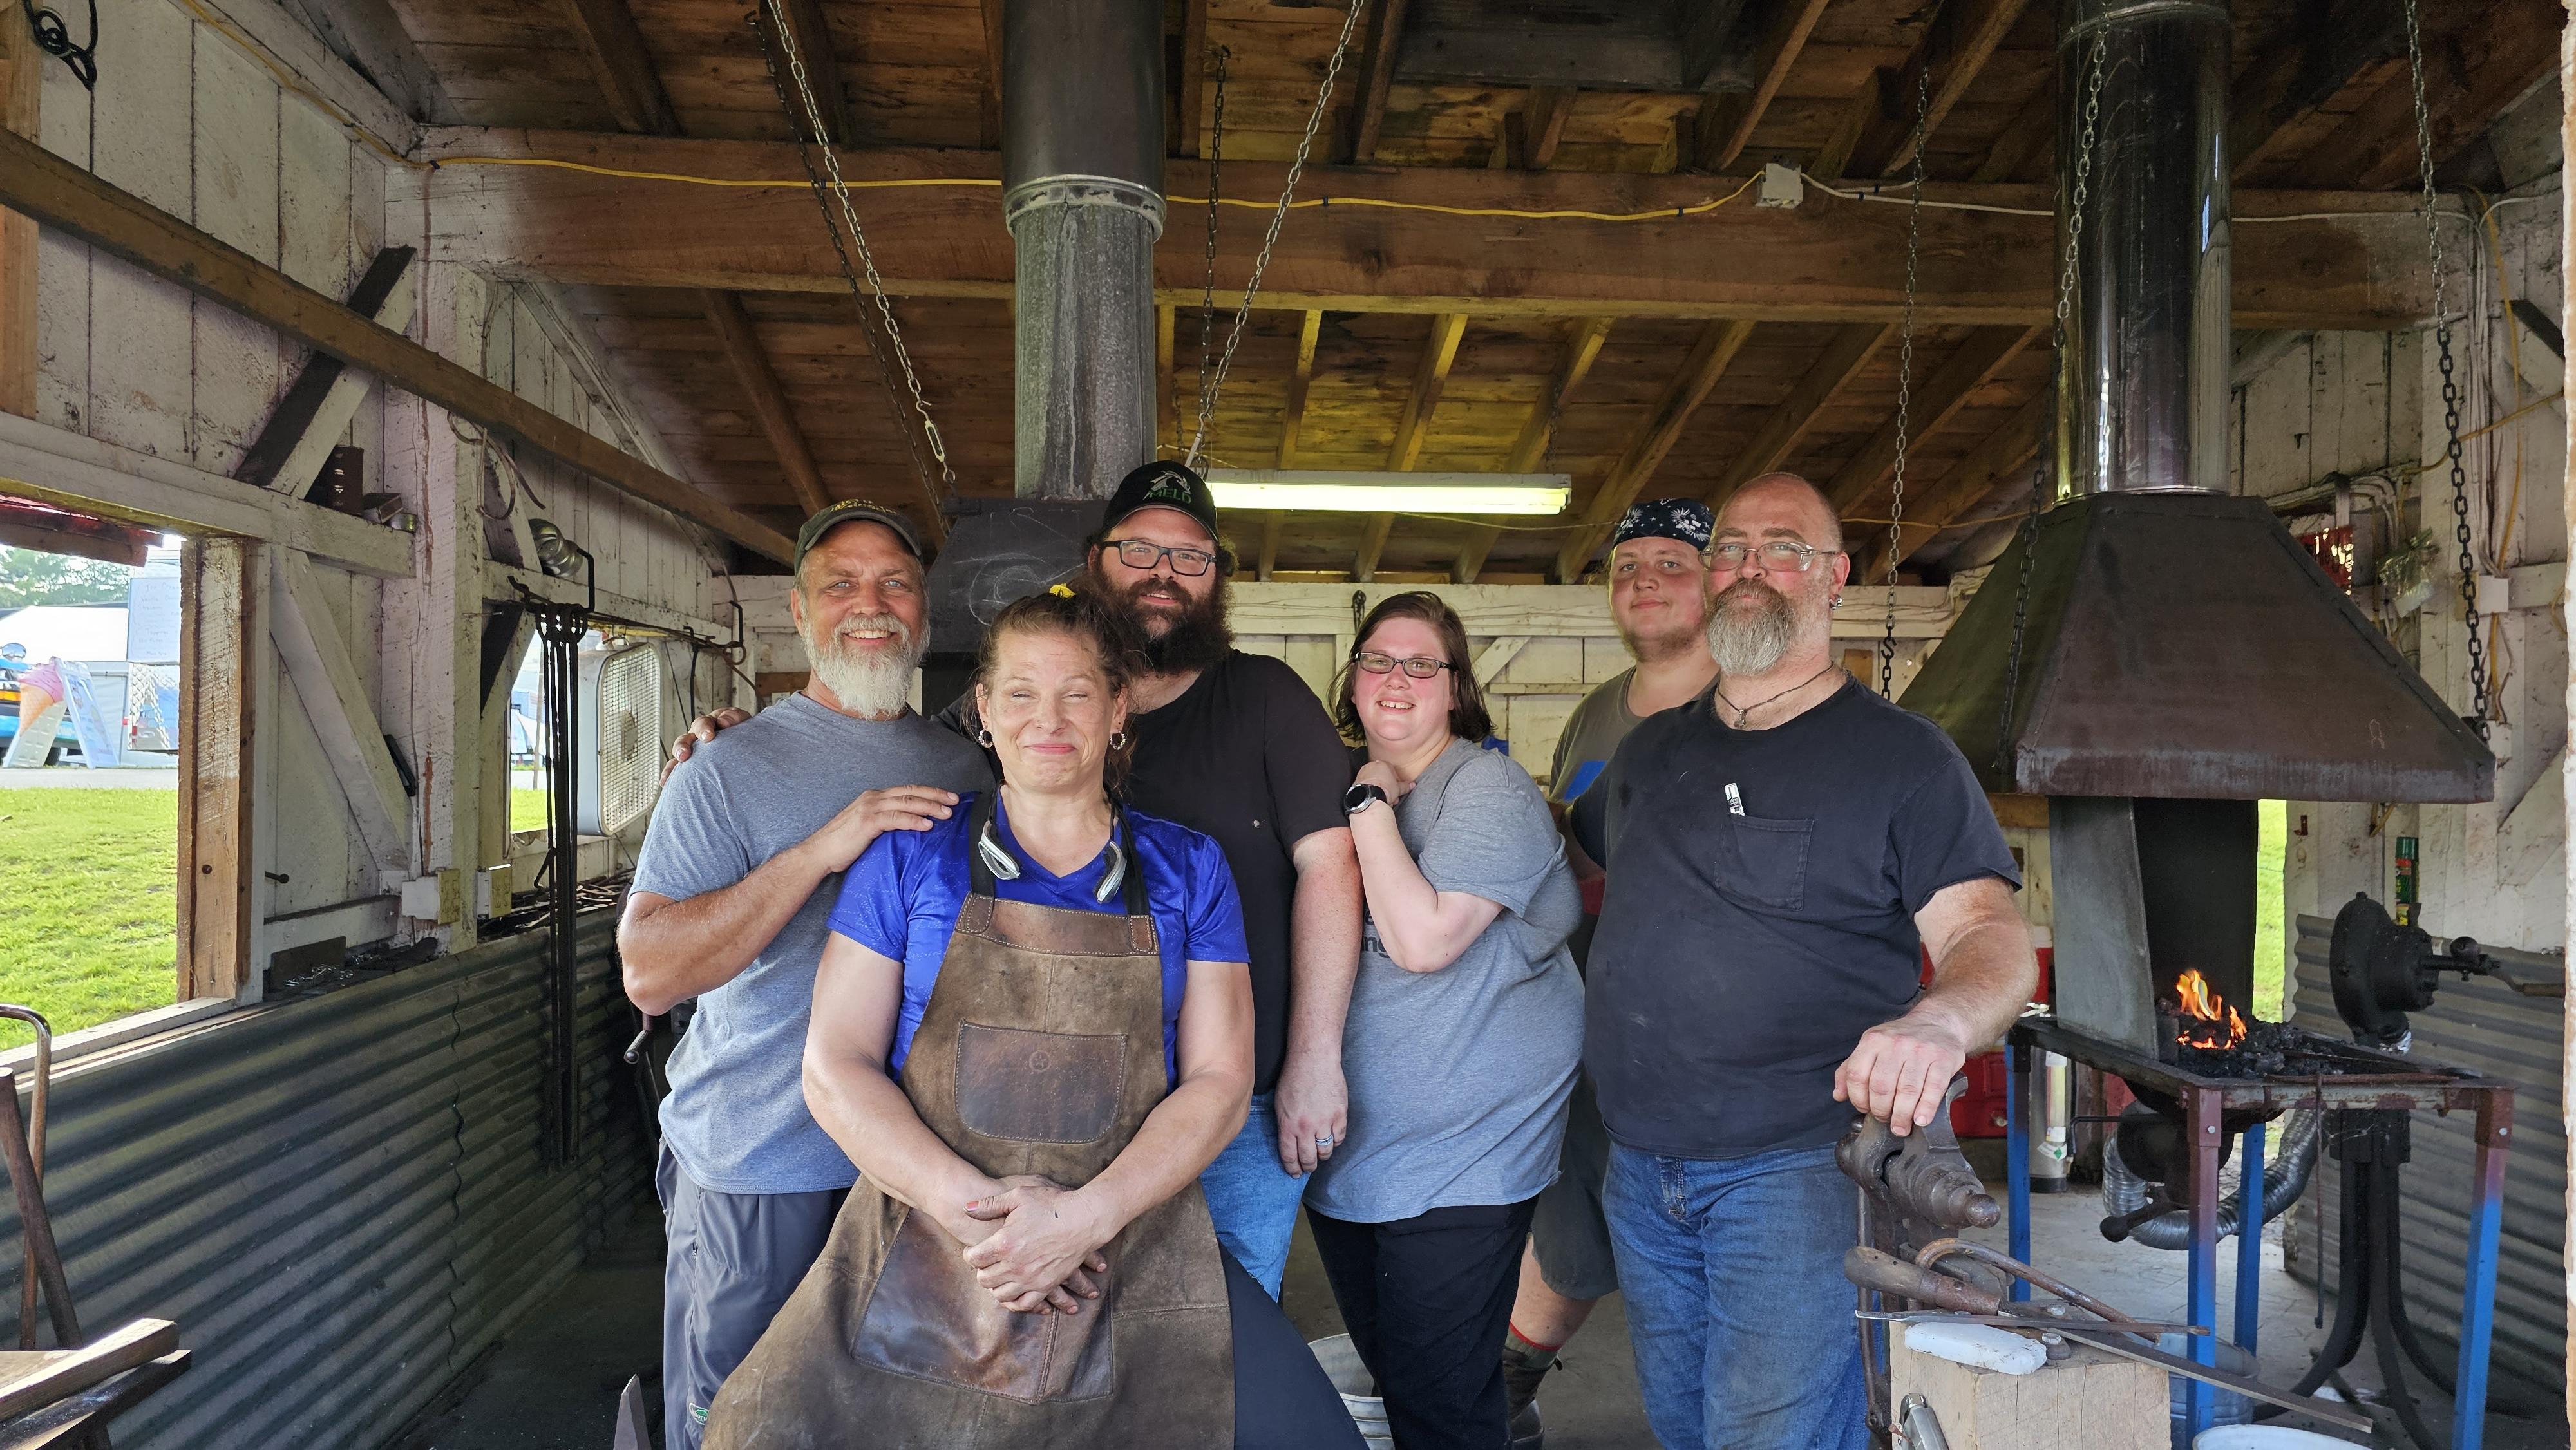
Had a great time today demonstrating down at the Brooklyn Fair in CT. I knew one of the guys. Person in charge thru out an invite to the CT blacksmithing guild so I reached out. Such a great group of people. The Fair is huge.
-
/That is so cool.. Do you shutters work too? Nice job.. Looks great.. Remember to be careful with watered Coal in the forge bed.. Also remember to add some clay before firing around the firepot.. You don't have to fill it up but going tot he height of the flange on the firepot will help out a bunch.. Many of these forges were cracked from watered coal and no heat absorber/dispenser.. The clay acts as a buffer.
-
660 downdraft Buffalo forge with a # 200 blower.
jlpservicesinc replied to Miami 13's topic in Solid Fuel Forges
What would you think is a fair price for a used forge with broken parts.. -
The blast pipe needs to have a drop in front of it.. about 3" is about right, This is then filled with coal dust or clinker or sand. This area is to collect the clinker and slag that comes as the fire burns.. Your best option is to reach out to Williamsburg since that is what was copied. I would imagine they have a complete schematic of the forges used and any hardware they implemented to get the forges going. Things back then that were considered normal, now are not really done.
-
What is the exact date you are after give or take?
-
What did you do in the shop today?
jlpservicesinc replied to Mark Ling's topic in Blacksmithing, General Discussion
owl without a beak -
What did you do in the shop today?
jlpservicesinc replied to Mark Ling's topic in Blacksmithing, General Discussion
sorry John. thats a bummer.. They say it's back and growing faster in the population. I really miss the days of no one on the road.. LOL.. Not funny but certainly was great traveling.. Being involved with animals and farming I was able to travel.. -
660 downdraft Buffalo forge with a # 200 blower.
jlpservicesinc replied to Miami 13's topic in Solid Fuel Forges
It depends largely on how much damage there is and whether it's a usable unit.. In great shape and in useable condition. The price can be higher depending on the value to the purchaser. Does the forge have any damage? More photos? -
What did you do in the shop today?
jlpservicesinc replied to Mark Ling's topic in Blacksmithing, General Discussion
I've always forged solo. I find when exposed to a group I'm less productive and spend more time talking vs real forging. For some the social aspect is huge part of it. When I'm feeling humdrum about a project it's usually because I am experiencing a lack of skill. Yes, even after all this time I still experience problem areas. For me it's usually because I don't forge enough. So a project will come up like making welded hinges and the first 1 or 5 won't be great. I used to get disgusted and throw it in scrap or would say I'll fix it later. I learned if the first one is not what I'm looking for that I need to practice that one step that's leaving the rest of the project lack luster. So will pick up a piece of stock and just practice as an example a clean shoulder, or a better weld on a hinge barrel. It doesn't matter what the item is. I just focus on that one skill. The blah, turns to Wow, and the rest of the project and my skills benefit. Helps reignite. It takes me 5 or 7 hinge barrel welds now nearly Everytime I make a pair. My awe comes each time I hit the metal and it moves. . There is so much video content on metal working now it's hard to believe just a few sort years ago the selection was thin. By the way. It's ok to explore a subject your interested in a and then put it on the side. Finding that thing that is interesting to the individual and creates desire to do is what's important. The things that drive me: consistency, trouble shooting, and seeing things that I could do better. Also limiting outside tool use to make things easier. Grinding vs forging, drilling vs punching. I really like to use the main blacksmith kit. Anvil, hammer, forge, vise. That's just what I enjoy doing and helps keep me motivated. As a side note. Weather seems to play in more as I've got older. Go figure. -
What did you do in the shop today?
jlpservicesinc replied to Mark Ling's topic in Blacksmithing, General Discussion
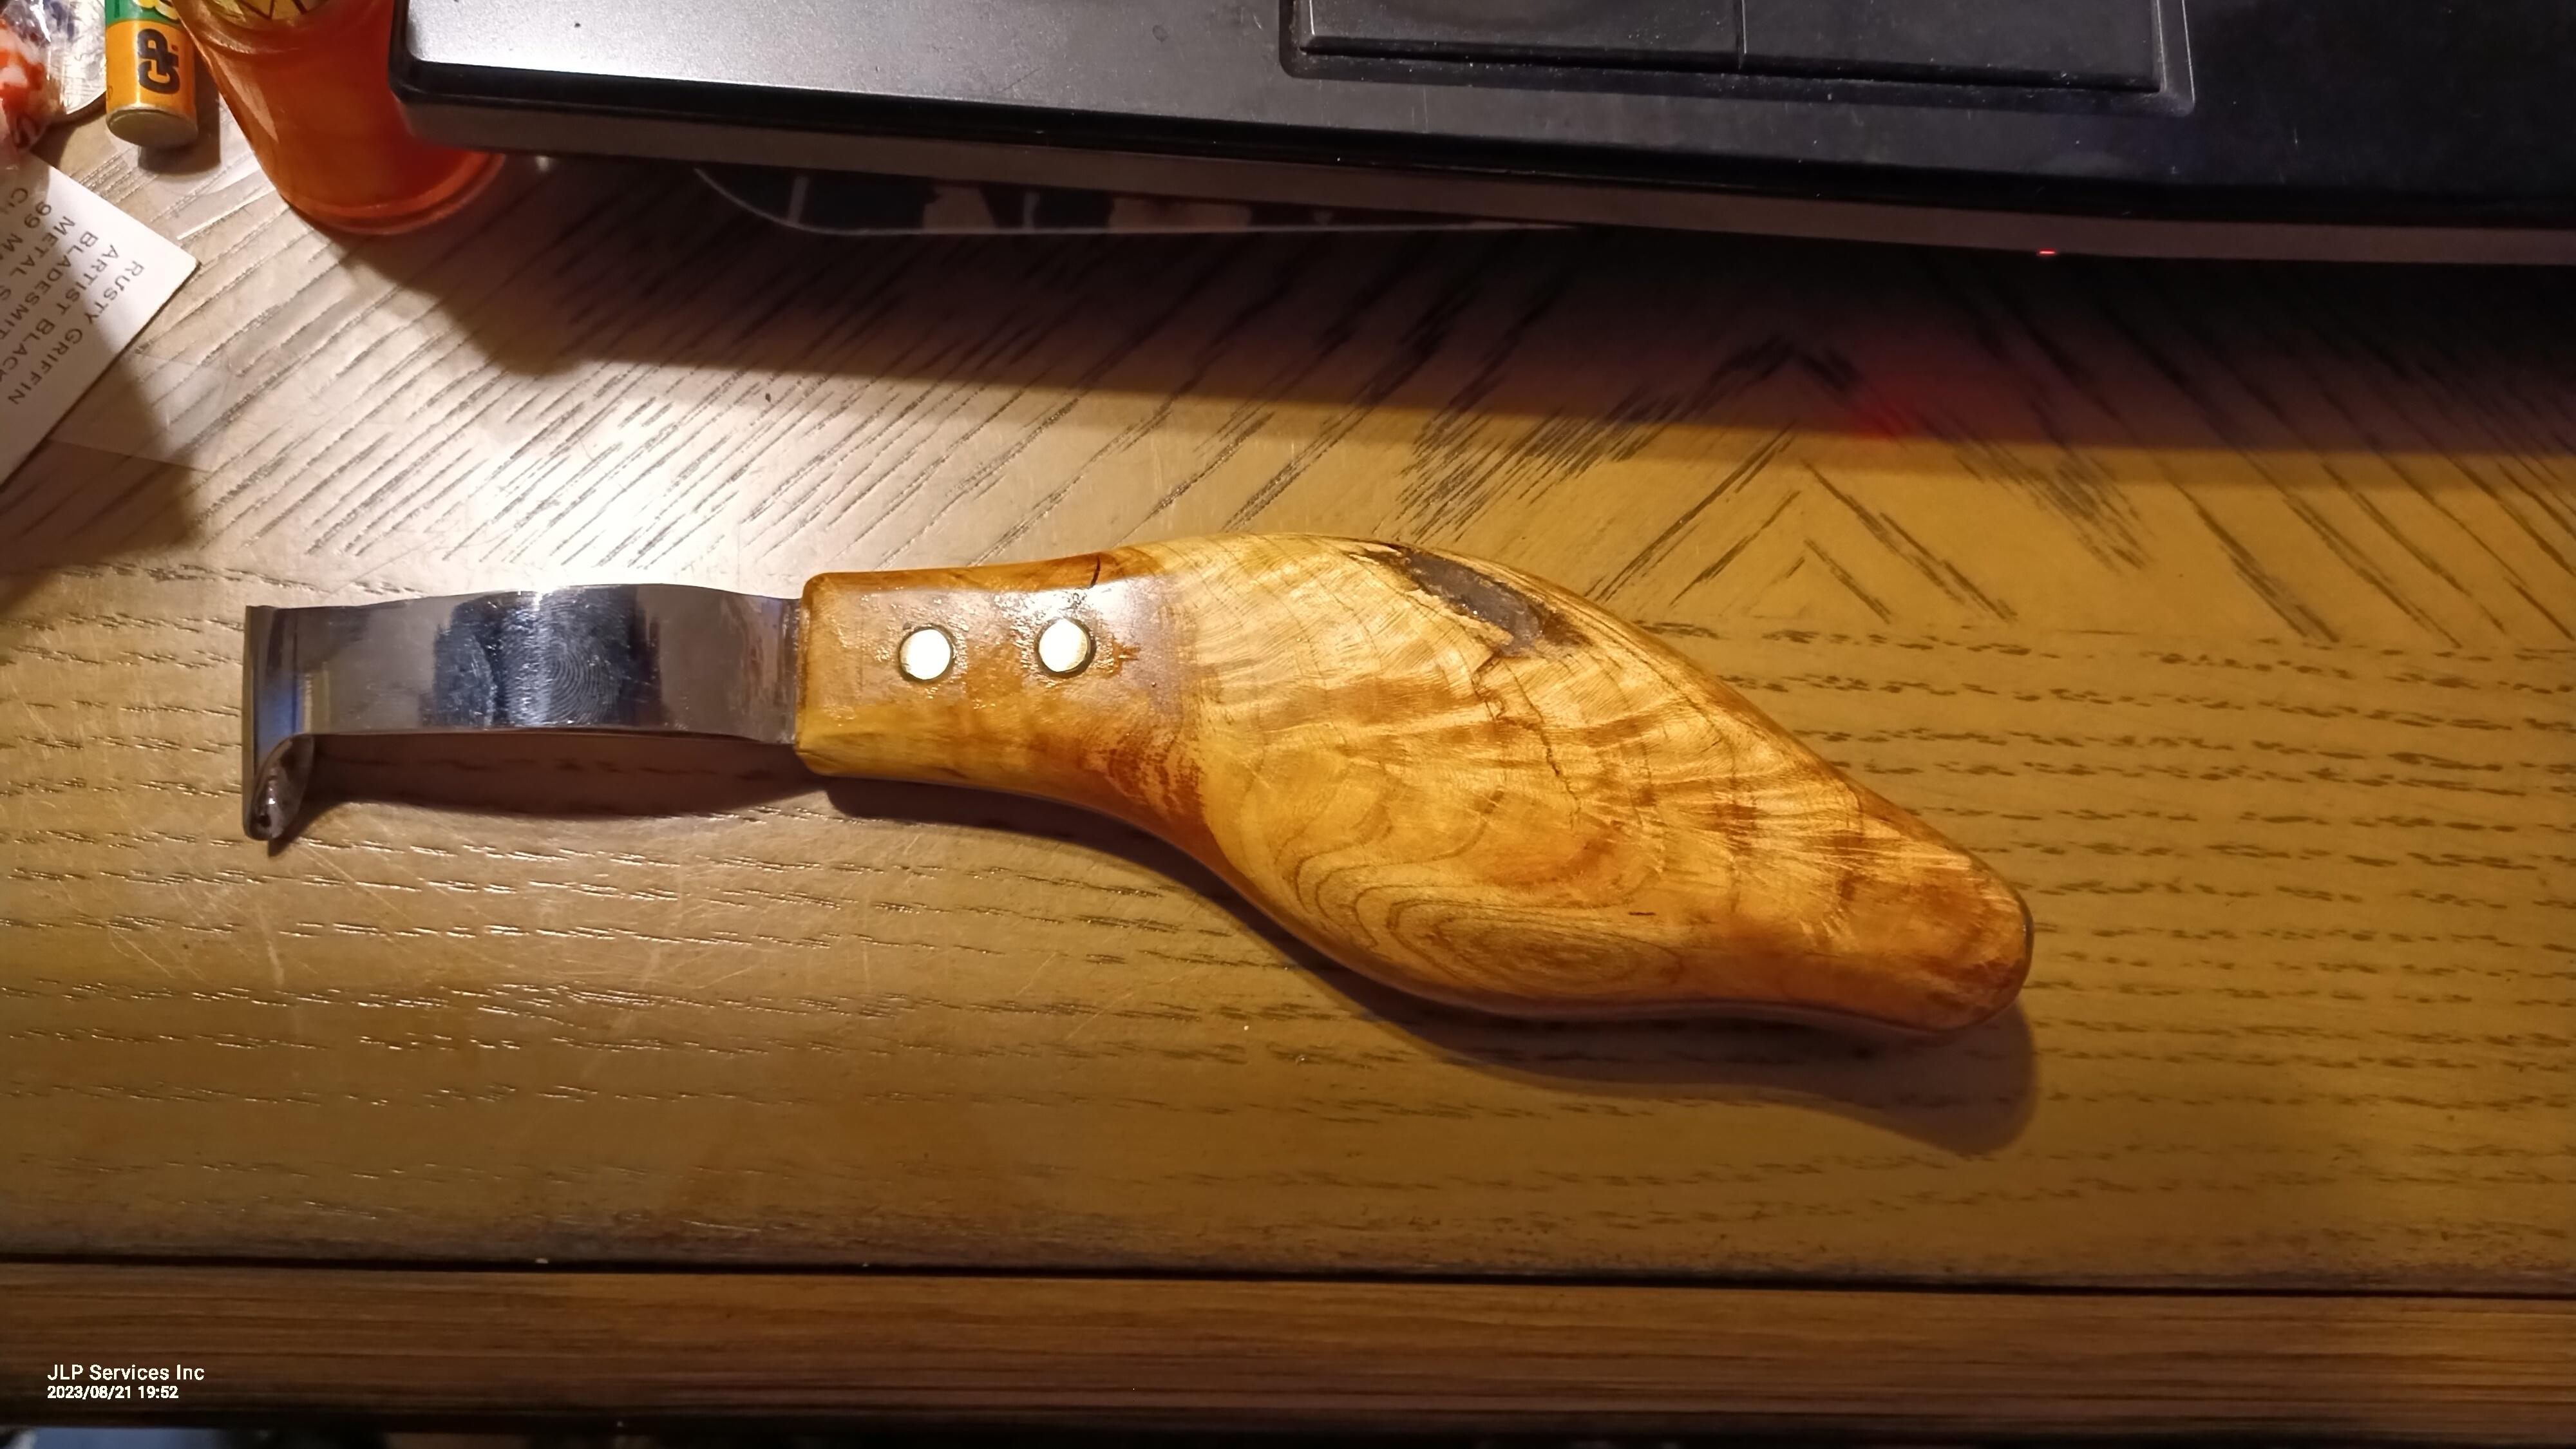
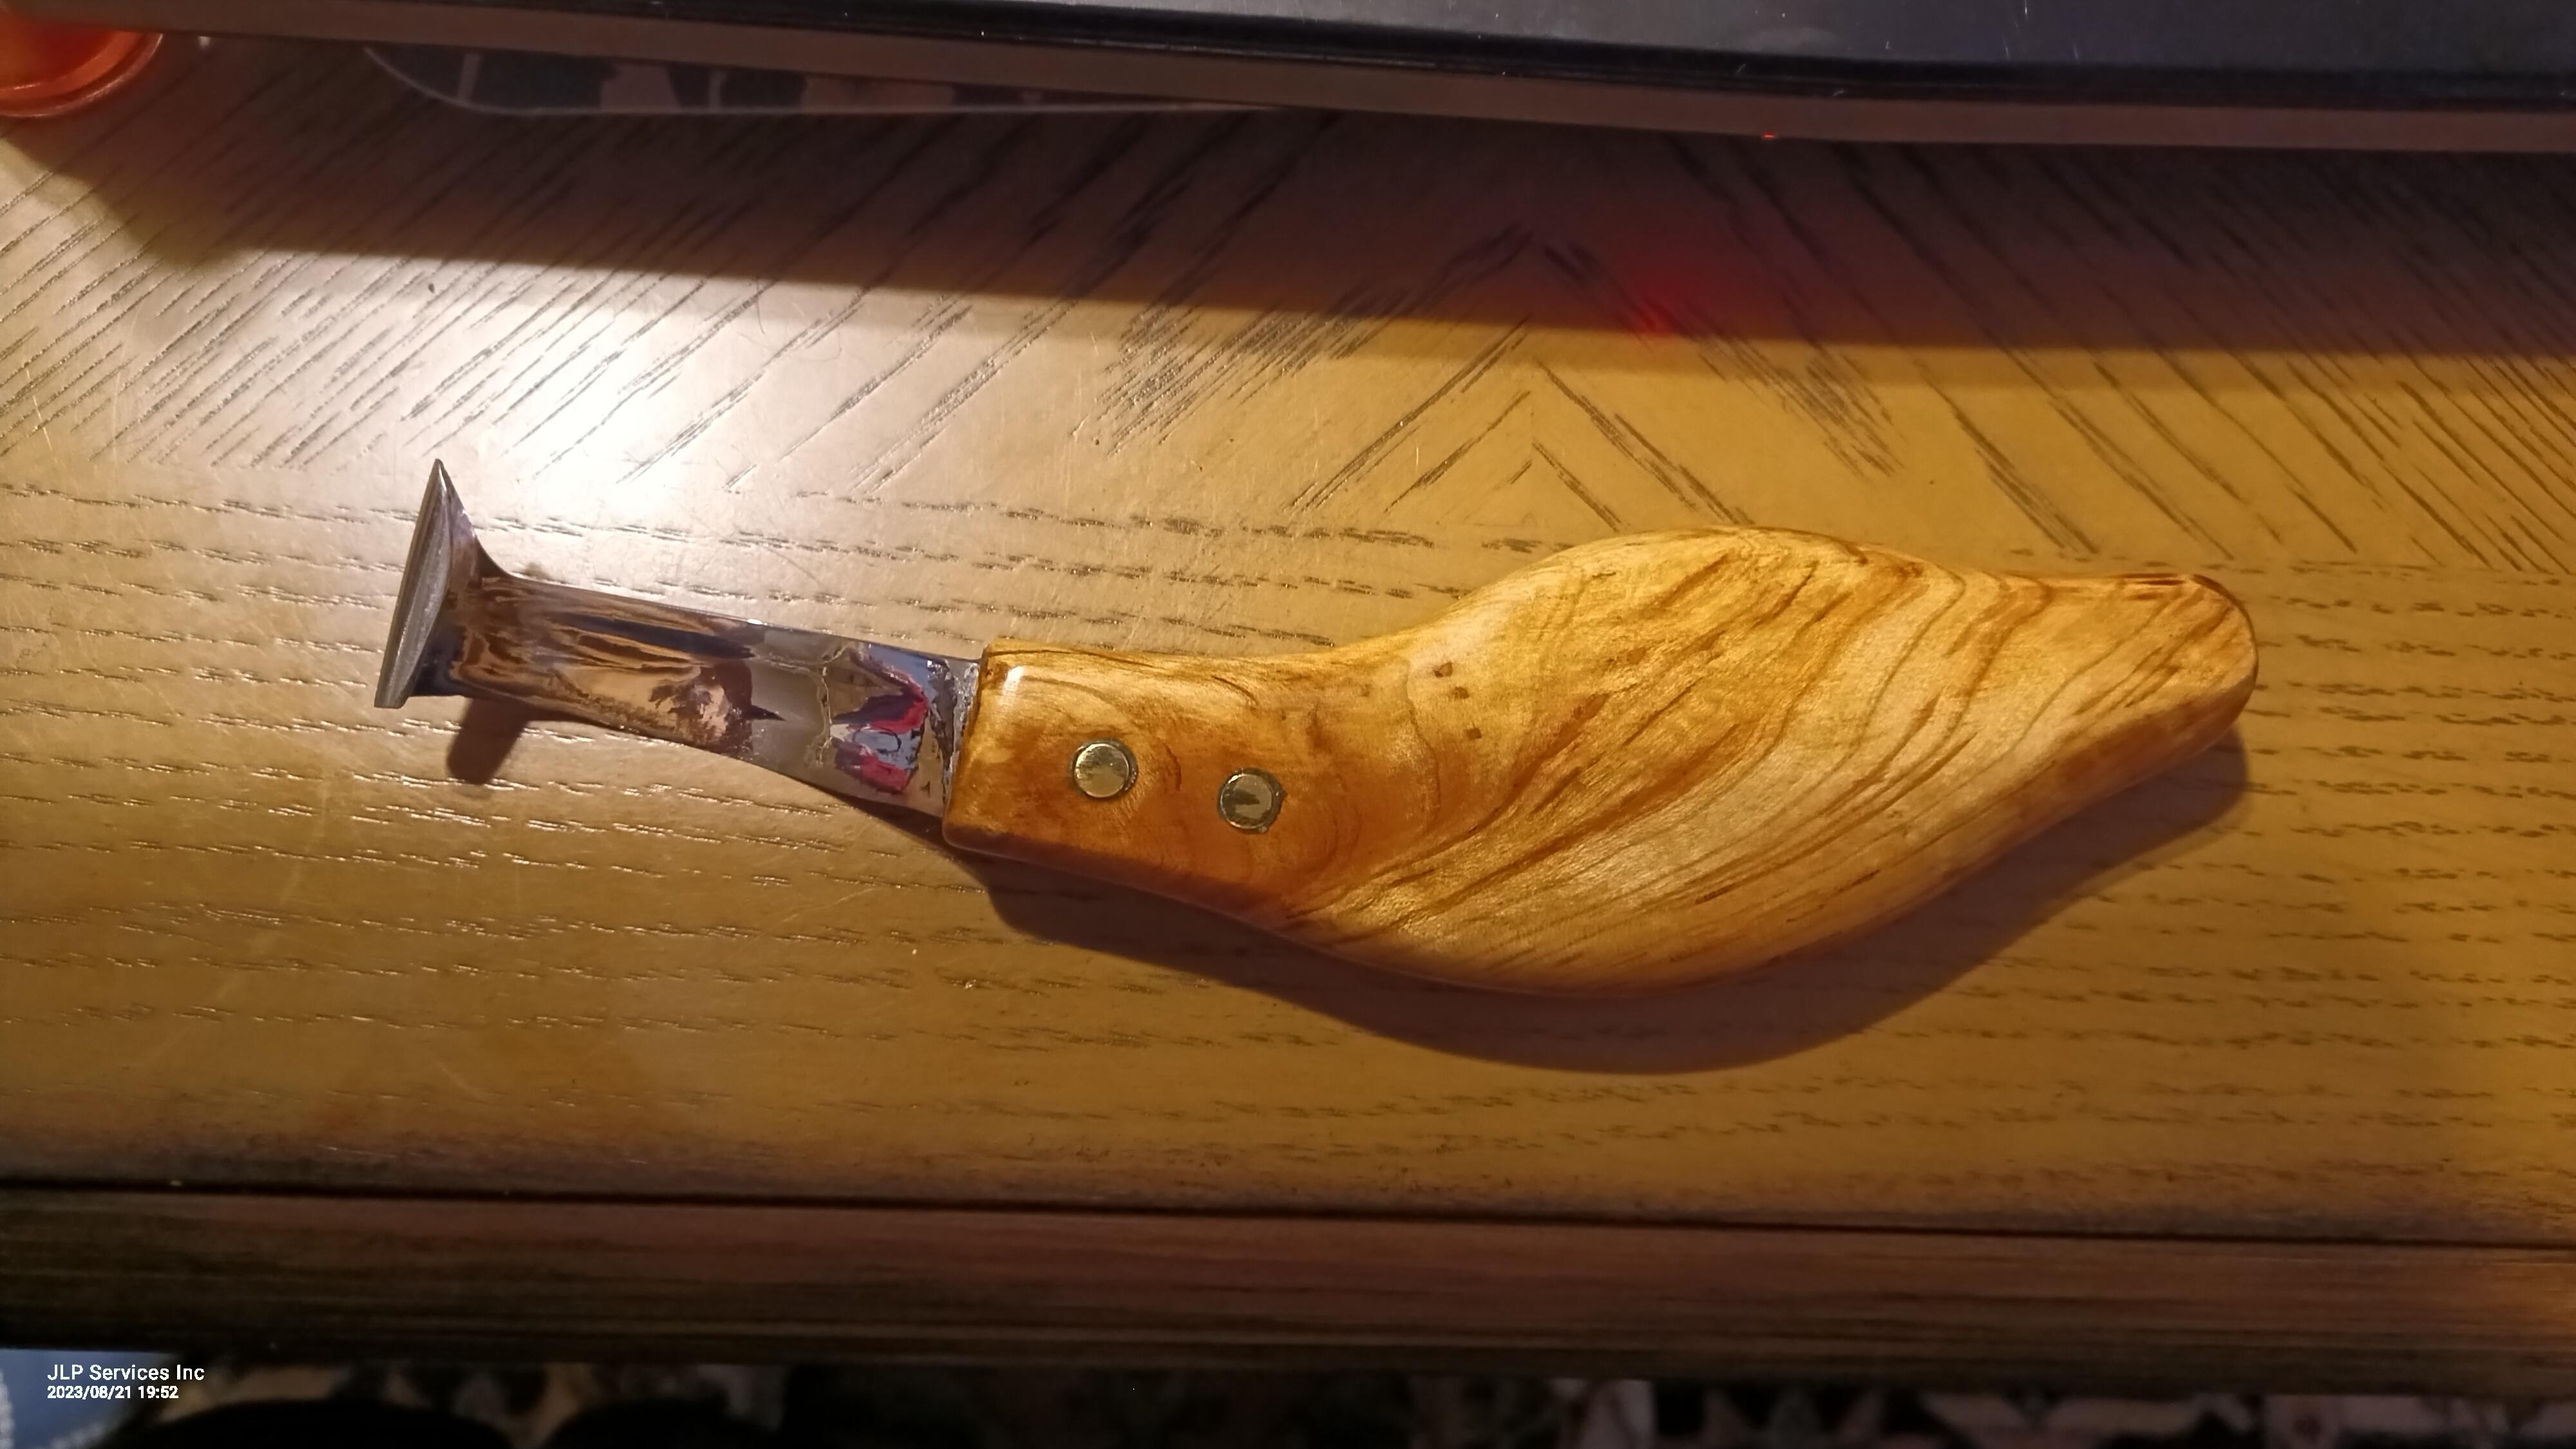
Thanks. it's high polish 5160. High polish helps to keep stuff from sticking like mud, foot, and wet hoof. -
What did you do in the shop today?
jlpservicesinc replied to Mark Ling's topic in Blacksmithing, General Discussion
Finished my fancy hoof knife.

-
What did you do in the shop today?
jlpservicesinc replied to Mark Ling's topic in Blacksmithing, General Discussion
Of note on the weld.. Flat to flat will always give you the best seamless weld as long as the sides are aligned. Flat to flat is the surface area not the stock dimension. Flat to flat is the best and easiest.. Round to flat, round to round.. In these last 2 types of welds.. There needs to be filler material that basically makes the round stock into flat stock or an additional piece with the correct scarf added in. Or enough material reduction to get them both into the flat to flat relationship again, not in dimension but in surface area. There are ways to negotiate this type of problem without additional material, but it's not a beginner technique.. I often find when teaching forge welding that people get confused by the misinformation they read online. Forge welding is a very simple process.. Literally, anybody can and should do it. Something to keep in mind and also why having a good hammer face is important. When you are forging the metal, it will generally move lengthwise the most.. It also moves to the sides and also back towards your hand or tongs to a much lesser extent.. With this said.. When your hammer lands on the hot metal, the area in contact with the anvil and face of the hammer are held or squished in place at the center of the hit area.. This means that if there is a hollow the hydraulic force within the metal upon hit will be forced into all directions including sending the low spot towards the hammer face and the anvil if the temperature is correct. kinda like squeezing playdough in your fist.. It will work thru and into any cracks.. -
What did you do in the shop today?
jlpservicesinc replied to Mark Ling's topic in Blacksmithing, General Discussion
Billy Nice work.. The ABANA curriculum addresses the issue you mention.. The curriculum is a great way to address skills without having to learn it on your own. There are tons of videos on it and the methods are extremely well thought out and explained.. -
What did you do in the shop today?
jlpservicesinc replied to Mark Ling's topic in Blacksmithing, General Discussion
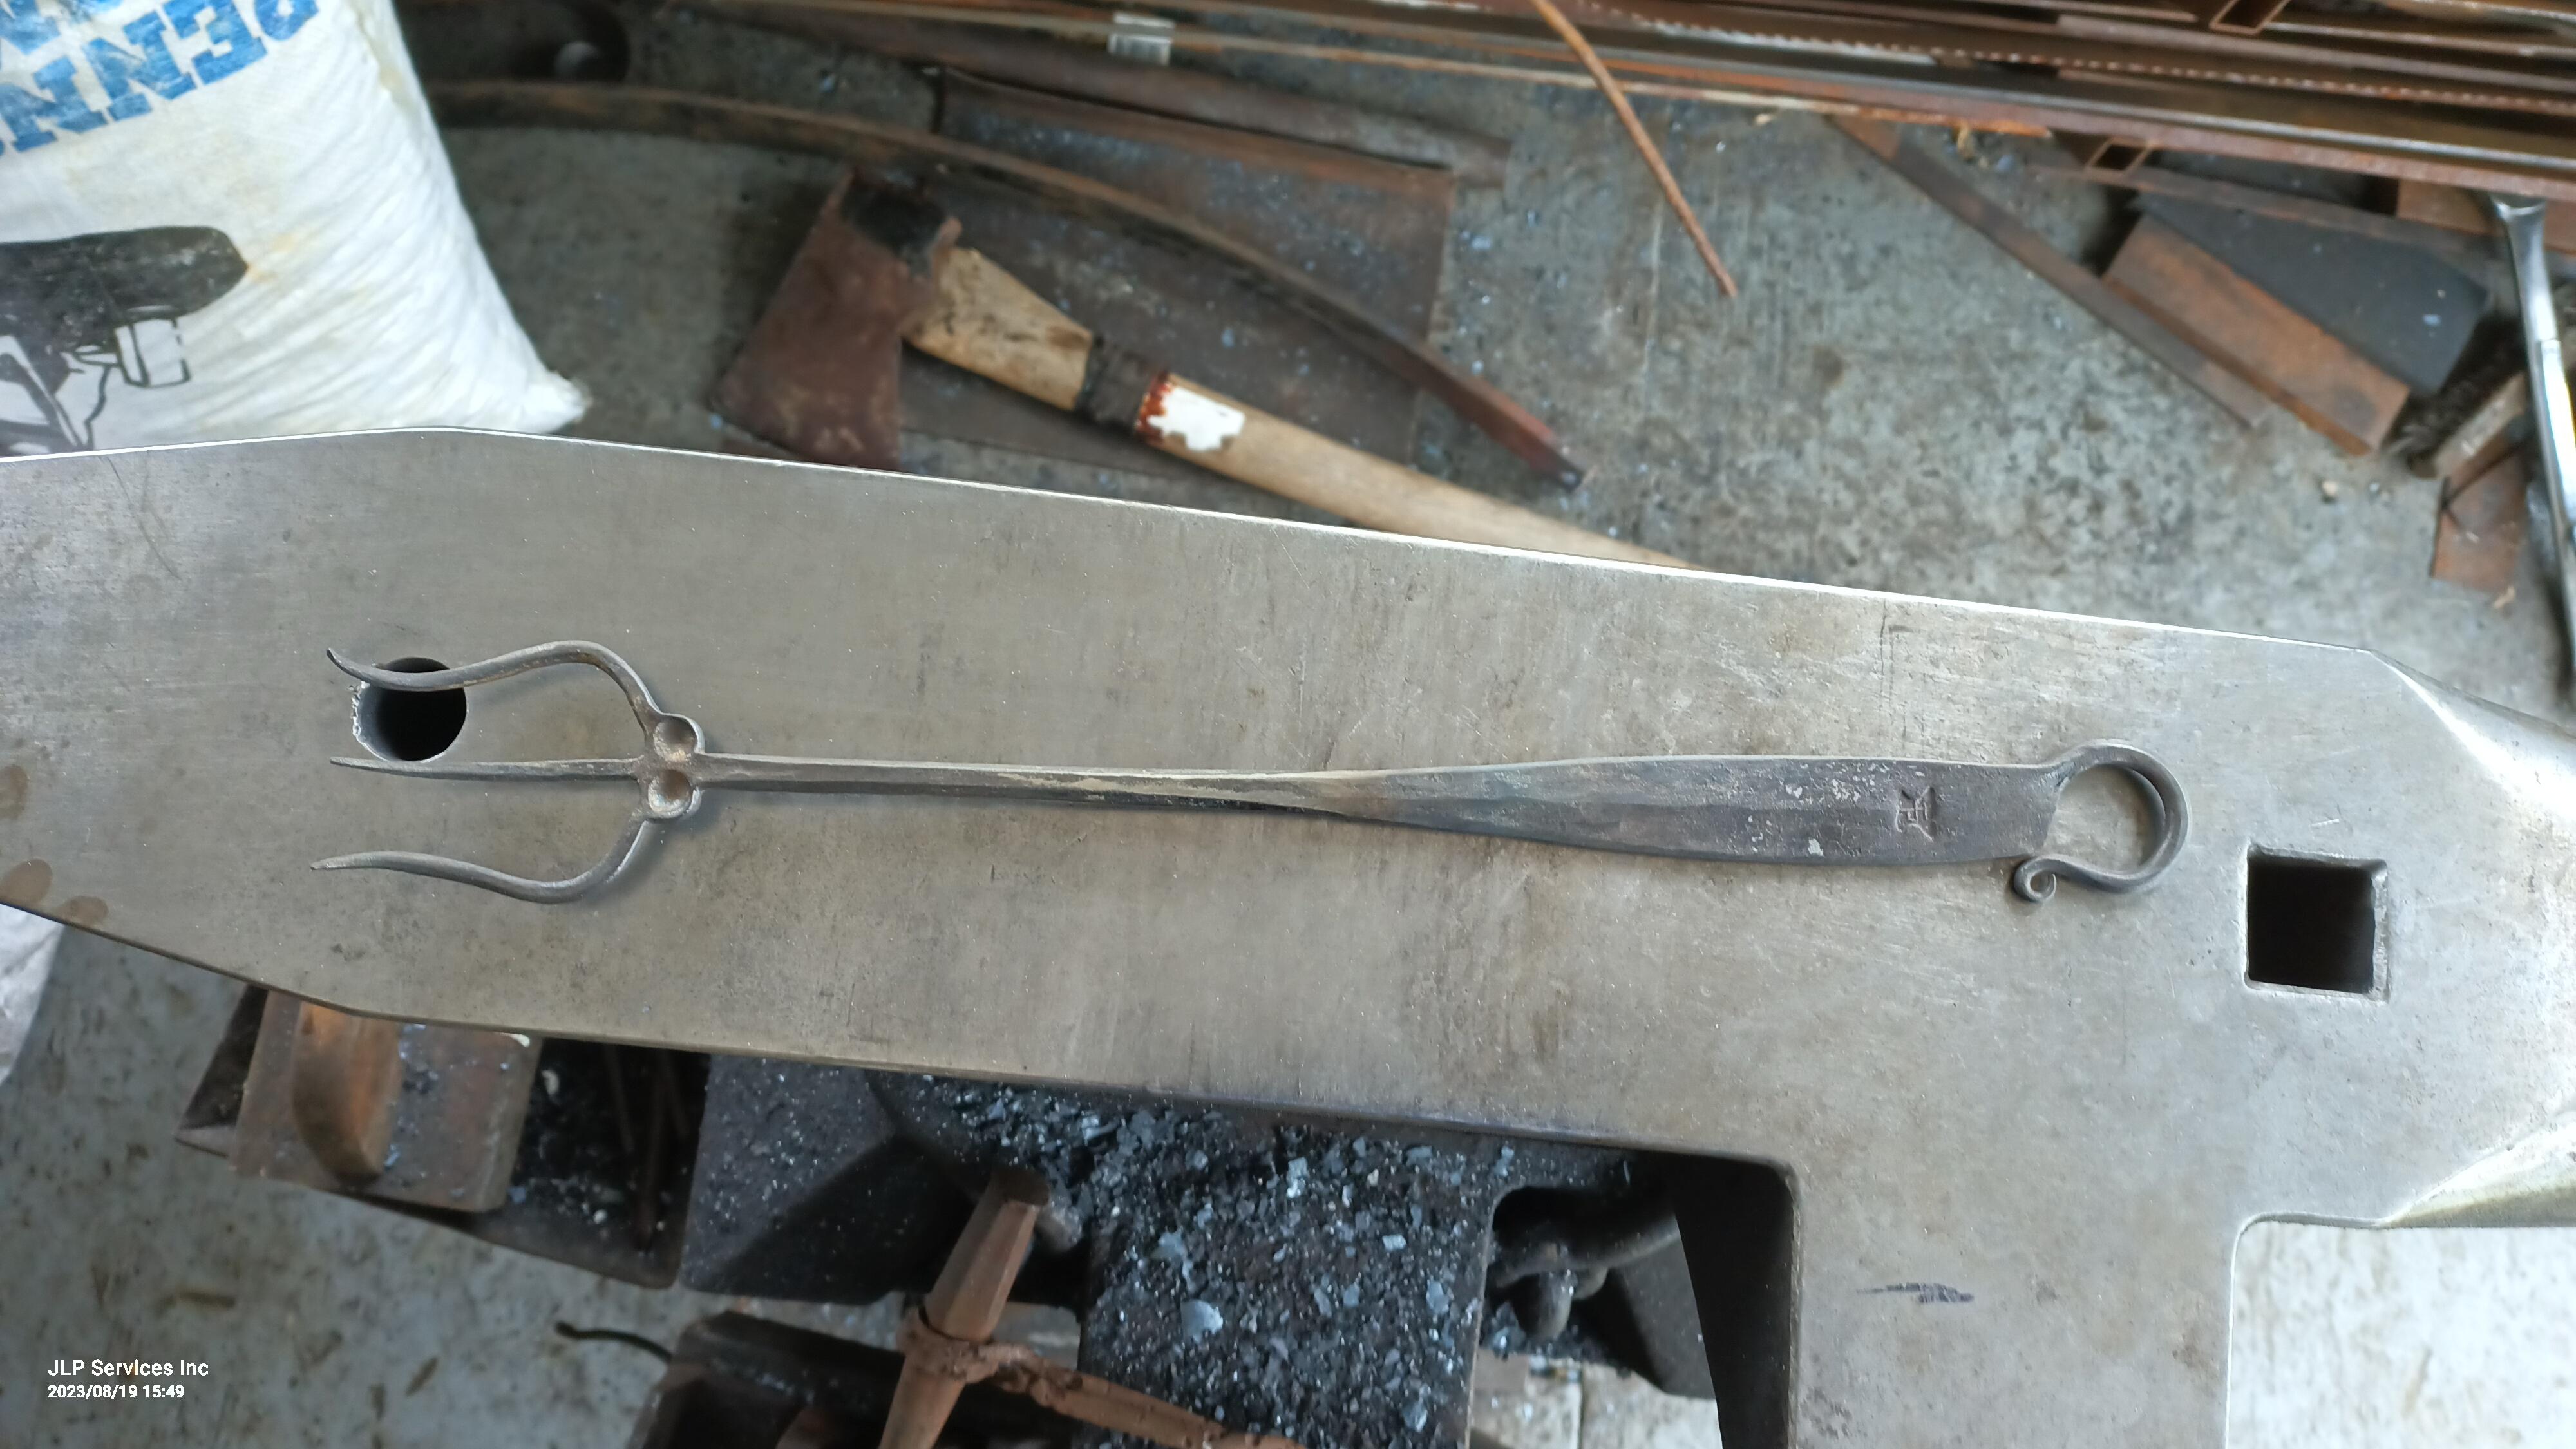
Forged a Trident at today's demo.
-
A hardenss tester needs to have a certain resistance to work properly. If there is not enough of material or if a layer of decarb is present then it will be wrong. There are files.. Which can test across items like damascus but they are not that accurate.. A penetrator is needed unless you have $$$$$$$$$$.. I own 4 types of indention type Hardness testers.. 1 set of files, and one bounce or kinetic type tester. The files will not work on decarb, the kinetic will not work on decarb.. How ever the penetration type will work since the penetractor will go right thru the decarb layer until it hits real material. Is it as accurate as removing the decarb.. No.. With this said.. You can feel the decarb layer with a regular file and just file or sand off the decarb.. Or better yet.. Since this is a real shop with real testing equipment.. Just put it on the surface grinder and remove a measured amount of material.. On thru hardening steels it amazing just how thick is thoroughly hardened vs a surface hardening steel like plain carbon steels.. Plain carbon steels 1000 series (1010, 1020, 1030, 1040, etc, etc 1095) are surface hardening. Meaning that for a given cross section, once the material get to a certain thickness, it's only a layer on the outside that is hard. 5160 is thru hardening.. This means for a very thick section I have found about 1/2" X 2X3 or even 1/2"X3X3 will be thru hardened with very little unhardened material if heated and cooled appropriately.
-
decarb varies with many factors. If the item is forged in an oxidizing fire the decarb layer will be thicker. If there is no prep before hardening the layer will be thicker.
-
You guys are kinda missing the mark.. Anytime you arbitrarily pull information out of a video, demo, lecture or website there is a lot of information that is lacking. This graph says just this and nothing else. 1084, 1/4" stock, quenched at 1475F.. Rockwell hardness and of depth of hardness depending on the quench fluid.. Speculation one way or the other is spitting in the wind.. "IS" or "IS NOT".. So. Can any of you guys dial into that 1475F exactly? Sure with a "heat treating oven" Now we can argue.. Salt melts at, or tempil marker.. Blah, blah, blah.. What about if the coupons were pulled from 6 different batches of 1084????? Then what. you guys would be better served by doing the same experiments yourself and seeing the results. Steve, I don't believe that is the removal of the decarb layer.. The decarb layer at this point should be removed to get a consistent result.. Easy enough to do with a surface grinder.. It would have to be speculation that the decarb layer is being measured in this test.. Or more accurately the decarb layer is being removed with each measurement.
-
What did you do in the shop today?
jlpservicesinc replied to Mark Ling's topic in Blacksmithing, General Discussion
Very nice. No leaks now. Hopefully. Do you have people that you can call to help with projects like this. -
It's interesting to me that "knife steel nerds" has studied the attributes of forging a knife and heat treating at his forge,band his recommendations after all the testing is what I've recommended and explained for the past 30yrs. It was great finally seeing someone in the metallurgic field actually do this kind of thing. If metals had to be processed at a laboratory level to do anything humans would not have survived.
-
Keep in mind they only show you the hardness. They in no way show what the grain structure is. I can take a piece of mild steel over heat it in the carbonizing part of the fire, quench it and get 62Hrc. Sure it's 62Hrc but the grain growth is useless for anything unless one understands how to utilize the steel and it's character to the best advantage.
-
What did you do in the shop today?
jlpservicesinc replied to Mark Ling's topic in Blacksmithing, General Discussion
I like this shape for cold hardies and a very narrow one for hot work. My only concern is the shoulder on the hardie hole to hardie is not that big.. You have to be careful about damaging the hardie hole and getting them stuck together.