BlackMetalViking
-
Posts
101 -
Joined
-
Last visited
Content Type
Profiles
Forums
Articles
Gallery
Downloads
Events
Everything posted by BlackMetalViking
-
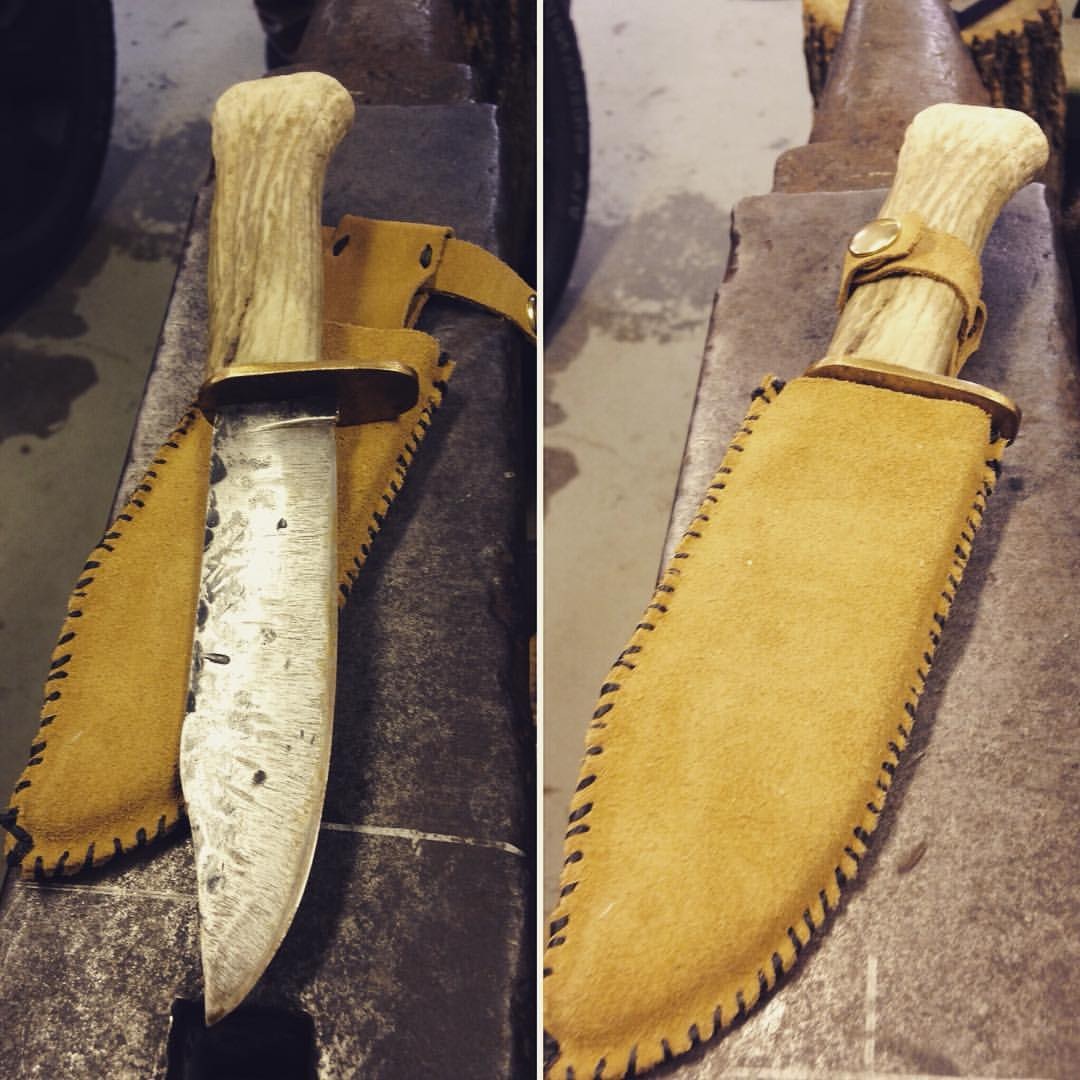
I haven't tried yet. I did a little work with a wire brush on a bench grinder, and then used some emery cloth. I'm sure you understand, once I finally got the forge up and running, all I could think about was what to try and forge next. I do plan on doing more finishing work over the winter, and I will definitely try a brass brush. And thanks Daswulf! Viking
-
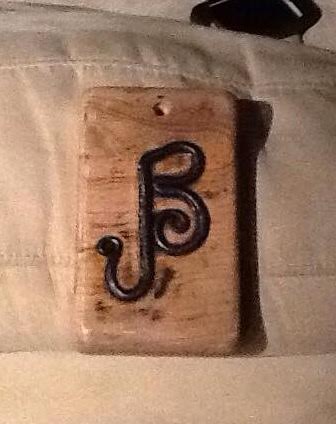
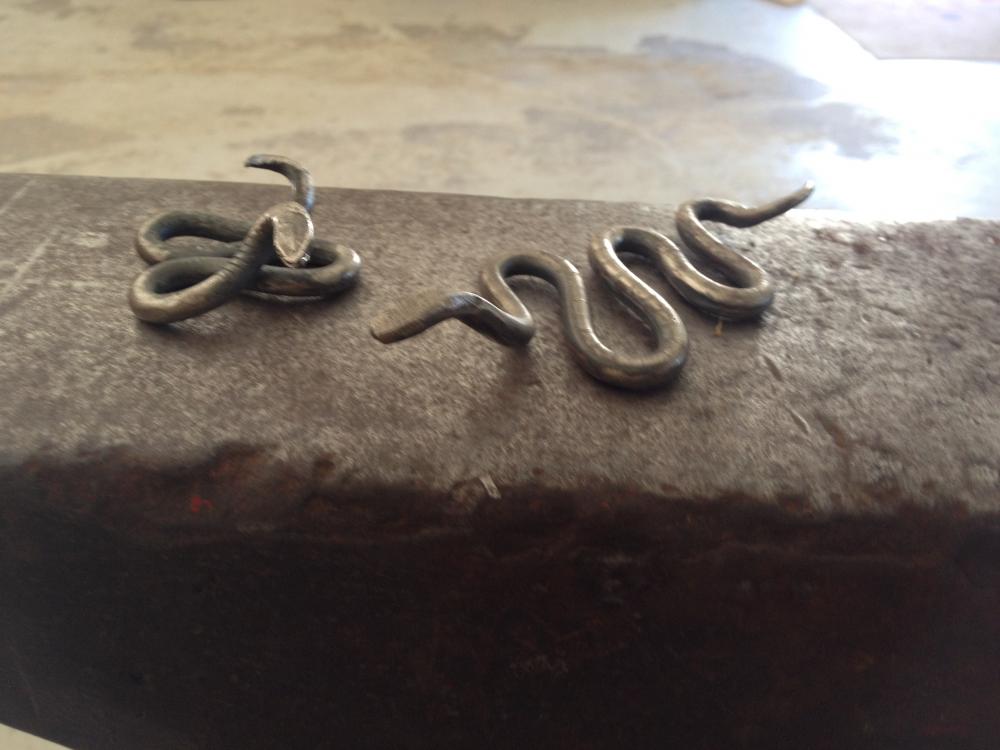
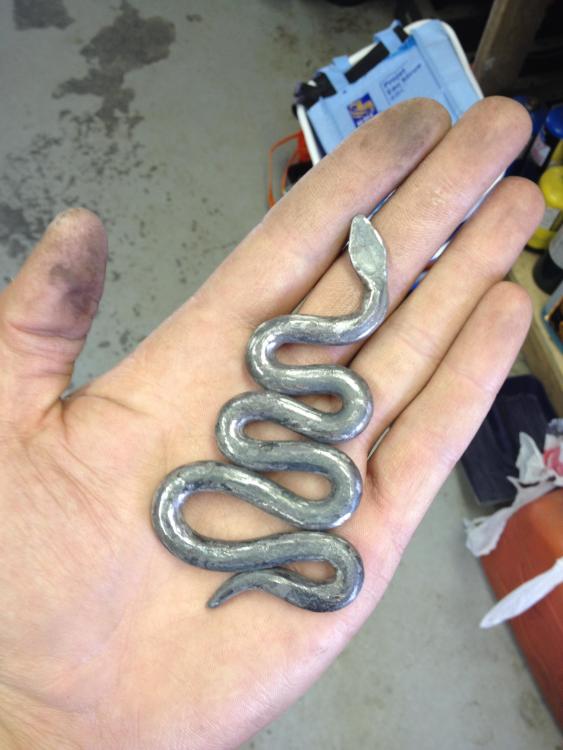
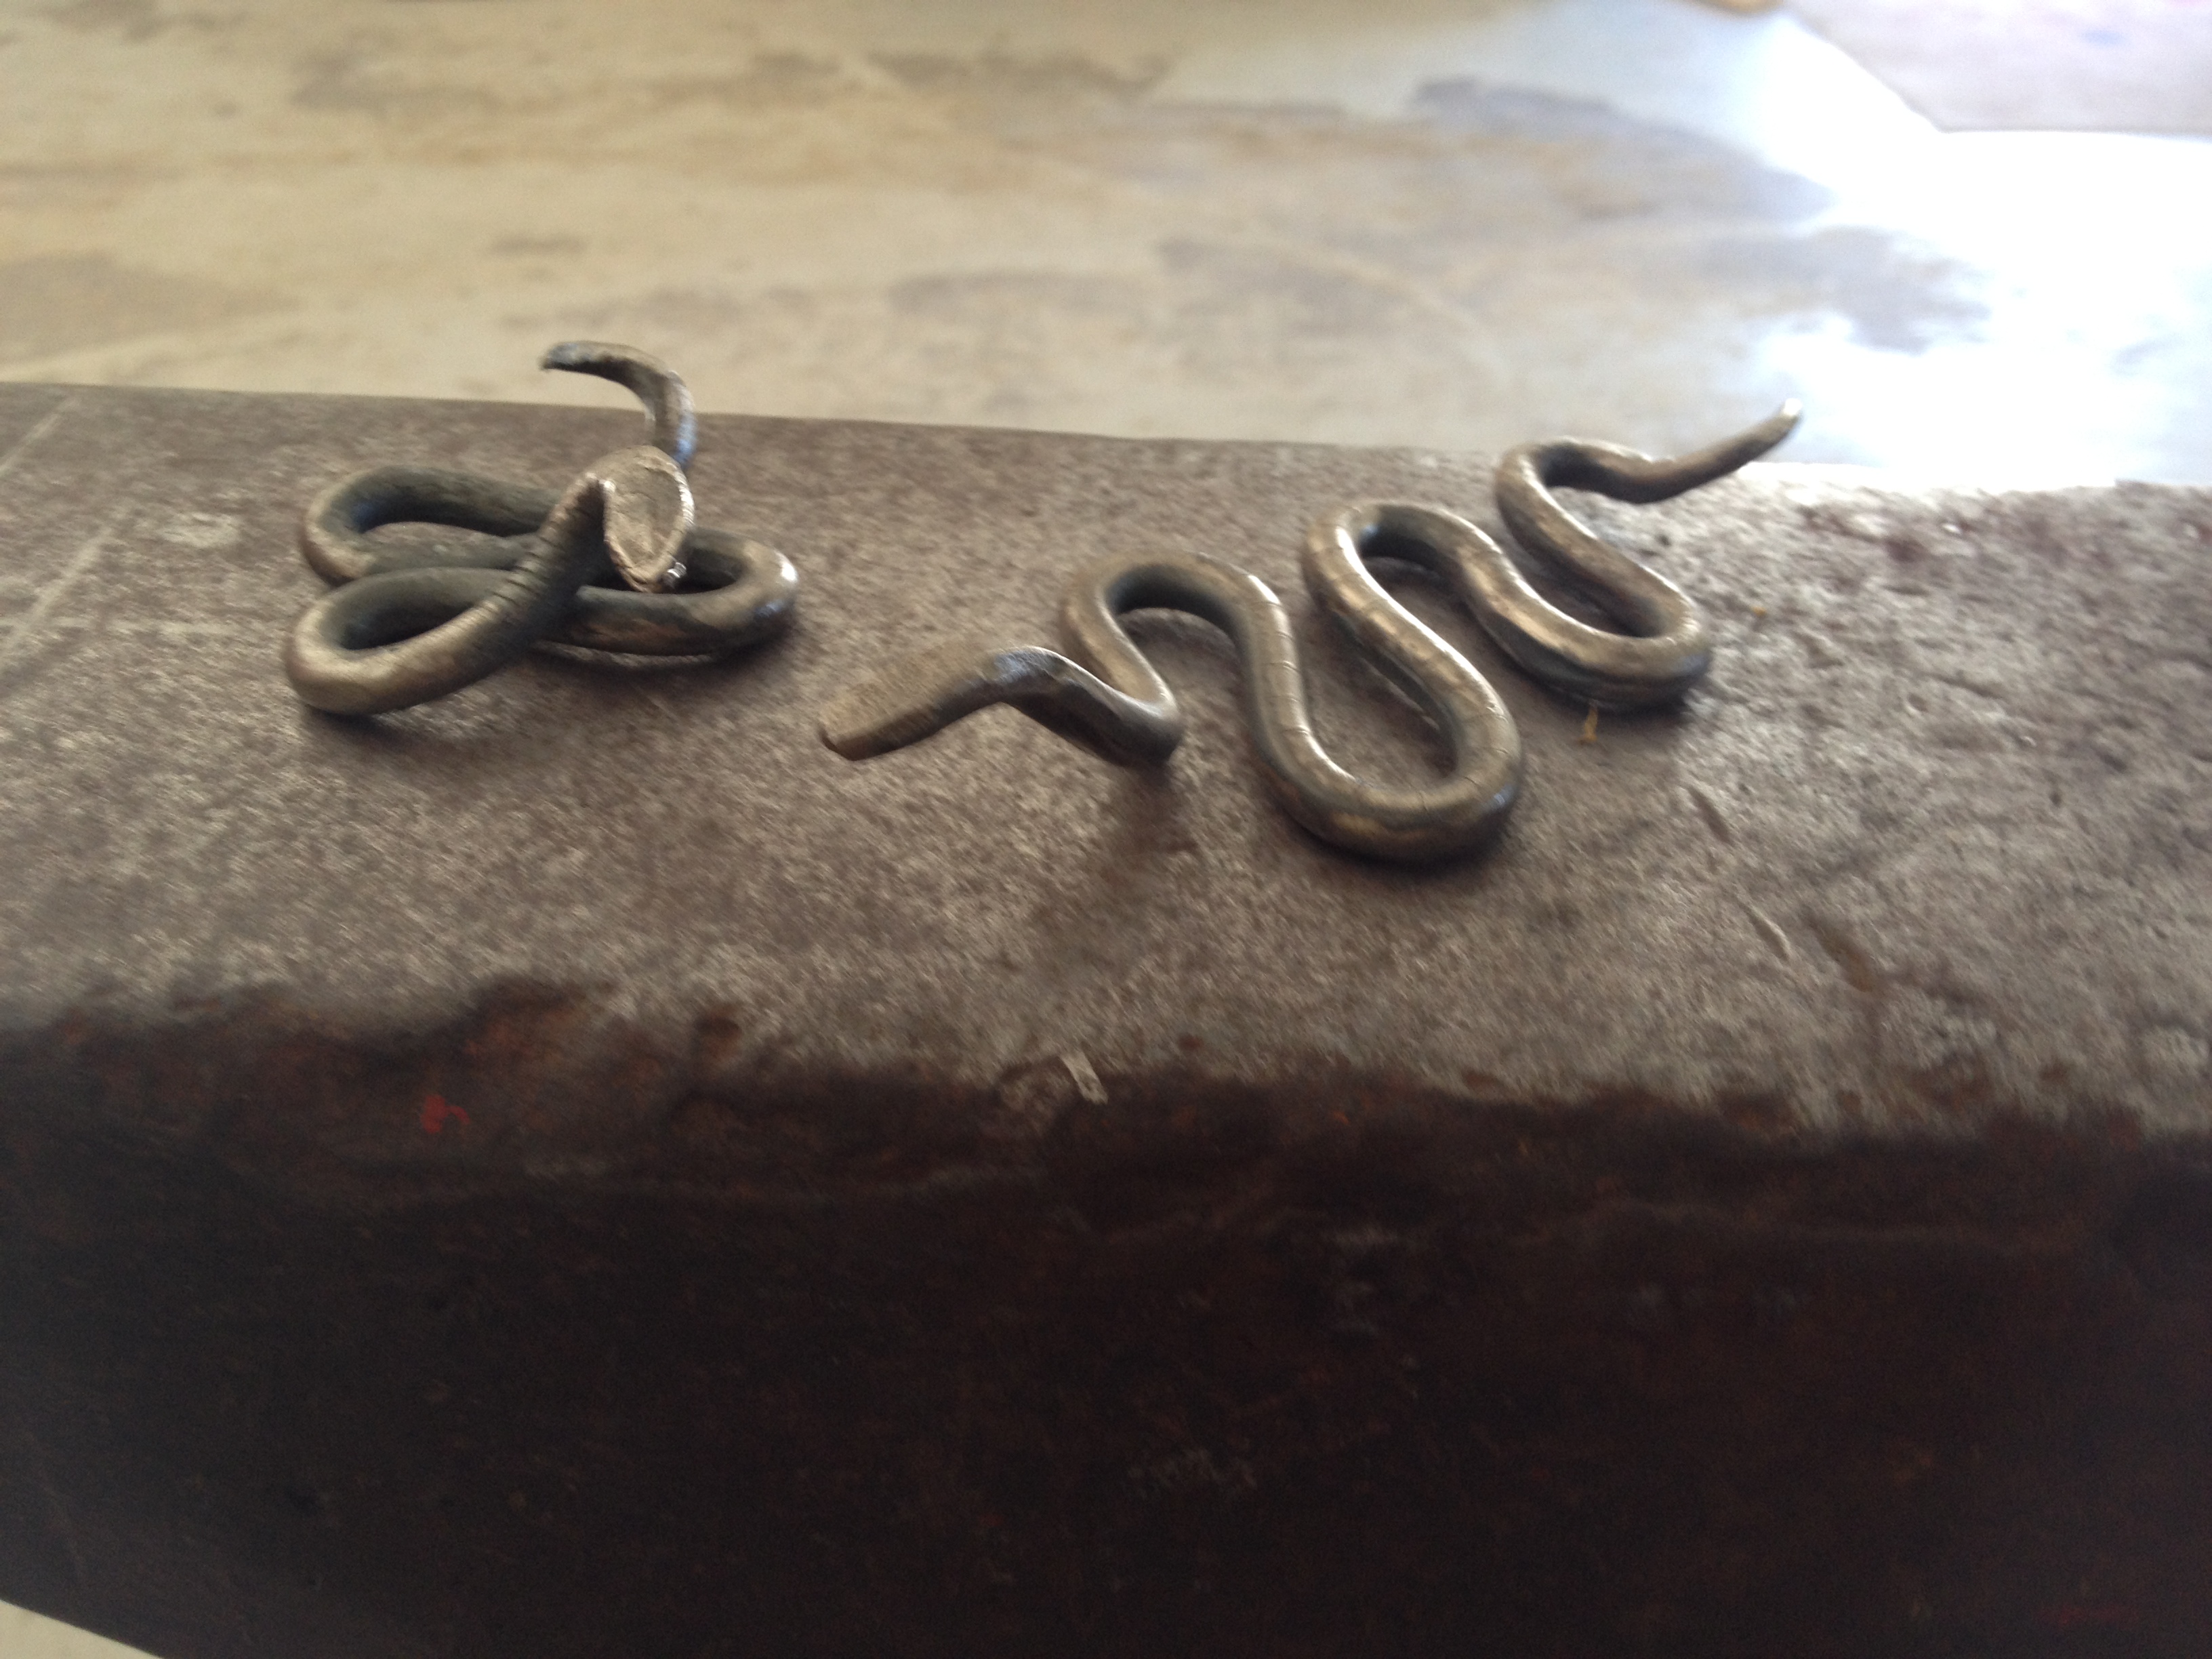
Here are a few pictures of some of my first projects and a wedding gift I made for my friends. The first snake is pretty much the first thing I actually forged. Its a little heavy, but it make a cool robust snake pendant. Here are a couple more snakes I made out of some nail spikes. And lastly, here is a picture of the scrolled JB that I made for a couple of my friends when they got married Nothing special, but I"m happy with them. Viking
-

Ball Peen Hammer Hawk
BlackMetalViking replied to rifleshooter2's topic in Axes, Hatchets, Hawks, Choppers, etc
That is beautiful! Job very well done. I'd say, sorry friend, this ones mine. Viking -
Brute de forge file knife with mosaic wood
BlackMetalViking replied to TheoRockNazz's topic in Knife Making
Another exceptionally beautiful blade Theo! I haven't been on YouTube in awhile, do you have some of the work on this up there? Viking -
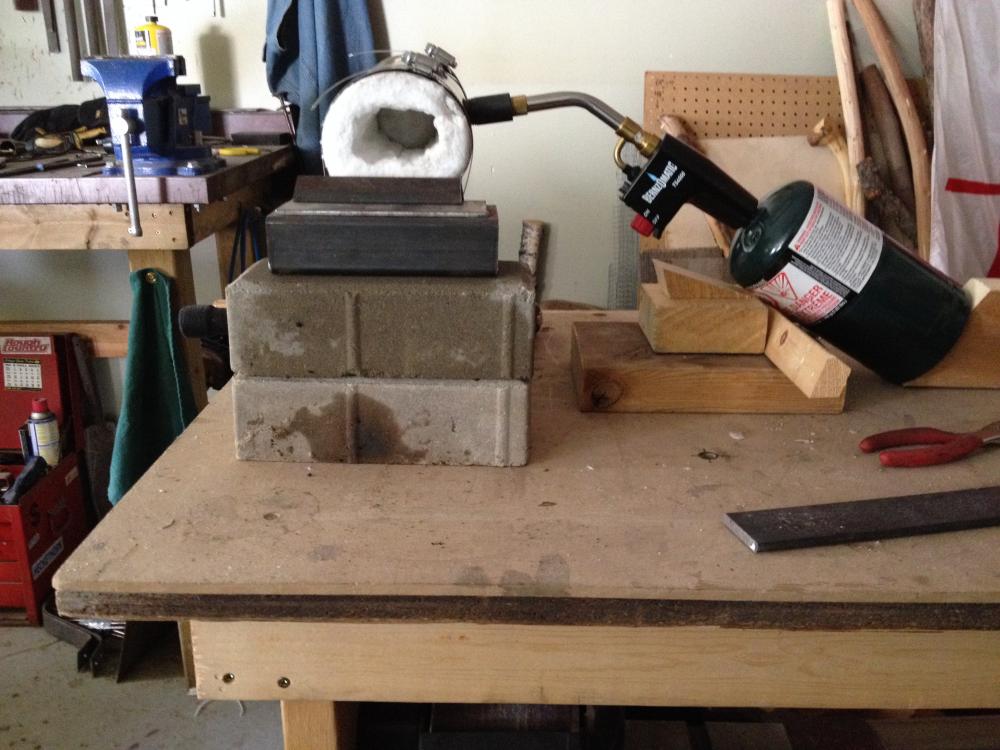
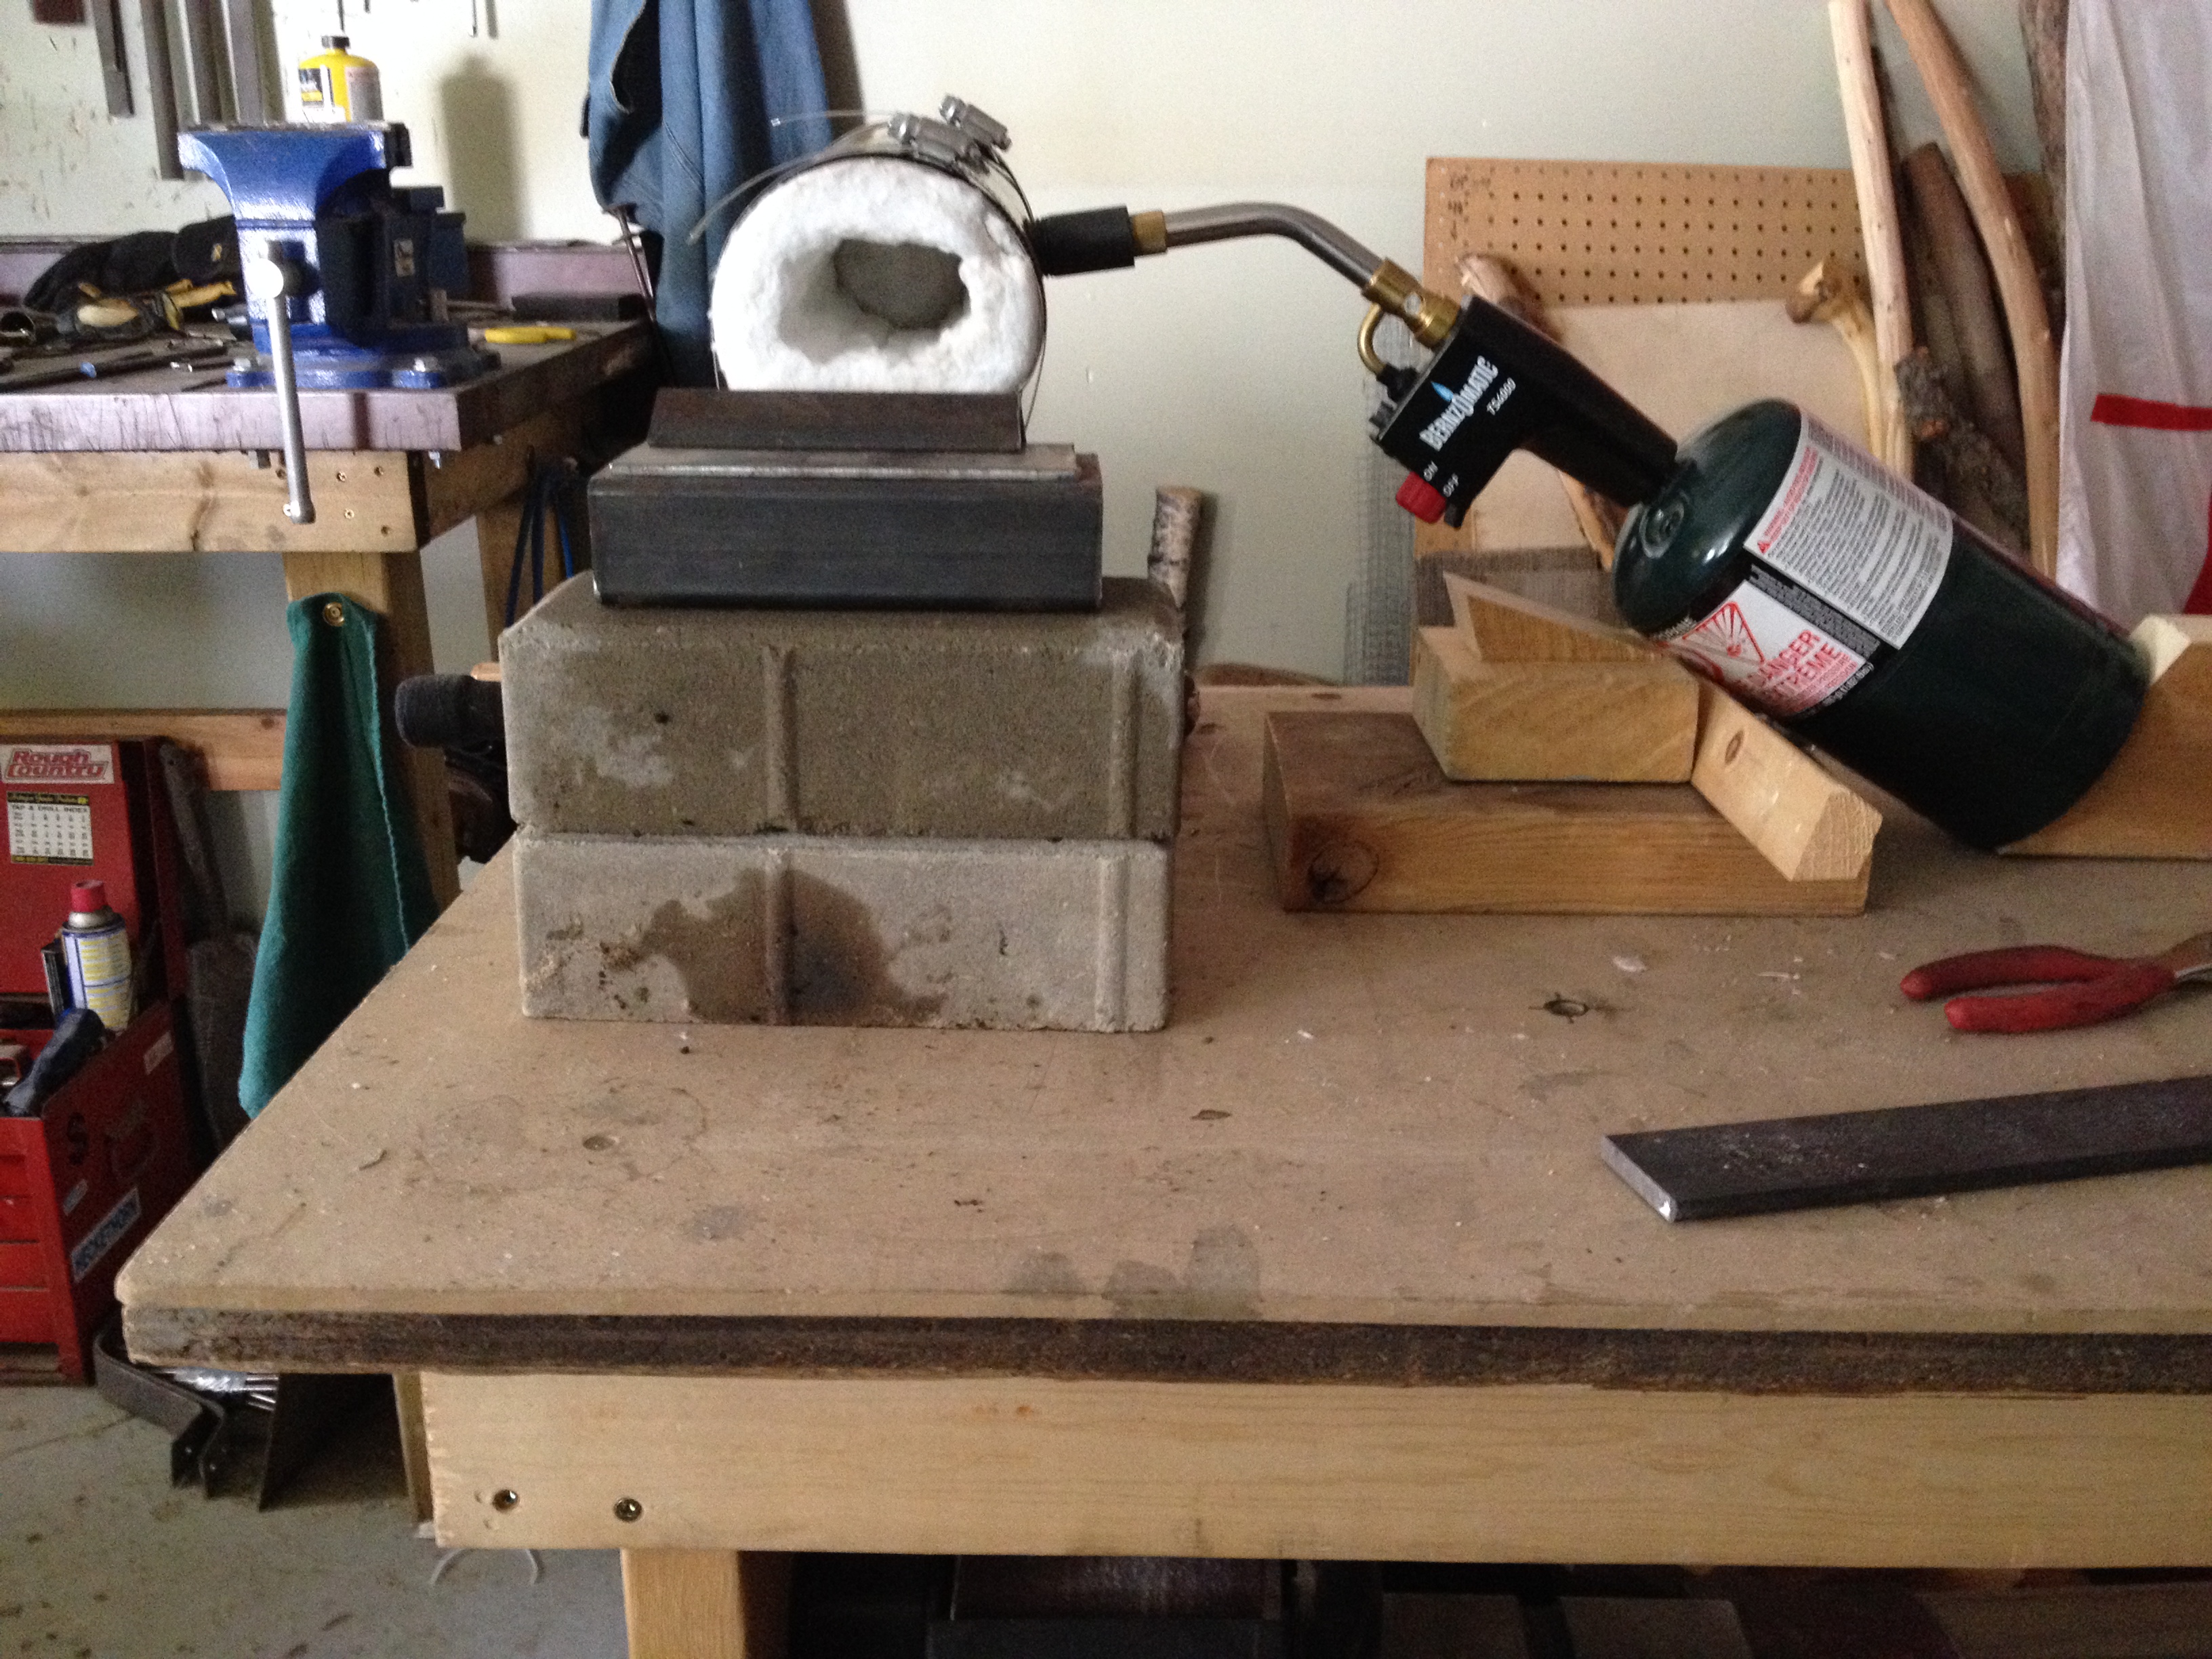
I hear ya, I am currently working on a second forge out of an old fire extinguisher, a little bigger, a little stronger, with two open ends and two burner ports. I am still planning on using the same burner, until I make my own. Right now the coffee can is strapped to a piece of 2"x 3" rectangular tube using gear clamps, to keep the heat off the table. Then I place it on a patio brick for some extra height. The photo attached is a bit older, I currently run a remote line from the torch to a 20lb tank.
-
If you want to go with a Bernzo, check out the TS4000 or TS7000. They are designed very similar to an NA burner, and I've been using mine for months with great success. Good Luck Viking

.thumb.JPG.7d7f4f3c8650e83b6705fc8c76466d9a.JPG)
.thumb.JPG.3455d6242d299647ae58d1dadc168cad.JPG)
-
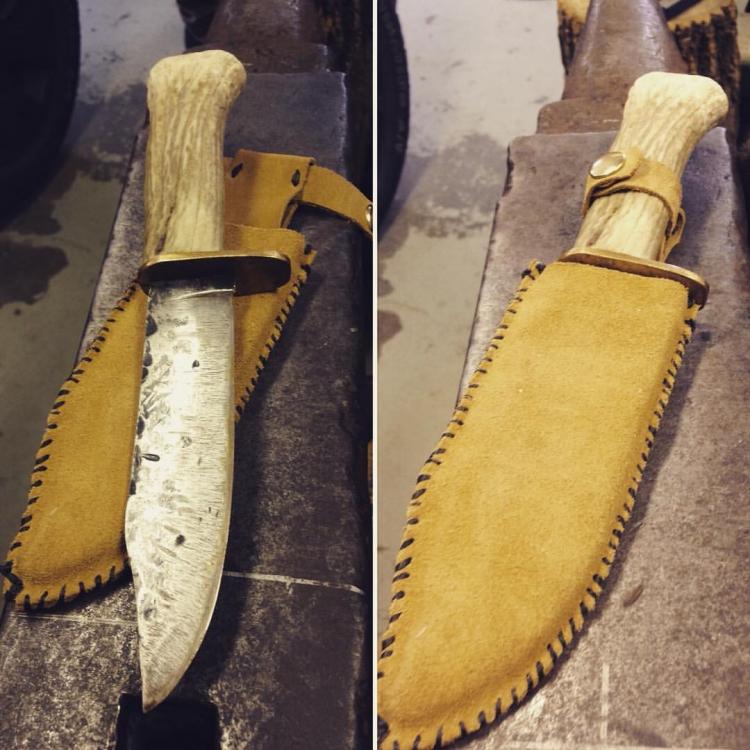
Thanks! It does have a nice hand feel, I think it will improve once I finish it too, I still need to wrap the handle and put an edge on it. I shut down the smithy for a bit while I build my next forge over the winter......and the ol' lady wants a few of her wood projects finished, so more work, less play.
-
Thanks Charcold! No I did not grind off the teeth, I just went at it.
-
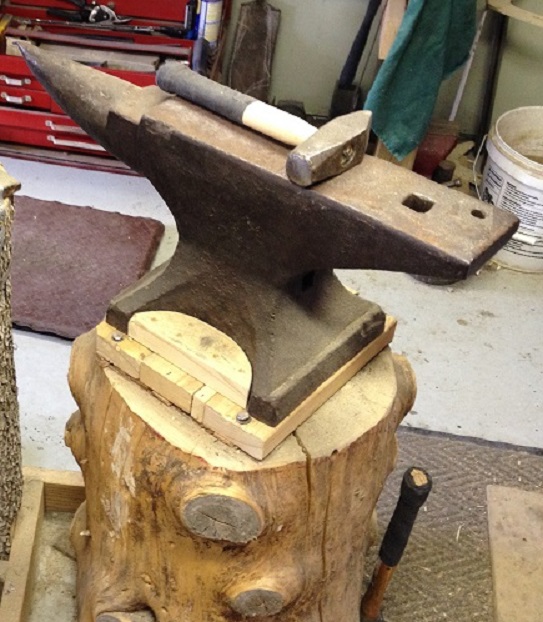
I had a wonderful surprise yesterday when I decided to give my anvil another close look. I was so excited to see a "ETER" a "IGHT" and a "TENT" above the hundredwieght markings. So now I finally know what I'm working with, a 176lb Peter Wright! And it was just given to me, its like a sign from Thor that I'm on the right path! Viking
-
Thanks Mikey, I really appreciate you taking the time! I use a small piece of pipe nipple threaded right into the forge shell. It acts as a burner mount stopping just inside the insulation layer, allowing me to keep the torch tip out of the forge. I am so fortunate to have this site as a resource, I can't say it enough, a little reading on here goes so far in the shop! Thanks again Mikey. Viking
-
Thanks Wayne. I already have a remote line to a 20lb, which greatly improved my fuel consumption.I started out just hooking to 1lb bottles, but learned very quickly how expensive that gets. I was using a 1 pounder per 3 hour session. Now with the remote line, I've been using the same 20lb for a few months. I apologize if I wasn't clear on the purpose of my last post, I was more just looking for opinions regarding the design of the torch in comparison to a mini NA Burner. I really appreciate your advice though, and I will very likely be contacting you over the winter months for some supplies for my next build, if you ship internationally that is. Thanks, Viking
-
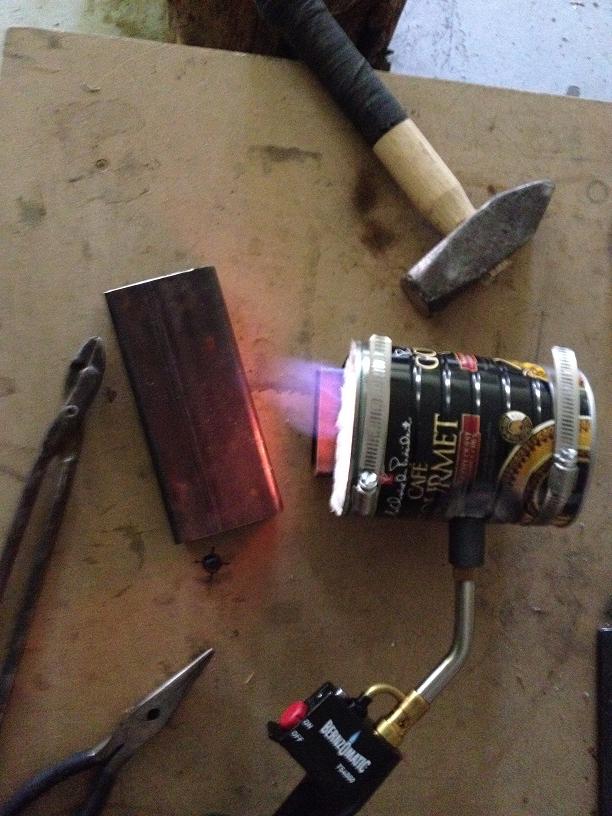
Hey Mikey, for the summer I've been using a particular Bernzomatic torch to fire my forge(TS4000), and I've found it to work quite well. If you have the time, I would like to know what you think with regards to its design. I know you have mentioned that you build burners from torches, but my limited knowledge tells me that this one is pretty darn close by itself. Any thoughts? The first photo is rather blurry, but it shows the general set up. I couldn't get a picture of the jet itself, but you can see the fuel supply line. As you can see a little in the second photo, there are four 1/4" holes behind where the fuel jet is. Out side the forge this torch puts out a lot more heat then you standard run of the mill torch. I don't know if you are familiar with this model, but I thought it was something that might be somewhat relevant. It is definitely a more expensive option than a burner build. I guess I'm just curious what you think.
.JPG.ad28a3424daa441ffd43f15b0b120df5.JPG)
.JPG.c0b8eda550fb007c36f0e2d7c4d3bf47.JPG)
-
New Knife Comission: Fantasy-Inspired Cake Knife
BlackMetalViking replied to LibrariaNPC's topic in Knife Making
I too live in a older home previously owned by a "handyman". Last year I delightfully discovered that he hard lined the dishwasher with copper, and neglected to install a shut off, needless to say when I acquired a new one, and pulled the old out to do the swap, the kitchen got a little wet...... as did the breaker panel...... which was located directly under. My most recent discovery was all the PVC drainage was only dry fitted. Luckily no mishaps there before it was fixed. my face hurts from all the palming. -
one-piece hawk
BlackMetalViking replied to matei campan's topic in Axes, Hatchets, Hawks, Choppers, etc
Two thumbs way up! Absolutely beautiful! Viking -
New Knife Comission: Fantasy-Inspired Cake Knife
BlackMetalViking replied to LibrariaNPC's topic in Knife Making
I look forward to seeing it in use, and more future projects! Viking -
Don Abbott Forging a Knife from an Old File
BlackMetalViking replied to Glenn's topic in Knife Class Reference Material
Thanks for so much great information, consider this page bookmarked! Viking -
for those who sell their knives.....
BlackMetalViking replied to dodo knives's topic in Knife Making
As long as you continue to make every knife by hand, I wouldn't discount unless you feel its the right thing to do. Every blade is a one time piece of art, and unless you get into mass production you should treat them that way. You put in the time and energy to create them, unless its structural, don't look at them as flaws, they are unique features on unique blades.Trust your gut and good luck! Viking -
New Knife Comission: Fantasy-Inspired Cake Knife
BlackMetalViking replied to LibrariaNPC's topic in Knife Making
We all have a long way to go. The day you stop learning, should be the day you stop breathing! Keep it up! Viking -
I've made 2 blades out of old pruning saw's. All stock removal. I made one small kukri out of an entire saw blade, and then made a type of karambit out of a smaller piece. They hold an edge very well, and aside from the little spring in the kukri, both perform exceptionally well. I'll try to remember to take some pictures to post for you if you'd like to see them. Viking
-
New Knife Comission: Fantasy-Inspired Cake Knife
BlackMetalViking replied to LibrariaNPC's topic in Knife Making
That's a very nice looking blade, especially the guard! Viking -
A couple little blacksmith knives. The first is hardened and sharpened, and is quite the nice little whittler. I made it out of a 4" piece of 1/4" Nail. The second has yet to be hardened, I have annealed it to do some file work first. I made it from 6" x 1/2" mild square. I chose to go with mild steel, knowing full well that they would not be the strongest knives, but in doing so, I can work on technique and control without using up my good metal. These are two of the first knives I actually forged blade to tang, not the best but I'm very happy with them! Thanks for reading! Viking I also thought I'd throw in my first start to finish K.S.O. It's sharp as a razor........until you use it!
.JPG.1ef155f4ecf2f6b25a628845d728a48c.JPG)
.JPG.62c6e5d37fdbd1daa2e9a3211c7a2afb.JPG)
-
Makeshift Hardie
BlackMetalViking replied to BlackMetalViking's topic in Hot Cuts, Anvil devils, metal cutting on the anvil.
Thanks Frosty! I thought of that as well after skimming some posts in this thread. I would have done exactly that, but fortunately, it seats itself after the first whack and I have enough of the shank out the bottom and just enough wiggle that I am able to tap it out fairly easily. Thanks for looking out though! Viking -
Here are some pictures of my makeshift hot cut hardie. I was looking for a hot cut solution, and my forge is too small to pound one, so I decided to pick up a Stanley 2" Brick Chisel. After pulling off the rubber grip I removed the paint and began slightly tapering the end. The next step was to find a piece of pipe that fit around the shank and hot fit it to my hardie hole. I left enough of the pipe round so that the chisel would still fit in and then I began to hot fit the chisel into the pipe while continuing to square it in the hardie hole. Over all the project took a couple hours total. It is simple and very effective for a makeshift beginner tool. I really need to get into the habit of taking pictures during the process though! Thanks, Viking
.JPG.5e6eb0622a31c2baf48192c91387336d.JPG)
.JPG.7944a7b65f6e8058b4bb7988f38c1f1e.JPG)
-
Thanks guys! John: With regards to thickness I only had to hammer down the bevels, the spine is original thickness, I'd say its around 1/8" and I quenched it in fresh motor oil. Theo: I'm going the K.I.S.S. route, just some leather lace. It already has excellent hand feel, I just need a little more thickness. Thanks again for the great feedback! Viking
-
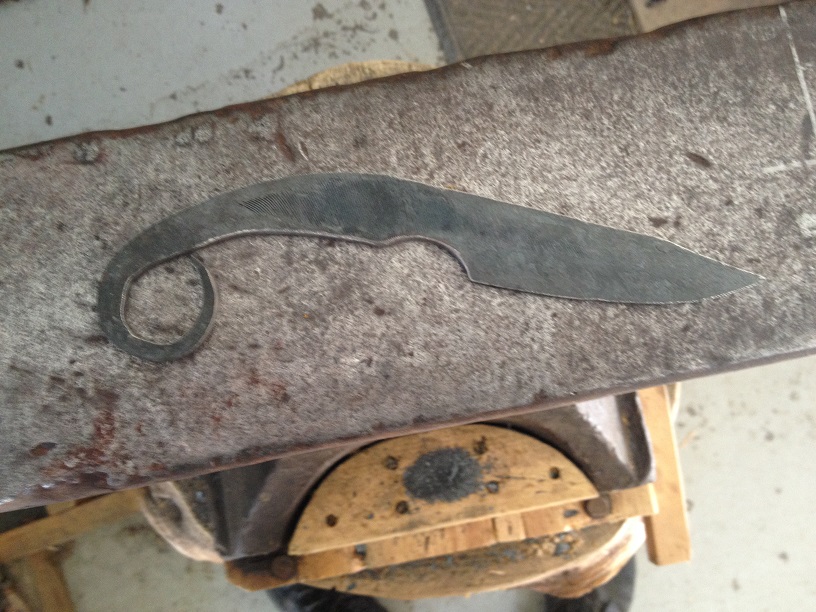
Here is a pic of my first file knife. I was successful in hardening it and now just need to sharpen and clean it up.

.JPG.318e719e6316466734abf7367168fa53.JPG)
.JPG.18f414b6922c1f883c466177de296a82.JPG)