will52100
Members
-
Joined
-
Last visited
Everything posted by will52100
-
Interesting idea, I was thinking of using an electric bucket heater, I use one in my normal quench tank and it works well enough that I have to shut it off to prevent overheating of the oil. A band heater would be a lot neater as well. Another thought is if it does work well, it'd be easy enough to rig up a PID controller to maintain a constant temp. I built one for my lead pot for casting and it works extremely well and didn't cost a lot to build.
-
Thanks, trust me, I'm listening to everybody here, way more experience at making big blades than me. I agree tempering is simple, just figuring out how to get it done consistently with my tools and equipment. Think I've got it worked out, now just need the time to get it done.
-
Thanks Basher, good idea on the peanut oil, I seem to remember it's got a very high flash point. Thanks for the help, I think I've got it worked out, maybe won't screw up too badly.
-
Sounds good, do you happen to have a manufacture ID of the oil? All I've got on hand is Texaco type A, and Brownell's tough quench. What your describing sounds like it wouldn't be too much trouble for me to build for a one off, or for occasional use. May try a few knives from 1084 or 1095 with this for tempering. I remember reading about Frank Richtig supposedly mar quenching 1095 to get the performance he did, or at least that's what they figured he did after micro graph's of some of his blades, Frank never did say. How many temper cycles do you normally do and for what duration? If I'm understanding you correctly, you are mar quenching your blades, coming straight from the forge to the pre heated oil and quenching. Thanks
-
No worries, and thanks for the input, I'll listen to anybody that's got more experience than me(with swords that covers just about everybody), and am open to just about any ideas. I'm most likely overthinking things as swords have been made and heat treated long before electric ovens came about. Not sure how well it'd work, but I'm leaning toward a long, heavy walled pipe in the gas forge, heat it to temp and shut the gas off, leave the hardened blade in the pipe and watch the temp so it doesn't over heat. I'm thinking I may need to grind a piece of mild steel to test before screwing with a sword. Or maybe just a hunk of steel plate on the coal forge and run the blade over it watching the colors and do that several times.
-
I can't remember off hand what the alloy is, some sort of 8620 or something. Something to remember as well, the "upset" ends are separate pieces that are friction welded on and may or may not be the same alloy, that's why most data books on drill pipe don't take the ends into account because they come from different manufactures. Would probably be OK for the body, but I'd want a high carbon bit for the edge, never tried forge welding it so I don't know how well that'd work though.
-
SLTT? I guess I could machine a set of jaws to fit, and leave the edges clear enough to avoid overheating them, didn't think it'd work good on a double edged blade. Maybe if it had a fuller, just use matching radius jaws to fit the fuller and run the colors from there? Reason I'm asking on here is it's such a different undertaking than my normal work. I haven't tempered anything by color, other than a hammer or punch, in close to 15 years. I like the performance and consistency I get out of an oven, and you've got to admit a sword has to be able to take more abuse than a knife. I even put axes or hawks in the oven. Basically for tooling I've got a coal forge, horizontal and vertical gas forge, 24" deep Paragon heat treat oven, and a toaster oven. I've also got oxy/propane cutting torch, power hammer, hydraulic press, treadle hammer, a bunch of hammers and tongs and such and a couple of belt grinders, and a bunch of quality files. I have a Smithy 3 in 1, but I wouldn't exactly call it heavy duty or precision, drill presses, a buffer, an arc welder, surface grinder, hand grinders, ect, in other words a pretty well outfitted home shop. Probably the most used tool is the files and sand paper. What I'm trying to figure out is the more common ways people who actually make swords use to temper there blades, and maybe give me idea's I haven't thought of or thought wouldn't work well. Thanks
-
Thanks, I'd been thinking along those lines, and that's what I'll probably do, part of it is wrapping my head around the higher temp, shorter duration tempering. Normally on knives I do 3 two hour temper cycles, I've found I can lower the tempering temp and still maintain toughness. I also have a torch, so that's easy enough to bring the tang to a higher temp. One other possibility I've though of, but haven't tried yet is tempering tongs, basically tongs with a couple large chunks of steel that you heat red hot and clamp on the back of the blade to do a differential temper. Wouldn't work with a double edged blade, but might work for a single edged blade, just take a while to get the whole blade done and for 2-3 cycles. That's about all I can think of short of getting a larger oven, and don't want to get into that expense this early, might make more, might not, we'll see.
-
I will be hardening in the gas forge, it's 15" long and by working the blade back and forth I can get it to critical temp, have done so while normalizing it, then quench in a tube of oil. I have a Paragon heat treat oven, but the internal capacity is only 24 inches. If I was to get set up for doing swords I'd either get a larger Paragon or Even Heat for sword length blades or go with salt pots. My grill is a Big Green Egg, it's only about 22" or so across the middle. I might do the briquet style tempering with a trench in the ground and a large pipe over it, would have to watch the temperature, but it might be doable.
-
I've been bladesmithing for about 15 years now, and have been wanting to try a sword. I've actually got a sort of Falchion forged and rough ground, but while I can harden it, I'm having trouble wrapping my head around tempering it. Trouble is, my oven is only 24" deep, blade and tang is a bit longer than that. I've thought about heating a bar of steel in the gas forge and running the back of the blade over the sword and watching the temper colors, or even putting a steel pipe in the forge as an oven. I've seen a pipe with oil heated and used for tempering on Man at arms, reforged, but not sure how high a temp the oil can stand, or what oil to use. How do you sword makers do your heat treat? Thanks
-
Kinda what I thought about scorching the wood, not nearly long enough at heat to kiln dry the wood or collapse the cells. I've been using straight grained hickory I had sawn into blanks about 10 years ago that have been sitting in the attic of my shop. When I do a handle I get it shaped and fitted, then leave in the house with the AC for a couple of days. And do a stain and boiled linseed oil finish.
-
I've seen several axe makers that stick there hafts into there gas forge for a few seconds to scorch them, then hand sand smooth. Supposedly it hardens and makes the wood a little more stable. Any thoughts on this? I normally make my hafts and handles from air dried straight grained hickory and really haven't had any issues.
-
Cool! Came out looking great
-
If I was to do any welding of the rim it'd be with the tire removed. If nothing else, even deflated you would soften and potentially damage the rubber, especially if its got a tube. I remember where they tried shock absorbers on a junkyard hammer on anvil fire, it didn't work too well, though it did work. Seems it absorbed too much of the energy instead of transmitting it to the ram and work piece. Me, I like the simplicity of the X1's linkage, http://www.anvilfire.com/AnvilCAM-II/index.php?video=x1-test1 but I don't know how well it'd work with a lighter hammer, the X1 is a 110 pounder. I would consider putting the tire at the rear like this hammer, http://www.anvilfire.com/power/cr-jyh_index.htm I may build an X1, or X2 as it were some day, but I'm still dreaming of an air hammer. That said, my primary use for a power hammer as a knife maker is turning large stock into small stock, very little shaping under the hammer except for drawing the tang out. Frankly, the Clay Spencer designed tire hammer is pretty much perfect as is. It's simple and reliable, and easy to build and repair. If I remember rite, the linkage is pretty much an exact copy of the little giant's linkages, center to center dimension wise. I have had a couple of failures, but those were due to some seriously sub par welding, with decent welds it's been bullet proof. Also I highly recommend something a bit thicker than 1/2" plate for the base plate, I welded mine down to two pieces of 3/4". I welded around the perimeter and welded some plugs in 1" holes to tie everything together. If I was building new I'd just go with 1" or thicker plate and save on time and effort. I might would also add grease fittings to the bronze link bushings instead of oil holes, but haven't felt the need to change. I'll tell you this, if I can't break the Spencer tire hammer with 6+ years of beating 52100 1 1/2" stock down to 1/4" at 1600 deg. F., I don't know what can break it. 52100 at 1500-1600 moves about like cold mild steel, very stiff, and makes the hammer ring like an anvil. With any hammer I recommend some sort of guard or deflector.
-
Kinda the way I felt about the Rusty linkage. On any toggle link hammer I highly recommend a shield. The tire hammer's linkage has a rubber hose over the spring, but I've still got a shield over it. Also it's good to inspect and lube before use. The only mechanical hammer I know of that keeps everything away from you is the rocking beam hammer, the springs and such are further back. A toggle link is more efficient and hits harder though, has to do with velocity and inertia, the faster you run it the harder it hits. The ideal would be an air hammer, but I like being able to run a hammer off an extension cord and a 1 horse motor, air hammers take bit more power.
-
Actually that's an old photo taken just after I bolted it down. I've since moved it about 4 foot, there's a treadle hammer behind it now. And yes, it was fun moving it.
-
The first power hammer I had was a rusty style I built. It's now been cut up for scrap. The flat belt clutch system doesn't have nowhere near the control of a tire clutch. Also the helve didn't hit as hard as the toggle link. And I really didn't like the spring flapping that close to my face. It was better than a sledge hammer, but the tire hammer beat it hands down. If I was to build a helve again I'd use a tire as the clutch, much finer control.
-
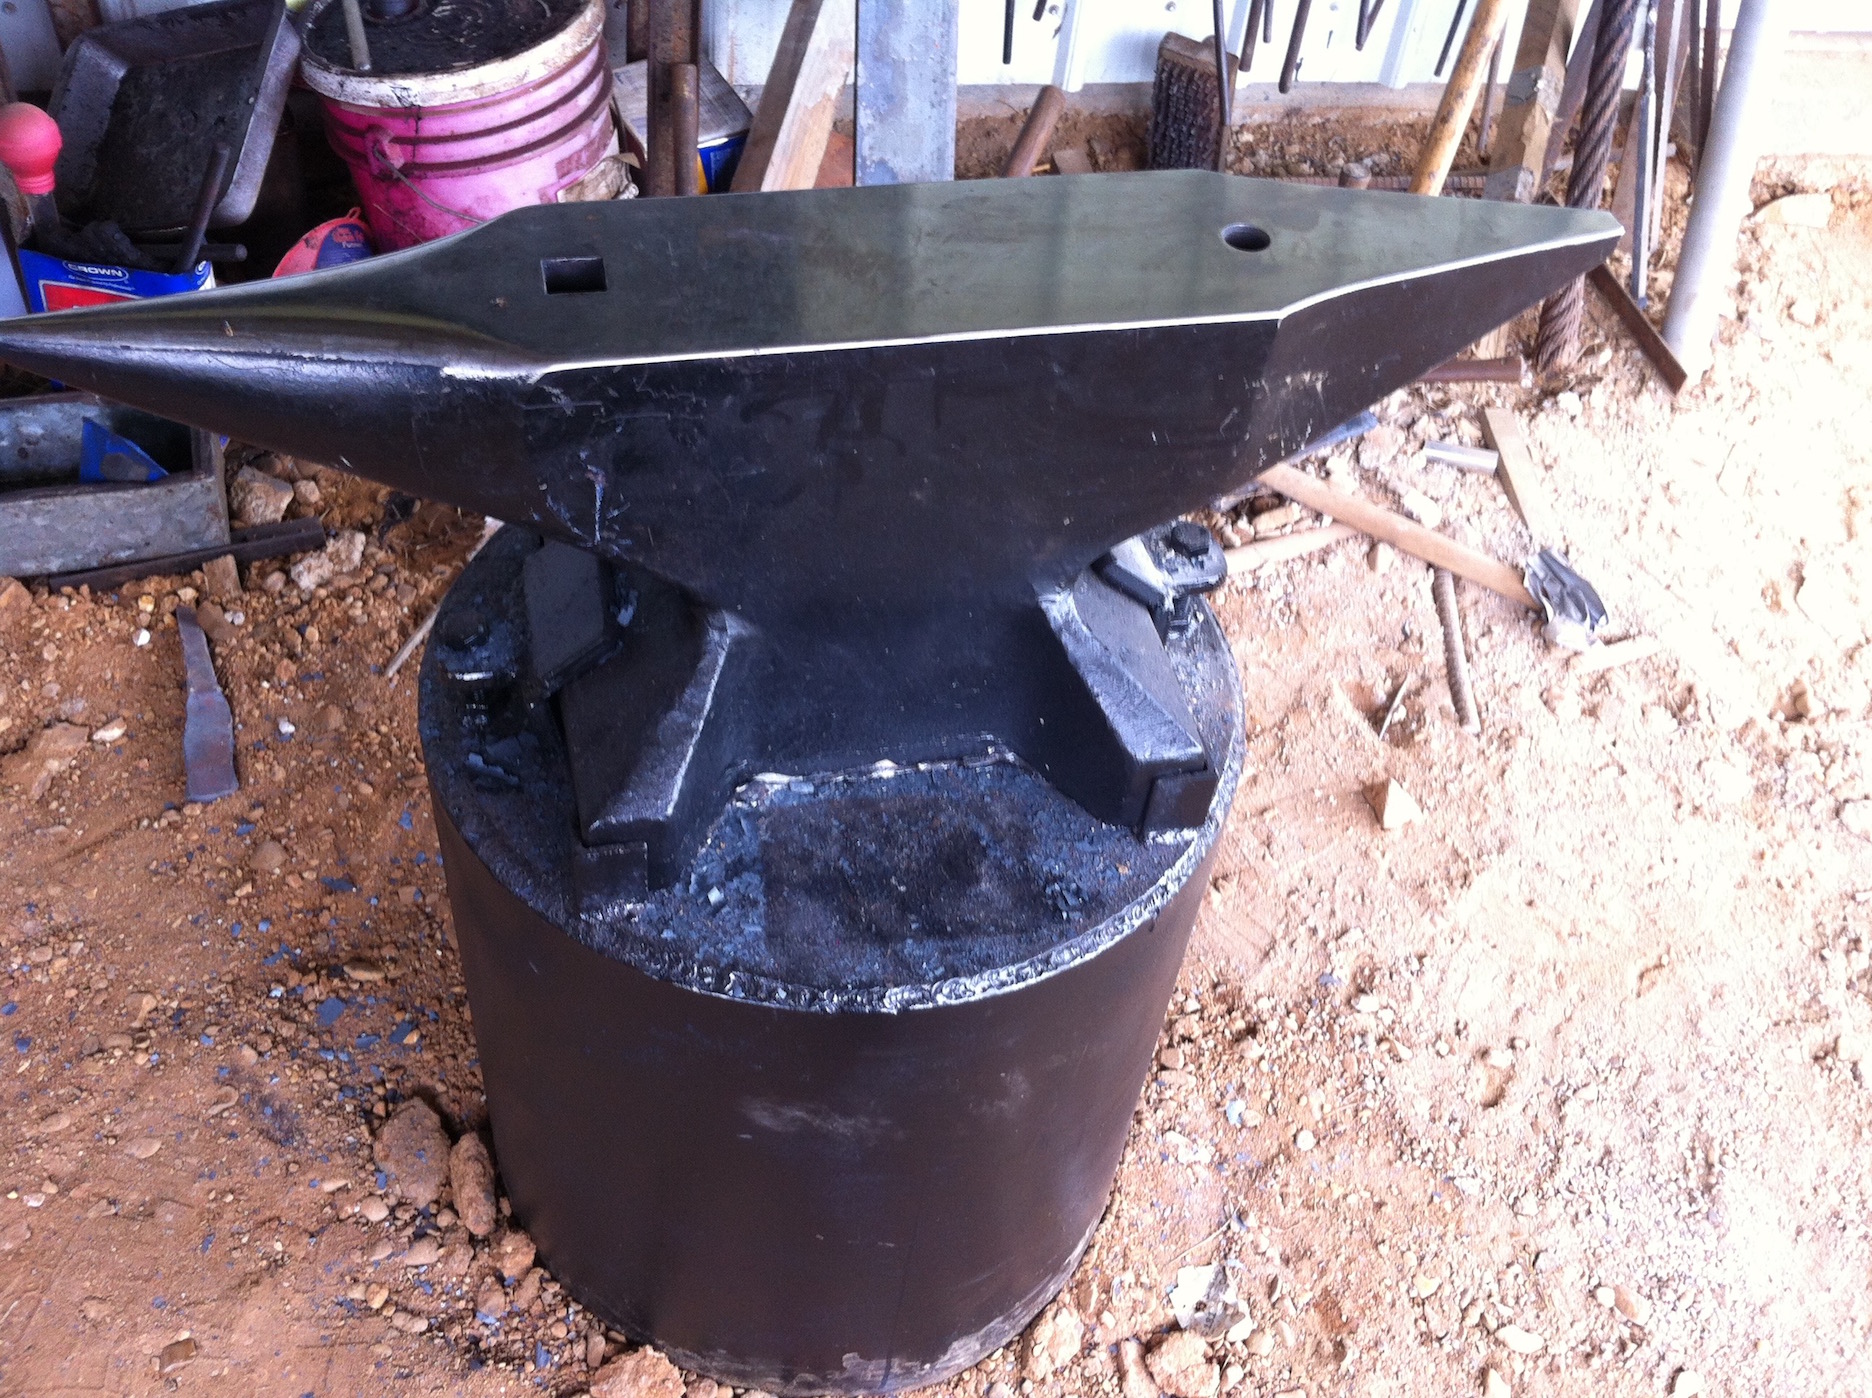
#57 330 pound Refflinghaus anvil mounted on 3/8" thick 20" diameter pipe, 1/2" thick top, filled with concrete and buried 6" in the ground. Solid as a rock.

-
Oh, and I'd see about setting it up to take dove tailed dies, the bolt on works, but I have had them back out once in a while, and there not exactly fast and easy to swap dies. Also had a bottom die break the welds and had to fix it, not a huge deal and once in 6+ years of hard use isn't too bad.
-
Nice! love how stout it looks.
-
I bought a Clay Spencer tire hammer about 6 years or so ago, can't remember off the top of my head. Wanted to build, but was working offshore and overtime they had a build I was on the water. Anyway, Ray Kirk was upgrading to an air hammer and sold it to me. I've been running it with no mercy for the entire time I've owned it and no real failures. Well, except for a bunch of welds breaking. Whoever did the welding on some of the assemblies needed some more practice. Luckily an easy fix. Oh, and the motor brackets I had to weld to the motor housing, the spot welds broke off pretty easily, basically a wet rag wrapped around the housing and a fast pass to the base, and a brace. A buddy of mine recently looked at mine and built one, with some minor changes. He used a trailer stub axel and trailer tire for the clutch. I've noticed the trailer tire is a bit softer than my donut tire, and maybe his runs just a bit slower due to the larger tire. The tire should harden with age, maybe a different sized drive wheel would compensate for the slightly larger tire. If I was to build one now, I'd probably go the rout of the Anvilfire X1, except I'd probably put large pillow blocks and the tire at the rear with a counterweight and the toggles in the front. Not a huge fan of the linkage mounted direct to the tire rim, but I've had no issues with it as of yet. Other than making sure the tire's got air!
-
Nice, I love doing Frontier damascus, it's a lot of fun to play with and you never know exactly what the pattern will turn out like.
-
I've forged a lot of 1084 and 15&20, and a few billets of 1080 and 15&20, compared to 52100 or other higher chrome steels it moves like butter. Are you sure you were hot enough? I normally forge weld then draw out at welding heat. What steels are you comparing it to? By far the hardest steel to move for me is 52100, even the power hammer doesn't move it very fast at 1550-1600 deg. F. By comparison 1080 and 15&20 feels like mild steel. Are you sure you have 1080? Before I got a hammer and press I was using an eight pound sledge with a short handle for drawing out.
-
Steveo99, I plan to re-harden and temper, thought the striker end will be left soft. Don't know how much good it'll do, but will see. Rite now I've got no time to work at the forge.
-
Nice hammer, OK, I'll bite, why are your handles shaped like that?