will52100
-
Posts
351 -
Joined
-
Last visited
Content Type
Profiles
Forums
Articles
Gallery
Downloads
Events
Everything posted by will52100
-
viking axe class
will52100 replied to teenylittlemetalguy's topic in Axes, Hatchets, Hawks, Choppers, etc
"The big thing about working in a traditional manner is that your shop should have at least 5 trained strikers in it. Any show with just 1 smith in it is working in the MODERN way." Couldn't agree more. Very nice axe, I've been wanting to try one like that for a while. -
Test them. I've found with the steels I use and either my toaster oven or my Paragon, if I do three, 2 hour temper cycles I can use a lower temp and still maintain flexibility. I don't KNOW that you've softened them, but they would be suspect until tested. The brass rod test will tell you more than any rockwell tester, and a cheap Radio Shack pocket microscope to inspect the edge is handy as well. I don't necessarily think it's the temperature and time alone that is the issue, more likely the cycling of the oven. In my toaster oven I have a 3/8" thick chunk of plate to hold heat and even out the temp swings. Both it and my Paragon run full blast until set temp is reached, then cycles on and off at full power to maintain the temp. Neither oven is perfect about maintaining temp, both rise and fall a little, and that may be what's causing the blades to be softer the longer they are in the oven. Long winded way of saying, sharpen and test, if the edge stays flexed during the brass rod test, you need to re harden. If it chips, raise your tempering temp a bit and re test. Also, if you have a fairly thin edge to start with, you might want to take a little off before testing as the thin section gets hotter quicker and may have tempered more.
-
mount for tire hammer
will52100 replied to canada goose's topic in Power Hammers, Treadle Hammers, Olivers
Not a problem. Would also add that there's a lot of hammers running with timbers between the foundation and hammer, like I said, many ways of doing the job and most work fine. -
mount for tire hammer
will52100 replied to canada goose's topic in Power Hammers, Treadle Hammers, Olivers
Part of it was due to welding, I am a welder and am aware of how and how much metal shrinks. Part was due to not being solidly mounted and wobbling on the concrete and dishing towards the edges, you could see the wear marks on the base when I laid the hammer in the back of my truck to transport. It was not major cupping, but when your used to looked at straight edges and angles it pops out at you. If it'd been solidly mounted to a concrete slab it'd most likely been OK. The original owner did not run it nearly as hard as I've run mine, with me it gets no mercy. To the point where I need to once again resurface the dies due to wear. Here's the thing, the 1/2" plate is what I'd consider minimal for a hammer base. It's what I'd consider barely adequate. I can't remember all the math as it's been a while since I researched it, but part of your anvil weight comes from a percentage of your base. The anvil on the tire hammer is minimal as is, and any extra weight you give it will help. That includes the concrete slab it's mounted to as well. I will mention that I have run mine hard, to the point I found many of the builder's weak welds and had to repair. Have not had too many problems with it, so it's a good design. I did have the lead in the head come loose. Re melted that and welded a cap on the inside so if it does come loose again it's not going anywhere. If was was pouring lead in a new head I'd likely put in a couple cross bars to pour around to lock everything in. All I did was use what I had on hand. If I was to do it from scratch I'd go with 3/4", or preferably 1" thick to start with base plate. What I did was simply place the hammer on a couple pieces of 1/2"x24"x36" plate I had laying around and welded together. I didn't bother shortening the plate, just stacked up, drilled a few 1" holes in the top piece to plug weld, think I did two or three roughly in the center. Grind any high spots and set the hammer on. Weld it through the existing bolt holes and then weld around the perimeter of the whole mess. It would have been easier if I'd had one thick piece of plate, but I used what I had. Drilled 4 bolt holes and made a rebar frame work to sit in the concrete and welded long bolts to the rebar cage. After pouring the slab I had 4 bolts sticking up. Slab was about 30"x40" and about foot deep, smithy floor is clay gravel, so I didn't use forms, just dug down and used the dirt as a form. Wish I'd put a little forming at the top just to neaten everything up though. I used a tractor and front end loader to set the hammer down on the bolts, with a couple layers of tar paper between the slab and base plate, and tightened everything down. If I was building from scratch, most likely I'd try and get my hands on 1" thick plate, make it the same size as Clay calls for and forget about it. I'd likely make the anvil a little larger as well, provided I could find the steel for a reasonable price, possibly adding a few heavy braces for weight and to spread the load out. One other possibility I'd consider, I'd look into using commercial power hammer dies instead of the bolt on's. The bolt on's work well, but can be a pain to change, to the point that I don't bother changing them unless I have to. Might or might not would go that way, would have to do a lot of thinking and planing to make the dove tails before doing it. The other thing I did while I had the linkage apart to fix the lead was to add grease zerks to the linkage pivots. It works, but not sure if it's better than spraying silicon in oil holes or not, and it takes a while to warm up on cold days. What I used for underlayment was to use a rebar cage with long bolts welded to it. I also put 4 nuts on and set to set flush with the concrete surface. Put grease on the bolt threads when mixing and pouring your slab, after the slab is finished and set you simply wipe the grease and concrete residue off, maybe a little wire brushing for good measure. Since the base I welded to was fairly flat, I just put a couple layers of tar paper down and bolted everything solid. If I'd had more cupping on the base plate I'd likely have mixed up a thin sand/portland cement mix and grouted the surface and set the hammer down on it and lightly running the hammer to settle it and let it dry before bolting solid. Hope this helps, and remember, there's more than one way to skin a cat. I don't know your skill level at welding so please don't take this the wrong way, but when welding around the perimeter of the plates I had everything tacked in place and would weld a rod or two on one side, then go to the other side to help prevent warpage. Also had them clamped together while tacking. -
mount for tire hammer
will52100 replied to canada goose's topic in Power Hammers, Treadle Hammers, Olivers
If your going by the Spencer plans and using 1/2" plate, I'd highly recommend going thicker. Several years ago, before he offered plans and was doing build workshops, I finally wound up buying one as I never could get time off to go to a build. Anyway, the 1/2" plate was cupping up from the anvil and the square tubing from not being mounted and just sitting on a concrete slab. It wasn't heavily used either. When I got it home I welded it to a thicker and larger plate, left the 1/2" in place and added to it, welding around the perimeter and a few plug welds. And mounted to a large concrete foundation, hits hard, doesn't walk around or vibrate, and no more flexing of the base plate. -
Love the leaf candle holders as well, very nice hammer control!
-
Nice work, and the basket looks great.
-
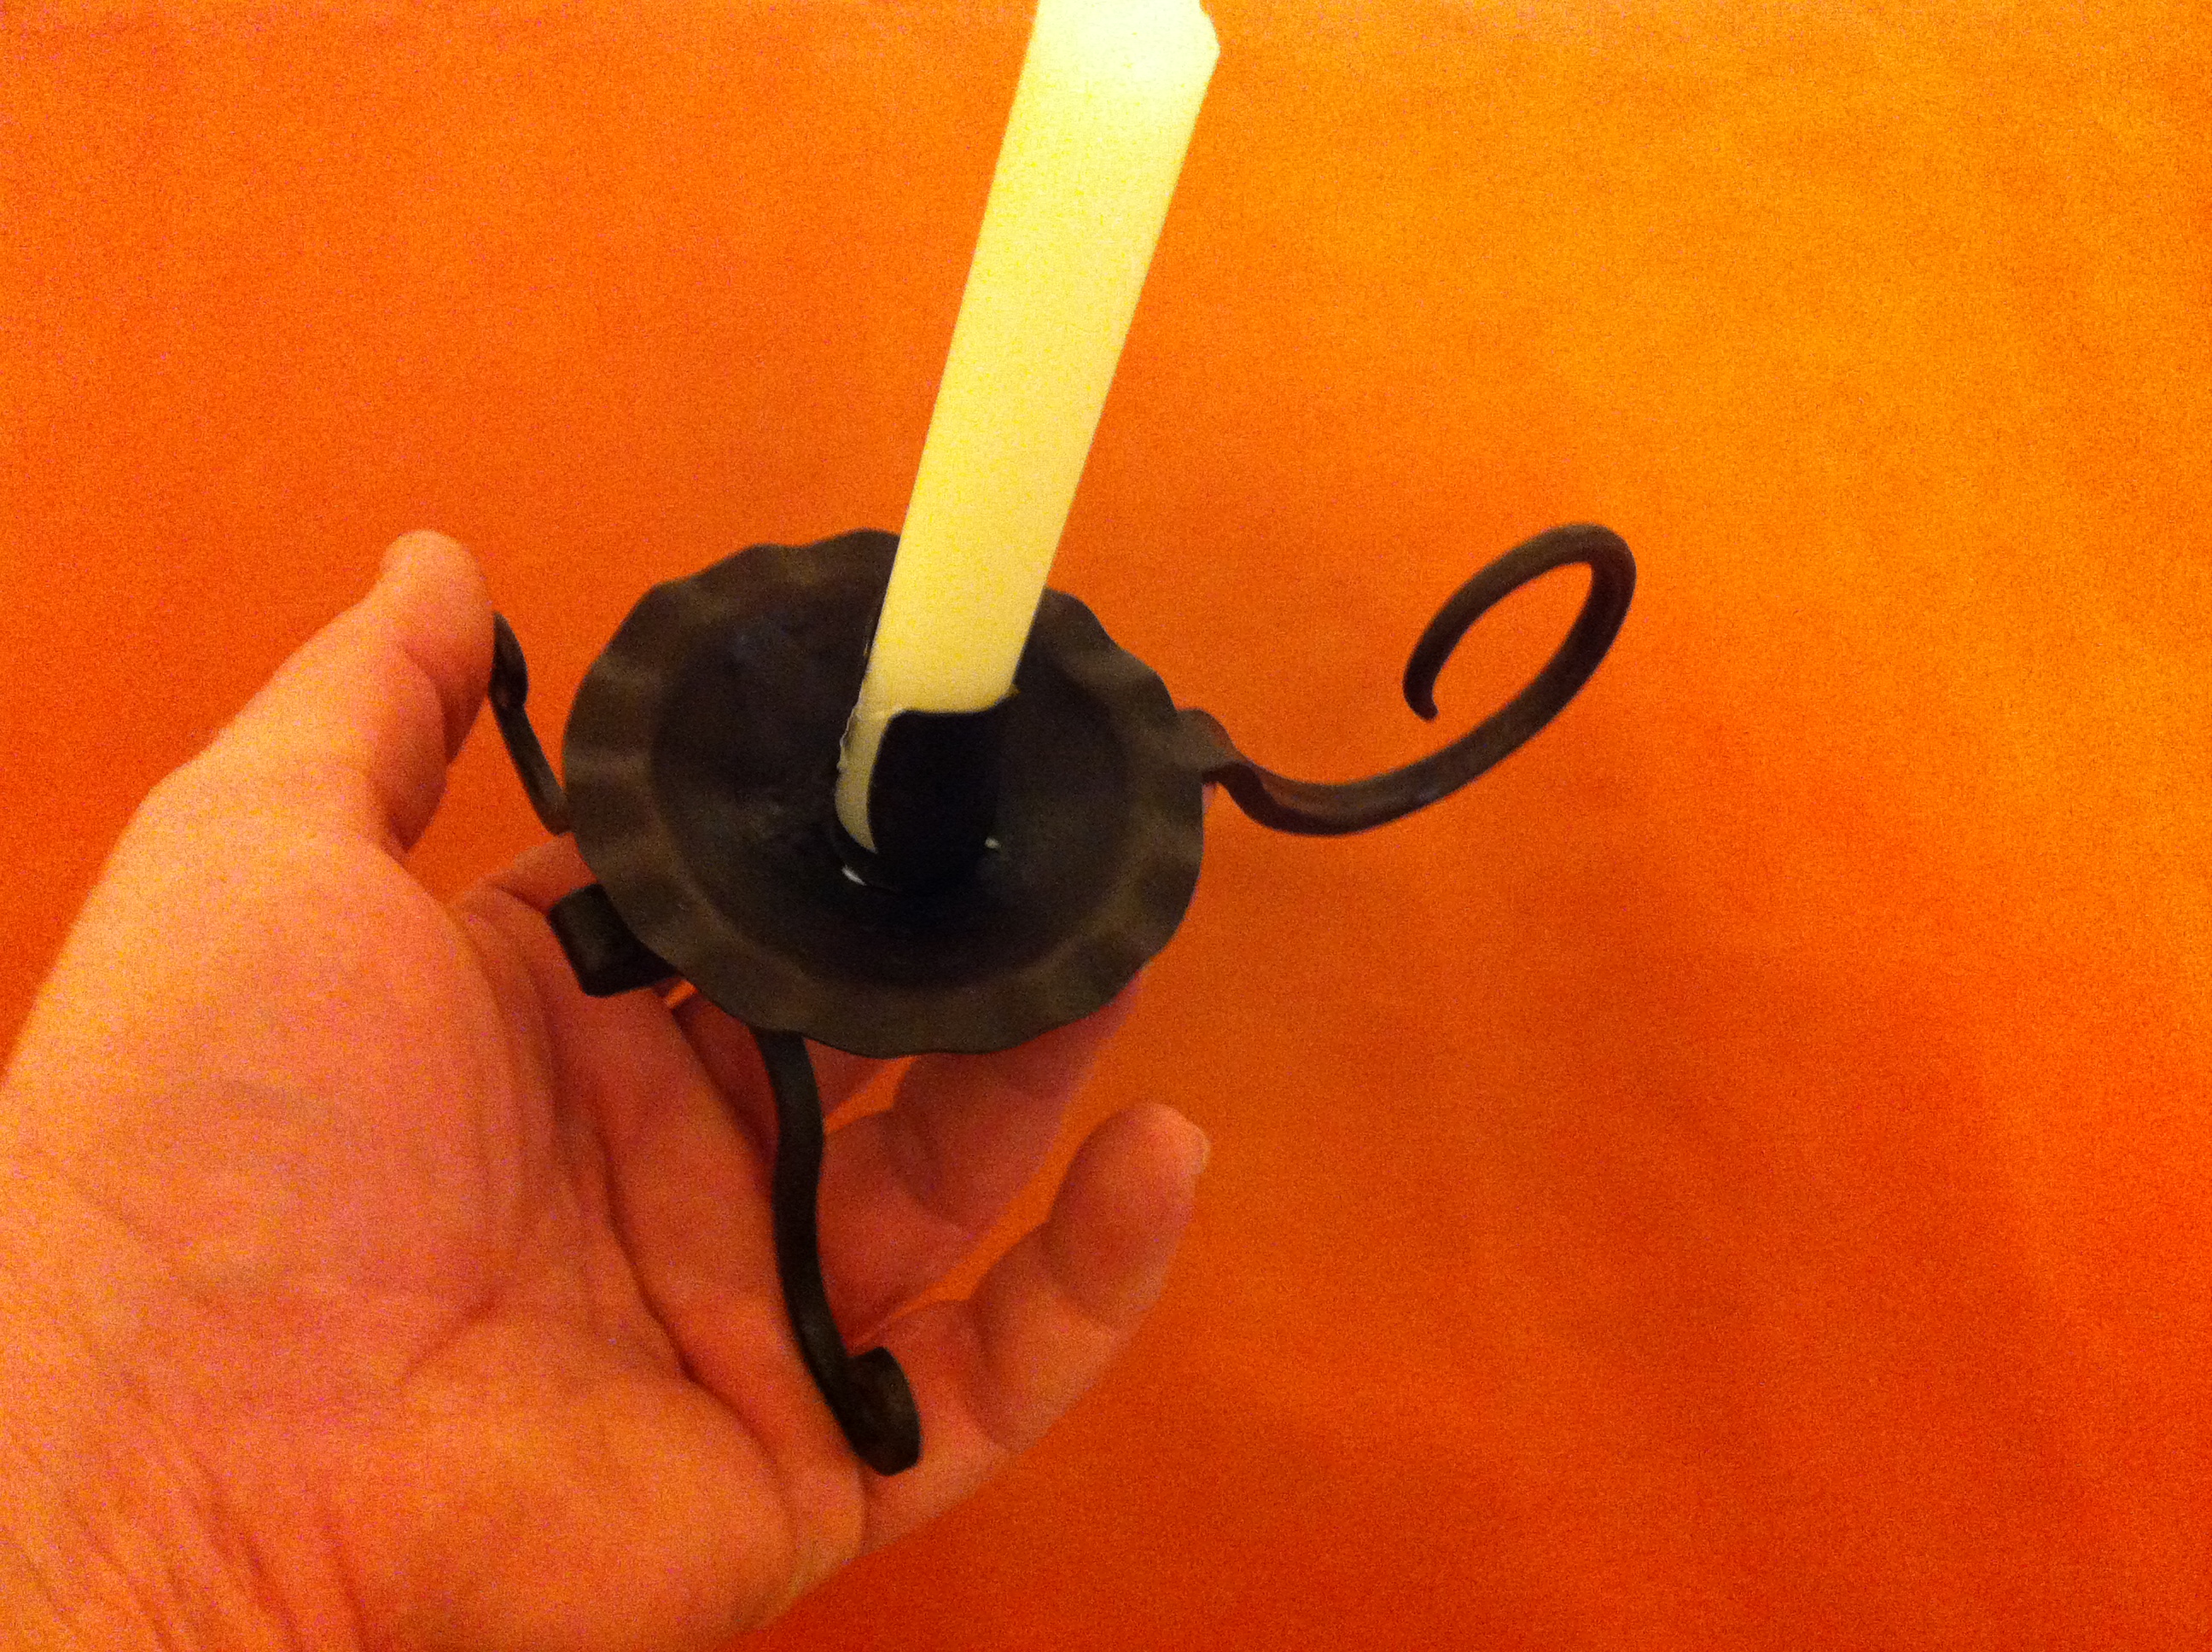
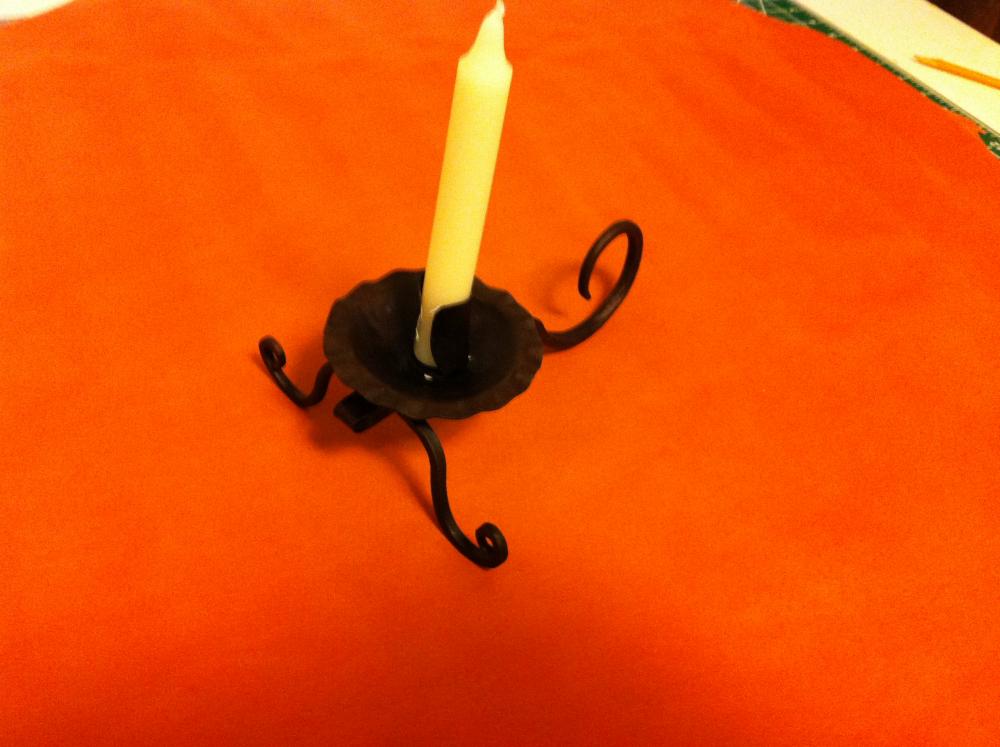
Thanks, I'm going to check into trying to override and learn how to properly use the iPhone's camera, there also are apparently different lenses you can clip on. As an aside, the inspiration for this holder was made after watching a couple different youtube video's by purgatoryironworks and Kovko Kova4.
-
Thanks. You know, I never did have a lot of trouble with the old 35mm SLR camera, but for the life of me can't get the cell camera to take decent pics.
-
Just finished this up, a little out of the ordinary for me, but been wanting to try something like this for a while. Uses standard household candles, sheet metal cup and holder are riveted on. Got to get a better camera, or else learn to use the iPhone's camera better one.

-
Looks good, loved the video, thanks for sharing.
-
Very cool, that pattern turned out great!
-
Very funny, would not be the first time I used my ample belly to help bend something either.
-
Cool story, I was afraid you'd used ball bearings for the balls, that's something a few welding shops down here used to do. I feel you on putting too much time and effort into something for a friend, I have to stop myself sometimes from going crazy with it.
-
Thanks for the suggestions, especially the COSIRA blacksmith books, good information there. I had planned on A36, but now that yo mention it it'd be lots better to go with 1018. I use 1081 for hawks after a bad experience with A36 popping loose. Also have some A36 1" square bar that I got for hardy tools and it's more of a diamond shape than square while the 1018 is pretty much square. I used to work as a welder and at one point the owner was buying bent up scrap metal and below standard grade and it was a PITA to straighten out and use. Not a bad looking fence, what did you use for the balls on top? I rarely use rebar for anything other than billet handles, it's like when they re run it at the smelter they don't get it mixed properly and it's got hard and soft spots in it. I've seen the "tortionator" and liked it, but I don't see myself doing enough to justify building something like that. Maybe if I start getting a lot of orders, but for now I think you've all convinced me to stick with individual jigs and hot bending. If I wind up getting large orders I can always expand the tooling.
-
Very true, thing is, I don't know what I need rite now as I've got a few projects in the back of my mind that if I ever get time I'll be working on. They will need several size scrolls one I get to designing the projects. That's one reason I was interested in the bender as it looks easy to adjust to different sizes. Having never used one I'm not so sure now if it's a project worth building. I can promise you down here there will not be much of a market for that kind of work, maybe a few pieces once in a while, but nothing steady. So basically it'll be for doing my own projects and once in a while selling a piece or such. I do have contacts with a sign company so it's possible that it might grow into something more, but it's still a very limited market. Most people's idea of a fence down here is barb wire. Last bit of scrolling I did the first one came out great, the next 3 or so not so much and then the rest matched up. Took me by surprise just how much material goes into scrolls. Great idea on cold hammering to alleviate stress, hadn't thought of that, but I've got a large air compressor so it would not be an issue to put pneumatic hammer to it, will have to give that a try.
-
Not a problem, I tend to OCD and hard headed, but never claimed to be very smart either. I haven't tried ha penny ends yet, but I'm getting what your saying about clamping the ends. I haven't had an issue with that yet, so far just doing fish tails, starting the bend on the anvil and clamping in the jig with vise grips. The issue is the amount of fuel I use to make the bends, either gas for the torch or coal for the forge, most times both. Then I see people apparently making nice scrolls cold and figure I should be able to do the same. Unfortunately I'm thinking it's not as simple as they show to get good scrolls cold bent.
-
You are correct, and I know I'll never get it within thousandths, but I don't want them to be obviously off either. But what you bring up about inconsistencies in A36 is something I should have considered, so if I'm understanding everybody correctly, heating and forming is more accurate than cold bending? So far I've been heating and bending, using the hammer and light blows to snug the scrolls up to the jig. They are not perfect, but not bad either. If that is the case then it's a fool's errand to chaise a way to cold bend them if I'm going to have to fight inconsistencies in the steel itself. What I'm trying to say, is that any time saved by bending cold is spent tweaking the finished product to fit properly and look good? Also, good point about the hammer and anvil, not a lathe and micrometer. Sometimes I get hung up on precision too much, which is one of the reasons I'm enjoying heating and beating on stuff. As long as I can stop myself from taking it to the grinder and putting a mirror finish or 2k hand rubbed finish.
-
So in other words to get the accuracy I want I will have to go the heat and bend route? I had not thought of inconsistencies in A36, but should have. Thanks for the help and suggestions.
-
I agree with you that low end is a trap. What I'm trying to say, and apparently badly, is that I am developing my skills and I am not going to be able to produce world class iron work at this time, though I will not offer junk either. I will do as I normally do and strive to constantly improve and make each new piece better than the last. I have no desire to compromise on quality either, but then I can not spend a month building something and then give it away for nothing and take a loss. I can and do price my work far below the time I have in it just to be able to sell some of it and pay for materials and consumables. Also you have to know your market, I sell 10 times as many basic hunters as I do mosaic damascus bowies. I do not skimp on quality or performance on the hunters, but I don't put mammoth ivory and mosaic damascus on them with silver sheaths either. I also try to improve upon the last one I did. I enjoy doing high end work, but the basic working knives are what pays the bills. I whole heartedly agree with you on not letting questionable work out either, every so often I test a blade to complete destruction, and often it's one that I though I could do better or have messed up some how and as you say, I do not wish to be haunted by a clunker years from now. What I was looking at the floor mounted type bender was easy repeatability and set up, not compromising on quality. I'm starting to think I'd be better off just building a complete scroll jig for each one I do as needed. From what I've seen there are a few traditional scrolling jigs that people bend the scroll cold. What bugs me about that, and I had hoped to eliminate, is the spring back causing the ratio to be off. I know it's not going to be perfect, but I can see minor deviations and they drive me nuts. Last time I built a scrolling jig I wound up drawing it out on poster paper and since it was for 3/8" bar stock I drew where the rod would go to try and eliminate any deviation in the scroll and built the jig from that drawing. As an example a friend of mine built a scrolling jig for a hand rail he was building and I could easily see something was off. The scroll matched his jig, and he'd supposedly laid it out correctly, but upon closer inspection we found a few area's that were off by about an 1/8" in a 10" scroll. That kind of thing drives my OCD nuts.
-
Thanks for the head's up on the website, I've fixed the link. First, I thought I was being fairly straight forward, looking for plans for a Hossfield type bender to handle larger scrolls. Even posted a video of something similar to what I had in mind, even if not exactly what I was thinking. Would have been happy with most of the suggestions I've received so far. If all I was wanting was small scrolls out of thin stock I'd probably get a Harbor Freight bender with scrolling attachment. Second, I was jumped on in the 4th post for "wanting to make third world junk", I assure you I have way too much OCD to even think about letting junk out of my shop, and take way too much pride in my work. I too am not young anymore and can be prickly to comments like that from people I don't know, especially when I have tried to be respectful. Nor is it easy to judge tone and intent from typed words. Old and cranky is no excuse for lack of manners. Third, I was trying to meet you half way or better, and obviously failed, for that I apologize. I have been researching and do not wish others to do it for me, just to point me in the general direction or to give me a lead from there own experience. If it sounded otherwise, that was not my intention. Fourth, I guess there is such a thing as a dumb question. However, I fully intended to share any plans or information I found, including anything I build with the information. Due to the direction this thread is taking I would just as soon as let it die before going much further down this path as I'm not here for an argument or to upset the apple cart. Thank you for time gentlemen.
-
Thank you for the suggestion to look around instead of having others do it for me, the thought never crossed my mind. I have been researching and coming up with nothing, otherwise I would not have asked. I have spent the last 15 years primarily focused on edged tools, just starting on architectural work and have a lot to learn. Part of asking for information is finding out where and what to look for. That said, I thank you whole heartedly for the information on the Uri Hofi blueprints, I will check them out, along with the link to the FABA. Thanks, Will
-
I'll probably do something like this next time, he shows doing several different end profiles. The way I normally do it is I clamp the fish tail with a pair of vise grip. No reason you couldn't clamp a fish tail in a bender instead of straight flat, which I agree looks cheap and unfinished. My few scroll jigs I have currently are welded to sheet metal, I'll have to try something like this to see if I can do it accurately enough, I get nuts sometimes chasing the last few though trying to get a perfect ratio even though I know I'll never get it.
-
Uh, you don't have to arc weld products for the least discriminating clientele. Also? Around these parts most people would rather buy tube steel factory crap for little money and watch it rot away. And you can arc weld it together and clean it up. Might not be 100% historically accurate, but until someone starts producing real wrought iron bar stock again then none of it is 100% historically accurate. I'm not planning on shipping world wide, I'll be lucky if I sell much of it at all, and am just starting with architectural iron work. Remember, for every Bill Moran or Ed Fowler there's 1000's of us that scrape by. I like the bender as it looks like it makes it easier to do scrolls, but I assure you I would forge the ends as I normally do. I just don't see a point in heating the entire bar to work it around my normal scrolling jigs as I'm doing now. Less fuel used and less time.
-
Will give them a look. I've got a couple of scroll plates I've made, but nothing to bend cold.