

FieryFurnace
-
Posts
2,106 -
Joined
-
Last visited
Content Type
Profiles
Forums
Articles
Gallery
Downloads
Events
Posts posted by FieryFurnace
-
-
Ciladog
I would contend that comment in a friendly sort of way!
Carbon steel tongs are, IMHO superior to mild steel tongs. I have yet to have a pair of my spring steel tongs bend in use, whereas I've had mild steel tongs bend a number of times.
I often cool my spring steel tongs in water when they start getting warm. I never leave my tongs in the fire and never get them anywhere near cherry red. However, they do, obviously get very hot on the end. I cool them off in water with a number of very fast dunks in and out of water. (Cooling the metal down, not quenching it completely off.) I've never had a pair crack. I also use the same methods to cool the handles down after forging, so I can turn them around and work with the jaws. I haven't had any break or crack yet.
That's just my experience, which I'll be the first to admit, is still relitavely small. -
Brain Brazeal makes a really nice pair of tongs that hold dang near everything from 1/4" to 1-1/8" or so that he calls ugly tongs. They are especially suited to holding the tapers on them cut-off hardies. Maybe we can bribe him into posting a tutorial on making them buggers, I've made a few pair, but I am sure my process is nowhere near as efficient as his, as mine involves alot of guess work and about 4 hours... LOL.
I would second that!
Those combo dies are my original flat dies. My air hammer broke down, and I was in a hurry and had to forge about 20 dinner bells, so I modified my flat dies! -
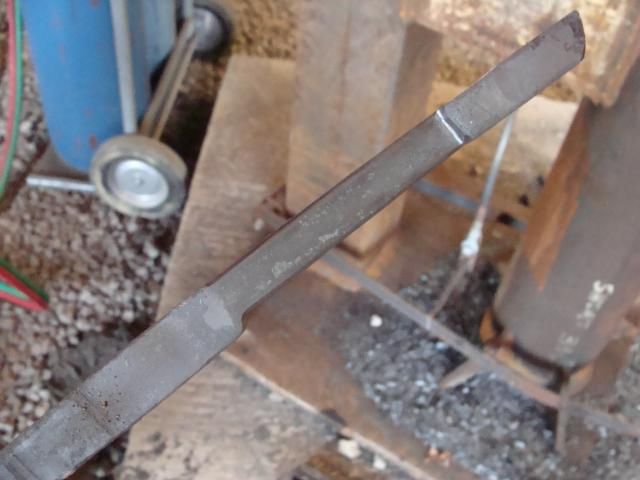
Tongs blueprint!
The tongs I made today did not turn out all that great and I'll explain why towards the end of the BP. However, I took pictures of the entire process, and I think this might be a help to some folks wanting to make tongs.
I use 10-11 inches of 1/2-inch round coil spring. Spring makes a tough, strong, springy pair of tongs. I usually get an 18-inch pair of tongs out of 10-11 inches of 1/2-inch coil spring.
So first things first! Cut some spring. I use a torch but you can also use a cutting disk on an angle grinder. Another option would be heating the end of a whole spring, straightening it, and then cutting it on a hardy.
Any way you do it, cut 10-11 inches of 1/2-inch coil spring.
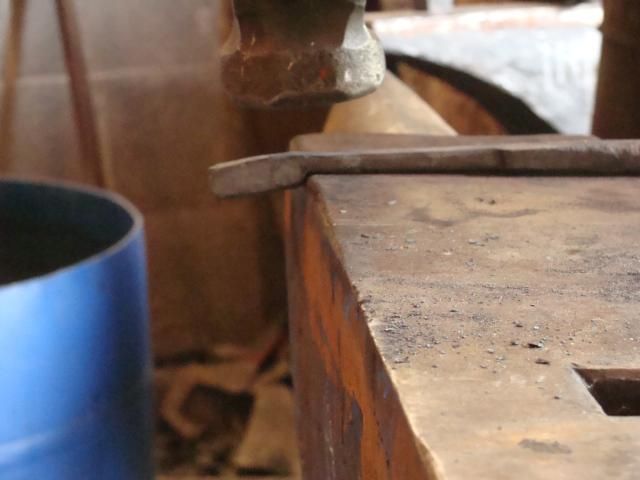
Heat it up and straighten it out. I use the pritchel hole to help straighten it, and I like to wear a glove on my tong hand because it is going to throw some big chunks of scale around while you are straightening the piece.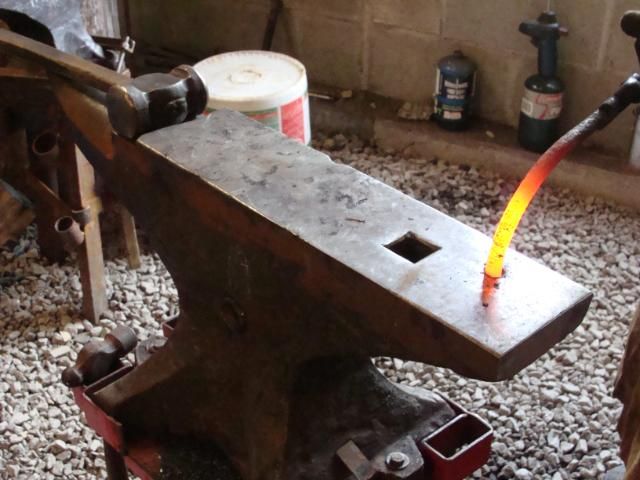
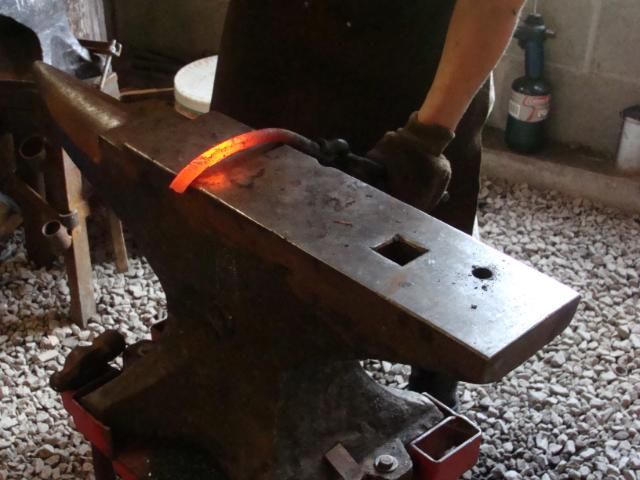
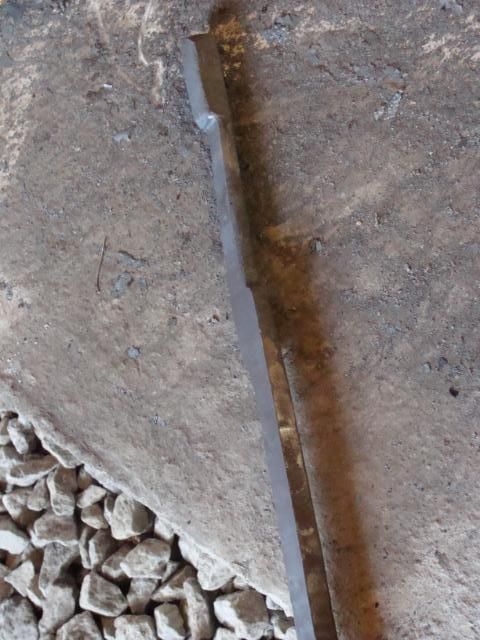
Next, make a center punch mark, 1-inch from the end and then 2.5-inches from the end. (Or 1.5-inches from the first mark.)
I use a v-block marked at the measurements. (I also tend to overhang the end and mark a hair more than 1-inch so I can trip at the end.) Here is my v-block.
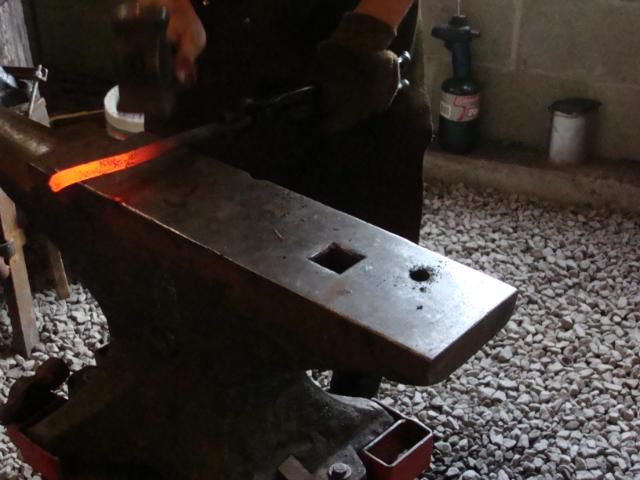
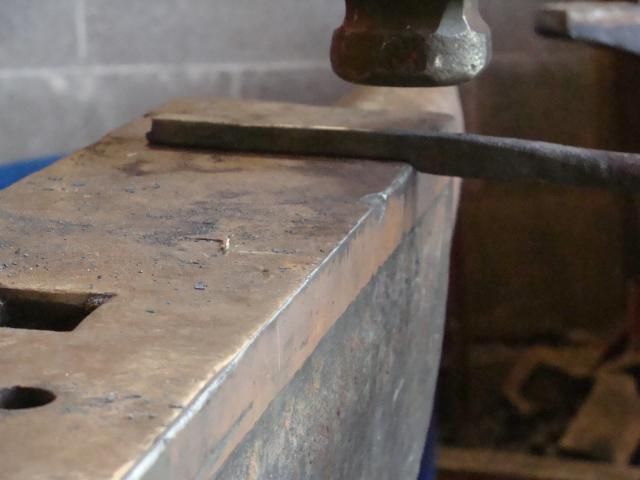
Next, isolate the end at the 1-inch center punch mark, using half-on, half-off blows on the far edge of the anvil. This is shown cold below. Once this isolation is made, square up the blob left on the end, but leave it big still.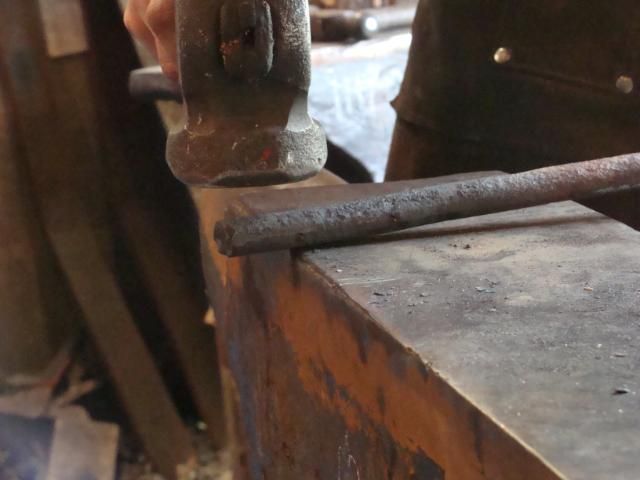
You can also do it on the power hammer. If your dies are adjustable you can just offset your dies. If they are fixed dies, you can use a hand-held flatter.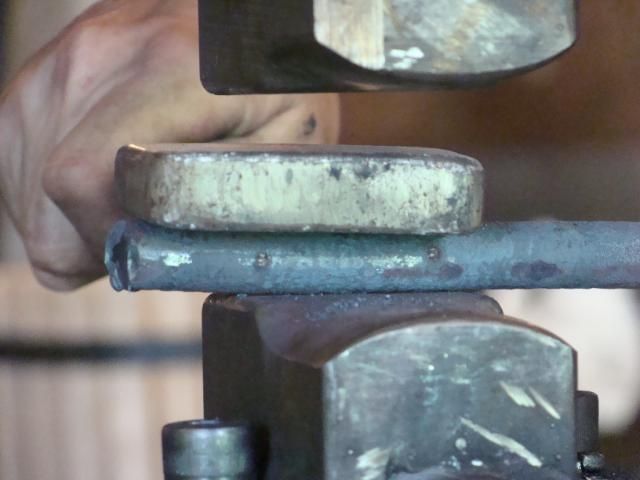
This is the result of that isolation. (Notice the location of the first and second centerpunch marks.)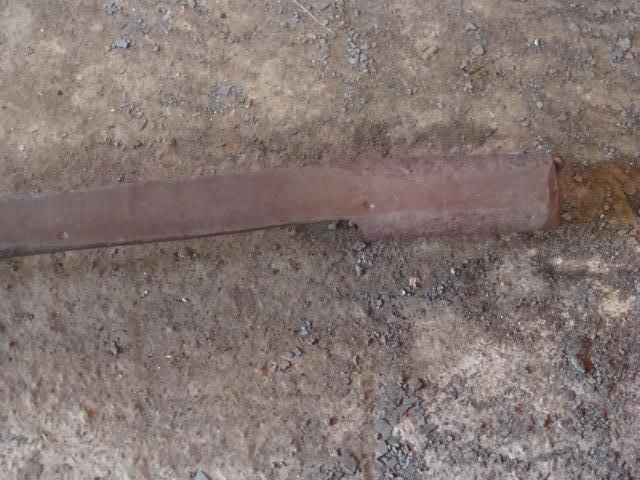
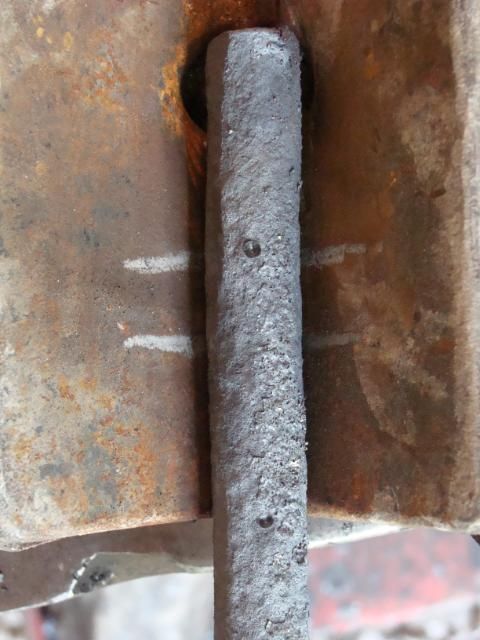
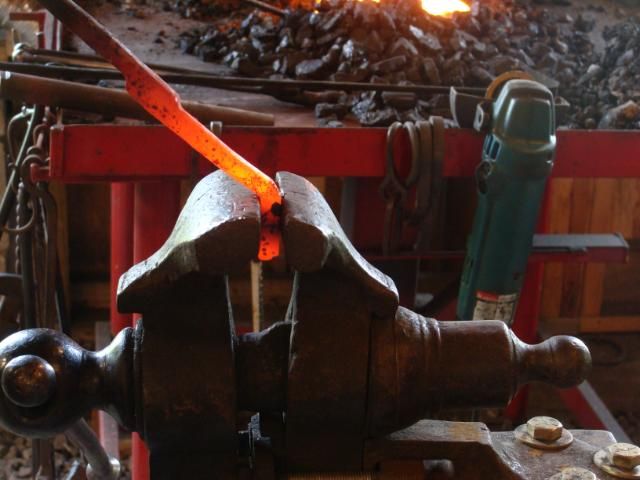
Place the piece back on the anvil, in the same position it was in while you were forging the first isolation at the 1-inch mark. Rotate 90 degree counterclockwise. Move to the near side of the anvil and use half-on, half-off blows to isolate material at the second center punch mark.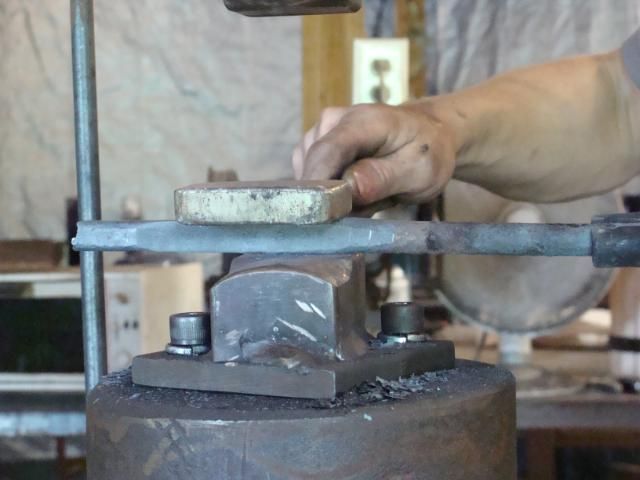
Here is what you should end up with more or less. I usually like to leave the area between the two center punch marks about 1/4x1/2-inch.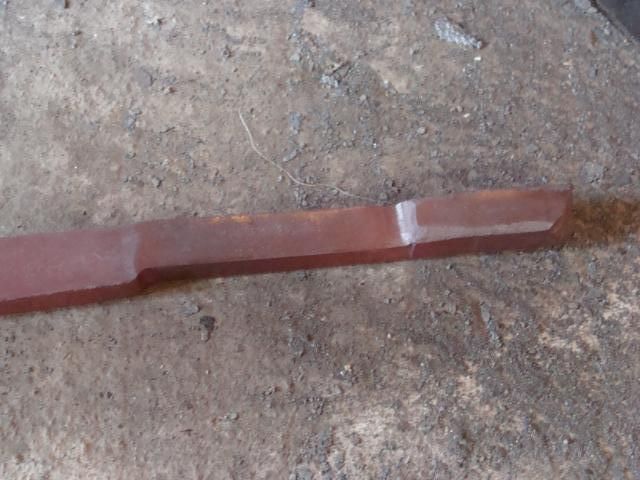
Here are some more shots of the overall process including positioning at the anvil, and just different angles to help you understand exactly what is going on.
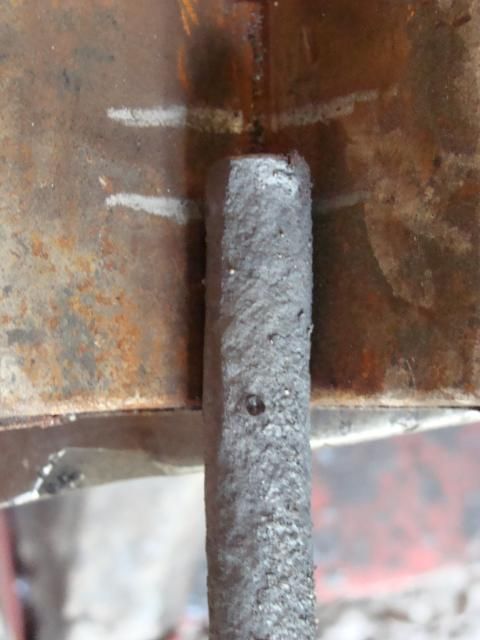
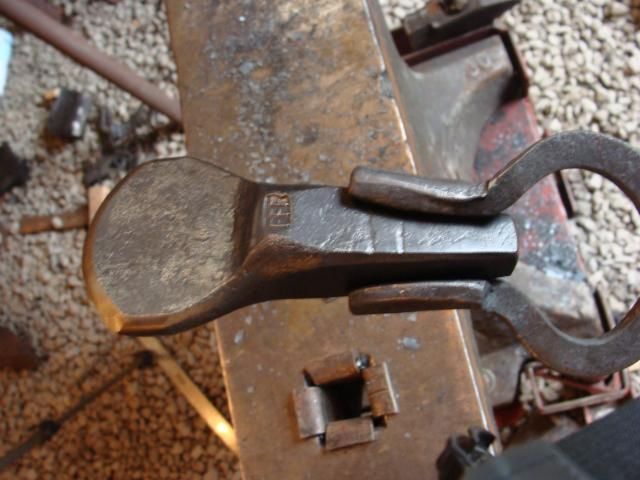
Next its time to forge the boss or the part where the rivet will go. I usually leave a little more than a square for the boss. The boss is forged by using half-on, half-off blows on the far edge of the anvil. This isolates the boss and starts the handles of the tongs. Notice the positioning of the previous isolations in the pictures. (This isolation is on the aposite side from the previous one.)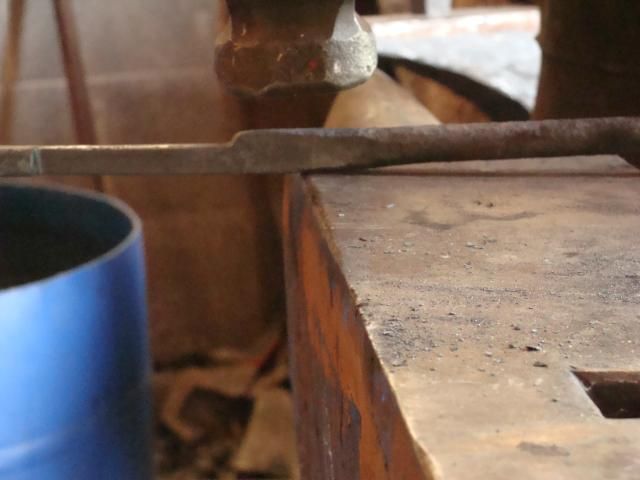
What it should look like now.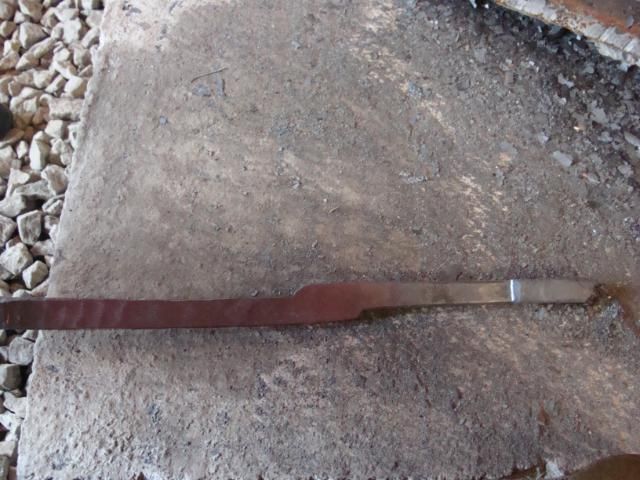
The next step is to taper out the handles or reigns of the tongs. I usually start the handles at about 1/4x1/2 and taper them down pretty small. You can adjust the size of the handles to fit the size of the tongs. Once the handles are tapered to size, hammer the corners down and round the top and bottom sides of the handles. This will keep you from having to file or grind and provide a comfortable grip.
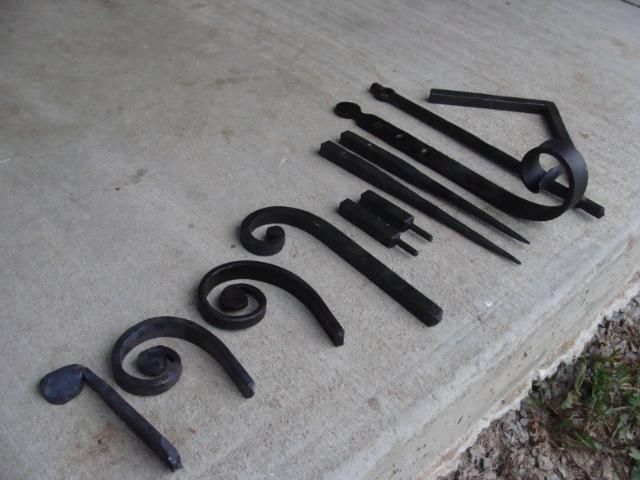
Now, we need to bend the area between the boss and the jaws. (The jaws being the blob left on the end.)
Heat the area between the boss and the jaw, and clamp the jaw in the vise. Bend downward. Refer to the picture to see the direction of the bend in relation to the boss.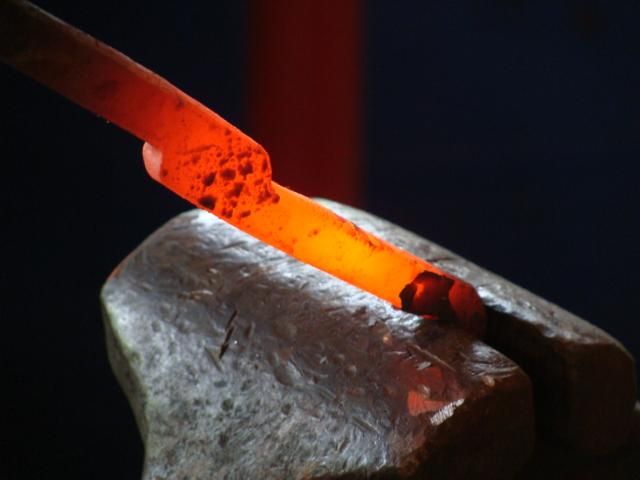
Make a second bend at the boss as shown below.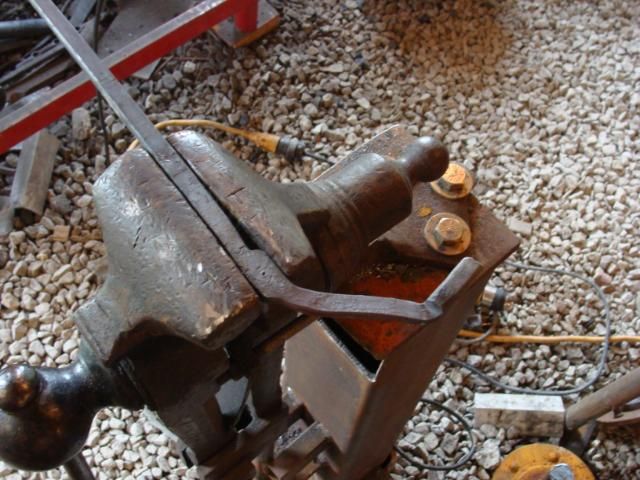
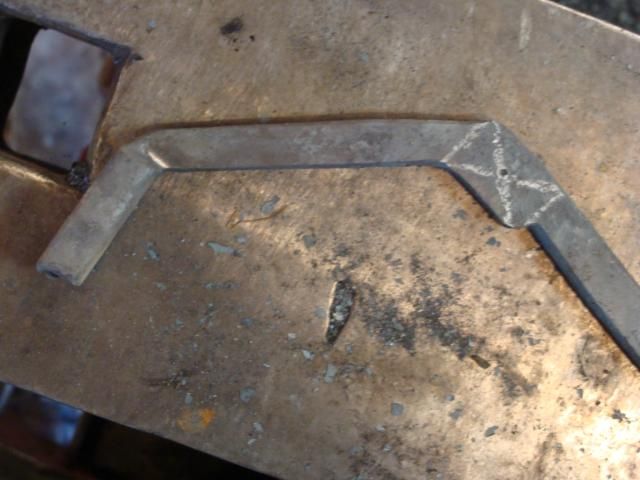
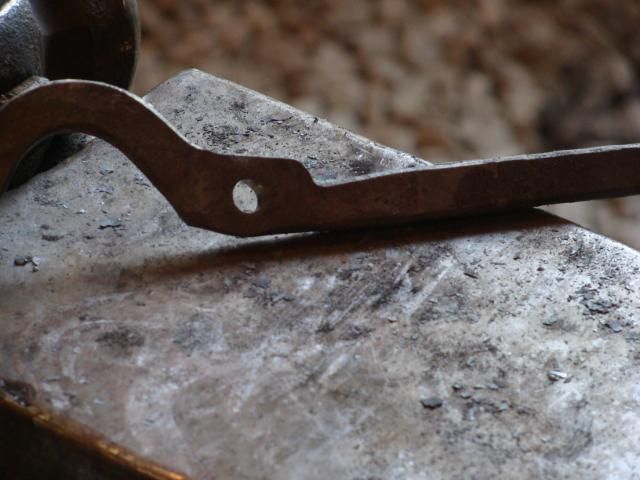
Next, center punch the location of the rivet holes in the boss. I usually mark it out as shown below, and center punch the center of the "X".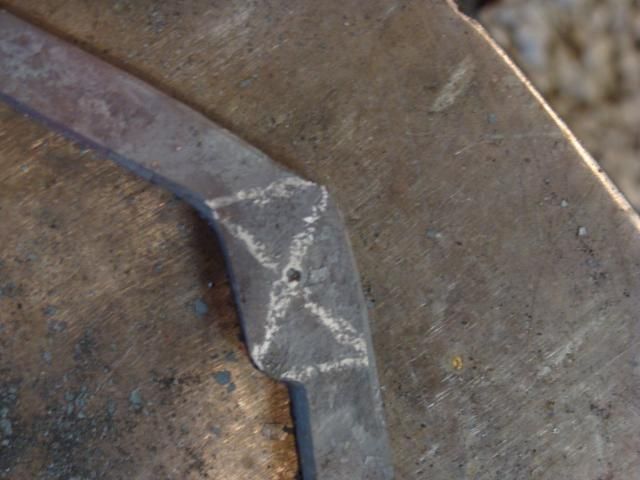
Now it's time to bend the area between the jaws and the boss (called the "bit,") to form the "bolt" tongs shape.
This can be done in the vise with a piece of round bar, it can be done with a jig, or it can be done on the horn. Try to get both sides of the tongs pretty similar.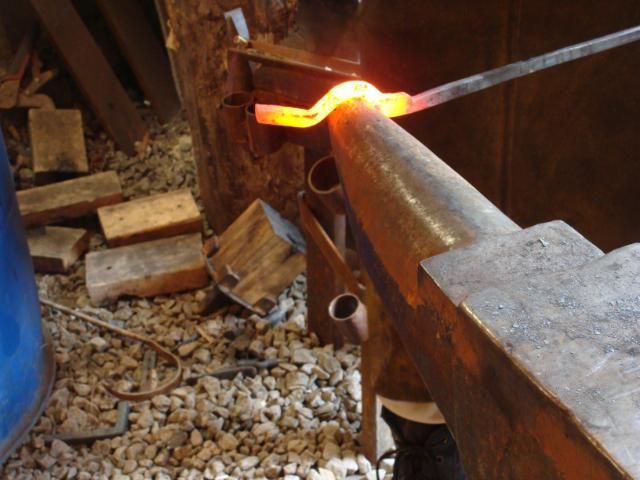
Showing the angle of hammer blows.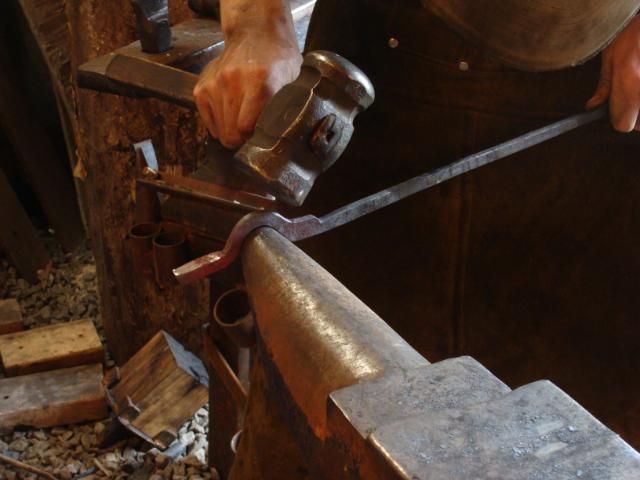
Check to see how similar they are to each other.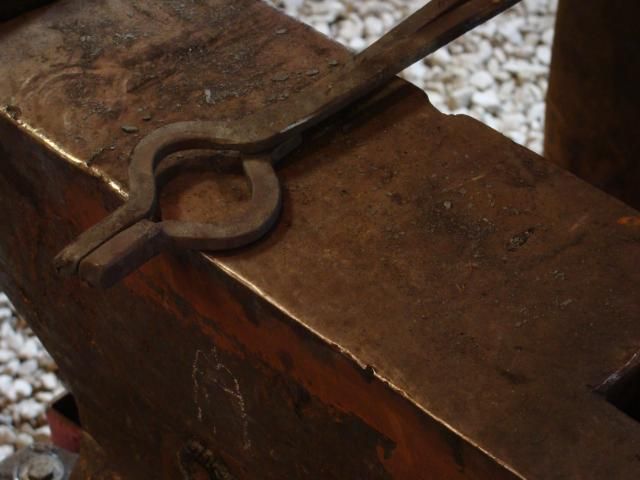
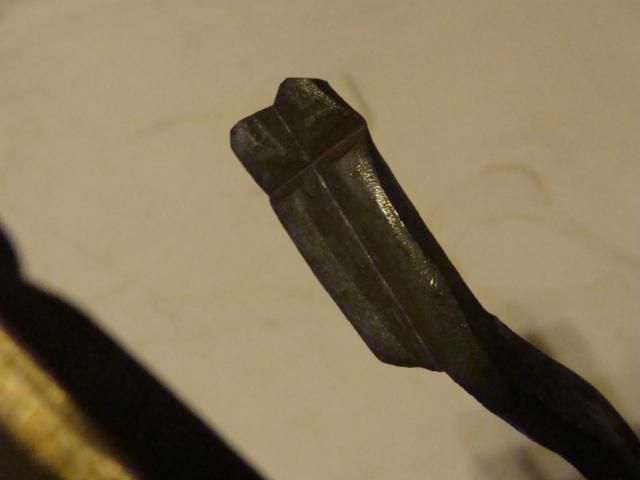
Make a line down the center of the jaws of the tongs. (The blob left at the end of the tongs.) Chisel a groove in this "blob."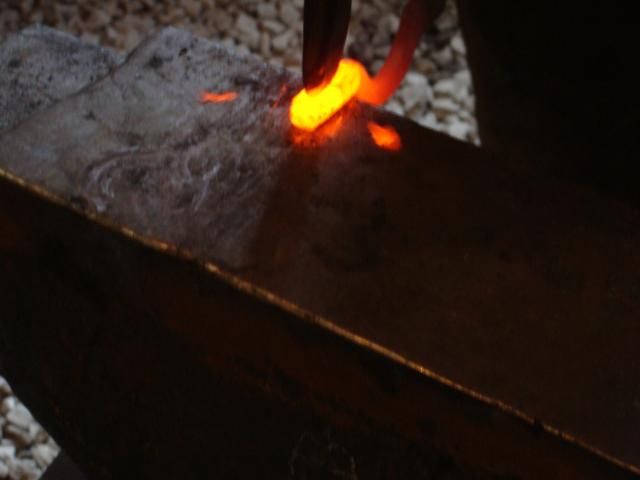
In this next picture you'll notice how my chisel line is not straight and it is a hair off center towards the end of the line. This is going to come back to haunt me. Make sure your chisel line is as straight and centered as humanly possible.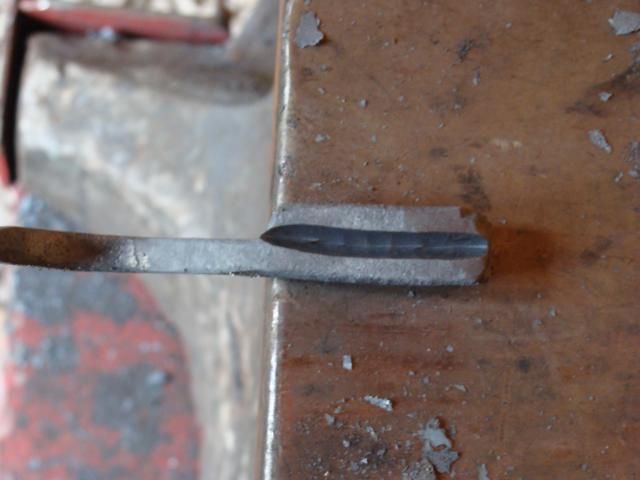
Now punch the rivet hole. I like to use a 1/4 inch rivet.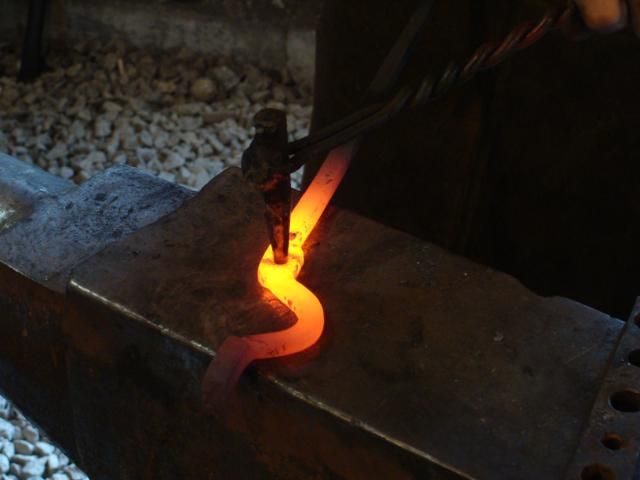
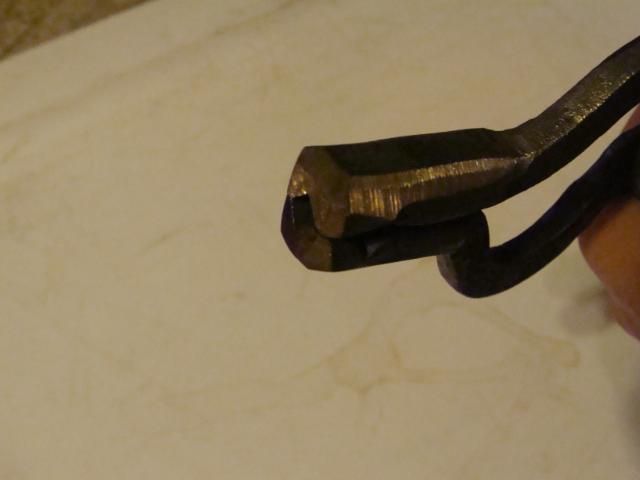
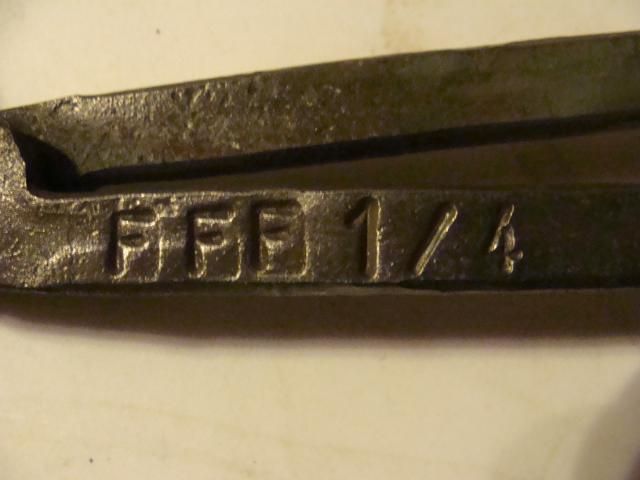
If you want to put a touchmark or stamp the tongs size in, now is the time to do that. These tongs were meant for holding hardy shanks, so I stamped "FFF" (for Fiery Furnace Forge,) and "HARDY."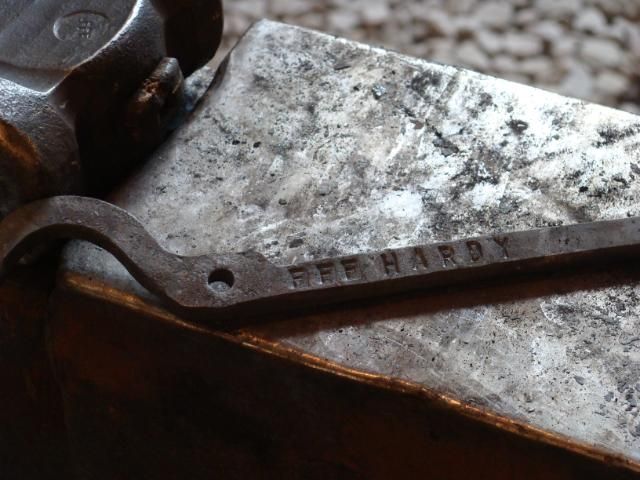
Rivet, but do not completely pound the rivet down. Just get it stuck!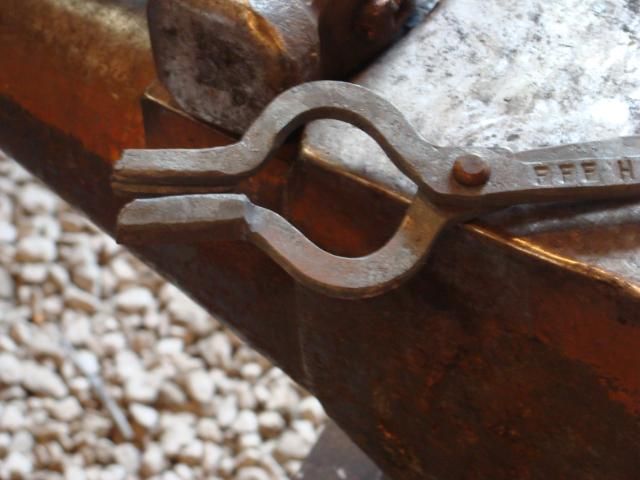
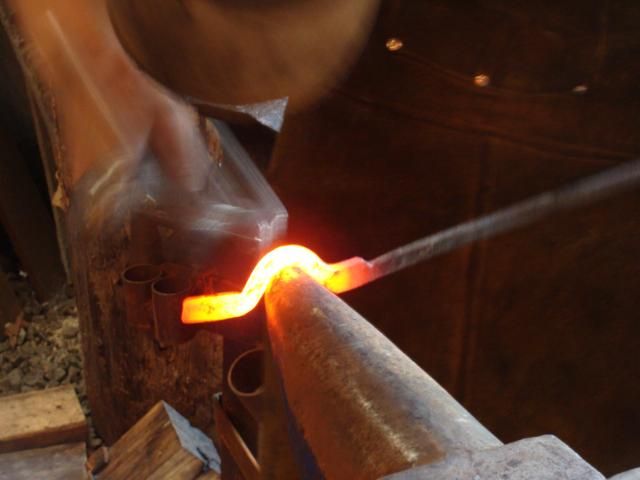
Now grab a piece of stock that is the size you want the tongs to hold. This is a piece of 5/8-inch that is pretty much the same size as the hardy shank I'll be holding. Heat the entire jaw and bit area up, place the piece of stock in the chisel grooves and hammer an even number of times from both sides. This is where the chisel line is really important. If it is a bit crooked, the jaws will not forge evenly and ultimately will not provide a strong grip.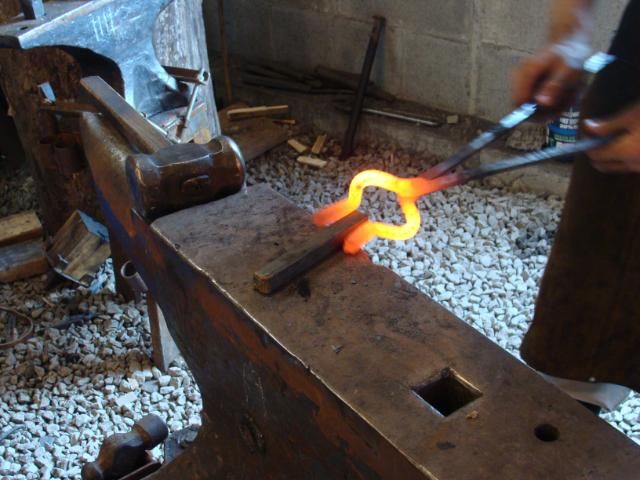
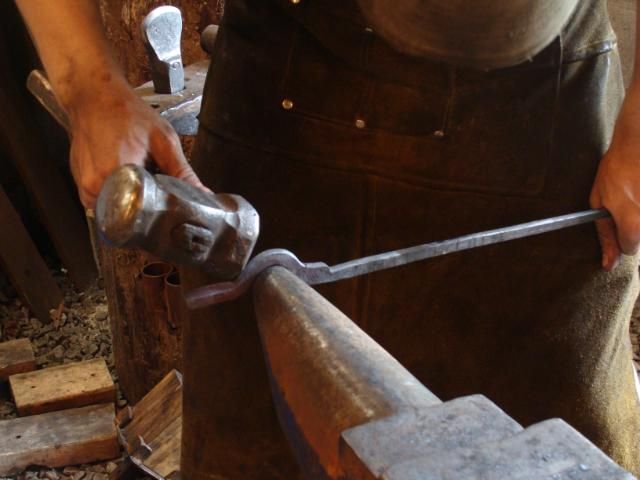
Forge the jaws down until you have a good V-shape inside to hold square or round stock. You can also place the stock in at a 90 degree angle and forge a side groove which is very handy. After the jaws fit and hold the stock firmly, adjust the handles to a comfortable grip. Finish out the rivet too and work the tongs at a low cherry heat, to loosen them.
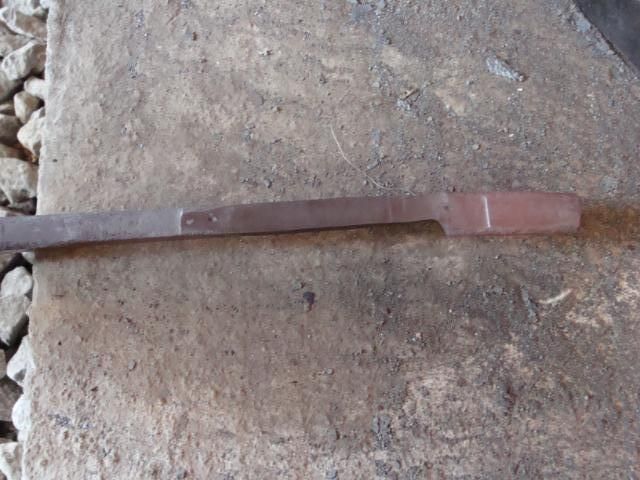
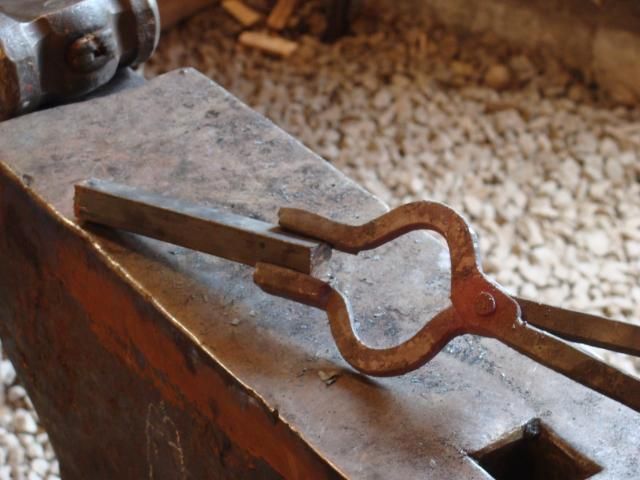
Since I got my chisel line a bit off on this pair, I spent a long time trying to forge and align the jaws. Even when it was all said and done, I was not pleased with the results. It's not the best looking pair of tongs I've ever made, and while they do work, they do not perform at 100%.
However, hopefully you get the idea.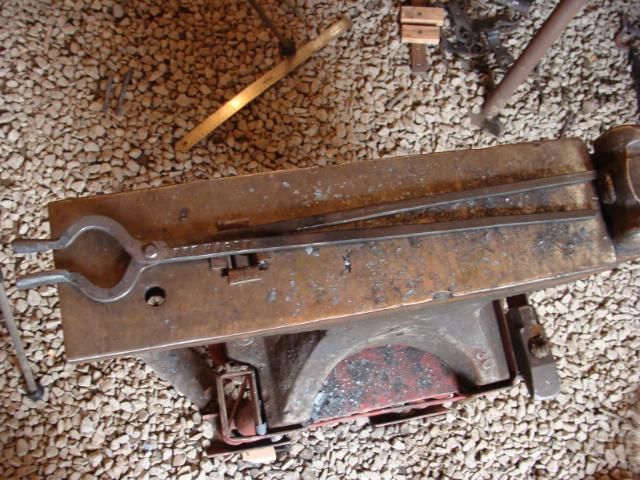
Here is a better looking pair of tongs for 1/4-inch stock. Also notice the 90 degree v-groove I put in these.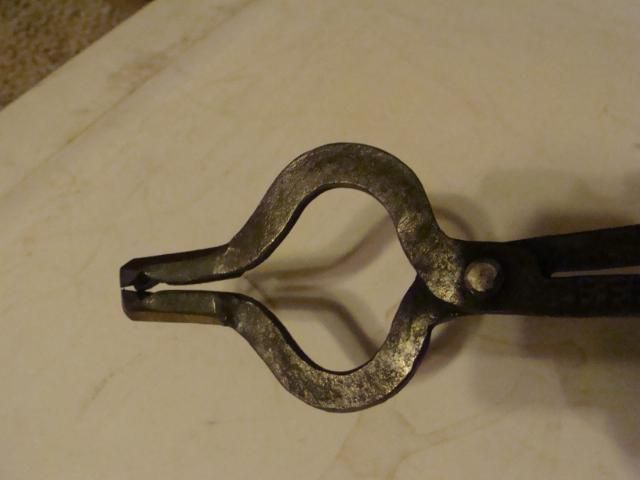
With a power hammer and a little bit of practice, forging a pair of tongs in an hour is easy. With proper hand hammer technique, you can forge a pair in a couple of hours by hand.
A newbie, will require 5+ hours of work to forge a pair of bolt tongs like this.
Tongs are important and knowing how to forge a good pair of tongs for your shop is something that should be learned, regardless of whether you are a once a month hobiest or an every day full timer.
I am still a learner, and I am more than sure that my method is not the best or fastest, but hopefully I've helped someone out! -
Love those chainmaker v-bits. Try making a gooseneck pair so the jaw is offset allowing stock to not interfere with the hinge, my favorite pair of tongs for 1/2 inch is a set of OCP gooseneck chainmakers, the jaw looks almost identical to yours.
I agree you are getting into a high end product there, except the time. I would be pleased to own a pair of your tongs made to this standard (but only if you can price competitively)
Phil
I've made gooseneck tongs before! -
I'll do a BP with the next pair!
-
I used a grinder with a regular ginding wheel to do the bulk of the removing. Mass keeps the material cool, but don't stay in one place. Move around the entire face as evenly as possible to keep it as smooth and flat as possible. Once the marks are removed, switch to the sanding disk of a finer grit and once again, move evenly around the entire face as flat as possible. I did this on my big Fisher and my small Trenton with much success!
-
Forged from 1/2-inch round spring steel
18-inches overal length
14-inch reigns
Made for holding 1/4-inch round or square.
They took an hour and twenty minutes to make. I made about a dozen pair back to back a few months ago and got them done much faster, but it's been a while since I made a pair of bolt tongs. I need to make one of the jigs for the jaws. I think Spears posted some sort of jig a while back.
Anyway, they are smooth and I am pleased with them. I'm making a couple pair as a gift to someone.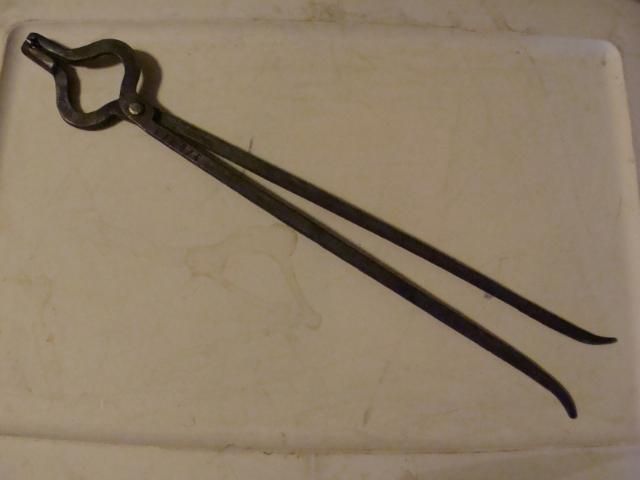
-
Not sure! You probably don't have any dents over 1/8 inch deep. As long as it hasn't been ground a zillion times already you should be fine. Can you see the line where the face plate is welded to the base? How thick is it?
-
Well it's cracked alright!
Ok seriously! I would try grinding the entire face down past all those marks. It's going to be impossible to forge anything smooth on that face. If you are lucky maybe the crack is just on the surface and you could grind past it.
Either way you need to smooth that face up. So I'd say it's worth the shot! -
Sorry I let this slip down the line a bit folks.
I currently have an application in for a journeyman position out of state. It will be a while before I know if I get it, so my hands are tied there as far as planning and hosting a meeting. (It'd be a bummer to host a meeting in my shop and then not be able to attend! LOL)
If someone can host a meeting sometime, that would be great! I'll do all I can to assist! -
Congrats! LOL That's the way most problems are! The answer seems so obvious once you figure it out!
I see you are pretty new to the forum though. The rules around here say that if you mention any type of tool you have to post pictures of it! We are picture addicts around here. :D
WELCOME TO IFI! :D -
Unfortuneately doing craft show items, I don't get to do a lot of penny scrolls, snub ends, fish tails etc. I've taken classes and seen them demonstrated, and even done one here and there, but not with any regularity.
I bend a lot of small round taper scrolls by hand, on my dinner bells, but that's about it. I do try to incorporate forge welding, slit and drift, rivets, mortise and tenon, and punching in some craft show items to keep me in practice. I still need pieces that include collars and various styles of scrolls.
A scroll starter is on the "tool making" list now too!
Nice to hear from you Mr. Eddie! Things going well your way? -
Good job! Too many people forget to do that tuck before you roll and that's what makes the hay-penny. (The hay-penny is actually the English half-penny, but they say it the other way. It's a big coin.) Too many just have the disc on the end of the bar and start the scroll. You need to do that tuck or squish first so the transition from the disc to the bar gradually flows out. Way to go, Dave!
Thanks for that pointer. On the scond one I did not do that tuck prior to scrolling and once I started scrolling I realised something wasn't right. So I undid it and then redid it. -
If you have the room I would keep the 4x6 saw. I had to sell mine because I didn't have the room, but I miss it every now and again. You won't get much for it because they sell so cheap. They can be really handy for cutting smaller stock. Also if you have to cut a forged piece and are concerned about it being hard or your clamping is a little sketchy it is nicer to do in the little saw because if you mess up a blade on the little saw it is $20 the big saw is $40-50. I might be inclined to lock the arm up and set it up with a decent table so you have a vertical saw.
Yeah I was kinda thinking the same thing! The stand on the small one is falling apart so I was going to build a new heavy duty one (which would make it worth more,) but I did figure it might be nice to keep! -
I have a kinyon, but it's a bit different than yours. (Old style with the cylinder attached directly to the head. Mine has stuck in the up position once or twice, and what causes it on mine is that the roller valve that reverses the flow of air through the main valve, does not get compressed enough to switch the flow. On my hammer, I just have to loosen the screws that hold the roller valve in place, and scoot it over a bit.
I'm not sure if your style even uses a roller valve, but if it does, make sure it is being compressed all the way. -
Thanks for the tip! I think I understand! I am going to keep practicing.
-
I don't particularly like the penny scroll. Just don't care for the way it looks.
I've never personally forged one (that I remember,) but I have seen them forged in the past.
Well, it's one of those things you keep putting off but eventually have to try. So today I tried forging a penny scroll.
Here are three that I did. The first was 1/4x1-inch and the other two were 1/4x3/4-inch.
The first one was a complete and utter disaster. A crack developed after a couple of heats and it was such an unrepairable mess that I didn't even start scrolling it.
The second turned out better. It took about 8 to 10 heats and was ok.
The third took five heats total and was much better although the penny isn't the greatest circle in the world.
Here they are first, second, and, third pictured left to right.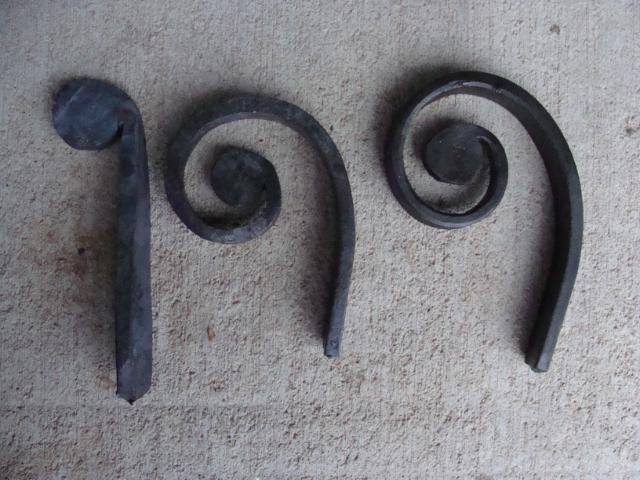
I did a whole bunch of techniques today. Just playing around in scrap. The penny scroll was the only one I'd never done though. All of it was done with a hand hammer and anvil except for one of the round tapers. (One was done with a hand hammer, one with the power hammer.)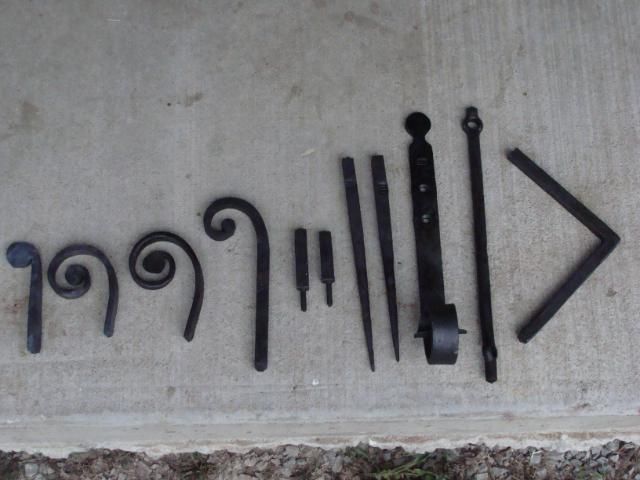
My results were as follows.
square corner in 1/2-inch square bar: 5 heats
drop-the-tongs weld in 1/2-inch round bar including, scarfing, welding, and dressing: 4 heats (round bar with slit and drift hole)
round taper in 1/2-inch square bar: 2 heats by hand, 1 heat under the power hammer
1/4-inch tenon in 1/2-inch square: 2 heats
fish tail scroll in 1/4x1-inch flat bar: 3 heats
1/2-inch round slit and drift hole in 1/2-inch round stock: 2 heats
snub end scroll in 1/2-inch square: 3 heats
penny foot in 1/4x1-inch flat bar: 1 heat
two 1/4-inch round holes punched and countersunk in 1/4x1-inch flat bar: 1 heat total
I have no idea if these times are good by comparison with a smith of my experience. I sure hope they are!
Anyway, thought you all would enjoy! -
1"x1" round slugs hammered down to about 3/8, then stamped.
http://www.youtube.com/watch?v=Tl-Sqigzw9E&feature=plcp -
A "round tuit" is a little funny piece of metal. It is a round disk of metal that is stampted with the letters TUIT. The idea is that when someone tells you to do something and you tell them "ohhh I'll get around to it" you do have a "round tuit."
Mine are about 3/8-inch thick, 1.25-inches wide, and are stamped with the letters "TUIT." -
Like everyone said, for starters, list your location. There are probably smiths on here in or around your location so we need that info.
As far as an axe head being easy, I wouldn't recommend it for a starter project. (Then again, I don't make them!)
If you are going to create a single item in a mass-production type setting, you need to know your market (how many you will need to provide,) know how to reach your market, and then build your facility to accomidate those needs.
You'll need a general idea of how many of what you are making, you are able to sell, and at what price you can sell them. That's going to let you know if this is even doable.
From the little bit of information you listed, I gather there will be two people (you and your friend,) producing these "things."
In that case (and assuming that what you are making actually has to be forged,) you are going to need two forges and forge stations, coal or propane.
If you are producing large quantities in a time efficient manner, more than likely you will need a power hammer.
So you are looking at basic equipment purchases of
2 forges
2 power hammers
2 anvils
2 pairs each of the appropriate tongs needed
2 each of several sizes of drifts, mandrels, punches, slitters (depending on what it is and how you are making it.)
whatever types of appriate hand hammers
files, grinders, sanders for finishing
proper steel and a steel source
If you are making production axes, knives, swords or whatever, a heat treat furnace might be handy.
Probably a bunch of other things that I'm forgetting.
And a shop to put it all in.
And if whatever you are making requires a wooden handle, you'll probably want a few basic wood working tools.
Now you may understand why you need to know the market and what kind of potential sales you are dealing with. Business is an investment, so make sure you've got a solid chance of making money.
You are jumping in head first. If you want to just do it as a hobby, a hammer, vice grips, hair drier, brake drum, a big rock, and a leaf spring will get you going. -
KYBOY: do you get metal at Sandusky over here in Columbia ever? I know they don't carry it, but they may be able to order it in small quantities. I've talked to them about ordering other types of specialty steels before.
I've got no clue what it would cost!
Here is there number!
270-384-4716 -
Ok I kept track of what I made April 30th thru May 29th. This list, shows most of what I made during that period.
week one
1: custom fireplace crane
2: horseshoe toilet paper holders
8: customized sign bars
2: 24-inch wall-mount pot racks with 12 hooks
100: "round tuits"
20: dinner bells
10: leaf hooks
1: hat rack
2: change dishes
5: horseshoe hearts
Total hours worked for week one: 38
week two:
4: toilet paper holders
3: bath towel bars
2: camping tripods
1: forge welded tree
28: "round tuits"
1: fire poker
10: crosses
5: horse heads
Number of hours worked in week 2: 17
week three:
10: horse heads
4: dinner bells
2: camping tripods
8: leaves
6: leaf hooks
Number of hours worked in week three: 15
week 4:
20: s-hooks
4: heart hooks
3: change dishes
6: crosses
number of hours worked in week 4: 12
Totol number of days worked: 15
Total number of hours worked: 82
The hours listed do not reflect the time I spend doing business related paper work and stock/supply trips.
During this month of keeping track I had a two day vacation, and a total of 8 days at craft shows. I do not work on Sundays, and I spent one day on a trip going to pick up a piece of equipment. -
Create yourself a "photobucket" account. (www.photobucket.com)
After you create your account, use the "upload" button to upload your photos from your computer to photo bucket.
Then copy the "IMG" code on your photo and past that code into your forum post, wherever you want the picture to show up. When you post your thread, your picture will appear. -
talk about missing the forest for the trees! you are a blacksmith now dummy build a new bed for it, nice flat bed would do great I bet
You want to try to talk my dad into that....go right ahead.....I couldn't convince him! LOL
It's my dad's truck. I don't own a vehicle........uhhhh yes I'm 19 and I've never owned a vehicle. No it's not because I'm a reckless driver and dad doesn't want me to have one. I wouldn't have the shop I have now if I spent my money on a vehicle. I'm saving and working toward getting one next year. I'm in no hurry!
Oh and although it was recked on a trip I planned, I was not driving. :D
Tongs blueprint
in Tongs
Posted
Lighter tongs are easier and more comfortable to use! :D
I don't mind criticism, but I didn't take your post that way at all! You just brought up a point about tongs material that many good blacksmiths would agree with.
I dissagree but didn't take it as criticism!