

FieryFurnace
-
Posts
2,106 -
Joined
-
Last visited
Content Type
Profiles
Forums
Articles
Gallery
Downloads
Events
Posts posted by FieryFurnace
-
-
Hi there!
You first need to get a good grasp on the basics. Then move to joinery. After you understand joinery and how it works, then you can start putting pieces of metal together and making multiple pieces work together.
Practicly everything in blacksmithing is a combination of forging (changing the dimension and shape of the steel,) and joinery (putting those pieces together.)
That's the order I learned in.
As far as developing an eye for art, just practice! Study art! Get inspiration from other artist blacksmiths. (Don't steal their work...change it and make it your own.)
You will develop an eye for seeing what can be made out of a piece of steel once you've gotten some experience and a good foundational skill set under your belt.
I don't bother with much scrap as I have new steel readily available and cheap. You'll develop your eye according to what you have available.
Come up to my shop sometime if you want! I'm only two hours away! -
If you ever see the guy at a car-lot, don't buy the car! :D
-
Under the hammer, how do you keep the punch from sticking in the hammer blank when you are pounding it under a power hammer? What type of hammer and what type of throw does it have?
Are you still practicing the hit and remove the punch, process like Brian uses with a striker?
I have and air hammer with a 12-inch throw. I need to weld my extra set of hump tools to some bottom dies, make a cupping die, and figure out a way to punch under the PH.
Like Brian says, a punch press is the ideal, but that's not in the list of shop additions anytime soon here.....in the mean time, I'd like to be able to make a few hammers, and I don't have a striker!
How much does that hammer weigh? -
Nice! Nice! Nice!
-
I've got over 700 square feet and am satisfied for now. I've got all the big equipment I want, and plenty of room for small tools still. My main shop is 20x28 feet and I've still got some breathing room. The steel room is 13-feet square and is a separate room from the shop, although it is attached. Very nice having a separate steel room. It too, is big enough for everything I do!
I have additional space upstairs for storage for stuff like packing materials, the light table, etc. That's handy too!
Walls do not cost much.......roofs do! If you need more storage space, try going up, not out! -
Very nice! Collars look great as well as the entire center piece! Just really neat looking!
What is the finish going to be? -
The hammer club... I really should be ashamed, but I'm not B) <_<
what are you forging????? Ship anchors or RR engines? -
Where you been Dave? havent seen you around :)
Ehhhh Mississippi, Missouri, South Dakota (ABANA), Wyoming, Montana, Colorado, New Mexico, Texas.......I'm sure I'm missing a couple. Been on the road without internet for a month. Just got back a week ago. Been REALLY busy since then too! -
I've used clear coat on several screens on big fireplaces that get used. Never had a problem with it! Cold oiling would be a good second joice!
-
Great to see this project back on the table! I was afraid you had finished it and had not had time to post about it.
Love the idea of the parallel strings to check the height on the upright eliments.
The painters tape on the collar areas is great too! A couple of questions on the collars! Are you doing plain or decorative collars? Are they going to be butted or overlapped? What size stock? Are you tack welding under the collars? (Sorry, had to ask!) Are the collars being done hot or cold? -
I'd also take a look at it. Need more info and specs though!
-
My guess = Dave Custer ~ AKA Sparky ~ (AKA) FieryFurnace
LOL that would be a dream come true! -
The hacksaw or the cutting disk will work just fine. Hot splitting would probably take two heats and the rag would be forged down when the texturing was done. I need to try hot splitting one sometime just to say I've done it.
-
Great job! Great to see this is still being used!
You've got a great cross with great texture. Try centering up the flare on the top, next time, and experiment with different ways to center that and to keep it from becoming off-center. It takes a little practice! Metal always has a tendency to end up fatter on one side than on the other. That happened to me this past week, making a dutch heart. It turned out great, but the point was out of center.
Keep at it, and thanks for searching for, referring to, and using my tutorial! -
Not the most fun ride in the world and would probably be over twice the time it took me, but taking a Greyhound bus is rather inexpensive. Those considering taking a class should consider that option as transportation to help keep cost down!
"Black Frog" EXTREMELY wise choice! I've been smithing for six years and have taken over 9 weeks of classes at John C Campbell folk school. (And that's a GREAT school and I've learned under some of the BEST they have!) However, after taking Brian's class, my forging ability and production doubled, my enjoyment of forging doubled, and it's helped with things as simple as heating the metal more efficiently than before.
PS: Sorry Brian but I still haven't picked up on the not dropping the tools on the floor thing. I've got two tool trays, and I still drop my tools on the floor, and then grab another off the tray! I try, but it hasn't stuck yet! :D -
Brian Brazeal. He (apparently) currently has a student from CT. Brian is in Mississippi and is the best techniques teacher for moving metal, quickly and efficiently, with little energy use. I took a week long class from him and came home with tons of tools and more knowledge of smithing and moving metal than I've gotten anywhere else in the last six years combined. Excellent guy, excellent teacher!
Great cover picture Lyle! -
AWESOME! You need a student to come bang it up for you? :D
I was at the junk yard just yesterday and they had a piece of 3x4 solid steel about 18 inches long. As soon as I saw it, I thought STRIKER ANVIL! The junk yard man wanted to keep it though for a scrape blade weight! :(
Electric blower makes heating that more fun I supose! LOL -
Neat! Really neat looking shop! I love the fold-down sides. These guys full timers?
Good luck! -
So to understand correctly from the pictures, you got the self contained air hammer before you got a steel rack? OK! A bit out of order ya think?
LOL I'm just messing with ya! :D
Nice looking rack! There is something about a good steel rack with the long bars all arranged neatly, that just looks cool! :D Must be a blacksmith thing! -
Testing with picasa to figure out how to post their pictures directly to IFI!

Ok so Lyle!
I can't post your pictures on IFI so I had to post one of mine! On your Picasa account, click on the picture you want to post. That should take you to the big version of that picture. Over on the right hand side of the page there is a list. At the top, it should have your profile picture and name. Below that you should be seeing things like "Photo information", "People", "photo location" "post on" etc.
In that list there should be one that says "tags" and just below that it should have a link you can click on that says "Link to this photo". Click on that link.
That's going to open up a pop-down list, with two link boxes and a couple of check boxes. Check the box that says "image only (no link)."
Then copy the link in the box labled "Embed Image." Open the image inserter box in the forum post tool bar. (Top of the reply box, it's a little icon that has a tiny little tree in it.) Paste the link you copied, into that box, and click "OK." It should post the image. You can adjust the image size by clicking on the "Select size" option, on picasa before copying that link.
Hope that helps!
And WHO MOVED THIS TO "EVERYTHING ELSE?" Brian is teaching "GENERAL BLACKSMITHING" and these pictures will help anyone who looks at them in "GENERAL BLACKSMITHING." It'd be different if it was a photo album of Brian playing tennis! C'mon! -
Yeah the curly eliment is AWESOME! I'm definately trying that one sometime! Is that a new thing Mr. Brian came up with?
Oh and this is my new favorite forging picture of all time......that is until Lyle takes some more pictures! :D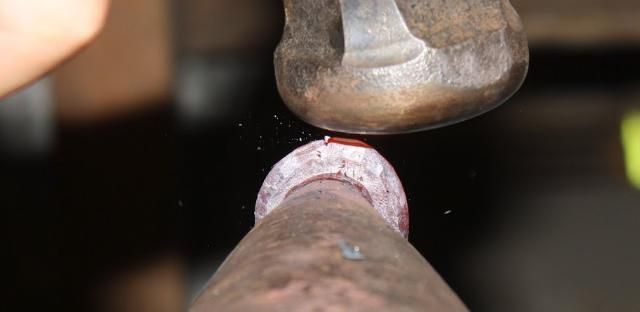
-
Someone PLEASE video this demo and put it up for those unfortunate enough to not be able to attend! .....like......uhhh ME! :D
-
Has this project progressed anymore or is it still on the back burner?
-
Thanks for the blade suggestions! My jet is a horizontal/vertical too. So Yeah, I'll stick it in the vertical position, build a table for it, and be ready to cut anything that comes my way.
The guy said he wanted something to cut the logs off perfectly square. After watching my dad do some chainsaw work, I think I know why the guy didn't try to cut square with a chainsaw! LOL
Cutting 2" solid
in Problem Solving
Posted
curved hot-cut with a striker and a curved top cut! 1-heat job!