

FieryFurnace
-
Posts
2,106 -
Joined
-
Last visited
Content Type
Profiles
Forums
Articles
Gallery
Downloads
Events
Posts posted by FieryFurnace
-
-
That would be fun! LOL You'd have to have a pretty large piece of metal to do that. Make sure you have the ability to heat that larger pieces.
I'm working on editing the video I was talking about making. It will probably be tomorrow morning before I post it. -
those are good, make 20 more, you'll notice the little things. have fun
That is undoubtedly the best way! I was thinking more like 20,000 though! :D
Nick: the tip is where you have to start. You were on the right track before, however, getting that good curve is where the heat and hammer control come in. It's not easy at all!
I'll be in the shop some today......I'll try to do a video on how to make that curve over the edge. It would probably be helpful for those that don't have an anvil horn.
Stand by! -
Could you weld the black pipe to your current "anvil?"
It appears to me that you are starting the bend in your hooks at the bottom of the hook. Start your bend out on the tip of the hook. Place a bit of stock over the far edge of your "anvil" and tap it down. Feed more material over the edge and tap down again. Continue doing so until you get that constant curve that forms the completed hook.
That's DEFINATELY not the easiest way to do it, but without a horn or round shape to use as a horn, that's they way you'll have to do it.
It is 100% about control. To get a good bend that way you will have to use good heat control and good hammer control. It would be an excellent exercise though.
In my opinion it would be easier to control the material if you did a full taper instead of just the ribbon. -
I would not suggest 1/4-inch material for starters.
The guy that showed me the first few things I ever learned, told me to use 3/8-inch stock.
Three eighths is a happy medium: it doesn't loose heat so fast, there is enough material there to play with and to see what is going on, and there isn't so much material that you beat your brains out trying to forge it. I'd suggest going with 3/8 round or square.
In addition to practicing tapering and scrolling (which is a smart idea,) practice spreading. This can easily be incorporated into hook making as the screw hole bracket. Practice spreading the material evenly to both sides. This will prove a great help once you resume leaf making.
Here is my old J-hook video where I show how to spread the material for the screw hole bracket. -
One of my older videos and not my best, but maybe it will help.
http://www.youtube.com/watch?v=mG-fIPeLjyI
You've got a lot of material left in the edges of your leaf. This can be "pulled" out using the edge of the hammer or the peen on a cross peen hammer.
You are practicing tapering which is good. To make a leaf you need to know how to taper (how to control the length of your tapers,) how to neck or fuller the metal, and how to spread.
From looking at the tip of your leaf, you are heading in the right direction with the taper on the tip. Try to get it a little sharper next time.
It looks like you did a good job thinning down the material behind the leaf. That is the necking or fullering part of things.
Your ONLY real trouble was spreading. From the center of your leaf, use the edge or peen of the hammer to pull that material out until it is paper thin. This will take some practice and hammer control, but each leaf will develop more profile as you develop your eye and coordination. To get that nice leaf profile, you'll want to pull more material out at the base of the leaf and less towards the tip.
It is difficult to describe, and hard to see on video. Try to locate a blacksmith near you and get a live demo. Your best bet is to go on ABANA and find some contact info for guild members near you. I did that when I was first starting and got some great advise from a guy about all sorts of stuff. -
Hello
wondered if anyone could help me with an idea ,I had about making closed dies for fire place tool handles , they would be water jet cut , my question is would they lengthen in the die , and need to be
blanked out a bit first , any ideas . Thanks
Most any type of die that imprints the metal or forms/shapes the metal in any way is going to lengthen the bar. (If you displace metal, it's got to go somewhere.) How much it changes the bar depends on the die type. A die that simply imprints a chisel line in the steel is not displacing much metal and will not create a significant change in the stock. If you are making a ball in the center of a bar with the bar tapered down to the ball on either side, your stock will lengthen.
It sounds like you are all about production. You want to turn out fireplace handles fast. My best advise is to make the dies and do a test piece. If they create an unacceptable change in stock, change your design and send the "useless" dies to me! :D
Best of luck! -
Yeah I'm wanting to go up to quad state this year.....so I can wait 'till then. I looked up shipping if he split them up and was around 80 bucks a piece.
Hopefully someone closer can get a deal and put them to good use! -
I'll check but I don't think he wants to ship them separate.
-
Well, I priced shipping and the cheapest thing I could find was $250. WAY too much for me to pay on top of the $100 the guy wants for the vises.
If anyone is in Iowa within driving distance, these look like a good deal.
http://www.ebay.com/itm/170786031266?ssPageName=STRK:MEWAX:IT&_trksid=p3984.m1438.l2648
I wish they could come home to me, but I can't afford to pay $350 for the two of them.
Thanks for all of the help! As usual, the combined knowledge of the membership of this forum has proven a great source of assistance. -
(Aimed at Beth's post #5.)
Now THAT'S a tennon! LOL
Of course ladies can be smiths. If a woman turns out nice work, then by golly, she's a blacksmith! (I hope it wasn't a mod that said that though, because some of us are liable to dissappear! LOL OK that was a joke!)
Linda Metcalf (Elmer Roush's wife) can turn out some very nice designs. I took a class under Clay Spencer and Julie Clark was in that class. She did a very nice piece, and forged the socks off of nearly all the other guys. (Including me!) -
The owner has, so far seemed very honest, replying quickly to my questions, and sending four pictures of the screw when I asked him about the condition. He said the screw works smoothly in and out. The boxes look good on the outside.
The screw pictured goes to the six inch vise. There is also a 5.25-inch vise that has a brand new looking screw. Both vises are in great condition overall, from the pictures.
He wants $100 plus shipping. I was thinking I might be able to get both for $200 tops. Seems like a good deal to me.....but only if the screw is useable. Sounds like it might be.
I figured rebuilding would be a bit of a pain and didn't think about the box being in similar shape to the screws. -
The title says it all! I've found a 6-inch vise, but I'm wondering, how much life does the screw have left in it? The wear is pretty noticeable but does this thing have another 50 years?
Is it practicle to rebuild the worn down threads with mig weld and then file finish?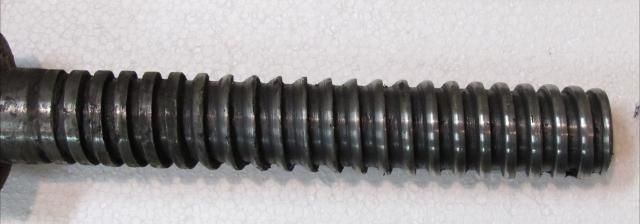
(It is a set of two vises for a pretty good deal!) -
Let me phrase it another way "OUCH my blade came out like a corkscrew in heat treat after I spend 50-100 hours working on it and then broke when I tried to straighten it---boy that $50 for a piece of A2 sounds DIRT CHEAP right now!" You may want to prove in some of your ideas about methods and tooling on cheaper metal but when you are going for the gold the extra cost often saves you time and effort many times over!
A long time ago, I made a dagger from a small file. I left the file grooves down the center wich made a neat decoration. I filed and sanded and filed and sanded. I looked great! A little court dagger fit for the bravest knight in the court. Well, I heated it and quenched it in water to harden. (Didn't know I was supposed to use oil!) It came out shaped like a snake a warped and everything. Not knowing what else the water did to the steel I tried to straighten it by hand.....I ended up with two pieces. I've kept that as a reminder. I need to frame it and put it in the shop.
Whenever I have enough knowledge of technique, tooling, and finishing to turn out a good blade, I'll certainly pay up and get the good material.
I always appreciate your posts Thomas. Informative, helpful, and to the point. I know some people take it the wrong way sometimes, but regardless of how blunt it may sound, I know that you are offering your knowledge, time, and assistance, and I really do appreciate it! -
Good video Dave. Where did you get the hammer, I have one just like it.
Vic.
LOL! The hammer is just an old Lowes, 2.5 pound cross pien hammer. I knocked the handle out of it and put a wooden handle in it's place. I've been using it since day one, six years ago.
Thanks for the complements.....more videos in a week or two! -
Thomas is correct! In order to deliver an accurate response that will answer the inquiry you posted, we needed information. Thomas listed the information you did not know we needed, so you would know! He also pointed out the fact that, without that information, there is a large amount of variation ($2-$3 a pound,) in what the answer could be.
He could have spent a bunch of his time typing a long winded post to point out this missed information, or save his breath fingers by quickly pointing out the missed information, (which he did.)
No reason for anyone to take sides and start sniping off other people.
Like Thomas said, your anvil is in great shape. At 131 pounds (if I was in the market for an anvil that size,) I would be willing to pay a tops of $2.00 per pound.
Are you a blacksmith or are you trying to value the anvil so that you can sell? Either way, welcome to I FORGE IRON! -
Try an internet for bee keeping associations. More-n-likely there is someone pretty close to you!
-
Definately would give you "biggest bench vise" bragging rights, but I'd also rather have a good 6-inch post vise. Thanks for sharing!
-
Don't apologize. These are exactly the kind of stories that keep me coming back to this site.
Yeah really! This really turned into an interesting thread! -
P.S. WELCOME TO I FORGE IRON!
-
Nice job! Without an anvil horn, it would be very difficult for a beginner to get a good circle hook on each end. For the available tools you had, you did a good first S-hook. Be sure to keep it!
When I make S-hooks, I do the twist after the hooks are formed. Which way to do it is a personal preference thing. It would probably be easier for you to do so prior to making the hooks.
There is nothing wrong with using two pair of pliers to make the twist. A vise is easier, but use what you have until you can find one. It is going to be much harder to keep things straight when you are using two pliers, but that just means that when you finish twisting, you'll need to tap on it until it is straight.
WD-40 gives a nice finished look, but don't expect it to keep it from rusting. Vegitable oil, parafin wax, bees wax, and linseed oil are all good finishes. Wal-Mart has all of those but the bees-wax. -
Here is the completed stand. Well pretty much completed. It still wants me to pain it, and it also wants a bigger vise. LOL I've got to cut some shims for it too!
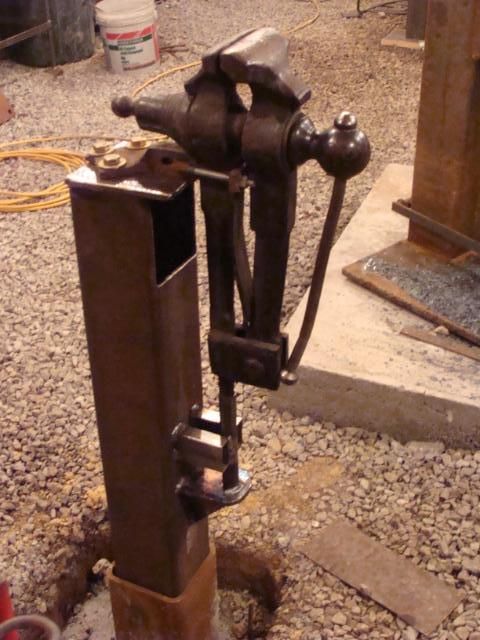
This hole was supposed to be on the backside of the pipe. It is the bolt access hole. I got messed up and welded the top plate on backwards. It's not really a big deal because with this vise, I can reach in there with a wrench and tighten the bolts without any problem.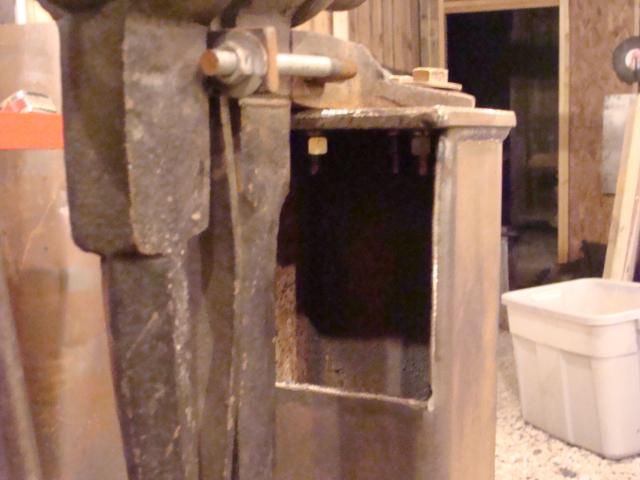
And this is the post support.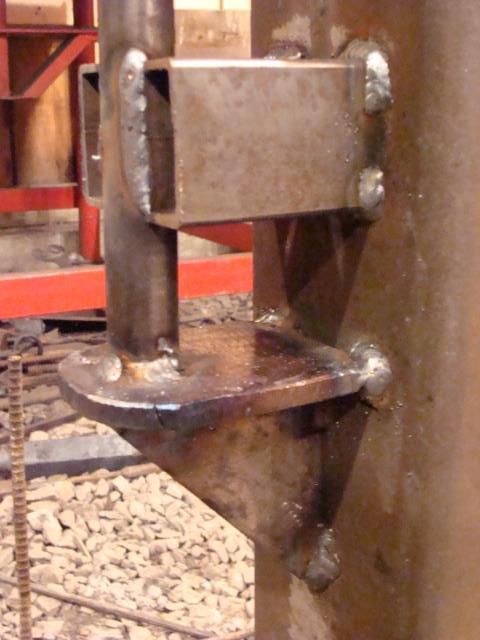
The pipe is 5-inch square tubing with .25-inch walls. The top plate and down pressure support plates for the post are all 3/8-inch plate. The post sleave is 7/8-inch ID pipe...pretty thin stuff, and the two supports welded onto that are 1-inch by 2-inch tubing. (They are like 10 gauge or something.)
It's a pretty stout stand, weighs a half a ton, and I think will serve me well. -
WOW! This has turned into a real history giving interesting thread. I do suppose if day-in day-out you are turning out horseshoes, modifying an anvil would be more efficient. I am always looking for ways of making things more efficient, so I can't blame the guy!
Very interesting.....thanks all for chiming in, and educating me! -
I agree with the efficiency of forging horseshoes, but a saddle that fit over the face and bolted down to the anvil stand or some sort of configuration would have been better, I would think!
Anvils were not antiques, but proportionally, I doubt they were any cheaper then, than now. When you get paid in milk and firewood for iron work, I imagine a new anvil was as serious an investment then as now. -
http://www.ebay.com/itm/140-lb-TRENTON-FARRIERS-BLACKSMITH-ANVIL-Forge-Iron-/110823557000?pt=LH_DefaultDomain_0&hash=item19cd994788
C'mon! Please!! Here is one of matchlessantiques anvils I found on ebay today. Maybe I'm just seeing things but did someone grind/machine a rope twist swage into to face????????? I don't do a lot of rope twisting, but even if that's all I EVER did, cutting the swage directly into my anvil face would not have even crossed my mind. Poor trenton!
coat rack
in Member Projects
Posted
You'll need to coat that bare metal with something. Go over the black with clear coat. I would polish the bare metal a bit first though.
The entire thing is awesome. My only thought would be maybe it would take up too much wall space. However if the person it is made for has the wall space, it will be the eyecatcher of the entire room.