FieryFurnace
-
Posts
2,106 -
Joined
-
Last visited
Content Type
Profiles
Forums
Articles
Gallery
Downloads
Events
Posts posted by FieryFurnace
-
-
Keep in mind those blowers you saw are priced at $500 and $800. This simply means nothing! Just because someone prices an item at a certain price does not mean it is worth that.
I will grant you that you have an unusual blower, perhaps even qualified as very rare. This, of course, makes it more valuable.
A good smooth-working standard champion 400 is worth $200. "Worth" being defined by what a patient man can buy one for.
Yours is rare and thus more valuable, but a blower of that size, regardless of condition and how rare it is, is worth very little to your every day backyard blacksmith. You are going to need to sell this sucker to someone with a very large industrial forge, a collector, or a smith that just wants bragging rights. (Or someone with a mine that needs a bit of fresh air. LOL) That's your market, and I doubt that market is going to want to hand over their Little Giant when they can buy a good, big electric rig for $400. -
I'm liking the idea of the fine crushed gravel for the main forging area. Concrete elsewhere! This will allow me to get the torch and welder close enough to anything in the shop.
I also like the idea of the wooden blocks on end. The level of moisture in our shop though, would probably make that impracticle. The shop is was built at the bottom of a hill and gets a lot of drainage. I have done a rediculous ammount of grading and ditch digging to help fix the problem. I'm about half done with the grading. I'm thinking the plastic layer beneath whatever flooring we use, will help with moisture.
Thanks for the ideas! -
I like the fullured grooves idea! Does seem it would help.
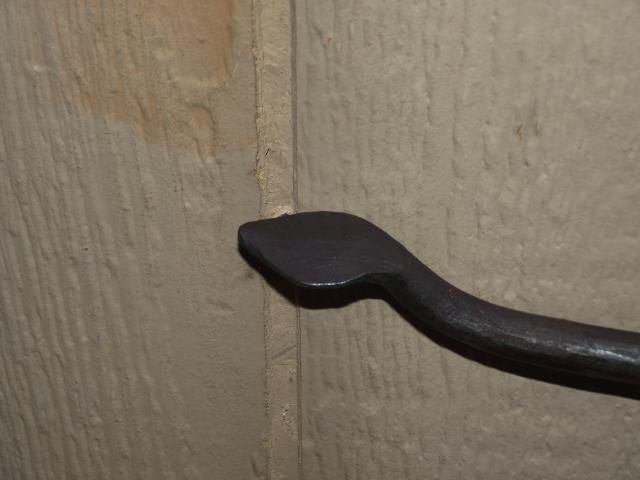
I altered the tip as the client requested. I'll get some pictures before I ship it off. The tip is now a flat diamond like a snake head. -
So folks, I'm wondering!
My blacksmith shop and my dad's wood-working shop is one building. The main shop area is a 20x60 building and we each have half. My dad has a full wood working shop and of course I make chocolate covered strawberries over on my side of the shop. ;)
Right now the entire floor is gravel. It is a pain to roll my torch cart around, impossible to move the welder, and dad's tools are stuck in place too.
I initially was planning on pouring concrete over the entire shop, and I do have the funds to do that. This is not an "I don't have the cash" thread.
I don't particularly care for working on concrete. I am noticably more tired when I work a full day on concrete. However, I need the smooth surface of concrete for the welder and torch. I am thinking about on my side of the shop, pouring concrete around the welding table and other portions of my shop and doing some sort of other flooring in the main forging work area. The question for me is, what do I use? I want whatever I use to be level with the concrete.
How about sand? Maybe a finer gravel? Maybe something else? I can't just use the gravel that is there because, I want the work area to be level with the concrete and also, we are laying plastic down between the current layer of gravel and whatever we use for flooring. The plastic is going to be a moisture barrier, which is sorely needed.
What are your suggestions?
OK now my dad's side of the shop has nothing to do with fire. It's all wood-working. We've talked about doing all concrete, or doing concrete slabs for each machine and something else in the areas between. Once again, what are the recomendations here? Wood floor? Sand? Finer Gravel?
Thanks for your input ahead of time! -
Ohhh I'm getting soooo excited. I always like when you get enough pieces done to lay it all out and sort of see the finished project. (Then it seems like there is an endless list of tweaking before you can start on assembly.) Looking great! Can't wait to see the rest of the progress!
-
weight wise a 15:1 ratio that would put your anvil post at 750 lbs. (for a 50 pound head, if I'm reading you right, you are saying 15 x 50 = 750) Wow! The posts we used in the NC tire hammer build last year were between 6 and 8 inch solid rounds. They weighed an average of about 420 pounds each.
My tire hammer has a 7 inch post and does just fine. It would be interesting though to use one with a post closer to your ratio and see how much more efficient it would be. -
I've been keeping track and will post my results here at the end of the month. I've got two shows this month and will count that time and track what I make at the show.
I looked over my notes from last week, added things up, and was very pleased with my results. We'll see how I do this week! -
yeah mine is 1.25-inch as well. What kind of anvil is that anyway?
-
yesteryearforge: yeah those are nice but are of little help to people that done have the tools to make and the tools to use such a jig. I believe that is the point of this video.
Trip: experiment! :D
LarryH: EXCELLENT! I have a swage block with a shovel form, but I like the idea of forging it using the anvil. (Well I actually like the ring method better.) Thanks so much for taking the time and the energy to produce this video. I think an important part of being a good blacksmith is being aware of the MANY forging surfaces on the anvil. It's not just a face, a step, and a horn. Your video shows how to be mobile around the anvil to get to and use the various forging surfaces available on the anvil. I think it will help everyone who watches it with an open mind, understand a little more and become a little more efficient in everyday work. I'll definately be trying your methods out!
Thanks again! -
Spare tire clutch on a rusty hammer is simply a motor with a round solid pulley which rotates a tire. (Just like the tire hammer.) The drive rod on the rusty is then placed off center on the tire so that when the tire rotates the rod moves up and down creating the sea-saw motion of the helve hammer. A break pad can be rigged to stop the tire so that you gain hit-stop controllability. (That's important!) I've never used a rusty style or any style helve hammer, however, in theory, I would consider the spare tire system superior to the v-belt pulley system. Check out the online gallery of rusty helve hammers accessable from the rusty helve hammer site. Many of the hammers pictured there are run off of spare tire systems.
-
-
I would got with a minimum of six months each with Brian Brazeal and Mark Aspery. Both have some excellent techniques. Having survived 7 days with Brian, I'd love the chance to try six months. I've never met Mark, but I've emailed him once, and he seems like a nice guy.
After that, (having a foundation in good technique) I'd like a year or more with an established full time blacksmith working on large scale pieces to give me experience in using those techniques to make a large number of pieces work together.
I don't know a whole lot of large scale blacksmiths, but I think I'd like a spell with Rory May or Andrew Molinaro. I've never met either in person but I've read a lot of Rory May's posts and he seems like good guy. Andrew Molinaro offered me a position in his shop (Artisans of the Anvil) about a year and a half ago. (Wish I could have accepted but I had too much going on at the time with construction here.) He also seems like a great guy!
I really like both of those guy's work. Just something about the style or something that I like more about other smiths I've seen! -
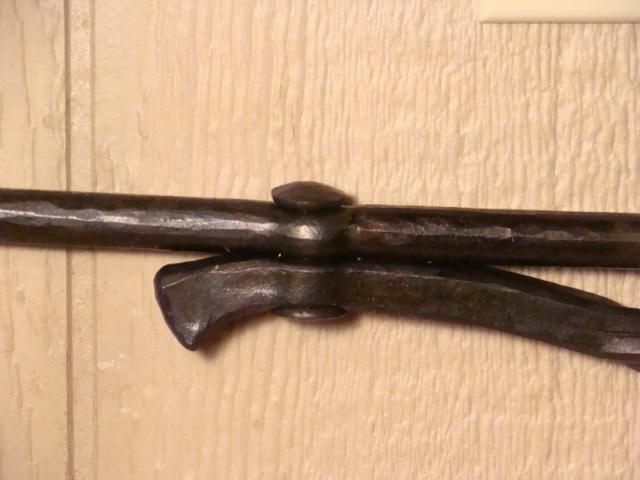
Finally the ring joint around the upright does not seem to be fastened.
That's the point Thomas! LOL It's a "blind rivet."
Also, I would think you could hang some pots farther back around the arch. I would have moved it back some, but I was going for as proportionally similar to the book design as possible. I could have riveted the arch about an inch farther back without any problems, but hind-sight is 20-20!
@ petere76:
I think loss of stock dimension just behind the square corners is due to hammer blows placed too far back. This is easy to do when you are first getting the corner started. I end up with massive stock increase, because square corners are an upset technique. You should end up with stock increase that has to be forged back down to size.
I'm not an expert on square corners and have only done a few. (I avoid it whenver possible! LOL) I could be totally off! -
Indeed! Instead of technique and skill though, I was thinking of frustration and hair pulling. Comes to the same thing though, right? :D
The corners took me four or five heats a piece. I always end up fighting square corners. No inside cracks though.......they are smooth as can be. -
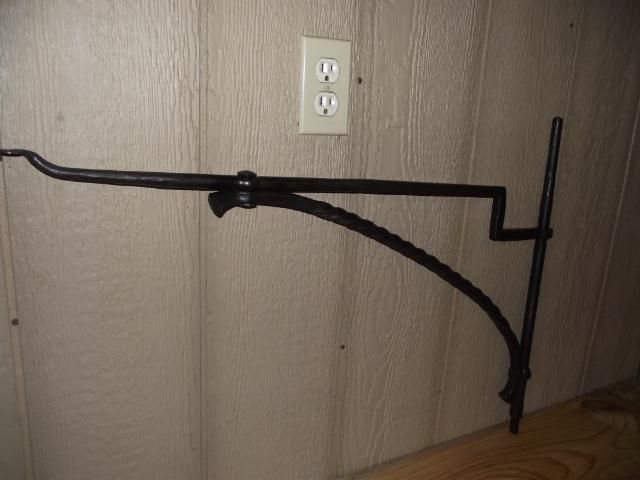
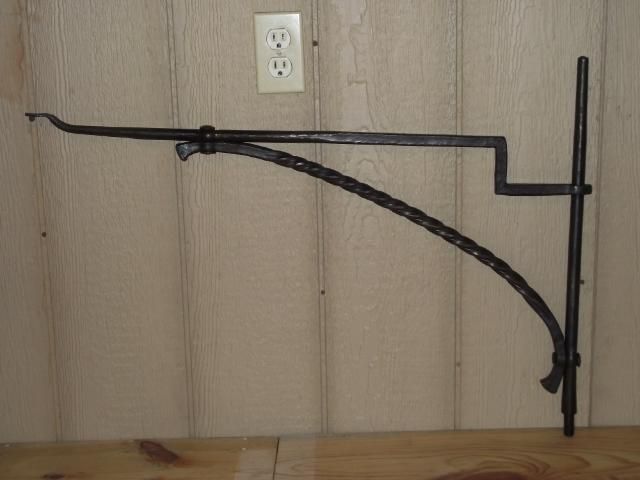
Thanks for the comments. A Heritage in Iron is the book that the design was found in. My client bought me the book some time ago.
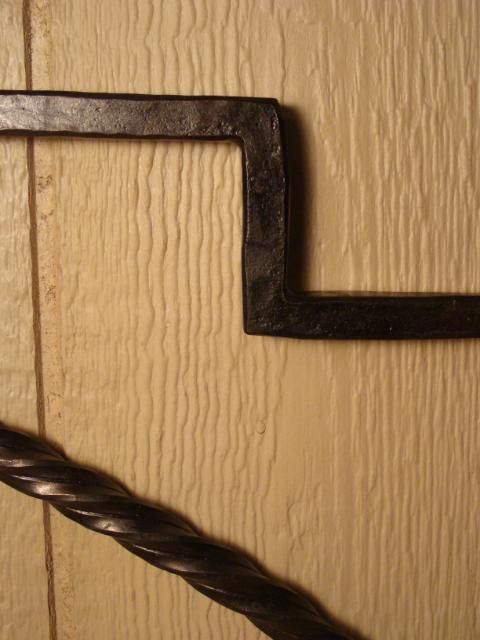
I like the way square corners look and they look better in the book than they do on my version. I don't particularly like forging square corners though. The square corners, to my knowledge, do not serve any purpose. Just a visual thing I think.
I certainly agree about the end. I'd rather have a hook or something to position a pot on, instead of the flat end. Once again, though, I'm stuck with the design in the book.
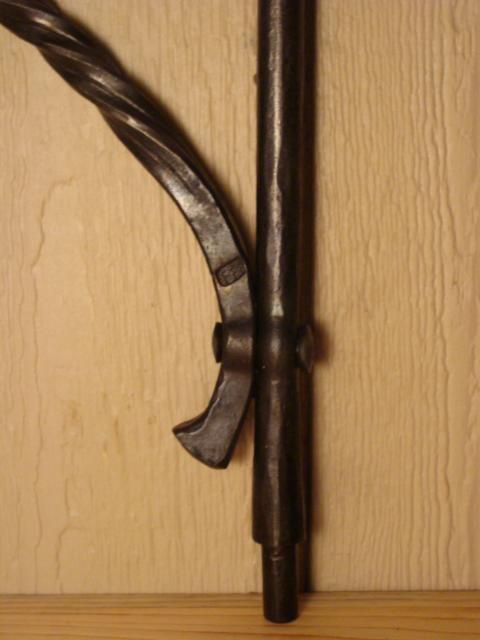
My client wants the end altered. :( He said something about a diamond shape on the end. I didn't see that shape on the end in the book, but I'll have to look again. Should be fun getting the hole thing in the forge and moving it around. I do have enough mass on the end to make that alteration though.....I think. ;)
Also, the picture makes it look like the whole horizontal arm is slanted upward. That is just positioning, as the horizontal arm is level.
Thanks for the complements as regards the work. -
One of my clients asked me to make this crane for him based off of a crane in a book I have. It's the same design as what was in the book, but I had to guess at material size and make the entire crane to his size specifications.
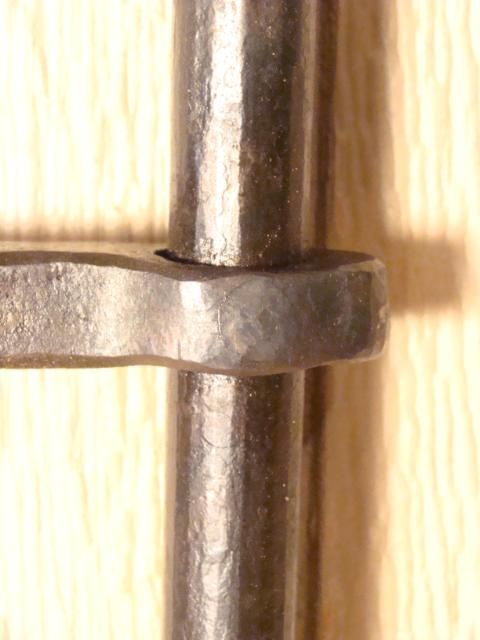
The upright bar is 3/4-inch round with 5/8-inch tennons. The top part of the bar is slightly tapered from 3/4-inch to 5/8-inch round so that it fits in the top pintel without being a noticable size reduction.
The rivets are slit and drift to half inch, and I made the rivets from 1/2-inch round. The twisted bar and the horizontal bar are both 5/8-inch square. Since taking Brian Brazeal's class I'd much rather have done his style of square corners (Haberman bend is what he calls it,) but the client wanted the regular square corners. The part of the horizontal bar that goes over the upright bar was slit and drifted to 3/4-inch round. There is a blind, 3/16-inch rivet there.
The twist was done in three separate heats, and then a couple more heats were used to get things evened out. I'm pleased with the way it turned out. It is a little tighter at one end than the other, but it is not too much of a difference. The curved bar was a bit of a pain. I would have prefered the top rivet to have been about an inch farther back than it is.
Once again, I cannot claim the design, as it isn't mine. I took the overall design out of a book and customized it to my client's size specifications.
32-inches long
22-inches tall
10 hours including mistakes! :D (I messed up the first curved bar and had to start over about 30 minutes into it.)
Anyway, thoughts????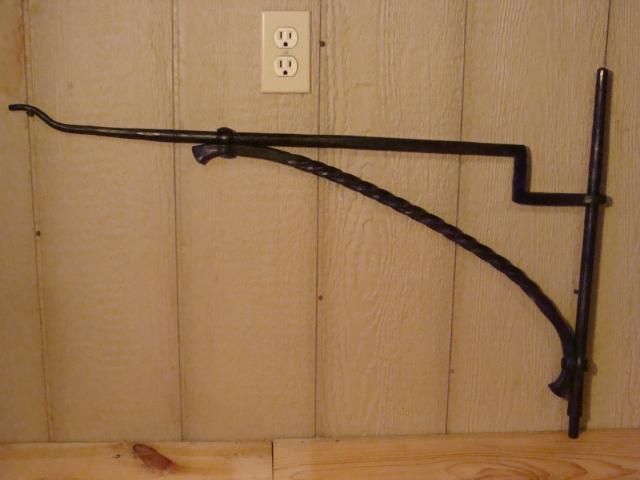

-
Like I've said before, my jobs are always on a much smaller scale, but the "not enough time" factor is still there.
Ok! I understand! That's pretty slick about using the stop on the bottom die as an edge stop. That's a simple solution but I wonder how long it would have taken me to figure it out if I had to do some lines like that! LOL
I need to make a chisel for the upper die on my air hammer. I had to do a square bar twist with chisel lines down each side. The lines were about 24 inches long on all four sides. With my current tool inventory I had to use my little tiny chasing chisel to get the line started and then use a handheld cold chisel and hammer. (All done cold.) It took longer than it would have to put in a different top die and do it under the power hammer. :)
Thanks for sharing the process! It's taught me quite a bit so far! -
Brian Brazeal with no competition for first place!
Brian's classes are technique, not project classes so you spend 100% of your one-on-one class learning new things. His techniques are different from anything I've seen, faster than anything I've seen, more effective than anything I've seen, and are less tiring than anything I've seen. (Or done!) I took a seven day class from him several weeks back, and I think it is safe to say that, after implementing the techniques he taught me, my work production has doubled.
If I could, I'd buy a house next to his!
A long time ago someone on the forum said "Brian Brazeal is the best technical smith in the country." He was right! -
Reynolds: If you remount it up in the ceiling you could use a chain handle so that it would give a bit when you run into it! :D
marcusb: Tanning hides isn't THAT hard. I've done coon and deer hides. Seems like a thick cow hide would be easier. I always leave the hair on, which probably makes things simpler too. (I suppose that wouldn't matter too much, and a hair on bellows would look pretty neat! LOL) It takes time and room, but isn't that hard. -
Doing shows a lot, you'll get odds and ends that turn up. I was at a show this past weekend and a guy came up and said he had a big bellows (like a 7 footer.) Said the first $100 would take it home. I'd love to have one but I don't have the floor space and the ceiling isn't tall enough to hang it up there.
That's not something to worry about until you get a covered forge or a shop. They are bulky and I would HIGHLY suggest using one before buying one. I didn't really like the one I used once. Hand crank or electric is so much more compact, and I like the way they work better.
They do occasionally turn up. I've got a friend up here that has one for sale for (I think) $500. You just have to keep a continuous eye out on craigs and the local adds on ebay for one. -
I am enjoying this thread imensely and have learned much! PLEASE keep posting the info and pictures!
I love the twisting contraption...seems like it would work a lot better than direct contact with the vise. I also like the way you handled the slit and drift. (I am supposing that the "slit and drift on the diamond" thread was in reference to this project.) I like the twists on either side to get the slit and drift area on the flat. The transition is great, and eliminates the need for the diamond slit. The idea of the diamond slit and drift is neat, but I haven't seen any really clean, really attractive examples.
One question about the power hammer grooving. I see you have a stop mounted on the power hammer but it doesn't seem to be doing anything in the grooving process. I suppose it is just left over from a previous heat. There is no stop as far as I can tell, for the chisel depth. Do you have that much control with the hammer? I've used a large Saymak and the 115 Big Blue, and they have pretty good control. Even my JY Kinyon air hammer has a decent amount of control. I don't know about using it for even grooving.
So is there not a stop, you simply have enough control and confidence to groove without a stop? Just wondering. -
I'll begin in May!
-
I use a Brent Bailey's centre punch, drift and chisel tools, as well as hammers, the technique is what it is, centre punch first, chisel, then drift, in that order, not sure who perfected the technique I use, but works great for me, I adopted it to fit my needs, my style of blacksmithing, my physique...so any new way of learning is appreciated as well as tool design, I would like to thank all that contribute on IFI and promote blacksmithing, thank you. P.S. I would love to spend an hour with Brian Brazeal, sign me up.
Thanks for the video, FieryFurnace.
Nice looking tools!
If I've got you right, the slitter punch is on top, the opener in the middle, and the drift on the bottom. Why is the drift a single direction taper? I've used that style before, but it seems to me a double taper drift is easier to use as you just drive it all of the way instead of having to flip the stock over and tapping the drift out. Also seems like you'd have to regrind the working end of the drift sometimes.
I'd also love to see some pictures of the results these tools give you on a regular basis. Post them here! It would be good to have a reference point as to what tools and methods give you what results. -
Yeah that'd be nice! I like the stainless beer kegs too. Right now all I have is a 7 gallon galvinized feed pan. :(
fireplace crane
in Member Projects
Posted
Here is the altered end.