

Ed Thomas
-
Posts
597 -
Joined
-
Last visited
Content Type
Profiles
Forums
Articles
Gallery
Downloads
Events
Everything posted by Ed Thomas
-
Bob, I've read many of your posts on PM. Thanks for replying over here. Welcome, of course.
-
making metal look "medieval"
Ed Thomas replied to andreas's topic in Blacksmithing, General Discussion
I think "texturing" or "stressing" hand-forged work is relatively pointless and usually obnoxious. In "Wrought Iron in Architecture", Gerald Geerlings in 1929 railed agains the same thing. Apparently lazy fabricators were taking a ball pein hammer and beating on dimensioned iron to make it imitate forged work 80 years ago also. If you have the time, your iron really benefits from "re-forging" as several people have said already. By taking one size and forging it to the best of your ability to another size, you are forced to touch every part of the metal with your hammer. The difference between your goal of perfect, and the reality of the new piece, is the beauty of many subtle reflective surfaces that give wrought work its character. Try REALLY hard to make it smooth and beautiful, though. I just made another pilgrimage to the National Cathedral to look at the iron again. Once again, I was startled to see how much I disliked a particular gate set. On closer inspection, I could see that the whole thing was "distressed" to make it look "authentic". There were other issues with the gate, but that was the most glaring violation of good forging practice, in my opinion. Back to the original question: Andreas --- forge the work to the best of your ability. If every part of the steel is forged and done cleanly, it will look authentically forged and clean. That is what they strove for in those days and so should you. Stray hammer marks were a sign of inferior work. It may look "new" rather than medieval, but with the right finish it will look like restored, well-preserved work from that period. ANY hammer will do, by the way. I use power hammers and treadle hammers whenever possible. It is the PROCESS of forging that counts. -
Apprentice: By "authentic", I think DMS meant that tongs ought to look like tongs rather than bent twisted rebar. Rebar sucks as a forging material. It is meant to be buried in concrete never to be seen again for a good reason. It is scrap junk. If you are going to spend an hour making a set of tongs to be used as a serious tool to help you effectively hold material to forge, then make them right and make them out of the right stuff. There is nothing wrong with practicing a technique on scrap with the intention of discarding it when you are done. But when you invest hours on a project, it is counterproductive to gamble that the unknown scrap is reasonable forging material.
-
Johnny: I am glad you are looking to make your own tongs. What are you using for instructions? Do you have someone nearby that can show you? They are not hard, but they are also MUCH easier if you can watch someone make them. There are also some pretty good references in several blacksmithing books. Jr Strasil contributed this tong-making blueprint BP0098Tongs: http://www.iforgeiron.com/Blueprints/BP0098Tongs100/BP0098Tongs100.htm which should get you started. I strongly recommend you try making a pair. If they don't turn out, just take some pictures and we can tell you pretty easily what went wrong for you. If they turn out the first time, great! Make another pair! Note that in the blueprints, you can click on the pictures to see a larger image.
-
Rebar is a lousy material for forging. It is of unpredictable composition. Home Despot probably also sells small sections of steel, but if your place is big enough to have a HD or Lowes, then you can probably find a real steel supplier somewhere. Classic tongs for hand-forging are usually made of 5/8" or 3/4" square. Mild steel will do fine.
-
A "small" sledgehammer :-)
Ed Thomas replied to Kallsme's topic in Blacksmithing, General Discussion
Chris Pook: There are still active industrial shops around. If you really want to do that sort of work, go find one and hire on. A quick google check yields: Industrial Blacksmithing,Queen City Forging,handmade parts,custom forge tooling,craftsmanship,service. Tool Steel Forgings, Inconel, Aluminum Plate, Forge, Stainless Steel - SteelForge.com Kompass Company Directory - Business Directory - Products & Services Classification - Suppliers Directory (in India) Forged Crane Hooks, Metal Forging, Industrial Replacement - Butler Forge and Metal Works You now have no excuse. Go forth and forge big. -
A "small" sledgehammer :-)
Ed Thomas replied to Kallsme's topic in Blacksmithing, General Discussion
Apprentice: I don't think you quite appreciate the scale at which Kallsme -
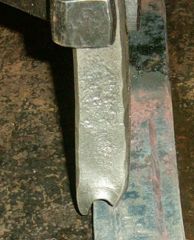 The long edge of the tool follows along the side of the steel, so the groove always winds up the same distance from the edge.
 -
 You can drive this tool fairly deeply, which makes the groove more and more wide.
 -
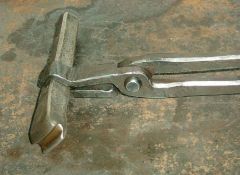
Grooving tool with tongs designed to hold them.
Ed Thomas posted a gallery image in Member Galleries
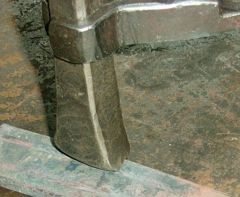
 This is a grooving tool I showed earlier on this board before it crashed. It is an excellent height for use under the treadle hammer. As you can see from the profile, if you drive it far enough, you will get a half-round border.
 -
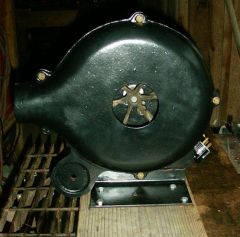 You can see the flat paddle vanes and the hole where the motor goes through. This seems to be a very typical arrangement. Judging by the bracket mount cast on the left bottom, I am almost certain this was born as a hand crank blower, though it came to me with a dead motor attached.
 -
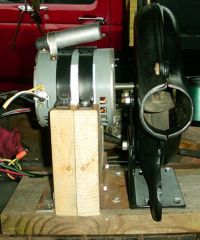 This is an earlier iteration using a 220V motor. You can see that all I had to do was make a motor mount, a simple blower bracket, and wire it.
 -
Rick: That is very nice work. However, you might want to go back and read the whole posting to get a better feel for the original issue. Square (rectangular) collars are straight forward. Smitty was asking about binding 3 small round pieces.
-
Thomas Dean: Rick put a link to his web page in his profile. Just click on his name in his first post and you'll see it. Rick: Welcome. I enjoyed the tour of your work on your site. In particular, your news rack is VERY nicely done. The sort of work that makes one smile just to look at it. Thanks for the link!
-
DanL: Steel is better for forging anyway. Wrought iron is way over-wrated. :)
-
The first scroll is very nicely done. The line is a continuous curve, the taper in the steel is continuous and appropriate, the edges are soft and invite the eye right down the flowing lines, and the negative space is JUST right. There are two major problems with the second scroll in execution that make it less appealing to the eye. One is the flat spot just as the scroll starts... the piece bends, then straightens, and then bends again into the beginning of the scroll. That is an interruption to the flow. The second big problem is readily apparent when you look at the negative space -- the area between the iron. As your eye goes around the curve, you can see that the open space widens and narrows and widens and narrows, in conflict with the inward direction of the scroll. In other words, the top scroll is better executed than the bottom. It isn't a matter of which shape scroll is "better". The "perfect golden mean scroll" is not the only beautiful scroll and not always appropriate. Continuous and deliberate flow are a lot of what make a scroll beautiful or not. Well-forged iron is beautiful. And the bottom scroll is some beautiful iron. However, forged iron is almost always a frame. That is... it bounds space somehow. This "negative space" must also be controlled. In fact, some of the stuff we find most compellingly beautiful is so because the artisans did such wonderful things AROUND space. They forged air! Thank you for sharing these very nice pictures!
-
Brent: Bruce just posted two days ago on the Stetsons topic. He also contributed to two of the power hammer topics recently. All you have to do is click on "Members List" and go to "Bruce Wilcox (either search or scroll through the 'b's), and then select "find all posts by bruce wilcox". You will see what he said and when. Also on the member's profile, you can click on the option to send him a private email, or even a private message on the board here to ask him about his web site. Don't be afraid to explore the board options here. It's fairly friendly and flexible. Here is a link to bruce: smithy It does look like he dropped his web site.
-
Rebuilding of a 150KG Beche
Ed Thomas replied to Kallsme's topic in Blacksmithing, General Discussion
Chris: If you click on a member's name, you can select one of several options including look at their published profile or go to their web page. Kallsme'n has a web page for his company which shows more of the shop. It's a shame you missed some of his posted pictures in the past, some of which would make you laugh out loud with delight. They have entirely too much fun at that shop! Ha. Maybe we can get him to repost the ones from the Winter Olympics and the hotdog roasting. -
DanL: A few other tests... if you can get a piece small enough to bend, such as a minor strut, you can sometimes tell by bending. Iron has very little "memory" compared to even mild steel. If you can get a grinder to it, it sparks rather sparsely compared to steel. Very different pattern. If it has been exposed to the weather for a very long time, you can often see the grain. It weathers much more slowly than steel. It doesn't seem to have as much of that big flaking chunk rot like steel over water can get.
-
Rebuilding of a 150KG Beche
Ed Thomas replied to Kallsme's topic in Blacksmithing, General Discussion
Excellent! What a treat for the eyes. :) -
John: No problem -- I didn't take your post badly at all. On the forge-welded bundle... I've not had much success with that. I've welded plenty of bundles together, but the collar puts a bit of a shield around the rods at that point. So while it is difficult to get the rods beneath the collar up to welding temp, the rod parts which extend on either side of the collar are exposed and cheerfully heat right up. By heating very slowly and bringing the whole mess up the temp VERY carefully, it can be done, but it's tricky. The picket elements are easier because the picket has a good bit more mass than these 1/4" wires. Plus Smitty would need to make a swage for the weld. Maybe somebody here has used that technique for the top of a basket handle? I've always simply welded the bundle, but have seen the swage-welded ball, so it is an option. We're just going to have to get Smitty a camera to see what's really going on. :)
-
John: I like your shrinkfit ball with holes idea. Since I've never done it myself, I wasn't sure how well it would work. Someday I'm going to have to play with that idea. I couldn't picture how forge-welding would help Smitty in this particular application. I just keep thinking that by the time he forge-welded three 1/4" rods together, he wouldn't have enough material left to be much of a support for three cakes. It seems like there are several solutions to joining the 1/4" wires but they feel more like work-arounds than optimal choices for construction. Smitty: If your project is really more like wire-art than forging, that's a different animal. I haven't done any of that, but have seen some quite interesting results by other people. I hope you post pictures of your final results. Also, your "failures" would be nice to see, if you don't mind. It would be very instructional.
-
Chris: You can't ask for more than that... a trial run. It is probably better to use a thin machine oil than WD-40. To free the press up completely, you might have to take the screw all the way out and clean/degunk the internal threads. If it's not too much trouble to you, it is probably worth the time because you can inspect them for damage. If that feels like too much trouble, then just generously douse the threads with lightweight machine oil (even that household 3 in 1 oil should be fine... though machine oil is usually available in a hardware store). Keep working the screw while dribbling oil down each of the threads. Eventually, it should feel friction-free and float up and down. When you get it to as near that point as it will get, then drive it fairly vigorously into something. Put a blunt top tool in it and run it into a bar of steel, for instance. Not like you're trying to destroy it, but pretty aggressively. Now check the feel of it again. If the internal threads are broken anywhere, they will compress against the screw and act like a brake. If the screw turns as freely as it did before you bottomed out, then the threads are probably fine. If not, it is probably not worth buying.
-
Smitty: Okay, I think I understand what you are doing. I have some suggestions, though. 1) Go bigger. Using 1/4" for anything but the smallest of hooks is a waste of forging time. For a cake stand, especially one expected to hold THREE cakes, I wouldn't use less than 3/8" square. 2) Every part of every piece made by a blacksmith should be forged. If you just use dimensioned stock and bend it, it has no life. The main reason forged iron is so interesting as a material is because the process of working it creates all these reflective facets. Perfectly round stock is boring. Crisp milled rectangular stock is boring. Carefully re-forged iron is interesting. The reason I say this is that down there at 1/4" round, you will be hard-pressed to do much re-forging, and the results would be so sparse as to not be worth the effort. In my stuff, I often use round stock and hammer it square with relieved (beveled) edges. 3) Ignore what you see in Walmart and Lowes and magazines as models. They are imitating us; not the other way around. They ALWAYS use stock that is too small and boring. 4) Although it is not impossible, collaring three round pieces together is practically a recipe for frustration. Skip the round stuff if you can. Did I mention that I think round is boring? If you must collar them, consider forging the inside to a 120 degree angle so that the three pieces can't roll around each other. "Close" to 120 is good enough... I just mean put flat surfaces against each other as I said before. 5) A typical way of joining multiple round pieces is by "wrapping" them rather than collaring. I think this is way overdone, so I don't recommend it. But if you get in a bind, and have already committed yourself mentally or orally to this design, consider taking a wire of smaller diameter (yeesh...you'd be down to 1/8" welding wire) and simply winding it a few times around the bundle of 1/4" round stuff. You see this a lot in the current crop of wine bottle holders, with the wrap pretending to be a vine tentacle... sometimes with a leaf of some sort. Then on your next project, plan to use bigger stock in a design that allows you some proper collars more easily. 6) Do NOT weld. Working with small stuff and looking at pictures of fabricated imitation stuff will lead you down this path. Though it will be easy and gratifying at first, you will feel dirty and used and cheap the next morning. :)
-
Chris: I don't know that particular flypress model, but it sounds like it is a #4 or larger. The number is supposed to reflect the force which the press is designed to develop in tons, the same way hydraulic presses are rated. The current crop of new imports are nice; just be aware that their numbering is a bit on the optimistic side. A new #6 flypress is about an old #4. Usually you can find a number cast somewhere on the press that reflects it's rating. Things to look for: 1) Make sure that it turns easily the entire height. It should literally float from the highest position to bottom by itself... or at least with minimal prodding. 2) Make sure that it doesn't bind when bottomed out vigorously. This can be a sign of bad/broken threads. 3) Check that the screw has no play or slop inside the casting. 4) Chips or cracks. These can be indicative of abuse. A broken casting is worthless. I know of no inherent advantage to buying an older flypress over a new one, so if the price is close, go for the new one. I have an older one with the handle and ball arrangement. The 360 degree wheel would be SO much easier. Enough so that I might try to change mine out some day. Hidden costs: New ones don't come with a table. You must make or buy that, which is not a trivial cost. Shipping and/or tax: Unless you connect with a vendor at a big meet (such as SOFA coming up) you will pay a big chunk in shipping for a new one. And a vendor is supposed to collect tax if you buy on site at an event.