

Ed Thomas
-
Posts
597 -
Joined
-
Last visited
Content Type
Profiles
Forums
Articles
Gallery
Downloads
Events
Everything posted by Ed Thomas
-
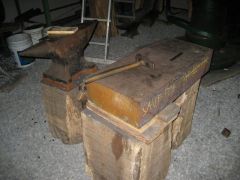 This chunk of 4140 came from Patrick Nowak at the 2006 SOFA. Patrick got it from his work, where it was a drop... the end waste piece of a large forging. In this picture, you can see a six inch ruler and the 1kg hammer for scale. It is 6" thick, 14" across, and 31" long, which puts it at about 750 pounds of tool steel.
 -
I'm letting you know. Where are the machines?
-
Louise: It already is -- it is called the Blacksmithing forum. That is the very best sort of stuff to be here anyway... questions on technique, design, development, and tools for forging iron. However, before you ask a question, do a little bit of searching and see what has already been asked. Download the online books and study them, particularly the COSIRA books in the links I provided. Some of them have very good pictures and explanations. That way if you have questions, you can refer to the page and pictures which makes it easier for us to make recommendations.
-
Louise: This question comes up a lot, and the recommendations are as varied as the smiths that can read. so here are some discussions on this board which have already beat this up before: http://www.iforgeiron.com/forum/f7/free-blacksmithing-books-web-2032/ http://www.iforgeiron.com/forum/f7/just-some-old-books-2752/ http://www.iforgeiron.com/forum/f8/mt-richardsons-book-2202/ http://www.iforgeiron.com/forum/f7/blacksmithing-instructional-dvds-1687/ http://www.iforgeiron.com/forum/f7/great-book-1535/ http://www.iforgeiron.com/forum/f7/book-suggestions-1426/ http://www.iforgeiron.com/forum/f7/blacksmith-literature-1188/ http://www.iforgeiron.com/forum/f7/blacksmithing-books-798/ http://www.iforgeiron.com/forum/f7/recomend-book-184/ Among these older discusssions you should find more than enough opinions to satisfy your question.
-
Weighing My Options.
Ed Thomas replied to Hillbillysmith's topic in Blacksmithing, General Discussion
Tony: I do have another suggestion, then. Try to find an older person who is happily doing what you want to do. Someone who has high capabilities you would like to obtain, and has a lifestyle you admire. Then ask them how they got there and if they would do anything differently to get there. The problem with asking here is that you really don't know who we are, and our advice may reflect our own desires, regrets, and goals. And we might be complete failures at what you want to do. The internet has some fine features; personal contact is not one of them. I do get good information and help on the internet. But it is usually by asking pointed, specific questions. For instance, some questions you might have could be: "Has anyone here gotten their skills in welding in the military? How good did you find the training? Has it helped you in civilian life?" That way, the only people who should answer you are those who have specific experience with what you asked. And you can pretty much ignore the rest. -
Weighing My Options.
Ed Thomas replied to Hillbillysmith's topic in Blacksmithing, General Discussion
Tony: None of us know you and should not advise you on what to do with your life. Although I spent 20 years in the service, I've been out for 14 years and it changes a lot. However, here are some ways you can get more information on your options. 1) Try to visit a military base and talk to active duty men and women there. Recruiters are highly-trained salesmen who have recruiting quotas. That means not only numbers of people every month, but also the category, so they will push the current needs of the military as much as possible. The sailors, soldiers, airmen, and marines who are out doing the work can hopefully show you what life is like for them. 2) Try contacting locations and companies that have the sort of work you really enjoy doing, or want to do. Maybe you can ask them what they look for in an employee and ask them what you need to do in the remaining year to get a foot in the door. I do have this advise: Lose the weight and keep it off. Many employers do not like to hire overweight people because they are a long-term health risk. It only gets harder as you get older. Our whole country is fat and getting fatter. Resist the trend. When I was very young and about to get married, an older brother wrote to me and said: "I only have this one piece of advise: Ignore everybody's advise." I usually do, and I have very seldom regretted going my own way. -
Hmmm... the inserts are fine for spindle turning and scraping, but in my limited experience, I haven't seen them used as replacements for gouges. Seems like it would be more trouble to shape an insert for gouging than to machine or forge a gouge from M-2 and heat treat it. However, here is a link to the premier site for turning, where you might get more help if you are really interested: The American Association of Woodturners homepage
-
Concur with Finnr. Have him buy the real tools. No, S-7 and A-1 are not the right tools for wood turning. I've made turning tools from M-2 for myself. The heat-treating to optimize it is a rather involved cycle and requires a heat-treating oven. Many of the better turning tools are now M-42. Wood turning tools are subject to fairly high heats; the sort that takes high-speed steel to retain a sharp edge with the high friction, rather than alloys such as the S-7 which are designed to take shock. It is unlikely that you will be able to improve on what your friend already has without some experience in heat-treating, and some time on the lathe to get a feel for what is expected of the tools. Now if you have some bars of M-2 and wanted to do this for yourself, I'd strongly encourage you to try it. But someone else is not likely to be happy with your results.
-
Christopher: For this sort of stuff, you will get a wider response on the Practical Machinist forum or perhaps the Home Shop Machinist. I never go to the Home Shop board, but Practical Machinist - manufacturing and machinist forum - home page has so much traffic the ink won't be dry on your virtual paper before you'll have some answers.
-
Randy: Welcome. Your book has been the inspiration for many blacksmiths, including me when I started years ago. Ed
-
Beaudry Hammer pictures
Ed Thomas replied to Ed Thomas's topic in Power Hammers, Treadle Hammers, Olivers
Glenn: Thanks. The pictures were actually much darker in the original. I'd already cleaned them up a good bit. My son is experimenting with his new camera, so was having trouble with lighting. By the time I got these pictures in my computer, he had already gone back home so I couldn't get him to take more. Hollis: I dunno bout movies. I have a hard enough time taking regular pitchers. Jmercier: Hammers and presses do different things. I think that a hammer is more useful most of the time. This Beaudry is my second (functioning) hammer. You will really enjoy having one once you build or buy a power hammer. Good luck. Ted: Don't I know it! I can't get over how nice this machine is finally. Bill: Thanks. Now that the hammer is finally running, I can get BACK to hammering. :) -
Beaudry Hammer pictures
Ed Thomas replied to Ed Thomas's topic in Power Hammers, Treadle Hammers, Olivers
Hmmm... somebody has been playing with my post... and brought my pictures to the gallery. Thanks, Glenn. Hollis, this hammer is SO graceful compared to my other one, which needs a serious overhaul. Despite being twice the weight, it is far easier to use tooling under it, and its responsiveness is really impressive. Having a good brake helps a lot. I'll have to climb up to the "power plant" to take pictures sometime. I'm using a 7.5 hp single phase motor. A 5 hp would be more than sufficient, but the extra hp means it doesn't bog down at all when engaging the belt. Once again, thanks for your help over the years in learning the Beaudry and figuring out how to repair and set this one up. Right now, I'm starting on some bolt on dies. You can't see them in the pictures, but I put 1/2" bolt holes in the dies. Now I wish I'd gone larger, but too late now. The classic clamp arrangement works fine for bottom tooling, but is impractical for a top tool. So I'm going to try a pair of bolt-on combination dies. -
Hollis asked me to post evidence when I finally got the #7 Beaudry hammer running. Here's the proof. Beaudry Full View Beaudry Black & White Beaudry Closer View The #7 is the 200 pound hammer. It is remarkably well-behaved and smooth, as a good Beaudry always is. The piece being forged is a large truck leaf spring that was just a tad too wide to use as the tool bracket. It was quicker and easier to forge it down to the right height than to machine it. The bracket is now made and is used to hold tooling, either by clamping or with a hardie shank ala Clifton Ralph. The dies were the last major part of the rebuild. A previous owner had run it without a bottom die, right into the sow block. I should have taken pictures of how mangled it was. That repair was very tedious, involving many, many hours of grinding, filing and fitting. The dies have a 4.5" x 8" face and are made of S-7. The bottom die is slightly taller than upper die to compensate for the lost metal of the sow block and probably weighs about 40 pounds.
-
Hollis: It shouldn't be long. I can actually see the end! The brake material came from McMaster Carr. It's been so long since I ordered it, I actually don't know which material I chose, but I'm fairly certain it is the non-metallic stuff... look at item# 6175K136 (1/4" x 2") $6.14 per foot. I used their contact cement. I alsoused that to hold the replacement sleeve for the hammer guide, but don't know yet how it will hold up. I will say that having a new brake pad is amazing. That flywheel stops on a dime. I'm running out of dimes proving it.
-
Hollis: The dies are made from S-7. H-13 would probably be an easier heat-treat, but I got a pretty good deal on the steel. In this case, I don't think anybody used a plate or anything, because you could plainly match the destruction pattern in the sow block with the outline of the top die. My guess is that it was just used to mash and bend things cold.
-
Thomas Powers: Old machinery is still available quite cheaply, as long as you are willing to take stuff that is too large for the weekend 1-car garage tinkerer. The only reason manual machines are starting to get a little more scarce is because scrap prices have gone up enough to make it more worth loading and hauling. With disturbing frequency, the scrap price is higher than anyone is willing to pay for the machines. I got several of mine below scrap prices from people whol couldn't bear the idea of them being melted down and were actually grateful to pass them on to someone who intended to use them.
-
Hollis: The #7 Beaudry is almost finished. I've been saying that for awhile, but today I put the brake pad on and did some final marking for the dies. The only major item left is to heat treat the dies, which is a bit scary because I have so much work in them. I have a pretty nice roomy electric heat treating oven, which I got from an auction for just over $300. It already proved its worth in treating the replacement roller bearing that was bad. I've been making a lot of tooth picks from 2" x 4"s as I do all the adjustments and test the die fitting. You might remember that the sow block on this hammer was completely buggered up. A previous owner had run it with only a top die... no bottom die! I have no idea what they were doing with the hammer, but it seriously tortured the casting underneath. I had to grind and file over an inch of the block away, and then painstakingly file in the dovetail. If I could have gotten the sow block off, it would have made it a thousand times easier... just shape it up on the Steptoe. But that wasn't happening. I should have been done years ago, but it never seemed a high priority while the smaller Beaudry was available. But that one is REALLY tired and needs overhauled so I need to quit goofing off and finish the #7... which is a much better machine anyway. Sorry I didn't answer your question sooner... somehow I missed it! Ed
-
Feukair: As Hollis said, that is the ideal solution... a constant speed blower, with a gate on the output. habu68: For every forge blower I've owned or used, gating the output provided better air control and has never hurt the motor.
-
If you like working with metal, it is all one. You can form an object by removing what isn't that object from the original piece (machining), by building it up in sections (welding), by compression (forging), by molding (casting), or any combinations of any these. They all have their place. The point is to look at what you want as the finished object, and select the tools and methods that accomplish that the best. NOT what you are most comfortable doing, but which is the most appropriate. Then you will choose to learn the skills as you need them. Of particular interest to me is that old, fairly large machinery for machining is MUCH cheaper than old large machinery for forging. Supply and demand, of course. For less than the price of one Beaudry power hammer, I have two lathes, two milling machines, and two shapers with oodles of tooling. Machining tools are a big help in a forging shop. I just got done making my larger Beaudry dies using my 16" Steptoe shaper which cost me $100. I made a replacement roller bearing for it using a 13" x 8' 1911 Southbend lathe I got basically for free. Both the 3 hp Gorton vertical mill and small Hardinge horizontal mill have paid for themselves many times in doing odd jobs related to projects, but neither one was very expensive. I have no formal training as a machinist. That means I ask a lot of questions of machinists and read a lot of books. And I take my time, practicing with focus. It's worth it. I only have limited formal training in welding. That means I ask a lot of question of professional welders and read a lot of books. And I take my time, practicing with focus. It's worth it. I have lots of training in blacksmithing. That means I ask a lot of questions of other professional blacksmiths and read a lot of books. And I take my time, practicing with focus. It's worth it. It's all good.
-
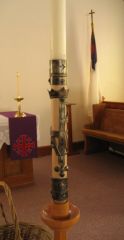 Here the previous symbol set is retained with forged nails as pins in a maple candle extension I turned on the wood lathe. The candle then mounts on the extension. To complicate things, the original candle stand must have been made for a different diameter candle, because for years, the pastor has had to whittle the candles to fit in the socket. So I turned an adapter plug on the lathe and reforged lag bolts to hold the bottom. Like Lego's I guess. It would have been more satisfying to make an entire Paschal Candle holder from scratch, but there is a plaque on the bottom of this one dedicating it to some long dead congregation member. I would likely be hung in effigy (or for real) if I suggested retiring this church heirloom. Hence the modifications, rather than replacement.
 -
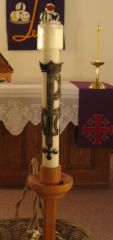 The symbol set for the Paschal Candle is tooled from one piece. It was made awhile ago at the request of the pastor of our Lutheran church to allow using a plain white candle rather than the ornately painted (and more expensive) Paschal candle. The problem is that as the candle burned down to the point in this picture, the symbol set got in the way, necessitating replacing the candle about 14" before it is consumed. To get around this problem, I made a candle holder extension, as seen in the other picture.
 -
Dennis: It's all about the puddle. One of the advantages to learning gas welding, in my opinion, is that things move more slowly than electric welding, and you can watch the behavior of the steel as is goes from solid to plastic to liquid, which can help someone learning to forge-weld. So I guess, though it is a stretch, that this is an appropriate question in the blacksmithing forum. Here are a few links: http://www.metalwebnews.com/howto/gtwelding.html http://www.bikewebsite.com/weld.htm Oxy-Acetylene Welding and Cutting by Harold P. Manly - Project Gutenberg Welcome to the Manufacturing Forum: oxy-acteylene welding filler To successfully weld, the metal MUST be joined in the puddle. If it is all blobbing up an you, then you might not be actually melting the pieces. Use the filler rod very sparingly. Sometimes, you don't even need a rod. In any case, the two pieces should be molten and THEN the filler rod is melted into the existing puddle. If you don't have the parent metal hot enough, when you approach the flame with the filler rod, it will melt in a blob and stick like a bugger on the pieces without actually fusing anything. Try welding some practice coupons using different tips and angles and pressures till it starts to feel right.
-
Metal cutting saws at reasonable prices?
Ed Thomas replied to JimCrawford's topic in Problem Solving
Jim: It sounds like you are dealing with relatively small stuff, so you might consider a Porta-band, or similar portable bandsaw. After I got my Milwaukee portaband, I couldn't imagine life without it. Porter Cable is probably pretty decent also. They are expensive, but well worth it. I actually had fairly good luck with the small Harbor Freight bandsaw. I bought it used from somebody for something like $30 and used it for years. When I bought a bigger saw, I just passed it on to another blacksmith who is still using it troublefree. No, don't use an abrasive cutoff wheel in a handheld drill. There are all sorts of reasons not to: 1) Abrasives are bad. Drills aren't usually made expecting to live in a grit environment. 2) Drills are made to be loaded inline with the chuck, not loaded perpendicular. You can wear a drill out fairly quickly loading it from the side. 3) The disks are made to cut at high speed. At lower speeds, the abrasive grit can clog and load up rather than wear away as it is supposed to do. 4) The shape of a typical hand drill does not give very good control of a disk the way a typical hand grinder does. 5) Disk grinders are not very expensive; pretty much the same as portable drills. Either way, I MUCH prefer to use a bandsaw over a grinder whenever possible. The noise is less and the cut is better. -
irnsgrn: Yes, I see those plates you referenced, and the description. Thank you for the direction. Despite frequently recommending those books, I often forget how good they are. I don't use what I call a set tool as a shear under the power hammer, since I typically use a snapper for that, although the shape of a snapper is really just a narrow set tool, I guess.
-
History Help - Blacksmithing
Ed Thomas replied to CChartreux's topic in Blacksmithing, General Discussion
CC: Try contacting the BGOP using the link I posted earlier. You should get help pretty quickly. I'll email some BGOP folks I know and see if I can find someone near you, in case you don't get good help. If you can wait that long, the BGOP Spring Fling is the 3rd weekend in April. There you can watch a Colonial Williamsburg demonstration, or else George Dixon who was the head blacksmith of the Yellin shop in Philadelphia some years ago. George would probably know more than anyone about the era you want specifically in Philadelphia. It will be held near you in Berryville VA, and is an extraordinary event for your money. Here is the link to information about the Spring Fling: Blacksmiths' Guild of the Potomac You have to pre-register... there is no walk-in attendance. I concur strongly with the recommendations to participate in some forging. There is no substitute for feeling it in order to write about it.