

Ed Thomas
-
Posts
597 -
Joined
-
Last visited
Content Type
Profiles
Forums
Articles
Gallery
Downloads
Events
Everything posted by Ed Thomas
-
Cone mandrels and what they are worth these days
Ed Thomas replied to Sam Salvati's topic in Mandrels
A cone mandrel is NOT for making rings. It is for truing rings. The ring should already be done before you drop it on the mandrel. I have a solid cast 2' mandrel and it is very handy. You don't use it often, but if you have one, it does the job like no other tool... quickly and easily. You don't hit the ring all the way around... you drop in over the mandrel and look for daylight. Wherever you see light, just tap those spots. The rings settles a little lower and in no time you are done. You tap at the bottom of the ring where it makes contact with the mandrel; not in the middle which would cause it to bevel. Usually, it's best to flip it over and do a quick tune up on the other side just to be safe. I would like to have a 4' mandrel but haven't ever had a job which justified that particular expense. -
First punch, almost done, but no cigar...
Ed Thomas replied to Alan DuBoff's topic in Blacksmithing, General Discussion
Alan: This looks like an excellent candidate for the critique section. :) -
Still on welding: O/A (oxyacetylene)
Ed Thomas replied to kogatana's topic in Welding/Fab General Discussion
Ludo: As mentioned in the other thread, the O/A torch is a powerful tool and can be very dangerous if not handled correctly. I didn't take a course, per se, but a friend was a welding instructor at a VoTech school back when I first used my torch, and I made sure I was doing things safely before I started. Every two years or so, our monthly blacksmith meeting demonstration is an O/A torch safety and use refresher by him. That is how important we all think O/A knowledge is here. Acetylene in it's free state is unstable, so containing it and using it requires diligent attention and no fooling around. The work you can do with it is well worth that attention, so don't be afraid of it... just respectful. A formal torch course would be best, but at the least make sure you are completely comfortable with all the operation and safety information from your dealer before you take off. If you don't have a knowledgeable friend as a resource or a timely night class, then I strongly recommend you buy all your equipment from a dealer rather than online or catalog. The small difference in price will be more than offset by the assurance that you are getting compatible and safe equipment for the work you intend to do. In fact, you can waste a lot of money trying to chase bargains which are incompatible with each other or are unsafe. Very often used torches leak or have defects, which is why they are being discarded. Used and cheap gages/regulators are very often faulty also. The Victor torches are very popular and good. Good luck. It is exciting to have someone from your part of the world with us in the forging community. I hope it works out for you. -
Sometimes I feel like a broken record. Seek out the BEST blacksmiths and references you can find. The difference in inspiration is enormous. Mediocre artisans and well-meaning beginners won't do you a lot of good when you are aiming high. There is nothing wrong with your current frustration. In fact if you harness that restlessness for perfection, you can improve dramatically. Go look at superb ironwork. Touch it. Wonder at it. And go try to capture whatever makes it superb in your own work. Finding inspiration will focus your energy in one direction, and then seek the skills that will get you there.
-
MIG, TIG, plasma Cutter...
Ed Thomas replied to kogatana's topic in Blacksmithing, General Discussion
Ludo: Yes, I really think an O/A torch is a better first tool than a MIG welder for a blacksmithing shop. I have a MIG and use it fairly often because it is a convenient tool, but it is quite one-dimensional... all you can do is weld. A good MIG will definitely cost at least as much as a good O/A set... in my case it was much more. The torch, on the other hand, just continues to increase in usefulness as you grow as a blacksmith. I routinely use the torch to locally heat for setting tenons and rivets. I often heat pieces that need shaped a particular way. By using a rosebud, you can heat and bend as you go, which makes complex bending with varying thicknesses a piece of cake. With cutting tips, you can cut rough shapes in MUCH thicker steel than a plasma cutter. It is nothing to cut a 2" bar of mild steel with a typical medium duty torch. With practice you can cut patterns in thick or thin sheets. I have used the O/A welding tips on site to tack pieces in position to get a pattern for railings. By making a mockup with scraps that I can bring back to the shop, there isn't any guessing on slopes and dimensions. The O/A set doesn't need an electrical outlet to do that sort of work. Welding sheet metal is actually easier with a torch than anything but a TIG. When I am all done forging, cleaning, and sanding a piece, I can use the rosebud on the torch to warm the work before applying a finish, and then use the torch to speed the drying or alter the look of the finish. Be aware, though, that this is assuming you are going to be working with iron and steel. Other metals present different problems and the torch isn't always the answer. -
MIG, TIG, plasma Cutter...
Ed Thomas replied to kogatana's topic in Blacksmithing, General Discussion
Ludo: For a blacksmith shop, an oxy/acetylene torch or equivalent is more useful and can be cheaper than a decent MIG or TIG welder. A plasma cutter is unnecessary in a blacksmith shop since it is entirely a fabricating tool. You can weld, cut, and locally heat steel with a O/A torch and the set is self-contained... you don't have to stay tethered to an eletric source. If acetylene is not an option, look for MAPP or propane, though they have other limitations. If you don't know what you want but are bound and determined to arc weld your way into the blacksmithing community, get a good simple stick welder. That is the cheapest route. Then as you gradually shift away from blacksmithing to fabricating, figure out what tools will replace the forging skills the best, and buy those as you need them. They are too expensive to guess ahead of time, and the cheaper versions aren't worth the waste of money. You don't NEED electric metal fusing/cutting devices in a hot forging shop. They are handy tools for making tools, but there is a forging equivalent for everything that they do. That is the point of blacksmithing -- traditional forging and joinery is free of gimmickry and is completely elemental. You need a heat source, and anvil, and a hammer. You can make or buy anything else as you need it. -
Terry, I have never done a spiral (helical) staircase, so hesitate to offer any advice since it would be all second hand. But I wanted to offer that there is a page or two in "Forged Architectural Metalwork" by Peter Parkinson that address the spiral railings, and a snippet in Whitaker's "The Blacksmith's Cookbook". Neither is sufficient, in my opinion, to tackle the stairs, but between them there is probably enough information for the railing portions of it.
-
I strongly recommend that you leave the farrier anvils to to the farriers and use an anvil designed for shop forging. Several years ago, I bought two of the Czech (German Style) anvils now sold by Blacksmith Supply Blacksmith Supply and think they are a decent anvil for your money. At 1/2 the price of an equivalent Peddinghaus, they are pretty good and in the same price range as you are looking at for the farrier anvils. The 260 lb (110 kg) anvil is one of my two main shop anvils and has stood up quite well. The 119 lb (50 kg) anvil is my portable for sharing events with the guild and so on. The reason for buying a german style blacksmith anvil is that the mass is more centered, and the shape of the two horns are better supported for the heavier work of a shop. The London pattern anvil is more a compromise, and left over from the carriage/farrier/general purpose workshop era. The European two-horn design is usually preferred for architectural and ornamental work... thick and heavy, with just the right amount of supported horn. I can't speak for the Euroanvil directly as I do not own one of those, but their prices are equivalent. If you are willing to pay a bunch more, the Nimba anvils from Washington State are probably as good as it gets. Nimba Anvils Home Page
-
Almost all new small shop machinery in the US is imported. It is not all crap. You just have to shop intelligently. If you buy cheap, that is what you will get. With all due respect to us blacksmiths, we probably aren't the best resource as a group for comparative shopping of new machinery. I recommend you spend a little time on the practical machinist board: Practical Machinist - manufacturing and machinist forum - home page In particular, I did a search for "drill press" on the older general forum subject area to get some hits. You might want to do your own search to see what you come up with. Of those topics, you might be interested in the US audience views on current domestic choices: Welcome to the Manufacturing Forum: Made In USA Drill Press Welcome to the Manufacturing Forum: Selecting drill press size/quality Here is a discussion on Jet/Enco: Welcome to the Manufacturing Forum: Drill press -- Enco vs Jet , etc.
-
I've spent a lot of money on books, read them all carefully, and tried to use them over the years. I have talked with other professional smiths about many of these and come to the conclusion that not all these books are actually "good" books, especially if used other than intended. Bealer's book has confounded more people than I can count and is nearly useless for anything other than reading a quaint writing by a man who was not a good blacksmith. Weyger's book is only marginally better. The Richardson books are a good resource, but I personally think that the shop layouts recommended in them aren't appropriate for a beginning home shop. If I don't say these things, with my prior knowledge of working in several blacksmith shops and building several of my own, then I am remiss. I hope my comments steer people to good choices for their money, and help them gain better forging skills. My feeling is that if everyone gets very good and has shops where they enjoy working, the quality of forged work goes up. Then the expectations of customers will go up and we all benefit.
-
Tyler: The Richardson books are okay; I've read them cover to cover at least twice. But they aren't meant to be a tutorial and there is almost no quality check on the sources for the articles. It is a bit like reading the forum here. You take your chances with the validity and experience of the authors. I wasn't recommending the CoSira books because they were free; I was recommending them because they are very good. They also happen to be very accessible and free, but as a text they are among the best written anywhere. Mart: I learned more about what I wanted in a shop from visiting lots of shops and working in them whenever possible. So much of a shop layout depends on the work you do now, and intend to do in the future. For instance, the single biggest improvement I made recently was a 4' x 8' decent layout table. There is nothing like a nice thick flat table for making a joy of working with complex pieces. But you won't read a lot about its importance in many blacksmithing sources. You can make do without it, but work is so much nicer with it. I'm not recommending you run out and buy a layout table this week. My point is that a shop is a workspace to do the things you want to do and will be different for every person. So far more useful than any book is taking time to go visit the best smiths you can find and see how they work. Then use the books as refresher and supplement.
-
I have all the books recommended so far and think those are terrible recommendations for someone learning the craft, ESPECIALLY the Bealer book. That is the worst. The Richardson books are fun reading and have good info, but not much use as a tutorial. The best books I've seen so far are the Peter Parkinson "The Artist Blacksmith" and the George Dixon "A Blacksmiths Craft". However, better than any of the other recommendations so far are the free downloads from the UK: Craft publications They are very good books at any price, so for free they are the best deal around.
-
Karl: It occurred to me that you didn't say how tall the gate is. For instance, if you are talking about a short, light garden gate, you can get away with a 6" treated post in concrete in the ground. (I'd go down at least 2 feet.) What is the approximate weight of each side of the gate? There are all sorts of solutions, depending on the use of the gate, the surrounding fencing, buildings, materials at hand... ? Can you tell us more about gate and its environment?
-
Karl: It is best to go look at GOOD existing gates, especially heavy ones, to see how they are hung. If possible, support the bottom of the gate directly on a pivot to the ground, and hang the top of the gate from the post. In other words, the post doesn't support the weight; it just holds it straight. To do that, you put a pin on the bottom that goes in steel hole in a plate flush with the pavement. Also, if possible, hang the top post hinge from steel, not just an anchor into the post. Sometimes you can put a plate on the backside of the post and pin completely through the post. Here is a picture of a smaller gate at the Washington National Cathedral. It is indoors, but it shows very clearly the optimal support for a gate of the dimensions you are dealing with. http://www.iforgeiron.com/gallery/data/500/P0002052_crop.jpg Here is a picture of the bottom pivot pin going into a socket imbedded in the floor: http://www.iforgeiron.com/gallery/data/500/P0002049_small.jpg And here is a picture of the hinge which keeps the gate upright: http://www.iforgeiron.com/gallery/data/500/P0002048_small.jpg
-
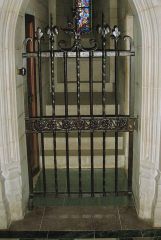 Washington National Cathedral smaller gate showing how the weight of the gate is supported by an inground pivot, while the gate is held upright with an anchored hinge.
 -
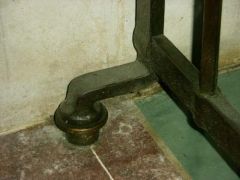 National Cathedral Gate showing how the bottom of a gate should be supported directly by the ground rather than hung, if possible.
 -
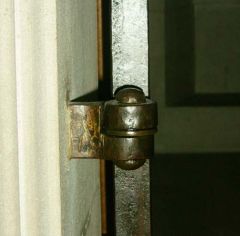 National Cathedral gate hinge shows how the upper hinge is attached to an anchored hinge in the support.
 -
Our group routinely gets compliments from visitors about how well we play together, how enjoyable the meetings are and how much they learn from them. I attribute our success primarily to two things... the people who make up the membership are great to be with, and we keep everything very simple and low key. That's it. Trying to grow is a mistake. Growth just happens by gently tending to the health as it is. Numbers don't mean a thing. People will flock to see something new and different, but won't stay. What you want in an organization is a culture that invites everyone to feel comfortable. Some basic rules: 1) ALWAYS provide coffee and doughnuts. 2) ALWAYS have the meeting... and ALWAYS meet at the same place and time. This is VERY important and the excuses for not doing it are all wrong. It is really almost as important as rule #1. 3) Play nice. 4) Learn blacksmithing. Most of our new arrivals come because they have seen members demonstrate in public and like what they saw. So as a group, take turns participating in area fairs and events. Make up business cards with guild information to pass out. When friends do demos together it is always fun, and people pick up on that and want a part of it. If you invite them to attend meetings and share your fun, that's all there is to it. Provide coffee and doughnuts.
-
Glenn: Okay, then I amend what I said to include this basic rule: ALWAYS provide coffee and doughnuts and it will be a success.
-
Personally, I think there are enough big conferences. There are so many that I have to be selective about attending them. Yet each one of these started as a quite modest gathering. The most durable conferences grew steadily around an ever-growing group. Trying to get big almost defeats the purpose and seems more forced and contrived than a genuine gathering of blacksmiths. I prefer one or two larger conferences a year so I can get exposure to distant blacksmiths and their ideas. And then I like relaxed local gatherings without much hype or fanfare for socializing and sharing skills for the rest of the time. For a successful conference, ALWAYS ALWAYS ALWAYS provide coffee and doughnuts. Then we shall come. And don't forget the coffee and doughnuts.
-
H. Hammer: I have two 90 degree bends in my exhaust and it still draws adequately. The pipe goes up about 5', then out 5', and then up another 15' or so. I forget. It does take a bit more to get moving, but once the exhaust starts drawing, it does fine. Use 10" diameter at least.... larger if you can get it. I couldn't bring myself to cut a hole in the standing seam roof I built, and built the chimney from 10" round stainless sections. A straight shot is way better, but you don't HAVE to.
-
Heat treating this tool.....???
Ed Thomas replied to Stu in Tokyo's topic in Heat Treating, general discussion
Stu: You can use other steel than mild steel. That means you will have to pay more attention to your welding technique, since each alloy has different requirements. However, for that particular tool rest, I'd just weld a 1/4" trianglular support under it and that will do the trick. In fact, I think you will get a bit of vibration and flex almost no matter what you make the tool rest from unless you support it. It won't take much. I think the last one I did was probably only about 1.5" tall or so. You will be amazed at the difference, and it is a lot easier than trying to heat treat a piece that big without proper facilities. The gouge only sits on the top of the rest, and as long as you don't weld a support lower than you need the rest to slide down, you should be fine. Don't let your turning buddies find out you weld and forge. They will give you no peace! :) -
You are almost certainly NOT getting it hot enough. At the duller orange and red heats, you cannot really forge... all you can do is bend. To forge, heat the steel to at least a very bright orange, and much preferably yellow. At yellow heat, you will have no trouble forging a square corner over the anvil.
-
Frosty: It is not all just practice, in the sense of muscle memory and repetition as you describe. It is forging intelligently and with focus, using tried and true techniques. Not "tricks" but methods to help monitor uniformity. One of these is marking and measuring the work as you go. Another is comparing the work in progress to a standard, drawn or forged. The question is a good one and deserves practical solutions, not a condescending pat on the head. I can teach these things to a beginner and see results very quickly, much as I was taught. Or the beginner can flail around for years on their own and never learn them. There are lots of blacksmith beginners out there who have been forging for decades. This issue of achieving uniformity is best addressed early and often. Without it, you cannot do even moderately successful joinery in furniture, gates and railings. It is achieved by having a very clear end result, and taking the right steps to get there. I, too, believe that part of the answer is spending time at the forge. I've gotten in trouble before for saying "practice, practice, practice", but I still believe in it. But practice must be with purpose and focus or it won't improve at all, and can actually do more damage than good.
-
E. Confused: I'd have to see a picture of what you are doing for more specific advise, but as you noticed, handles are very difficult to replicate. There are several areas that aggravate the problem. I'm assuming the handles are single piece with a flat at each end to put screws through... the classic lima-bean-ended, round-bar handle. These are the steps I'd take to try to home in on the problem areas: 1) Cut the pieces from identical stock to exactly the same length. Trim as needed. 2) Isolate the end for the bean where the screw goes through exactly the same on piece. 3) Shape the bean end. 4) Taper the handle to the bean. Measure the total length. 5) Forge the other pieces until they are all the same length and the bean and taper looks the same. 6) Do the other end the same way... form the bean end and taper. Compare this to one of the other partially completed handles. It is easier to see it that way than to compare it to the other end of the same handle, if that makes sense. 6) Make the other end of the remaining handles and measure them. Adjust till they are all the same. 7) Mark the center of the handle. Measure equally from the center toward each end to the point you want to bend. Put a punch mark on the INSIDE at each end where you want to the bend to start. Put another mark where you want to bend it the other way. 8) Bend right on that first mark as a reference, and then the other. Pay attention to how much you bent, and do the other end the same amount. 9) Put the handle on the anvil and adjust till it stands flat without falling over and is level across the top. 10) Form the first bend on the next handle and compare it to the first. Adjust as necessary and continue. Do the rest the same way. Some problem areas as I see them: The curves don't all start at the same place. The curves are sharper or shallower on each one. The bean ends are the same shape, often using differing amounts of material. The tapers are different lengths and thicknesses. The distance between the first and second curve is different on each one. That will make the handle taller or shorter. Always use the same handle as a reference for the rest. Otherwise any slight deviations will be multiplied.