

Ed Thomas
-
Posts
597 -
Joined
-
Last visited
Content Type
Profiles
Forums
Articles
Gallery
Downloads
Events
Everything posted by Ed Thomas
-
Using a magnet to heat treat
Ed Thomas replied to GrayR's topic in Heat Treating, general discussion
Quench: "...Finally, remember, this is blacksmithing not Metallurgical Engineering. Most people who read here don't even know what steel they are working with. Most of it is "found steel scrap" and some generic processes must be employed. If you actually buy steel, one must assume you posses the equipment and understanding of how to process it properly...." Hmmm.... you might be correct, but I'm not convinced. I, for one, have a pretty good idea what I'm using at all times. Regardless, I think that the majority of the readers are more than intelligent enough to follow this thread and apply the information if they want. Eventually, every beginner realizes the need to understand his material thoroughly, both treatable steel for tools and raw material for forging... or else he simply remains a beginner. There are some good points worth absorbing in this thread. -
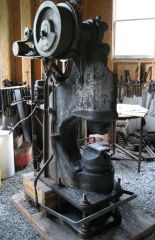
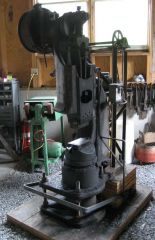
Matt: Yes, I took pictures as the hammer came apart and as I cleaned the sections. There are still a few pieces to clean up and I'll try to post them so they make sense.
-
Thanks for all the responses. I did get an email answer from someone convinced it should be run with lubrication, and I'm hoping to hear from Bruce Wallace soon since he owns the Beaudry name and literature. The flywheel/clutch parts are nearly ready for reassembly but will have to wait until I get some more free time in a few days. I really appreciate the thoughtful help from everyone.
-
Hollis: I forgot to update you on the disassembly. The hammer is completely apart except for minor things like the ram guides. The frame is laying on its side in the shop and things are getting stripped, brushed, smoothed, lubed and painted as they come off. When the ram came out, I thought it felt rather light for 400 pounds, and verified that it was actually just barely over 300 pounds on the bathroom scale. Exactly the size I wanted all along! It will be awhile before it is all together, in place and running, but it is better shape than I could have hoped for given its history.
-
Hollis, I just got off the phone with another 300# hammer owner who rebuilt his, and he runs his dry. He said it was dry when he took it apart to clean and repair, and runs appropriately without lube. I also have an email off to Bruce Wallace and will see what he has to say about it. I need some parts anyway, so it was a good time to contact him. A fairly exhaustive search of Anvilfire didn't yield anything on this subject. Thanks for your thoughts on this. It looks like you got it.
-
Hollis, I can't tell by the condition of the parts while disassembling because the hammer has been idle and out in the weather so long that all lubricants everywhere are dried or gone or both. But there seems to be a larger amount of grease residue inside the clutch housing than I'd expect for a dry clutch. On the other hand, there is no obvious way to apply lubricant once it is reassembled. The clutch system, like everything else on a Beaudry, is simple and elegant. And like MOST every other moving part on a Beaudry, has little in the way of lubrication opportunity. A friend of mine said that watching me go through a lubrication routine looked like I was getting ready to start a steam engine. Sure wish there was a useful manual on these. If it would help get me information, I can post pictures of the parts in various stages of assembly/dissassembly.
-
Does anyone know whether the internal clutch is supposed to be wet or dry?
-
Recently, there has been some off-line discussion about Beaudry-specific foundation requirements. The experience of Beaudry-owners in preparing a hammer for use is probably worth posting here, so please chime in with your own experience (not hearsay, please). The original Beaudry foundation description and blueprints are rather impressive, including concrete, end-grain white oak posts, and substantial excavation. I no longer have those plans, but decided to use a simple reinforced concrete block about 3 feet deep and squared larger than the hammer footprint... a 200 pound #7. For my hammer in progress, a 300 pound #40, I intend to go about the same depth... or until I run out of dirt. My #7 seems to be fine on a sheet of plywood, but the #3 seemed better on some 2" yellow pine. The height of the anvil/bottom die on the #7 seems a decent working height... maybe could add up to 2" for my taste. The #40 will be fine without any elevation.
-
-
-

-
Some points to ponder on steel supply: 1) Check and see what they will charge to deliver. For a long time, I assumed the fee would be outrageous for Dillon Supply to come all the way out to my place and didn't even ask. But they do it routinely for some ridiculously low "fuel fee" only. They assume delivery when you order. 2) If you are getting 12' lengths then you are almost certainly buying cold-rolled steel. Although that is usually a more reliable low-carbon grade than hot-rolled, it is also a good deal more expensive. Since you seem to have a limited budget, check to see if you can get hot-rolled in the more typical 20' lengths and have them delivered. 3) When I used to take my pickup to buy steel, I took a Milwaukee Porta-band and extension cord with me. Steel suppliers do exactly that -- supply steel. They aren't interested in wasting time cutting it to lengths for the customer so they establish an exorbitant price per cut to discourage you from asking them. However, if you are only getting a few pieces and you fumble with your own saw and look pathetic enough, the guy doing the loading will very often take pity on you and just cut the 20' lengths in half fast enough to not get caught by the supervisor. At least that's what I heard. 4) 20' lengths cut in half fit diagonally in an 8' pickup bed. 5) The portaband is so unbelievably handy that you will never regret buying one if you can afford it. I got a used one for something like $125 quite a few years ago and haven't had a lick of problems with it yet. Simple and durable and as useful a power tool as money can buy. Thoughts on Tongs: 1) The stock dimensions are a function of the style and size of the tongs you intend to make. Without a sample, we can't tell you the best size or shape. 2) "Classic" tongs, that is, tongs made with simple jaws such as recently featured in "Hammers Blow", are most efficiently made with square bar. Typical tongs would normally be made with 3/4" square, or sometimes 5/8" square for smaller sizes.
-
I have the 50K and the 110K "German Style" from Czechoslovakia. Mine came by way of Euroanvils, and are now sold and supported by Blacksmith Supply along with the Euroanvil style, here in Virginia. The 110 kg (260 pound) anvil is my primary shop anvil. I prefer to use it over the London pattern anvils around the shop. The reason I bought the smaller anvil was to have something portable for doing demos that took the same tooling as my larger anvil. They have the same size hardie hole, so I don't have to re-tool or fight sleeves for each anvil. I make the tooling and it all fits everywhere in the shop, including treadle hammer, power hammers, and both Czech anvils. The 110kg has been steadily used for 6 or 7 years and held up well. Yes, there are dings from using hammers and tooling that are harder than the face and occasionally missing. Overall, it feels good and is a nice shape. In my opinion, these are decent anvils. The surfaces are somewhat softer than an equivalent Pettinghaus, but when I bought mine it was about 1/2 the price of a Pettinghaus. I've also found that the 110kg is actually harder than the 50kg, which is counter-intuitive. It is probably luck of the draw. You could shop based on location, since they are all Czech inported and shipping really adds up in a hurry at these weights. I can't speak for the Euroanvils directly, though folks I know that bought them seem happy enough with them. Apparently, similar performance, just different configuration/shape.
-
Donnie, that looks like an excellent choice. Although I haven't used that specific one, I've gone through many blower configurations and much prefer the paddle wheel fan arrangement such as this for a forge blower. Strong and relatively quiet. You can put a gate inline or use the existing inlet gate. I don't think you will be disappointed.
-
The problem with this sort of coal is that it barely cokes at all. The amount in any fire is neglible so there is nothing left to save. Furnace grade coal generates more fly ash than clinker, although there is a good bit of debris in the bottom of the fire. Since it doesn't bind into coke, the coal itself is burning without much intermediate stage, which mean less concentrated heat per volume of fuel. The pieces of coal fall into the bottom too easily, blocking the air flow and making an "oven" for surrounding heat very difficult. DMS: I cut my forge-welding teeth on coal such as you describe. It was several tons of free coal, and wasn't worth the price. The secret to forge-welding in this stuff is to keep in mind the characteristics I just described. The oxygen in the air coming in the bottom is not going to be consumed as quickly as with good coal because the amount of ready fuel in its path to the top is less. So if you force the air too fast past a bed of coal that is too shallow, the heated air that reaches your steel will still have oxygen which wil scale up your piece and put a difficult barrier in the weld attempt. This is true in any forge-weld, but very pronounced when using bad coal. In other words, you have two conflicting problems... 1) you have to keep oxygen from burning your piece so you have to go more slowly, and 2) the fuel is bad so you need to provide more forced air to get the temperature up. Address this problem by mounding your coal higher, but not too tightly packed. Get it going fairly well and put the pieces to be welded 2/3 up the mound. Ideally, you don't want too much coal on the pieces, but in bad coal sometimes it just can't be helped. Shake that stuff off quickly as the pieces come out of the fire to weld. Other problems with bad coal are: 1) the grate in the bottom clogging, which diffuses the air making a strong central heat impossible. Correct this by dumping the ash and shaking the clinker breaker. Without a clinker breaker, just shake things up a bit and test the fire pattern until you are happy with it before welding. 2) Debris on the pieces from fly ash and coal dust. It is much worse with bad coal. Compensate by making sure you have good coverage with flux, and then shake that off quickly when the pieces come out of the fire. I do not bring things out of the fire and hit hard. When you are having trouble welding, all this does is mash all the debris together, the scale into the steel, the flux into the middle... and the weld fails. I hit firmly and quickly, trying to drive out the remaining debris and liquid scale by rolling it out in a rapid serious of blows from the middle to the outside or middle to the end. Getting the pieces to welding temperature is harder but still possible. You really have to be patient and shape the coal mound to concentrate the heat as best you can. As I said, this often means a higher mound than you might think, yet keeping the air path clear. Not easy, but can be done. There is a point where the coal is so bad that it really is not worth the effort because of the high failure rate. But once you get a knack for it, you can weld reliably in more poor coal than you'd think. And then when you get the good coal... you can weld while reading the paper, drinking coffee and eating a sandwich with your eyes closed.
-
A Guillotine tool question
Ed Thomas replied to rusty_iron's topic in Blacksmithing, General Discussion
Yes, just make a flat bottom die.... like the letter 'T'. Dies can be any shape you want, and don't have to match. -
Forging aluminum is very common in industry, and occasionally done by artist/blacksmiths. I have only played with it once in the forge, but it wasn't a big deal. Like everything else, you have to learn your material. Some links for this topic: http://www.artmetal.com/brambush/forum/bramyak2/messages/374.html Aluminum Chart Aluminum forgings from Scot Forge Forging non-ferrous metals Forging of Aluminum Alloys Wendell August Forge's hand-hammered aluminum carries on 77-year tradition
-
Another urban myth: Urban Legends Reference Pages: Don't Buy Gas on May 15 .
-
George: Welcome. Several answers... 1) There is no such thing as universal tongs. Every pair of tongs has a range of usefulness. It really makes sense to learn to make your own. That way you can make them exactly how you want. Perhaps the most useful first pairs are bolt tongs. There are several discussions on the best books to buy... just look back over the recent forum. You can get a very good start by downloading the manuals here: Craft publications If you look at Blacksmith Craft Part 5, there are pretty good directions for making tongs. And in the Blacksmiths Illustrated Manual Part 2, there are excellent pictures of tong configurations, with an accompanying set showing the steps to make them. 2) Unless I have a compelling reason to make something for someone at no charge, I invariably answer the request by agreeing to "help" someone make them. I invite people to come right on over and make whatever it is that they want using my tools and supervision. That way, they get a deep appreciation for the hard work and skill involved. It is amazing how few actually show up with that offer, yet you never have to say "no".
-
Jim, very nice grill! Elegant and clean. Great design and execution. Thanks for sharing that with us.
-
Jmercier: Yes, the mass and flatness of the block are it's chief advantages. I have a 500 pound and a 260 pound anvil as my primary shop anvils, so the block doesn't get a lot of HARD use. It is great as a solid small table for straightening and fitting when adjusting is necessary, without a lot of beating. Much better than using the layout table for that sort of thing. As a horizontal surface, it has a bad habit of collecting things, though. :p
-
Yes, AM, it is a good find. Within reason, Patrick Nowak can get occasion useful end pieces that are handy around the shop. If it is worth his while to bring them from Illinois, he can show up at SOFA with them. Pat tells me that this is 4130, not 4140 as I wrote in the descriptions, which of course, is somewhat softer after heat-treating.
-
Patrick Nowak asked me if I had pictures of the piece of tool steel I bought from him at SOFA last year, so I thought I'd just post them here. There is a description with each picture in the gallery. New Chunk O Steel Chunk O Steel With Anvil Chunk O Steel on Stand
-
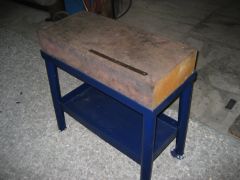 The legs on the stand are angled more than it looks like in this picture to provide better stability. The ruler is 12". Plywood is under the steel chunk to help deaden the sound. This is a surprisingly handy work surface in the shop. Although slightly softer than most anvils, it is more than hard enough for forging. Decent rebound and all that sort of thing that anvil nuts like to talk about.
 -
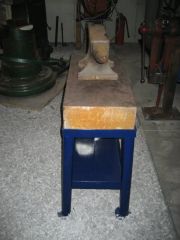 A 127 pound anvil sits on top of the steel block to put it in perspective. This was the WASTE piece of a single forging tool steel billet.